Spooky Mummy Brownies
These Spooky Mummy Brownies are proof that dessert doesn’t have to be complicated to feel special. I mean, Halloween treats should be fun, not stressful, right?
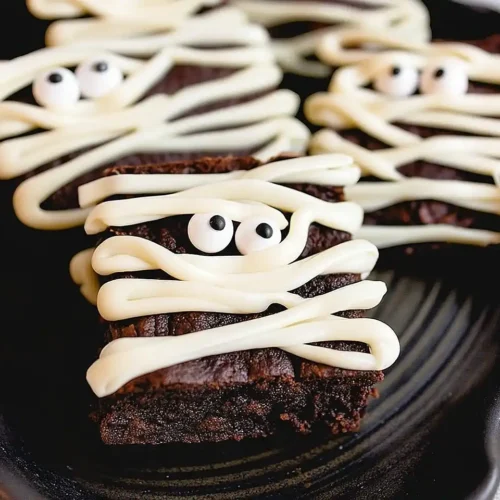
Last October, I made these for my niece’s school party and honestly? The kids went wild. They loved the googly candy eyes peeking out from under those white chocolate “bandages,” and the parents kept asking for the recipe.
Table of Contents
What This Recipe Delivers
These Spooky Mummy Brownies are rich, fudgy chocolate brownies topped with white chocolate drizzle and candy eyes to create adorable mummy faces. They’re perfect for Halloween parties, bake sales, or just because you want something cute and delicious. Plus, they’re way easier than they look — which is always a win in my book.
Why You’ll Love This Recipe 🌸
- These Spooky Mummy Brownies take less time than picking out a Halloween costume but deliver way more compliments.
- They’re fudgy, chocolatey, and perfectly sweet — exactly what you need when you’re craving something comforting with a festive twist.
- The white chocolate drizzle technique is so forgiving, even if your hands are shaky from too much coffee (been there), they’ll still look adorable.
- According to King Arthur Baking, Halloween treats should be fun first and fussy never — and these brownies are living proof of that philosophy.
Quick Facts ⚡
Here’s the quick scoop on this Spooky Mummy Brownies recipe.
- CourseDessert
- Prep Time15 minutes
- Cook Time30-35 minutes
- Total Time1 hour 20 minutes (including cooling)
- Servings16 brownies
- DifficultyEasy
Nutritional Peek
Look, I’m not here to judge your brownie intake (eat two, I won’t tell), but here’s what you’re working with per serving if you’re curious:
Note: Nutritional info is approximate and based on 16 servings.
Ingredients
When it comes to Brownies for Halloween, quality ingredients make all the difference. Trust me, I’ve tried cutting corners with margarine and store-brand cocoa — it’s just not the same vibe.
| Amount | Ingredient |
|---|---|
| ½ cup | Butter (yes, real butter — margarine just doesn’t cut it here) |
| ¼ cup | Semisweet chocolate chips |
| 2 teaspoons | Vanilla extract (the good stuff, not imitation) |
| 2 large | Eggs |
| ¾ cup | All-purpose flour (94g) |
| ½ cup | Granulated sugar (100g) |
| ½ cup | Brown sugar (100g — this adds that fudgy texture) |
| ⅓ cup | Dutch process cocoa powder (33g — worth the splurge) |
| ¼ teaspoon | Salt |
For the Mummy Toppings:
| Amount | Ingredient |
|---|---|
| 32 | Candy eyes (find them in the baking aisle or craft store) |
| 1 cup | White chocolate chips or candy melts |
Tools You’ll Actually Use
You probably have most of this stuff already:
- Large mixing bowl
- Medium mixing bowl
- Microwave-safe bowl
- 9×9-inch baking pan
- Parchment paper or cooking spray
- Whisk or wooden spoon
- Cooling rack
- Small sandwich zip-loc bag (for drizzling)
- Scissors
- Toothpick (for testing doneness)
Step-by-Step Instructions
Alright, let’s make some Spooky Mummy Brownies that’ll have everyone asking for seconds!
Step 1: Melt the chocolate base
In a large mixing bowl, combine your butter and semisweet chocolate chips. Pop them in the microwave for 30 seconds, give it a stir, then microwave for another 30 seconds. Keep stirring until everything’s smooth and glossy.
(If there are a few stubborn chocolate bits, the residual heat will melt them — just keep stirring.)
Step 2: Mix your dry ingredients
In a separate bowl, whisk together the flour, both sugars, cocoa powder, and salt. This step seems basic, but it prevents those annoying cocoa clumps that nobody wants to bite into.
Step 3: Add eggs and vanilla
Crack your eggs into the melted chocolate mixture and add the vanilla. Whisk it all together until it’s smooth and slightly lighter in color — you’re basically making magic here.
Step 4: Combine wet and dry
Pour your dry ingredients into the chocolate mixture and gently fold everything together with a spatula or wooden spoon. Don’t overmix — once you stop seeing flour streaks, you’re done. Overmixing leads to cakey brownies, and we’re going for fudgy here.
Step 5: Prep and bake
Line your 9×9-inch pan with parchment paper (let it hang over the sides for easy lifting later) or give it a good spray with cooking spray.
Pour in your batter and spread it evenly. Bake at 350°F for 30-35 minutes. You’ll know they’re ready when a toothpick inserted in the center comes out with just a few moist crumbs — not wet batter, but not totally clean either.
Step 6: Cool completely
This is the hardest part, I know. Let the brownies cool in the pan for 5 minutes, then use the parchment paper to lift them out onto a cooling rack. Give them a full 30 minutes to cool completely before slicing. (Warm brownies are delicious but impossible to cut cleanly.)
Step 7: Slice into squares
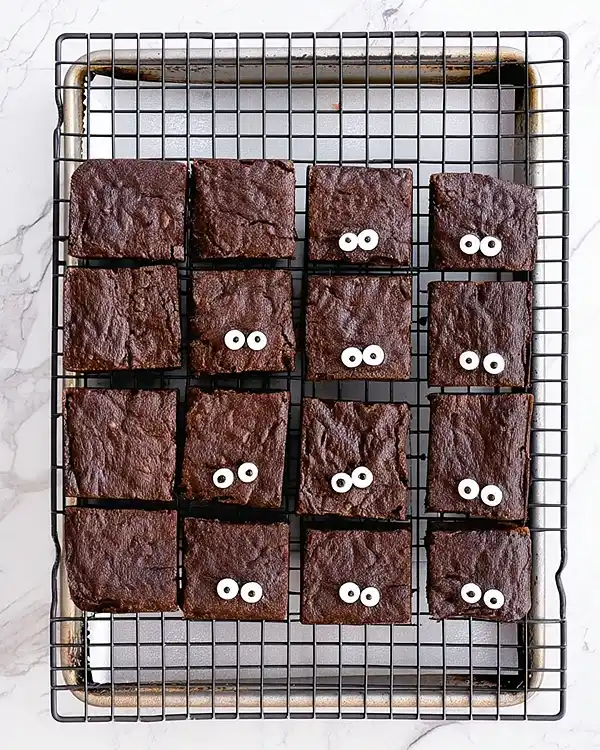
Cut your cooled brownies into 16 squares (4 rows by 4 rows) and arrange them on a cooling rack or parchment-lined surface. This makes the decorating part so much easier.
Step 8: Melt the white chocolate
In a small microwave-safe bowl, melt your white chocolate chips in 30-second intervals, stirring between each one. Don’t rush this — burnt white chocolate is grainy and sad. You want it smooth and pourable.
Step 9: Create your piping bag
Scoop the melted white chocolate into a sandwich-sized zip-loc bag and snip a tiny corner off. Start with a small cut — you can always make it bigger, but you can’t make it smaller.
Step 10: Decorate your mummies
Place 2 candy eyes on each brownie square wherever you think looks cute. Then comes the fun part: Starting at the top of each brownie, drizzle the white chocolate back and forth across the brownie, making sure to cross over the eyes to “secure” them in place.
Keep drizzling down the brownie in a zigzag pattern to create those mummy bandages. Don’t stress about perfection — messy bandages actually look more authentic!
Step 11: Let them set
Allow the chocolate to firm up for 10-15 minutes before storing or serving. If you’re impatient (no judgment), you can pop them in the fridge for 5 minutes to speed things up.
Claire’s Pro Tips & Gentle Guidance
Listen, I’ve made these Holiday Baking Halloween treats more times than I can count, and here’s what I’ve learned:
Use Dutch process cocoa if you can find it. It’s darker, richer, and has a smoother flavor than natural cocoa. Makes a huge difference in that fudgy texture we’re after.
Don’t overbake. Seriously, this is where most people mess up brownies. They should look slightly underdone in the center when you pull them out — they’ll continue cooking as they cool. According to Serious Eats, the secret to fudgy brownies is pulling them out just before they seem done, and I couldn’t agree more.
Let them cool completely before decorating. I know you’re excited, but trust me on this. Warm brownies + melted white chocolate = a drippy mess. Been there, cleaned that up.
Candy melts work great too. If you can’t find white chocolate chips or they’re too pricey, grab a bag of white candy melts from the craft store. They’re designed for decorating and actually set up a bit firmer.
Eyes before drizzle. Place your candy eyes first, then drizzle the chocolate over them. This helps secure them in place and looks way better than trying to stick eyes onto already-set chocolate.
Quick Fixes for Spooky Mummy Brownies
My brownies came out cakey, not fudgy:
You probably overbaked them or overmixed the batter. Next time, pull them out when they still look slightly underdone and fold (don’t beat) your ingredients together.
The white chocolate seized up and got grainy:
This happens when chocolate gets too hot or if any water gets into it. Try microwaving in shorter bursts and make sure your bowl is completely dry. If it’s already seized, you can sometimes save it by stirring in a tiny bit of vegetable oil.
My candy eyes keep falling off:
Make sure to drizzle chocolate directly over the eyes to “glue” them down. If they’re still being stubborn, press them gently into the brownie before decorating so they have something to grip onto.
The drizzle came out too thick/thin:
Too thick? Microwave the chocolate for just 5-10 more seconds. Too thin? Let it cool for a minute and thicken up slightly before piping.
My brownies stuck to the pan:
Always line with parchment paper or use a generous amount of cooking spray. Parchment is foolproof and makes lifting them out so much easier.
Variations & Fun Twists
Once you nail the basic Spooky Mummy Brownies recipe, here are some fun ways to switch things up:
Peanut Butter Mummies: Swirl 2-3 tablespoons of peanut butter into the batter before baking. Chocolate and peanut butter are basically best friends.
Mint Chocolate Mummies: Add ½ teaspoon of peppermint extract to the batter and use green candy eyes for a Frankenstein-inspired twist.
Gluten-Free Version: Swap the all-purpose flour for a 1:1 gluten-free baking blend. I’ve tried this with Bob’s Red Mill, and it works beautifully.
Vegan Mummies: Use vegan butter, flax eggs (2 tablespoons ground flaxseed + 6 tablespoons water), and dairy-free chocolate chips. Honestly? Still delicious.
Fancy Plating: Serve these on a dark platter with some scattered candy corn and mini pumpkins for a Instagram-worthy Halloween spread.
Rustic Vibes: Skip the perfect squares and go for rough-cut brownie chunks with messy bandages. Sometimes imperfect is more charming.
There’s a whole world of halloween & spooky treats waiting for you over at the Halloween & Spooky Treats collection. Each one is made with the same love and attention, and they’re all absolutely worth trying. Happy cooking!
Serving, Storage & Reheating
Your Brownies for Halloween deserve to be enjoyed at their best, so here’s how to handle them:
Serving: These are perfect at room temperature. I like to arrange them on a serving platter right before guests arrive. They look adorable and disappear fast, so don’t stress too much about presentation.
Storage: If you actually have leftovers (which I doubt), store them in an airtight container at room temperature for up to 4 days. You can also refrigerate them for up to a week, but the texture gets a bit firmer. Just let them come to room temp before serving.
Freezing: These freeze beautifully! Layer them between parchment paper in an airtight container and freeze for up to 3 months. Thaw at room temperature for about an hour before serving.
Reheating: Honestly, I don’t usually reheat these, but if you want them warm, pop one in the microwave for 10-15 seconds. Just be aware the white chocolate might soften, which actually isn’t the worst thing.
No-Waste Kitchen Magic
I’m all about using what you’ve got and minimizing waste, so here are some ideas:
Extra white chocolate: Drizzle it over easy mochi donuts or make white chocolate bark with some crushed pretzels and dried cranberries.
Leftover candy eyes: Toss them into trail mix, use them on cupcakes, or just keep them around for the next time you need to make something smile at you.
Brownie scraps: If you trim the edges to make perfect squares (I usually don’t bother), crumble those scraps over ice cream or fold them into vanilla frosting for a cookies-and-cream vibe.
Day-old brownies: Crumble them into a trifle with whipped cream and fresh berries, or pulse them in a food processor to make brownie “dirt” for a layered dessert.
Mummy Brownies FAQs
Can I freeze Spooky Mummy Brownies?
Absolutely! They freeze really well. Just make sure they’re completely decorated and set before freezing, and layer them with parchment paper so they don’t stick together.
What if I can’t find candy eyes?
You can use mini M&Ms, chocolate chips, or even pipe little dots with melted dark chocolate. They won’t look exactly like mummies, but they’ll still be adorable.
Can I make these in advance?
Yes! Bake and decorate them up to 2 days ahead. Store them in an airtight container at room temperature and they’ll stay fresh and fudgy.
Do I have to use Dutch process cocoa?
Nope, natural cocoa works fine too. Dutch process just gives you a richer, darker chocolate flavor, but both versions are delicious.
Cozy Closing
There you have it — the cutest, fudgiest Spooky Mummy Brownies you’ll make this Halloween season. Whether you’re bringing them to a party, making them with the kids, or just treating yourself to something festive and delicious, these brownies deliver every single time.
I’d love to see your spin on this recipe! Leave a note below or tag me on Instagram so we can share a sweet moment together. And if you’re looking for more fun treats, check out my white chocolate dipped maple cookies, easy German butter cookies, or even venture into something totally different like easy dango or easy Japanese katsu bowls.
Happy baking, friends!
I’m Claire Whitmore — a dessert daydreamer from Asheville, NC. For me, baking isn’t about perfect pastries — it’s about the joy of sharing something sweet (and maybe sneaking an extra scoop of icing).
Spooky Mummy Brownies
Equipment
- Large mixing bowl
- Medium mixing bowl
- Microwave-safe bowl
- 9×9-inch baking pan
- Parchment paper or cooking spray
- Whisk or wooden spoon
- cooling rack
- Small sandwich zip-loc bag
- Scissors
- Toothpick
Ingredients
Brownie Batter
- ½ cup Butter Use real butter for best flavor and texture.
- ¼ cup Semisweet chocolate chips
- 2 teaspoons Vanilla extract Use pure vanilla extract if available.
- 2 large Eggs
- ¾ cup All-purpose flour 94g
- ½ cup Granulated sugar 100g
- ½ cup Brown sugar 100g
- ⅓ cup Dutch process cocoa powder 33g; natural cocoa powder can also be used.
- ¼ teaspoon Salt
Mummy Toppings
- 32 Candy eyes Use 2 candy eyes per brownie.
- 1 cup White chocolate chips or candy melts Use white candy melts as an alternative.
Instructions
- In a large microwave-safe mixing bowl, combine the butter and semisweet chocolate chips. Microwave for 30 seconds, stir, then microwave for another 30 seconds. Continue stirring until smooth and glossy.
- In a separate bowl, whisk together the flour, granulated sugar, brown sugar, Dutch process cocoa powder, and salt until evenly combined.
- Add the eggs and vanilla extract to the melted chocolate mixture. Whisk until smooth and slightly lighter in color.
- Add the dry ingredients to the chocolate mixture and gently fold with a spatula or wooden spoon just until no flour streaks remain. Do not overmix.
- Line a 9×9-inch baking pan with parchment paper, leaving some overhang for easy removal, or coat the pan with cooking spray. Pour in the brownie batter and spread evenly.
- Bake at 350°F for 30–35 minutes, or until a toothpick inserted into the center comes out with a few moist crumbs but no wet batter.
- Let the brownies cool in the pan for 5 minutes, then lift them out using the parchment paper and transfer them to a cooling rack. Cool completely for about 30 minutes before decorating.
- Cut the cooled brownies into 16 squares, making 4 rows by 4 rows.
- Place the white chocolate chips or candy melts in a microwave-safe bowl. Microwave in 30-second intervals, stirring between each interval, until smooth and pourable.
- Transfer the melted white chocolate to a small sandwich zip-loc bag and snip a tiny corner off to create a simple piping bag.
- Place 2 candy eyes on each brownie. Starting at the top, drizzle the melted white chocolate back and forth across each brownie, crossing over the eyes and continuing down in a zigzag pattern to create mummy bandages.
- Allow the white chocolate to set for 10–15 minutes before serving or storing. For faster setting, refrigerate the brownies for about 5 minutes.