Easy Easter Bunny Cake
Learn how to make an Easy Easter Bunny Cake with just two round cakes, frosting, and simple decorations. This adorable bunny cake recipe is perfect for Easter celebrations and takes less than an hour to assemble!
Easy Easter Bunny Cake is the showstopper dessert you need this spring—no fancy baking skills required, just two round cakes, frosting, and a sprinkle of creativity. Hey there, I’m Claire Whitmore—a pastry whisperer in Asheville, NC, where butter totally counts as self-care.
This Easy Easter Bunny Cake recipe uses simple ingredients like boxed cake mix, store-bought frosting, and jellybeans to create an adorable bunny-shaped dessert that’s perfect for Easter brunch, kids’ parties, or any spring celebration.
You know that moment when you want to impress everyone at Easter dinner but you’re already juggling deviled eggs, a ham, and three side dishes? That’s exactly why I fell in love with bunny cake recipes like this one.
Table of Contents
Little Snapshot: What This Recipe Delivers
This Easy Easter Bunny Cake transforms two simple round cakes into an adorable bunny face complete with pink ears, a bow tie, and candy decorations.
The entire assembly takes about 30-45 minutes using basic cake mix, white and pink frosting, and chocolate details—no special pans or advanced decorating skills needed, making it perfect for busy moms who want a wow-worthy Easter dessert.
Why You’ll Love This Recipe 🌸
- This Easy Easter Bunny Cake takes less time to assemble than wrapping all those plastic Easter eggs, and it looks like you hired a professional baker.
- You can use whatever cake flavor your family loves—chocolate, vanilla, strawberry, or even funfetti if you’re feeling extra festive.
- No special bunny-shaped pan required, which means you don’t have to store another single-use kitchen gadget in your already-packed cabinets.
- According to Wilton’s guide to shaped cake decorating, the key to impressive novelty cakes is creative cutting and simple frosting techniques—and this bunny cake recipe proves exactly why.
Quick Facts ⚡
Here’s the quick scoop on this Easy Easter Bunny Cake.
- CourseDessert
- Prep Time15 minutes
- Cook Time25-30 minutes (for cakes)
- Total Time1 hour 15 minutes (includes cooling)
- Servings12-16 servings
- DifficultyEasy
Nutritional Peek
Here’s a general nutritional breakdown per serving (based on 14 servings using vanilla cake mix and store-bought frosting). Keep in mind that different cake mixes and frostings will vary slightly!
| Nutrient | Amount per Serving |
|---|---|
| Calories | 285 kcal |
| Protein | 3g |
| Carbohydrates | 42g |
| Fat | 12g |
| Fiber | 1g |
| Sugar | 28g |
Ingredients
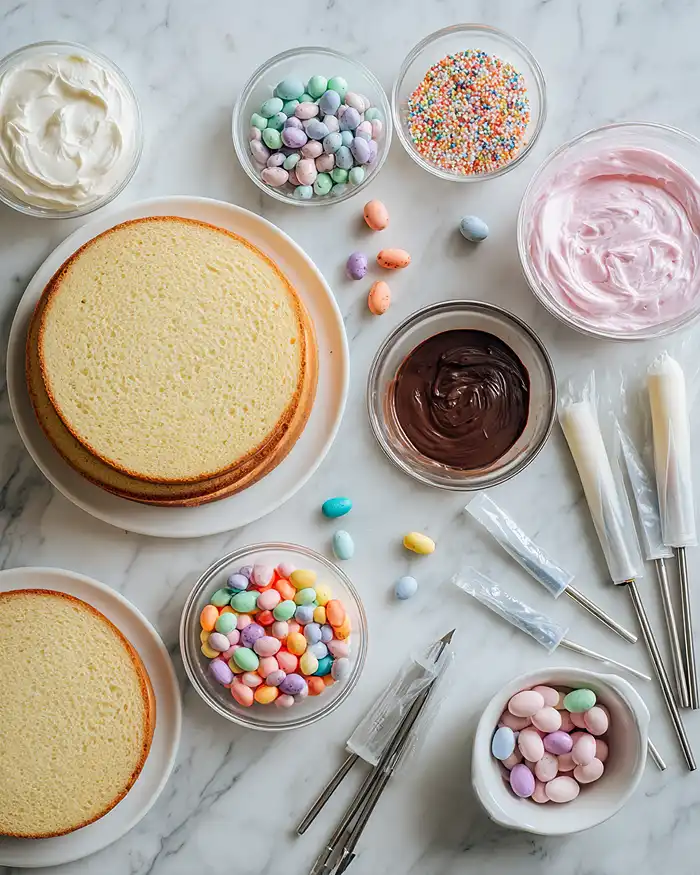
Let’s talk about what goes into making this bunny cake easy and adorable. For the cake base, you’ll need two round cake layers—either from a boxed mix (my favorite shortcut) or your go-to homemade recipe if you’re feeling ambitious.
For the frosting and decorations, you’ll want white frosting for the bunny’s face and ears, pink frosting for the inner ears and bow tie, chocolate icing or melted chocolate for drawing the facial features, and colorful jellybeans or round candies for that final festive pop.
| Amount | Ingredient |
|---|---|
| 2 layers | Round cakes, 8 or 9-inch (one box cake mix or homemade recipe) |
| 2 cups | White frosting (store-bought or homemade—whatever makes your life easier) |
| 1 cup | Pink frosting (strawberry frosting works perfectly and tastes amazing) |
| ¼ cup | Chocolate icing or melted chocolate (for drawing eyes, whiskers, and that sweet little smile) |
| ½ cup | Jellybeans or colorful round candies (for decorating the bow tie) |
| 2-3 | Piping bags or zip-top bags with corners snipped (optional but helpful for detail work) |
| 2 | Chocolate chips or candy melt wafers (for eyes—they’re just the right size) |
Tools You’ll Actually Use
- Two 8 or 9-inch round cake pans
- Large serving platter or cutting board (you need space for that bunny!)
- Sharp serrated knife (for cutting the cake into ear and bow tie shapes)
- Offset spatula or butter knife (for frosting)
- Piping bags or zip-top bags (for chocolate details)
- Small round tip or snipped corner (for piping)
- Toothpicks (for sketching the face before you commit with chocolate)
Step-by-Step Instructions
Making this Easy Easter Bunny Cake is honestly one of the most fun baking projects you’ll do all spring. The magic is all in the cutting and arranging—no advanced decorating skills required.
Step 1: Bake Your Cake Layers
Start by baking two 8 or 9-inch round cakes using your favorite boxed cake mix (I love classic vanilla or funfetti for Easter) or your go-to homemade recipe. Once the cakes are baked through and a toothpick comes out clean, let them cool in the pans for about 10 minutes, then turn them out onto wire racks to cool completely.
This cooling time is crucial—warm cake crumbles when you try to cut it, and nobody wants a bunny with shaggy ears.
Step 2: Cut the Second Cake into Bunny Parts
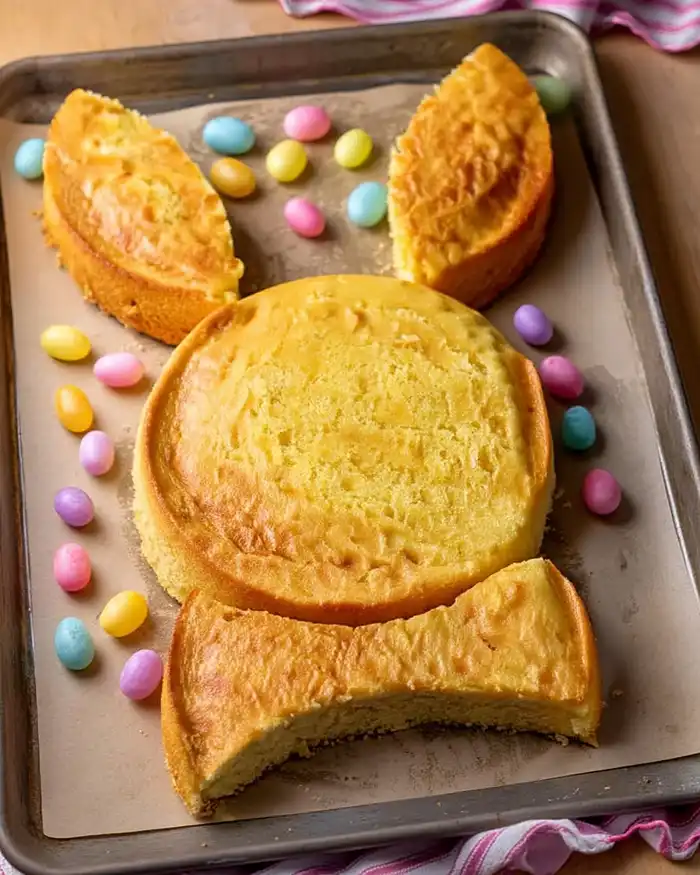
Take one completely cooled round cake and set it aside—this becomes your bunny’s adorable face. With the second round cake, use a sharp serrated knife to cut it into three pieces: two curved ear shapes from the top portion and one bow tie shape from the remaining bottom section.
Think of cutting two crescent moon shapes for the ears (about 3-4 inches long each), and the leftover center piece naturally forms a bow tie when you angle your cuts. If you’re nervous, sketch your cuts with a toothpick first.
Step 3: Assemble Your Bunny on the Platter
Place the whole round cake in the center of a large serving platter or cutting board—this is your bunny’s face and it needs to be front and center. Position the two ear-shaped pieces at the top of the round cake, spacing them slightly apart so they look like perky bunny ears.
Then place the bow tie piece at the bottom of the round cake, adjusting it so it sits right under where the bunny’s chin would be. Step back and admire your bunny shape—you’re basically a cake architect now.
Step 4: Frost the Bunny’s Face and Ears
Using your offset spatula or a butter knife, spread white frosting generously over the bunny’s face (the whole round cake) and the two ear pieces, smoothing it out as much as possible for a clean, fluffy look.
Don’t stress about perfection—bunnies are fluffy by nature! Next, use the pink frosting to fill in the inner part of each ear (just a stripe down the center of each ear piece) and to cover the entire bow tie at the bottom. The pink-and-white contrast is what makes this bunny cake so stinking cute.
Step 5: Add the Bunny’s Face Details
Now for the fun part—giving your bunny personality! Use chocolate icing or melted chocolate in a piping bag (or a zip-top bag with a tiny corner snipped off) to draw two almond-shaped eyes, a little triangle nose, a curved smile, and whiskers extending from the cheeks.
If you’re worried about messing up, lightly sketch the features with a toothpick first, then pipe over your guide. Press two chocolate chips or candy melt wafers into the frosting for the eyes if you prefer, and use pink frosting to pipe a small round nose in the center.
Step 6: Decorate with Candy and Serve
Press jellybeans or colorful round candies onto the pink bow tie, arranging them in a fun pattern or just scattering them randomly for that playful Easter vibe.
Add any extra decorations you like—maybe some pastel sprinkles around the platter or a few extra jellybeans as a festive border. Your Easy Easter Bunny Cake is now complete and ready to make everyone at your Easter table go “awww!” before diving in.
Claire’s Pro Tips & Gentle Guidance
Bunny cake recipes are super forgiving, but I’ve learned a few tricks over the years that make the whole process even smoother. Trust me, I’ve made this cake with both perfectionist tendencies and “let’s just get this done” energy, and it turns out adorable either way.
Let your cakes cool completely before you even think about cutting or frosting them. I know you’re excited (me too!), but warm cake turns into a crumbly disaster the second you try to slice through it. If you’re short on time, pop those cakes in the fridge for 20 minutes to speed up the cooling.
Use a serrated knife and a gentle sawing motion when cutting your ear and bow tie shapes—pressing down hard will compress the cake and give you wonky edges. If your cuts aren’t perfectly symmetrical, literally no one will notice once it’s frosted and decorated. Bunnies in nature aren’t symmetrical either!
If your frosting is too thick to spread smoothly, microwave it for about 5-10 seconds to soften it up, then give it a good stir. This trick has saved me from tearing up the cake surface more times than I can count.
For extra-smooth frosting, try the crumb coat method: spread a thin layer of frosting first to trap any crumbs, chill for 15 minutes, then add your final fluffy layer.
According to Food Network’s expert cake decorating techniques, assembling shaped cakes directly on your serving platter eliminates the stress of transferring a decorated cake—and that’s exactly why we build this bunny where it’s going to live.
Quick Fixes for Easy Easter Bunny Cake
Problem: My frosting keeps tearing up the cake surface and creating crumbs everywhere.
Solution: Your frosting is probably too thick, or your cake isn’t completely cool yet. Try warming the frosting for 5-10 seconds in the microwave to make it more spreadable, and always make sure your cakes are fully cooled before frosting.
A crumb coat (thin layer first, then chill, then final layer) also helps prevent this frustrating issue.
Problem: My chocolate details look shaky and unprofessional.
Solution: First, take a breath—nobody expects Food Network-level piping at home! To steady your hand, rest your piping hand on your other hand or on the edge of the platter while you draw.
You can also sketch the features lightly with a toothpick first, then pipe over your guide. If you really mess up, just scrape off that section of frosting and try again.
Problem: My ear pieces broke when I was cutting them.
Solution: If your cake breaks during cutting, don’t panic—frosting is basically edible glue.
Press the broken pieces back together where they belong on the platter, then frost over the cracks. Once everything is covered in white frosting, no one will ever know. I’ve done this more than once and the cake still looked adorable.
Problem: The bow tie keeps sliding down or looking weird.
Solution: Make sure your serving platter is completely flat and stable. If the bow tie piece is sliding, you can insert a few toothpicks through it into the platter to anchor it in place, then remove them before serving. Also, generous frosting acts as “glue” to help hold everything in position.
I have a feeling you’ll love what’s next. The Valentine’s & Spring favorites are packed with recipes that disappear fast at every gathering. Go check them out before someone else snags them!
Variations & Fun Twists
This bunny cake easy recipe is incredibly versatile once you’ve got the basic shape down. Swap the vanilla cake for chocolate, strawberry, or lemon cake depending on your family’s preferences—chocolate bunny cakes are especially popular with kids.
For a gluten-free version, use your favorite gluten-free cake mix (most bake up beautifully in round pans) and proceed with the recipe as written. The cutting and frosting techniques work exactly the same way.
If you want to make this bunny cake look extra fancy, add shredded coconut on top of the white frosting to create a fluffy fur texture. You can even tint some of the coconut pink for the inner ears. Edible flowers around the base of the platter also add a gorgeous spring touch.
Try different candy decorations based on what you have on hand—mini chocolate eggs, pastel M&Ms, or even fresh berries all work beautifully. For a more grown-up version, skip the jellybeans and go for elegant white chocolate shavings and fresh raspberries.
Serving, Storage & Reheating
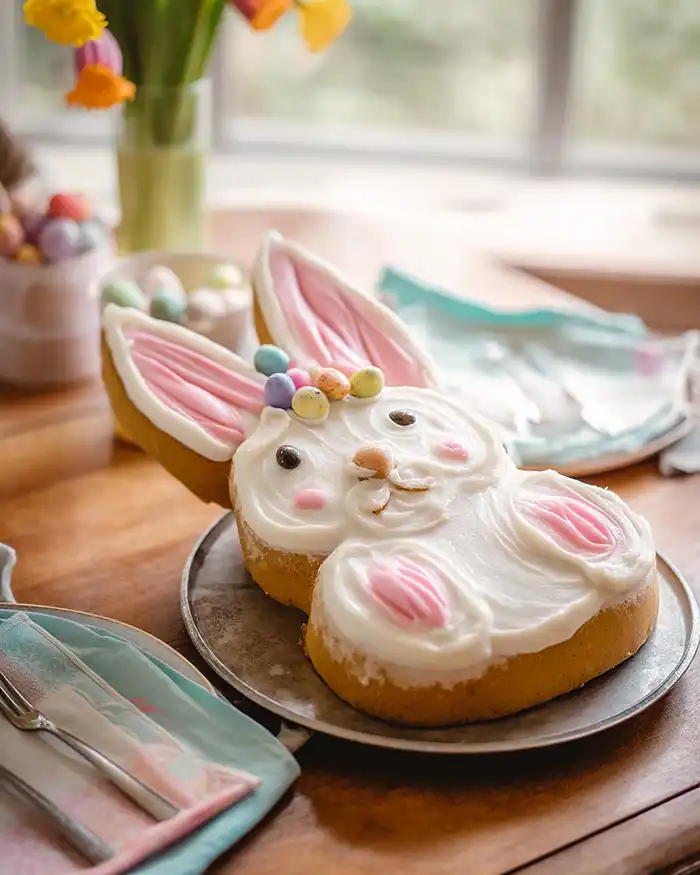
Serve this Easy Easter Bunny Cake at room temperature for the best texture and flavor. It’s perfect as the centerpiece of your Easter dessert table, and honestly, everyone’s going to want a photo before you cut into it. Use a sharp knife to slice from the outer edges inward, serving the ears separately if you want to make sure everyone gets a piece.
Store any leftover bunny cake (if you actually have leftovers, which I doubt) covered loosely with plastic wrap or in an airtight container at room temperature for up to 2 days. If your kitchen is warm or the cake has cream cheese frosting, refrigerate it instead, but let it come to room temperature for about 30 minutes before serving again.
This cake doesn’t really need reheating, but if you’ve refrigerated it and want to take the chill off, let it sit at room temperature for 20-30 minutes. Cold cake is still delicious, just a bit firmer in texture than freshly made.
No-Waste Kitchen Magic
Got leftover cake scraps from cutting your ears and bow tie? Don’t toss them! Crumble them up and mix with a bit of frosting to make cake pops, or layer them in parfait glasses with whipped cream and fresh berries for an instant trifle.
If you have extra frosting after decorating, store it in an airtight container in the fridge for up to a week. It’s perfect for frosting cupcakes, spreading on graham crackers for a quick snack, or using in my easy pizza eggs for a sweet breakfast twist (okay, maybe not that last one—but you get the idea).
Extra jellybeans can be used to decorate Easter cupcakes, mixed into cookie dough, or simply saved in a jar for next year’s bunny cake. They don’t go bad quickly, so you’ve got options.
Easy Easter Bunny Cake FAQs
Can I freeze this Easy Easter Bunny Cake?
You can freeze the unfrosted cake layers wrapped tightly in plastic wrap for up to 3 months, which is perfect for getting ahead on your Easter prep. Thaw them overnight in the fridge before assembling and decorating. I don’t recommend freezing the fully decorated cake because the frosting texture changes and the candy decorations can get sticky or discolored.
What’s the best way to transport a bunny cake to someone’s house?
Assemble and decorate your bunny cake on a sturdy cake board or flat platter that fits inside a large bakery box or storage container with a lid. Keep the container level in your car (the floor behind the front seats is usually most stable), and drive carefully around turns. If you’re really worried, insert a few toothpicks vertically through the cake into the board to keep pieces from sliding.
How do I know when my round cakes are done baking?
Your cakes are done when a toothpick inserted into the center comes out clean or with just a few moist crumbs (no wet batter), the edges are pulling away slightly from the pan, and the top springs back when you gently press it with your finger. Depending on your oven and the recipe you’re using, this usually takes 25-30 minutes at 350°F.
Will this work with different sized cake pans?
Yes, but you’ll get different proportions. An 8-inch round creates a more compact bunny, while a 9-inch round makes a larger, more impressive bunny. Just make sure both your cakes are the same size so your ears and bow tie are proportional. If you only have different sized pans, use the larger one for the face and the smaller one for cutting the ears and bow tie.
Cozy Closing
I’d love to see your spin on this Easy Easter Bunny Cake! Drop a comment below with your bunny cake photos—I’d love to see how you made it your own. This Easy Easter Bunny Cake is so versatile; I bet you’ve got amazing variations already in mind!
Whether you go classic vanilla or try a chocolate twist, whether you keep it simple or add all the spring decorations your heart desires, this bunny is going to steal the show at your Easter celebration.
And hey, don’t forget to check out more festive recipes on EdenPlate—like my low-carb chicken casserole for a savory Easter dinner main, or my easy vegetable upma for a cozy brunch option alongside your bunny cake.
Happy Easter baking, friends! 🐰🌸
I’m Claire Whitmore—a dessert daydreamer from Asheville, NC. For me, baking isn’t about perfect pastries—it’s about the joy of sharing something sweet (and maybe sneaking an extra scoop of frosting when no one’s looking).

Easy Easter Bunny Cake
Equipment
- Two 8 or 9-inch round cake pans
- Large serving platter or cutting board
- Sharp serrated knife
- Offset spatula or butter knife
- Piping bags or zip-top bags
- Small round piping tip
- Toothpicks
Ingredients
Cake Base
- 2 layers Round cakes (8 or 9-inch) One box cake mix or homemade recipe
Frosting & Decorations
- 2 cups White frosting Store-bought or homemade
- 1 cup Pink frosting Strawberry frosting works well
- 0.25 cup Chocolate icing or melted chocolate For facial details
- 0.5 cup Jellybeans or colorful round candies For decorating bow tie
- 2-3 Piping bags or zip-top bags Optional for detail work
- 2 Chocolate chips or candy melt wafers For eyes
Instructions
- Bake two 8 or 9-inch round cakes according to package or recipe instructions. Let them cool in pans for 10 minutes, then transfer to wire racks and cool completely before cutting.
- Leave one cake whole for the bunny face. Cut the second round cake into two curved ear shapes and one bow tie shape using a serrated knife.
- Place the whole round cake on a serving platter as the face. Arrange the two ear pieces at the top and the bow tie piece at the bottom to form a bunny shape.
- Spread white frosting over the bunny face and ears. Use pink frosting to fill in the inner ears and frost the bow tie.
- Use chocolate icing or melted chocolate to draw eyes, nose, whiskers, and a smile. Add chocolate chips or candy melts for eyes if desired.
- Decorate the bow tie with jellybeans or candies. Add optional sprinkles around the platter and serve.