Graduation Dessert Charcuterie Board
A Graduation Dessert Charcuterie Board is the kind of party spread that makes everyone stop, stare, and immediately reach for something sweet.
Hey there, I’m Claire Whitmore — a pastry whisperer in Asheville, NC, where butter totally counts as self-care. This graduation dessert board recipe is my go-to for celebrations that deserve a little extra sparkle.
It’s no-bake, endlessly customizable, and pulls together in under 20 minutes. Think mini cupcakes, shortbread, fresh strawberries, chocolate dip, and Gouda — all arranged beautifully on one gorgeous platter.
I made my first one for my niece’s high school graduation, and honestly? It upstaged the cake. No apologies. There’s just something magical about a board piled high with everyone’s favorite treats.
Table of Contents
What This Graduation Dessert Board Delivers
This graduation dessert charcuterie board is a no-cook party platter packed with cookies, fresh fruit, chocolate dip, and a touch of savory cheese.
It serves a crowd, comes together in 15 minutes, and requires zero baking. It’s an easy, eye-catching centerpiece for any graduation party.
Why You’ll Love This Recipe
- This graduation dessert charcuterie board takes less time to assemble than it does to find a parking spot at the party store.
- No oven, no stress — just a beautiful spread that looks like you spent hours on it (your secret is safe with me).
- It’s totally customizable to your grad’s favorite flavors, school colors, or dietary needs.
- According to Food Network’s complete guide to building stunning dessert boards, variety and visual contrast are what make a sweet board unforgettable — and this recipe nails both.
Quick Facts
Here’s the quick scoop on this graduation dessert charcuterie board.
- CourseDessert / Party Platter
- Prep Time15 minutes
- Cook Time0 minutes
- Total Time15 minutes
- Servings8–12 servings
- DifficultyEasy
Nutritional Peek (Per Serving, Approximate)
| Nutrient | Amount Per Serving |
|---|---|
| Calories | 320 kcal |
| Carbohydrates | 38g |
| Protein | 5g |
| Fat | 16g |
| Fiber | 2g |
| Sugar | 24g |
Ingredients for Your Graduation Dessert Board
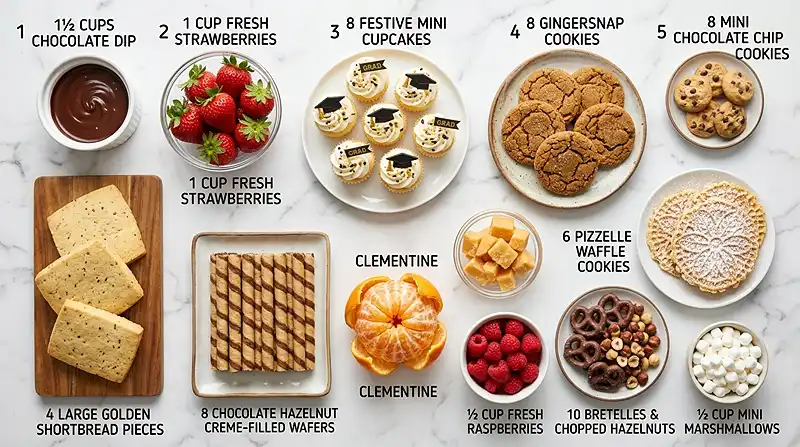
A sweet charcuterie board works best when you group your ingredients thoughtfully before you start arranging.
For the dips and fruit — chocolate dip, strawberries, raspberries, and clementine segments — keep them fresh and ready to place first. For the cookies and sweets — gingersnaps, shortbread, mini cupcakes, pizzelles, and wafers — arrange them in clusters for visual impact.
The savory touch of aged Gouda and the crunch of pretzel twists round everything out perfectly.
| Amount | Ingredient |
|---|---|
| 1 1/2 cups | Chocolate dip |
| 1 cup | Strawberries |
| 4–8 | Festive mini cupcakes |
| 4–8 | Gingersnap cookies |
| 4–8 | Mini chocolate chip cookies |
| 4–8 | Pizzelle waffle cookies |
| 4 large pieces | Shortbread |
| 4–8 | Chocolate hazelnut creme filled wafers |
| 1 | Clementine, segmented |
| 1/2 cup | Cubed aged Gouda cheese |
| 1/2 cup | Raspberries |
| 1/4 cup | Chocolate chunks |
| 1/2 cup | Pretzel twists |
| As desired | Small flowers for garnish (optional) |
Tools You’ll Actually Use
- Large wooden cutting board or serving platter (the bigger, the better)
- Small bowl or ramekin for the chocolate dip
- Cheese knife for the Gouda
- Small tongs or serving spoon
- Parchment paper (optional, for easy cleanup under berries)
This is the kind of recipe that makes you want to cook everything in sight. Lucky for you, the Seasonal Celebrations collection is full of exactly that. Go explore and find your new go-to dish.
How to Build Your Graduation Dessert Charcuterie Board
Making this graduation dessert board is all about building from the anchor point outward — it’s easier than it looks, I promise.
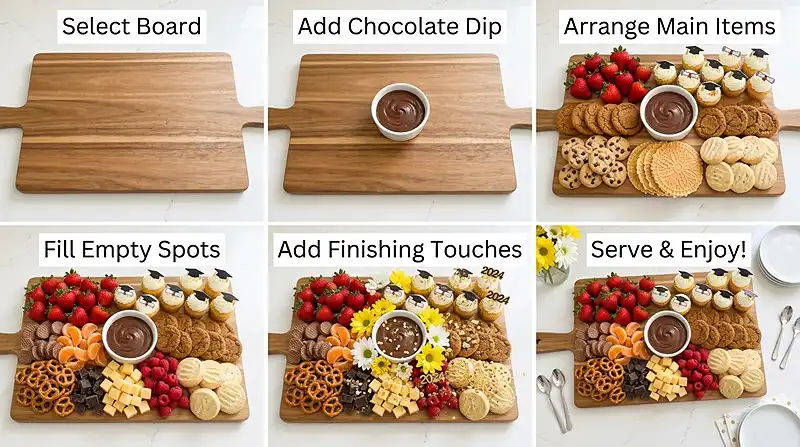
Step 1: Place the Chocolate Dip Bowl First
Pour your chocolate dip into a small bowl or ramekin and set it on your board first. Everything else gets arranged around it, so it anchors your whole design.
Step 2: Add the Larger Items
Arrange the strawberries, mini cupcakes, gingersnaps, mini chocolate chip cookies, pizzelles, and shortbread pieces around the bowl in clusters. Think in little neighborhoods, not straight lines.
Step 3: Fill in the Gaps
Tuck in the chocolate hazelnut wafers, clementine segments, cubed Gouda, raspberries, chocolate chunks, and pretzel twists. These smaller items are your “gap fillers” — they make the board look full and abundant.
Step 4: Garnish and Serve
If you’d like a finishing touch, tuck a few small flowers (edible or non-toxic decorative ones) into the corners. Step back, admire your masterpiece, and try to resist snacking before guests arrive.
Claire’s Pro Tips for the Perfect Party Dessert Platter
When it comes to a gorgeous party dessert platter, a few little tricks make all the difference between “looks good” and “jaw-dropping.”
Don’t overthink the arrangement. Imperfect, organic-looking clusters are actually more visually appealing than rigid rows.
Use odd numbers when grouping items. Three shortbread pieces look more natural than four. Five strawberries cluster better than six. It’s a weird little design trick that truly works.
Vary your heights. Prop a few cookies against the cupcakes, or stack wafers slightly. A flat board looks less interesting than one with dimension.
Add the most delicate items (fresh berries, flowers) last so they don’t get crushed during assembly.
Quick Fixes for Your Graduation Dessert Board
Problem: The board looks sparse. Add more pretzel twists, chocolate chunks, or extra berries to fill in gaps. Small items are your best friend for padding volume quickly.
Problem: Colors look dull or washed out. Brighten it up with the clementine segments and fresh raspberries front and center. The orange and red pop beautifully against the browns and creams.
Problem: The chocolate dip is too thick to scoop. Warm it gently in the microwave in 15-second bursts, stirring between each. It should be smooth and dippable, not stiff.
Problem: Cookies are going stale before serving. Assemble the board no more than 30–45 minutes before guests arrive. Keep cookies stored separately until then.
Variations and Fun Twists
One of the best things about a graduation dessert board is how easy it is to make it your own.
School Colors Theme
Swap in macarons, M&Ms, or sprinkled cookies in your grad’s school colors. A little food dye in the chocolate dip works too for a fun coordinated look.
Gluten-Free Option
Swap the gingersnaps and wafers for certified gluten-free cookies. The rest of the board — fruit, cheese, chocolate dip, and pretzels — is easy to adapt with GF alternatives.
Mini Individual Boards
Build smaller personal boards on wooden appetizer paddles for each guest. It’s a cute keepsake touch that doubles as a place setting.
Serving, Storage, and Reheating
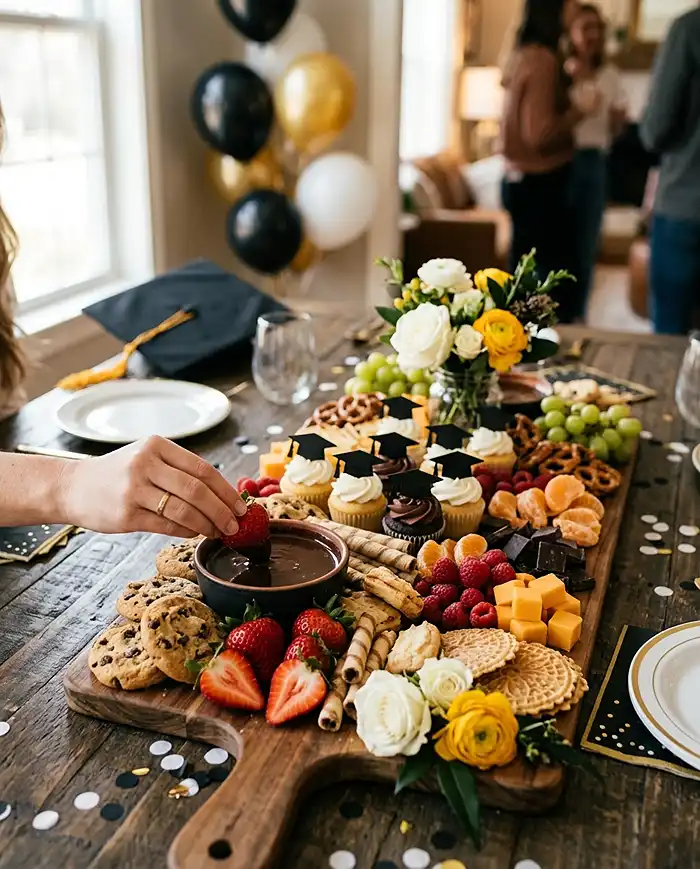
This sweet charcuterie board is best served fresh at room temperature. Set it out about 15 minutes before guests arrive so everything is at its best texture and flavor.
If you actually have leftovers (which I sincerely doubt), store the cookies and wafers in an airtight container at room temperature for up to 3 days. Keep the Gouda and fresh fruit refrigerated separately.
The chocolate dip can be refrigerated in a sealed container for up to a week. Re-warm it gently before serving again — it firms up in the fridge.
No-Waste Kitchen Magic
Extra cookies that didn’t make it onto the board? Crumble gingersnaps over vanilla ice cream for a quick dessert topping. Leftover shortbread makes a dreamy pie crust base.
Day-old cupcakes can be crumbled into parfait glasses layered with whipped cream and fresh berries. Nothing goes to waste when you get a little creative.
Extra Gouda? Pair it with apple slices and honey for an afternoon snack that feels fancy with zero effort.
FAQs About Graduation Dessert Charcuterie Boards
Can I make this graduation dessert board the night before?
You can prep the ingredients the night before — cube the cheese, segment the clementine, and store everything separately. Assemble the board itself no more than 30–45 minutes before serving so the cookies stay crisp and the fruit stays fresh.
What is the best way to arrange a graduation dessert board for a large crowd?
For a bigger group, use a larger board and simply double the quantities. Place two chocolate dip bowls on opposite ends so guests can access both sides without crowding.
How do I keep fruit from making my board soggy?
Pat strawberries and raspberries completely dry before placing them on the board. You can also line the board under the fruit sections with a small piece of parchment to catch any moisture.
Why should I use aged Gouda on a dessert board?
Aged Gouda has a slightly sweet, nutty, caramel-like flavor that pairs beautifully with chocolate and fruit. It adds a savory contrast that keeps the board from feeling one-note — and it surprises guests in the best way.
Will the chocolate dip harden on the board?
It can if the room is cool. Keep the dip at room temperature and stir it occasionally if it starts to thicken. A small warming candle or tea light under a heat-safe dish also works beautifully to keep it silky.
Cozy Closing
There’s something so joyful about putting together a Graduation Dessert Charcuterie Board — it’s one of those recipes that feels effortless but lands like a statement piece.
If you loved making this, you might also enjoy my whipped goat cheese and strawberry crostini for another crowd-pleasing party bite.
Planning a full graduation spread? Check out my easy meal prep buffalo chicken bowls for a savory main that feeds a crowd with zero stress.
I’d love to see your spin on this graduation dessert board! Drop a comment below with your photos — did you do school colors? A special flavor combo? I’d love to see how you made it your own.
I’m Claire Whitmore — a dessert daydreamer from Asheville, NC. For me, baking isn’t about perfect pastries — it’s about the joy of sharing something sweet (and maybe sneaking an extra piece of shortbread before anyone notices).
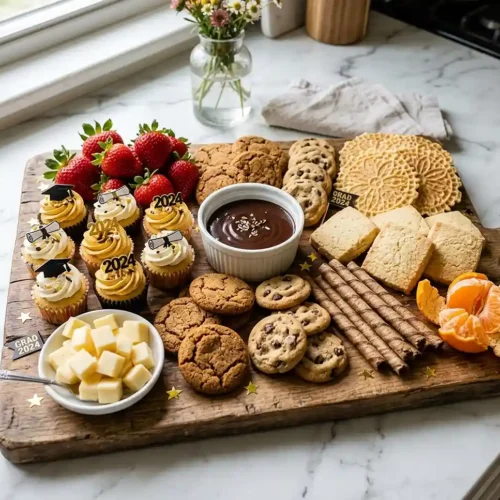
Graduation Dessert Charcuterie Board
Equipment
- Large wooden cutting board or serving platter
- Small bowl or ramekin
- Cheese knife
- Small tongs or serving spoon
- Parchment paper
Ingredients
Graduation Dessert Board Ingredients
- 1 ½ cups Chocolate dip
- 1 cup Strawberries
- 4-8 Festive mini cupcakes
- 4-8 Gingersnap cookies
- 4-8 Mini chocolate chip cookies
- 4-8 Pizzelle waffle cookies
- 4 large pieces Shortbread
- 4-8 Chocolate hazelnut creme filled wafers
- 1 Clementine segmented
- ½ cup Cubed aged Gouda cheese
- ½ cup Raspberries
- ¼ cup Chocolate chunks
- ½ cup Pretzel twists
- As desired Small flowers for garnish optional
Instructions
- Pour the chocolate dip into a small bowl or ramekin and place it on the board first to act as the anchor point for the arrangement.
- Arrange the strawberries, mini cupcakes, gingersnaps, mini chocolate chip cookies, pizzelles, and shortbread pieces around the bowl in clusters for visual appeal.
- Fill in gaps with the chocolate hazelnut wafers, clementine segments, cubed Gouda, raspberries, chocolate chunks, and pretzel twists to make the board look abundant.
- Add small flowers for garnish if desired, then serve and enjoy.