Japanese Cotton Candy Swiss Cake Roll
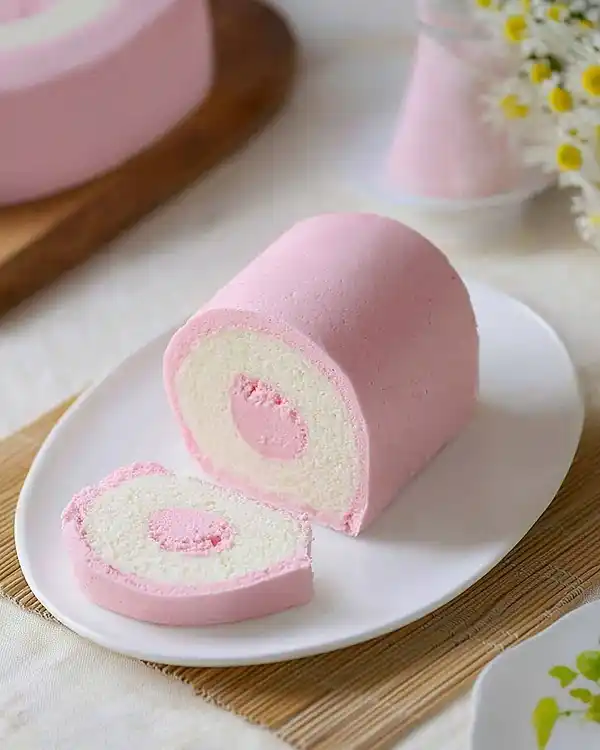
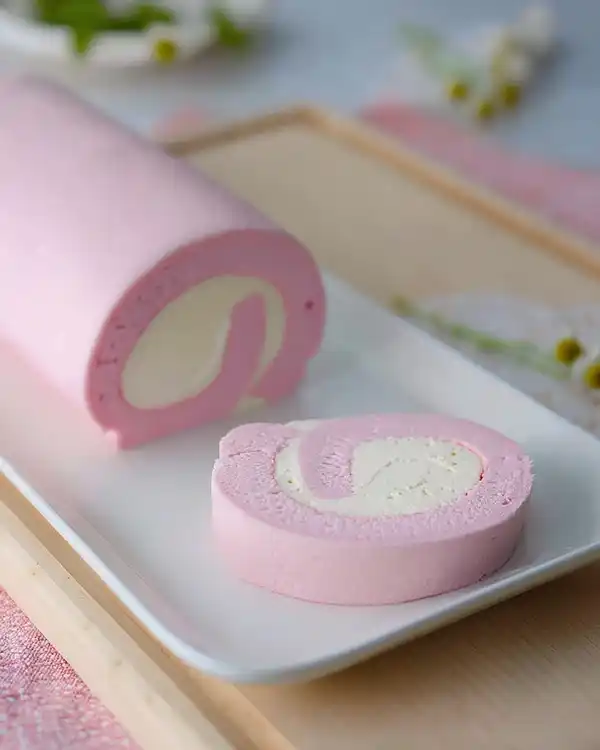
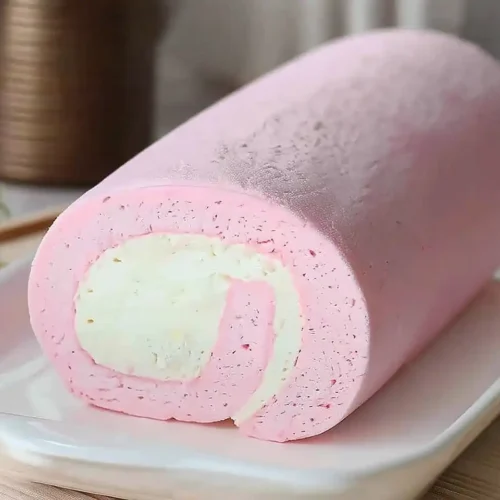
This Japanese Cotton Candy Swiss Cake Roll recipe is proof that dessert doesn’t have to be complicated to feel special.
I’ll be honest — the first time I attempted a cake roll, I ended up with what looked like a cracked yoga mat. But here’s the thing: once you nail the technique (which is way easier than it looks), you’ll be rolling out these beauties like it’s second nature.
This particular version brings together the cloud-like texture of Japanese sponge cake with that nostalgic cotton candy flavor we all secretly love. It’s playful, it’s pretty, and it’s about to become your new party trick.
What This Recipe Delivers
This Japanese Cotton Candy Swiss Cake Roll combines an ultra-light, airy sponge cake with stabilized cotton candy whipped cream for a dessert that’s as fun to look at as it is to eat. The meringue-based batter creates that signature fluffy texture, while the colorful swirls make each slice Instagram-worthy. Perfect for birthday parties, tea time, or whenever you need a sweet escape that feels a little bit magical.
Why You’ll Love This Recipe 🌸
- This Japanese Cotton Candy cake roll looks fancy but honestly takes less time than organizing your junk drawer.
- The texture is ridiculously light and fluffy — like biting into a sweet cloud that actually tastes good.
- It’s a total showstopper that’ll make everyone think you went to pastry school (our little secret).
- According to King Arthur Baking, proper rolling technique is everything — and I’m walking you through it step by step so you won’t end up with cracks.
Quick Facts ⚡
Here’s the quick scoop on this Japanese Cotton Candy Swiss Cake Roll.
- CourseDessert
- Prep Time25 minutes
- Cook Time12 minutes
- Total Time37 minutes (plus cooling)
- Servings8-10 slices
- DifficultyMedium
Table of Contents
Nutritional Peek
Here’s a quick nutritional snapshot per slice, so you know what you’re working with (though honestly, when something tastes this good, I’m not doing math):
| Nutrient | Amount per Serving |
|---|---|
| Calories | 185 kcal |
| Protein | 4g |
| Carbohydrates | 22g |
| Total Fat | 9g |
| Saturated Fat | 5g |
| Fiber | 0g |
| Sugar | 16g |
Ingredients
This Swiss Cake Roll starts with surprisingly simple pantry staples — but there’s a bit of technique magic that brings it all together. Trust me, once you see how these ingredients transform into something so light and airy, you’ll be hooked.
Dry Mix for Cake Base
| Amount | Ingredient |
|---|---|
| 70 grams | Cake flour (Note 2) |
| ¼ teaspoon | Sea salt |
Wet Mix for Cake Base
| Amount | Ingredient |
|---|---|
| 90 ml | Whole fat milk |
| 20 ml | Vegetable oil (Note 3) |
| 30 grams | Granulated sugar |
| ½ teaspoon | Cotton candy extract |
Meringue
| Amount | Ingredient |
|---|---|
| 6 | Egg whites, room temperature |
| 55 grams | Granulated sugar |
| ¼ teaspoon | Cream of tartar (Note 4) |
| As needed | Gel color in desired colors |
Stabilized Whipped Cream
| Amount | Ingredient |
|---|---|
| 1 cup | Heavy cream (36% M.F.), chilled (Note 5) |
| 1 tablespoon + 1 teaspoon | Granulated sugar (to taste) |
| 1 teaspoon | Cotton candy extract |
| 1 teaspoon | Unflavored gelatin powder |
| 4 teaspoons | Water |
Note 2: Cake flour is your secret weapon here — yes, it makes a real difference. If you can’t find it, you can DIY by replacing 2 tablespoons of all-purpose flour with cornstarch per cup, but honestly, just grab the cake flour if you can.
Note 3: Any neutral oil works (vegetable, canola, grapeseed). Just skip the olive oil unless you want your dessert tasting like a salad.
Note 4: Cream of tartar stabilizes those egg whites like a tiny insurance policy against flat meringue.
Note 5: The fat content matters for whipped cream — go for the good stuff at 36% or higher. Your cake roll will thank you.
Tools You’ll Actually Use
Here’s what you’ll need to pull this off without a kitchen meltdown:
- 8 X 12″ rectangular cake pan
- Toaster-sized silicone baking mat or parchment paper
- Small mixing bowl
- Large mixing bowl
- Stand mixer or hand mixer (seriously, don’t try whipping meringue by hand unless you’re training for something)
- Whisk
- Sifter
- Angled spatula
- Cooling rack
- Heatproof cup
- Small saucepan
- Plastic wrap
Step-by-Step to the Best Japanese Cake
Alright, let’s make this Japanese Cotton Candy Swiss Cake Roll happen. Deep breath — you’ve got this.
1. Line your 8 X 12″ rectangular cake pan with a silicone baking mat or parchment paper. Make sure it’s nice and flat with no weird wrinkles (unlike my bedsheets most mornings).
2. Preheat your oven to 325°F. This lower temp is key for that gentle, even bake.
3. In a small bowl, whisk together all your “wet” ingredients — that’s the milk, oil, first portion of sugar (30 grams), and cotton candy extract. Set this aside while it gets friendly.
4. In a large mixing bowl, sift in your cake flour and salt. Give it a quick stir to combine.
5. Create a well in the center of your dry ingredients (think of it as a little flour volcano). Pour all those wet ingredients right into the middle.
6. Combine everything until just incorporated. Seriously, stop mixing the second you don’t see dry streaks. Over-mixing is the enemy of fluffy cake, and we’re going for cloud status here. Set this flour mixture aside.
7. Now for the meringue magic. In a completely clean and dry non-plastic mixing bowl (any grease or water will ruin your volume), start whipping those egg whites on slow speed until they get frothy. Add the cream of tartar.
8. Increase to medium speed. Once the whites turn opaque and the bubbles tighten up, start adding your second portion of sugar (55 grams) a little bit at a time. Patience here pays off big time.
9. Bump it up to medium-high speed and whip until you hit soft peaks. Now add your gel colors — this is where you can get creative with swirls and patterns. Keep whipping until you reach stiff peaks (Note 6). Your meringue should stand up proud when you lift the beater.
10. Here comes the delicate part: gently fold the meringue into your wet flour mixture in three additions. Use a folding motion (not stirring!) to keep all that precious air you just whipped in.
11. Pour the batter into your prepared cake pan.
12. Spread it out evenly with an angled spatula, getting it into all the corners.
13. Tap the pan on the counter a few times to release any large air pockets that might create weird holes.
14. Bake for 10-12 minutes, until a skewer comes out clean and the cake springs back when you gently press the center. Don’t overbake or you’ll end up with a crackly mess when rolling.
15. Let it cool in the pan for 5 minutes — this helps it set without overcooking from residual heat.
16. Place a cooling rack over your cake pan, then flip the whole thing over so the cake lands on the rack. Gently peel off the paper. The side facing up now will eventually be the pretty outside of your roll.
17. Let it chill on the cooling rack while you make that dreamy cotton candy whipped cream.
Stabilized Cotton Candy Whipped Cream
18. Pop your beaters, bowl, and cream in the fridge to get completely chilled. This isn’t optional — warm cream just won’t whip properly.
19. Place 4 teaspoons of water in a heatproof cup and sprinkle the gelatin on top. Let it bloom for 5 minutes (it’ll look weirdly spongy — that’s perfect).
20. Set that cup in a small saucepan filled with simmering water. Once the gelatin melts into liquid, remove it from the water bath and let it cool on the counter for a few minutes.
21. Start whipping your chilled cream and sugar on medium speed right away.
22. Whip until you see tracks forming in the cream. Now slowly pour in that cooled (not hot!) gelatin in a steady stream, aiming for the space between the whisk and the bowl. Keep that mixer running.
23. Add your cotton candy extract.
24. Increase speed to medium-high and stop the second you hit stiff peaks (Note 6). Over-whipped cream turns into butter, and we’re not making butter today.
25. Use this cream immediately to fill your cooled cake.
Assembly
26. Spread the stabilized whipped cream onto your cooled Japanese Cake, adding a bit of extra cream on the edge that you’ll roll first (Note 7). This creates a nice spiral when you slice it.
27. Here’s the moment of truth: carefully roll up the cake from the short edge. Use the parchment paper underneath to help guide and push the cake onto itself. Go slow and steady — you’re doing great.
28. Wrap your beautiful roll in plastic wrap and pop it in the refrigerator to set for at least an hour before cutting. This helps everything firm up.
29. Before serving, trim off the ends for that professional bakery look. Your Cotton Candy Cake Roll can hang out in an airtight container in the fridge for 2-3 days (if it lasts that long).
Note 6: Stiff peaks mean when you lift the beater, the peak stands straight up without drooping. It should look glossy, not dry or chunky.
Note 7: That extra cream on the starting edge prevents the dreaded “hollow center” situation that happens when there’s not enough filling at the beginning of your roll.
Claire’s Pro Tips & Gentle Guidance
Making a perfect Cake Roll is totally doable once you know these little secrets (that I definitely learned the hard way):
Room temperature egg whites are everything. They whip up way better than cold ones. Just separate them and let them sit on the counter for 30 minutes before you start.
Don’t skip the cream of tartar. I tried leaving it out once to save a trip to the store, and my meringue deflated faster than my motivation on Monday mornings.
The fold, don’t stir, rule is real. When combining meringue with your batter, use a gentle folding motion from the bottom up. Stirring will knock out all that air you worked so hard to create.
Roll while it’s still warm-ish. If your cake cools completely, it’s more likely to crack. That sweet spot is about 15-20 minutes after baking when it’s cool enough to handle but still slightly warm and pliable.
Gelatin is your whipped cream insurance policy. According to the pros at Serious Eats, stabilized whipped cream holds its shape beautifully for days — and trust me, you don’t want your filling turning into soup before serving.
Practice your pour. When adding that gelatin to your whipped cream, make sure it’s cooled but still liquid. Too hot and it’ll cook the cream (gross), too cool and it’ll seize into chunks (also gross).
Quick Fixes for Japanese Cotton Candy Swiss Cake Roll
Even experienced bakers run into hiccups. Here’s how to troubleshoot the most common issues:
My cake cracked when rolling: This usually means it was either overbaked or rolled when too cold. Next time, pull it from the oven when it just barely springs back, and roll it while still slightly warm.
You can also try rolling it in the parchment paper first (without filling), letting it cool in that shape, then unrolling to fill.
The meringue deflated: Either your bowl had some grease residue, you added sugar too quickly, or you over-folded when combining with the batter. Make sure everything is squeaky clean and take your time with the folding process.
Whipped cream is runny: Your cream, bowl, or beaters might not have been cold enough. Or you didn’t whip to stiff peaks before stopping. Pop everything back in the fridge for 10 minutes and try again.
The roll has a hollow center: You didn’t put enough filling on the starting edge. That first inch needs to be loaded up so there’s cream all the way through when it spirals.
Cake is dense instead of fluffy: You either over-mixed the batter initially or didn’t whip the meringue to proper stiff peaks. Those egg whites are doing all the heavy lifting here, so they need to be properly whipped.
Can’t get enough of these flavors? You’re going to love what’s waiting in the Cakes & Cupcakes lineup. Every single recipe is made to impress without the stress. Happy cooking, friend!
Variations & Fun Twists
Once you’ve nailed the basic Swiss Cake Roll, here’s where you can get creative and make it your own:
Flavor swaps: Swap the cotton candy extract for vanilla, almond, or even strawberry. You could also add a tablespoon of cocoa powder to the dry ingredients for a chocolate version.
Color party: Go wild with the gel colors in your meringue. Try ombre effects, rainbow swirls, or match your color scheme to a specific party theme.
Different fillings: While stabilized whipped cream is classic, you could also use cream cheese frosting, buttercream, or even a thin layer of jam with the whipped cream.
Gluten-free option: Replace the cake flour with a gluten-free cake flour blend. I’ve had good luck with Bob’s Red Mill 1:1 baking flour, though the texture might be slightly different.
Make it boozy: Add a tablespoon of flavored liqueur to your whipped cream for a grown-up version. Amaretto, Bailey’s, or even champagne would be lovely.
Rustic vs. fancy: For everyday, just slice and serve on simple plates. For special occasions, dust with powdered sugar, add fresh berries, or drizzle with white chocolate.
If you’re into fun Japanese-inspired treats, you’ll probably love my Easy Mochi Donuts or Easy Dango Recipe too!
Serving, Storage & Reheating
Your gorgeous Cotton Candy Swiss Cake Roll deserves to be treated right, so here’s how to keep it at its best:
Serving: This cake roll is best served chilled, straight from the fridge. Use a sharp knife (wipe it clean between slices) to get those picture-perfect spirals. A hot knife also works beautifully — just run it under hot water, dry it off, and slice.
Storage: Wrap individual slices or the whole roll tightly in plastic wrap and keep in an airtight container in the refrigerator for 2-3 days. The stabilized whipped cream helps it hold up way better than regular whipped cream.
Freezing: You can absolutely freeze this! Wrap it really well in plastic wrap, then in aluminum foil, and freeze for up to a month. Thaw overnight in the fridge before serving. The texture might be slightly less fluffy after freezing, but it’s still totally delicious.
Reheating: Honestly, this one’s best served cold. Don’t try to warm it up or you’ll end up with melted cream and a sad situation.
If you actually have leftovers (which I doubt, but just in case), they make a pretty fantastic breakfast with your morning coffee. No judgment here — cake for breakfast is completely valid in my book.
No-Waste Kitchen Magic
Let’s talk about putting every bit of this recipe to good use, because I hate wasting ingredients:
Those egg yolks: You’ll have six leftover yolks from this recipe. Make a custard, lemon curd, hollandaise sauce, or save them for my Easy German Butter Cookies which are yolk-heavy and utterly divine.
Day-old cake roll: If your roll gets a bit dry after a couple days, cube it up and make a trifle with fresh whipped cream, fruit, and maybe some pudding. Layer it all in a pretty glass and nobody will know you’re upcycling.
Extra whipped cream: Pipe it onto fresh berries, dollop it on hot chocolate, or spread it between White Chocolate Dipped Maple Cookies for impromptu sandwich cookies.
Trimmed ends: Those pieces you cut off before serving? Perfect for the baker’s snack (that’s you). Or crumble them over ice cream for a fancy sundae situation.
Leftover gel color: Store it in your pantry for future baking projects. Gel colors last forever and work beautifully in buttercream, royal icing, or any time you want to add a pop of color to desserts.
Japanese Cotton Candy Swiss Cake Roll FAQs
What is a Japanese cake roll called?
Great question! In Japan, these rolled sponge cakes are typically called “roll cake” (ロールケーキ) or sometimes “Swiss roll.” The extra-fluffy version made with a meringue-based batter (like this one) is often called a “cotton cake roll” because of its cloud-like texture. They’re super popular in Japanese bakeries and come in tons of flavors.
What is Japanese cotton cake?
Japanese cotton cake refers to any cake with an incredibly light, airy, almost cotton-like texture. It gets this texture from whipped egg whites (meringue) that create tons of tiny air pockets. The most famous version is probably Japanese cheesecake, but cotton cake rolls like this one follow the same principle — maximum fluff, minimum density. It’s all about that melt-in-your-mouth experience.
What is cotton candy called in Japan?
In Japan, cotton candy is called “wataame” (綿飴), which literally translates to “cotton candy” — how cute is that? You’ll see it at festivals and street fairs, usually in fun colors and sometimes on a stick. The flavor we associate with cotton candy (that super sweet, vanilla-y taste) is popular in Japanese sweets and desserts too.
Is Castella cake and Japanese jiggly cake the same?
Not quite, though they’re cousins! Castella (カステラ) is a sponge cake that’s denser and more structured — it was actually brought to Japan by Portuguese merchants way back in the 16th century. Japanese jiggly cake (usually referring to Japanese cheesecake or cotton cheesecake) is way more delicate and jiggly (hence the name). Both are lighter than Western cakes, but jiggly cake has that signature wobble and almost soufflé-like texture, while Castella is more like a very fine-crumbed sponge cake. This cotton candy roll is closer to the jiggly cake family in terms of texture!
Cozy Closing
And there you have it — your ticket to making the fluffiest, prettiest Japanese Cotton Candy Swiss Cake Roll right in your own kitchen.
This recipe might seem a little fancy, but honestly, it’s just about taking your time and trusting the process. Once you nail it, you’ll feel like an absolute baking rockstar.
I’d love to see your spin on this Japanese Cotton Candy Swiss Cake Roll! Leave a note below so we can share a sweet moment together.
Did you try different colors? Add a fun flavor twist? Accidentally eat half of it before it made it to the table? (Been there.) I want to hear all about it.
And hey, if you’re looking for more fun treats that are a little different from your everyday desserts, check out my Easy Japanese Katsu Bowls for when you need something savory to balance out all this sweetness.
I’m Claire Whitmore — a dessert daydreamer from Asheville, NC. For me, baking isn’t about perfect pastries — it’s about the joy of sharing something sweet (and maybe sneaking an extra scoop of icing).
Japanese Cotton Candy Swiss Cake Roll
Equipment
- 8×12 inch rectangular cake pan
- Silicone baking mat or parchment paper
- Mixing bowls
- Stand mixer or hand mixer
- Whisk
- sifter
- angled spatula
- cooling rack
- heatproof cup
- Small saucepan
- Plastic wrap
Ingredients
Dry Mix for Cake Base
- 70 grams cake flour use cake flour for best texture
- ¼ teaspoon sea salt
Wet Mix for Cake Base
- 90 ml whole fat milk
- 20 ml vegetable oil or other neutral oil
- 30 grams granulated sugar
- ½ teaspoon cotton candy extract
Meringue
- 6 egg whites egg whites room temperature
- 55 grams granulated sugar
- ¼ teaspoon cream of tartar stabilizes meringue
- as needed gel color desired colors
Stabilized Whipped Cream
- 1 cup heavy cream (36% M.F.) chilled
- 1 tablespoon + 1 teaspoon granulated sugar to taste
- 1 teaspoon cotton candy extract
- 1 teaspoon unflavored gelatin powder
- 4 teaspoons water
Instructions
- Line an 8×12 inch cake pan with a silicone baking mat or parchment paper.
- Preheat oven to 325°F (160°C).
- Whisk together milk, oil, sugar (30g), and cotton candy extract in a small bowl.
- In a large bowl, sift cake flour and salt. Combine wet and dry ingredients until just incorporated.
- Whip egg whites with cream of tartar, gradually adding sugar (55g) until stiff peaks form. Add gel colors as desired.
- Gently fold meringue into batter in three additions.
- Pour batter into prepared pan, spread evenly, and tap to remove air bubbles.
- Bake for 10–12 minutes, until a skewer comes out clean and cake springs back lightly.
- Cool in pan 5 minutes, then invert onto rack and peel off paper. Let cool completely.
- Bloom gelatin in 4 teaspoons of water, melt gently, and cool slightly.
- Whip chilled cream and sugar until tracks form. Slowly pour in cooled gelatin and add cotton candy extract. Whip to stiff peaks.
- Spread whipped cream on cooled cake, roll tightly from the short end using parchment to guide.
- Wrap roll in plastic wrap and chill for at least 1 hour before slicing.
- Trim ends and serve chilled for best texture and presentation.