Easy Valentine’s Day S’mores
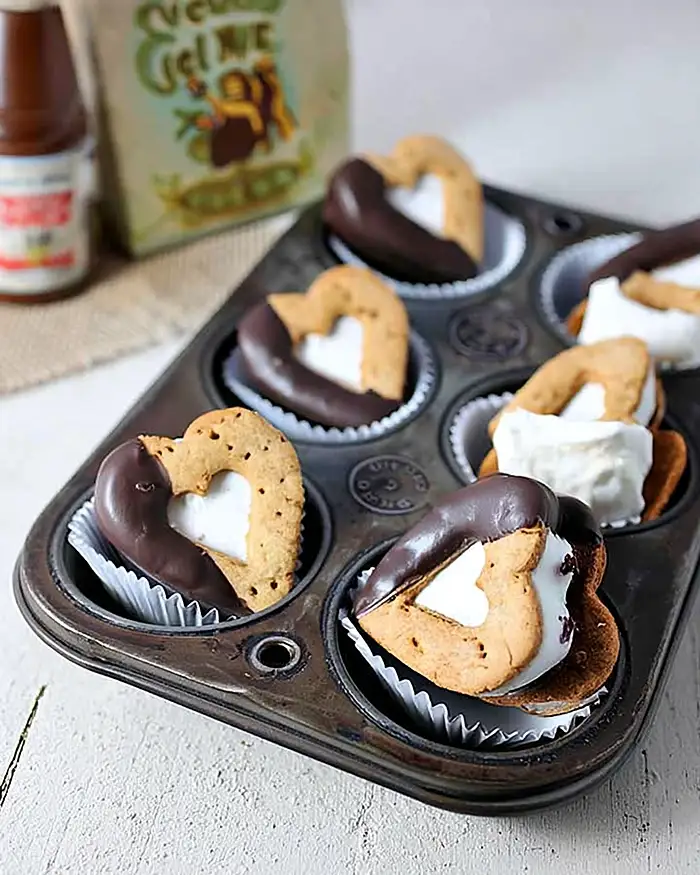
Valentine Day Smores combine fluffy vanilla marshmallows, homemade heart graham crackers, and rich dark chocolate for an easy Valentine dessert that looks fancy but comes together faster than you’d think.
Hey there, I’m Claire Whitmore — a pastry whisperer in Asheville, NC, where butter totally counts as self-care. This Valentine’s Day S’mores recipe is your answer to sweets to make for Valentines Day that actually feel special without requiring a culinary degree.
We’re talking fluffy vanilla marshmallows, cinnamon-spiced heart graham crackers, and silky dark chocolate all sandwiched together into the cutest easy Valentine Day desserts you’ve ever seen.
I’ll be honest — the first time I made these for my husband, he thought I’d ordered them from some fancy bakery. Nope, just me, my stand mixer, and a whole lot of heart-shaped cookie cutters. The best part? You can prep components ahead, which means less stress and more time for the fun stuff (like actually enjoying Valentine’s Day).
Table of Contents
Little Snapshot: What This Recipe Delivers
Valentine’s Day S’mores are homemade heart-shaped treats featuring fluffy vanilla marshmallows, cinnamon graham crackers, and dark chocolate coating. They take about 2 hours of active time (plus setting time for marshmallows), yield 20 adorable servings, and deliver that classic s’mores flavor with a romantic twist perfect for celebrating love.
Why You’ll Love This Recipe 🌸
- These Valentine’s Day S’mores look like you spent hours at a fancy bakery, but they’re actually way easier than they appear — promise!
- You can make everything ahead and assemble when you’re ready, which is perfect for busy moms juggling a million things.
- The homemade marshmallows are so fluffy and melt-in-your-mouth delicious that store-bought ones will never be the same again.
- According to King Arthur Baking in their guide to why homemade treats matter, making sweets from scratch creates memories that last way longer than the sugar rush — and these heart-shaped beauties prove exactly why.
Quick Facts ⚡
Here’s the quick scoop on this Valentine’s Day S’mores recipe.
- CourseDessert
- Prep Time2 hours
- Setting Time6 hours (for marshmallows)
- Total Time8 hours
- Servings20 s’mores
- DifficultyMedium
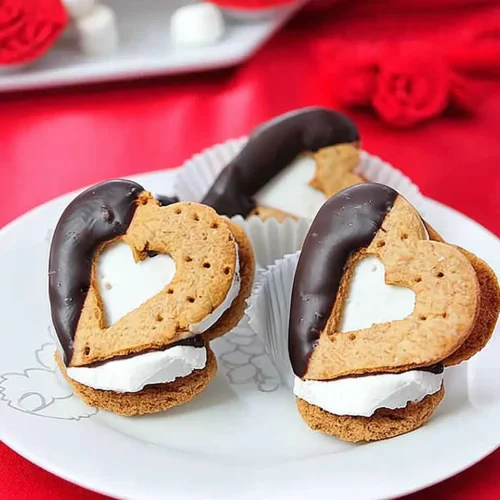
Valentine’s Day S’mores
Equipment
- 13×9-inch rectangular baking pan
- Stand mixer with whisk attachment
- Candy thermometer
- 3-quart heavy-bottomed saucepan
- Heart-shaped cookie cutters (2-inch and ¾-inch)
- Food processor or large mixing bowl
- Rolling Pin
- Parchment paper
- Baking sheets
- Fine mesh sieve
- Pastry brush
- offset spatula
Ingredients
Vanilla Marshmallows
- 3½ envelopes unflavored Knox gelatin about 8¾ tsp total
- 1 cup cold water divided
- ½ cup light corn syrup or ⅓ cup invert syrup
- 2 cups granulated sugar
- ¼ tsp salt
- 1 tbsp vanilla extract
- 2 tsp meringue powder optional
- 2 tbsp warm water if using meringue powder
Coating Mixture
- ¼ cup cornstarch
- ¼ cup powdered sugar
Heart Graham Crackers
- 1¾ cups whole wheat pastry flour 237g
- ⅓ cup all-purpose flour 45g
- ⅓ cup brown sugar packed, 75g
- ¾ tsp baking powder
- ½ tsp baking soda
- ½ tsp salt
- 1 tsp cinnamon
- 8 tbsp unsalted butter chilled and cubed, 115g
- 2 tbsp milk
- 1 tbsp freshly squeezed orange juice
- ¼ cup honey 65g
- 1 tsp vanilla extract
S’mores Assembly
- 10 oz dark chocolate use Ghirardelli melting wafers or tempered chocolate
Instructions
- Prepare Baking Pan: Grease the bottom and sides of your 13×9-inch baking pan generously with butter, oil, or non-stick spray. You really want to coat every corner here — nothing’s sadder than marshmallows that won’t release from the pan.
- Bloom the gelatin: Pour ½ cup cold water into your stand mixer bowl and sprinkle all 3½ envelopes of Knox unflavored gelatin (that’s 8¾ teaspoons total) evenly over the surface. Let it sit and bloom while you make the sugar syrup — it’ll look wrinkly and weird, and that’s exactly what we want.
- Make the sugar syrup: In your heavy-bottomed 3-quart saucepan, combine 2 cups granulated sugar, ½ cup corn syrup, ½ cup cold water, and ¼ teaspoon salt. Heat on low to medium, cover the pot for 4-5 minutes, and let everything dissolve without stirring — this prevents crystallization.
- Boil carefully: Once the sugar dissolves completely, uncover and increase heat to medium. Bring to a boil without stirring. If you see sugar crystals on the sides, dip a pastry brush in water and wash them down, or cover with a lid for 2-3 minutes to let condensation do the work.
- Monitor the temperature: Attach your candy thermometer to the inside of the pan and watch it like a hawk. When the syrup hits exactly 240°F, immediately remove from heat — we’re aiming for soft-ball stage here, which gives marshmallows their signature texture.
- Combine hot syrup with gelatin: Carefully pour the hot sugar syrup down the sides of your mixer bowl into the bloomed gelatin. The mixture will foam up dramatically — don’t panic! Stir with a wooden spoon for about 60 seconds until the gelatin completely dissolves into the syrup.
- Beat to fluffy perfection: Fit your mixer with the whisk attachment and start beating on medium speed. Once the mixture turns opaque and starts cooling, increase to high speed and beat until thick, white, and tripled in volume, then beat in 1 tablespoon vanilla extract. The whole process takes about 8-12 minutes, and you’ll know it’s ready when the mixture forms thick ribbons that hold their shape.
- Add egg whites (optional): If you’re using meringue powder for extra fluffiness, whisk together 2 teaspoons meringue powder with 2 tablespoons warm water in a small bowl until soft peaks form. Once your marshmallow mixture is lukewarm and thick, gradually beat in the soft-peak egg whites.
- Pour and set: Pour all the marshmallow mixture into your prepared pan and spread evenly with a greased offset spatula. Let them set uncovered at room temperature for 5-6 hours or overnight.
- Cut out hearts: Mix together ¼ cup powdered sugar and ¼ cup cornstarch for your coating mixture. Dust a large cutting board generously with this mixture, loosen the marshmallow slab edges, and invert onto the dusted surface. Dust the top generously too. Spray your 2-inch heart cookie cutter with non-stick spray and cut out as many hearts as possible, re-spraying the cutter between cuts to prevent sticking.
- Coat and store marshmallows: Roll each heart marshmallow in the powdered sugar-cornstarch mixture, then shake in a fine mesh sieve to remove excess. Layer marshmallows in an airtight container with parchment between layers — they’ll keep for 2-3 weeks.
- Mix dry ingredients for graham crackers: In a medium bowl (or food processor), combine 1¾ cups whole wheat pastry flour, ⅓ cup all-purpose flour, ⅓ cup packed brown sugar, ¾ teaspoon baking powder, ½ teaspoon baking soda, 1 teaspoon cinnamon, and ½ teaspoon salt. If using a food processor, pulse to combine everything evenly.
- Cut in cold butter: Add your chilled, cubed butter (8 tablespoons) and work it into the dry ingredients with your hands until the mixture resembles cornmeal with no large butter chunks remaining. If using a food processor, pulse until you reach that same cornmeal texture.
- Mix wet ingredients: In a small bowl, whisk together 2 tablespoons milk, 1 tablespoon fresh orange juice, ¼ cup honey, and 1 teaspoon vanilla extract until everything’s smoothly combined.
- Form the dough: Pour the wet ingredients into the dry mixture and stir with a wooden spoon, then use your hands to bring everything together into a ball. Don’t overmix — you just want it to hold together when pressed. Shape into a disk, wrap in plastic, and chill for 30 minutes so the butter firms up.
- Roll and cut graham crackers: Preheat your oven to 350°F. Roll the chilled dough between two sheets of parchment paper to about ⅛-inch thickness. Cut out hearts with your 2-inch cookie cutter and transfer to parchment-lined baking sheets.
- Create cut-outs: Using a fork, poke holes decoratively into each cookie. For half of your cookies, use the small ¾-inch heart cutter to cut out a mini heart from the center — these will be your top crackers where you can peek through to see the marshmallow.
- Bake to golden perfection: Bake at 350°F for 12-14 minutes, watching carefully so they don’t burn. Thicker cookies need a couple extra minutes, while thinner ones will crisp up faster. You want them golden brown and your kitchen smelling like a cinnamon dream. Let cool completely on the baking sheets.
- Melt the chocolate: Melt your 10 ounces of dark chocolate using a double boiler or microwave in 30-second bursts, stirring between each until silky smooth.
- Build the sandwiches: Place one graham cracker (without the cut-out) on your work surface. Dab a tiny bit of melted chocolate on the cookie, press a heart marshmallow on top, add another dab of chocolate, then top with a cut-out graham cracker so the marshmallow peeks through that adorable heart window.
- Dip in chocolate: Dip half of each assembled s’more into the melted chocolate at an angle, letting excess drip back into the bowl. Place dipped s’mores on wax or parchment paper and let the chocolate harden completely at room temperature (or pop them in the fridge for 10 minutes).
Notes
Valentine’s Day S’mores Nutritional Peek
Here’s what you’re looking at per s’more (because knowing never hurts):
| Nutrient | Amount per Serving |
|---|---|
| Calories | 185 |
| Protein | 2g |
| Carbohydrates | 32g |
| Total Fat | 6g |
| Saturated Fat | 3.5g |
| Fiber | 1g |
| Sugar | 22g |
| Sodium | 95mg |
Valentine’s Day S’mores Ingredients
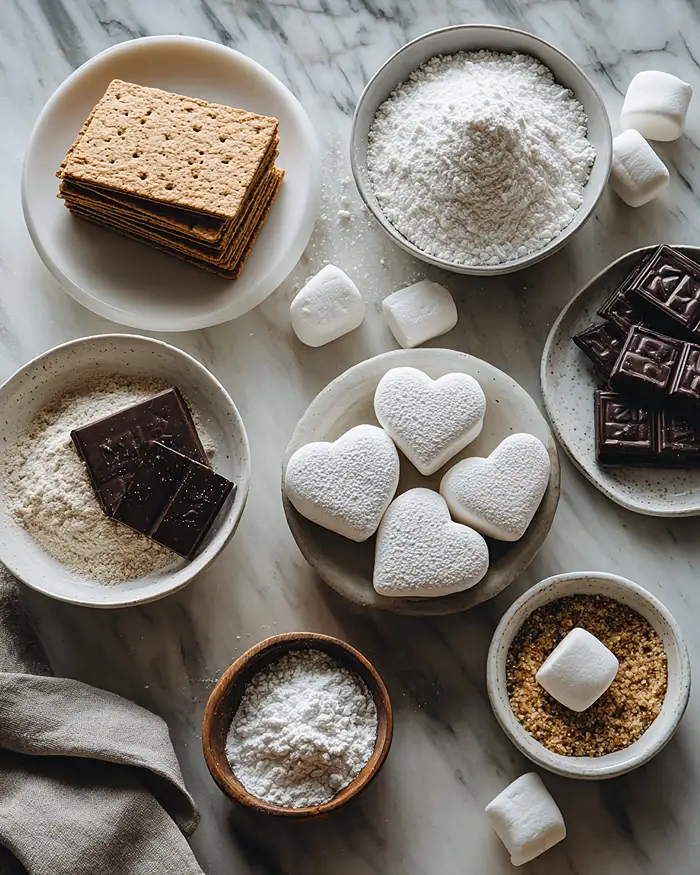
These easy Valentine day desserts start with three simple components that come together like magic. For the marshmallows, you’ll need unflavored gelatin, corn syrup, and vanilla extract to create that signature fluffy texture.
The graham crackers call for whole wheat pastry flour, honey, and a touch of cinnamon for warmth, while the chocolate coating uses quality dark chocolate that melts smoothly and sets with a gorgeous shine.
Vanilla Marshmallows
| Amount | Ingredient |
|---|---|
| 3½ envelopes | Unflavored Knox gelatin (about 8¾ tsp total — yes, we’re getting precise here) |
| 1 cup | Cold water, divided |
| ½ cup | Light corn syrup (or ⅓ cup invert syrup if you’re fancy) |
| 2 cups | Granulated sugar |
| ¼ tsp | Salt |
| 1 tbsp | Vanilla extract (the good stuff, not imitation) |
| 2 tsp | Meringue powder (optional, but makes them extra fluffy) |
| 2 tbsp | Warm water (if using meringue powder) |
Coating Mixture
| Amount | Ingredient |
|---|---|
| ¼ cup | Cornstarch |
| ¼ cup | Powdered sugar |
Heart Graham Crackers
| Amount | Ingredient |
|---|---|
| 1¾ cups | Whole wheat pastry flour (237g) |
| ⅓ cup | All-purpose flour (45g) |
| ⅓ cup | Brown sugar, packed (75g — don’t skimp on the packing) |
| ¾ tsp | Baking powder |
| ½ tsp | Baking soda |
| ½ tsp | Salt |
| 1 tsp | Cinnamon (this is what makes them smell amazing) |
| 8 tbsp | Unsalted butter, chilled and cubed (115g — cold is key here) |
| 2 tbsp | Milk |
| 1 tbsp | Freshly squeezed orange juice (adds a little brightness) |
| ¼ cup | Honey (65g) |
| 1 tsp | Vanilla extract |
S’mores Assembly
| Amount | Ingredient |
|---|---|
| 10 oz | Dark chocolate — use Ghirardelli melting wafers or tempered chocolate for best results |
Tools You’ll Actually Use
- 13×9-inch rectangular baking pan
- Stand mixer with whisk attachment (trust me, you don’t want to do this by hand)
- Candy thermometer (non-negotiable for perfect marshmallows)
- 3-quart heavy-bottomed saucepan
- Heart-shaped cookie cutters (one 2-inch for graham crackers, one smaller ¾-inch for cut-outs)
- Food processor or large mixing bowl
- Rolling pin and parchment paper
- Baking sheets
- Fine mesh sieve
- Pastry brush
- Offset spatula
Step-by-Step Instructions
Ready to make the cutest Valentine’s Day S’mores ever? Let’s break this down into totally manageable chunks.
Making the Vanilla Marshmallows
Step 1: Prep your pan. Grease the bottom and sides of your 13×9-inch baking pan generously with butter, oil, or non-stick spray. You really want to coat every corner here — nothing’s sadder than marshmallows that won’t release from the pan.
Step 2: Bloom the gelatin. Pour ½ cup cold water into your stand mixer bowl and sprinkle all 3½ envelopes of Knox unflavored gelatin (that’s 8¾ teaspoons total) evenly over the surface. Let it sit and bloom while you make the sugar syrup — it’ll look wrinkly and weird, and that’s exactly what we want.
Step 3: Make the sugar syrup. In your heavy-bottomed 3-quart saucepan, combine 2 cups granulated sugar, ½ cup corn syrup, ½ cup cold water, and ¼ teaspoon salt. Heat on low to medium, cover the pot for 4-5 minutes, and let everything dissolve without stirring — this prevents crystallization.
Step 4: Boil carefully. Once the sugar dissolves completely, uncover and increase heat to medium. Bring to a boil without stirring (seriously, don’t stir — it’ll make your marshmallows grainy). If you see sugar crystals on the sides, dip a pastry brush in water and wash them down, or cover with a lid for 2-3 minutes to let condensation do the work.
Step 5: Monitor the temperature. Attach your candy thermometer to the inside of the pan and watch it like a hawk. When the syrup hits exactly 240°F, immediately remove from heat — we’re aiming for soft-ball stage here, which gives marshmallows their signature texture.
Step 6: Combine hot syrup with gelatin. Carefully pour the hot sugar syrup down the sides of your mixer bowl into the bloomed gelatin (not directly onto the whisk attachment). The mixture will foam up dramatically — don’t panic! Stir with a wooden spoon for about 60 seconds until the gelatin completely dissolves into the syrup.
Step 7: Beat to fluffy perfection. Fit your mixer with the whisk attachment and start beating on medium speed.
Be careful — the bowl is hot! Once the mixture turns opaque and starts cooling, increase to high speed and beat until thick, white, and tripled in volume, then beat in 1 tablespoon vanilla extract. The whole process takes about 8-12 minutes, and you’ll know it’s ready when the mixture forms thick ribbons that hold their shape.
Step 8: Add egg whites (optional but recommended). If you’re using meringue powder for extra fluffiness, whisk together 2 teaspoons meringue powder with 2 tablespoons warm water in a small bowl until soft peaks form.
Once your marshmallow mixture is lukewarm and thick, gradually beat in the soft-peak egg whites — this makes them absolutely cloud-like.
Step 9: Pour and set. Pour all the marshmallow mixture into your prepared pan and spread evenly with a greased offset spatula. Let them set uncovered at room temperature for 5-6 hours or overnight — patience is everything here.
Step 10: Cut out hearts. Mix together ¼ cup powdered sugar and ¼ cup cornstarch for your coating mixture. Dust a large cutting board generously with this mixture, loosen the marshmallow slab edges, and invert onto the dusted surface.
Dust the top generously too. Spray your 2-inch heart cookie cutter with non-stick spray and cut out as many hearts as possible, re-spraying the cutter between cuts to prevent sticking.
Step 11: Coat and store. Roll each heart marshmallow in the powdered sugar-cornstarch mixture, then shake in a fine mesh sieve to remove excess. Layer marshmallows in an airtight container with parchment between layers — they’ll keep for 2-3 weeks.
Making the Heart Graham Crackers
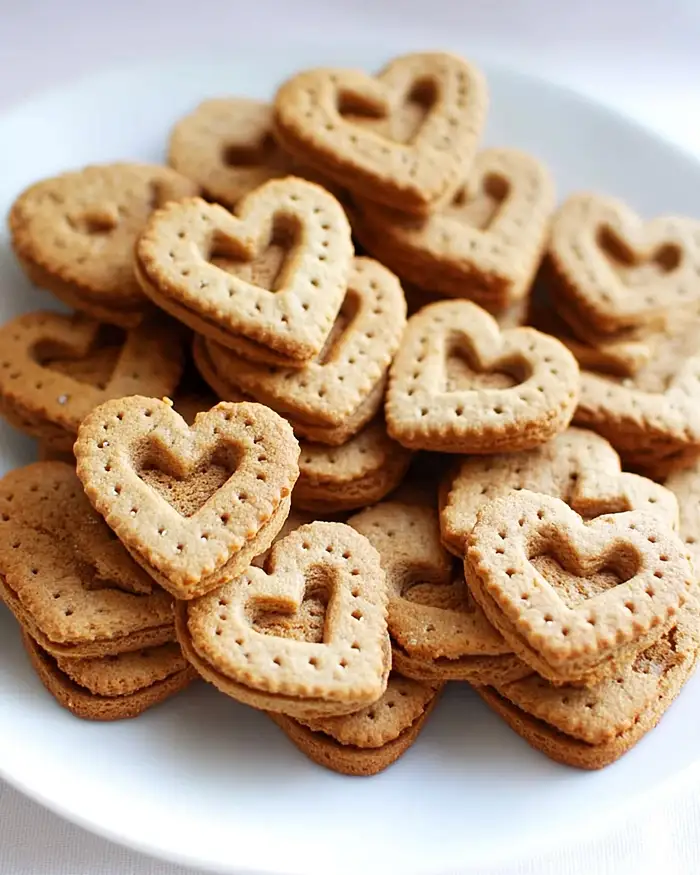
Step 1: Mix dry ingredients. In a medium bowl (or food processor), combine 1¾ cups whole wheat pastry flour, ⅓ cup all-purpose flour, ⅓ cup packed brown sugar, ¾ teaspoon baking powder, ½ teaspoon baking soda, 1 teaspoon cinnamon, and ½ teaspoon salt. If using a food processor, pulse to combine everything evenly.
Step 2: Cut in cold butter. Add your chilled, cubed butter (8 tablespoons) and work it into the dry ingredients with your hands until the mixture resembles cornmeal with no large butter chunks remaining. If using a food processor, pulse until you reach that same cornmeal texture — it should look like coarse sand.
Step 3: Mix wet ingredients. In a small bowl, whisk together 2 tablespoons milk, 1 tablespoon fresh orange juice, ¼ cup honey, and 1 teaspoon vanilla extract until everything’s smoothly combined.
Step 4: Form the dough. Pour the wet ingredients into the dry mixture and stir with a wooden spoon, then use your hands to bring everything together into a ball. Don’t overmix — you just want it to hold together when pressed. Shape into a disk, wrap in plastic, and chill for 30 minutes so the butter firms up.
Step 5: Roll and cut. Preheat your oven to 350°F. Roll the chilled dough between two sheets of parchment paper to about ⅛-inch thickness (thinner cookies will be crispier). Cut out hearts with your 2-inch cookie cutter and transfer to parchment-lined baking sheets.
Step 6: Create cut-outs. Using a fork, poke holes decoratively into each cookie (this prevents puffing and looks cute). For half of your cookies, use the small ¾-inch heart cutter to cut out a mini heart from the center — these will be your top crackers where you can peek through to see the marshmallow.
Step 7: Bake to golden perfection. Bake at 350°F for 12-14 minutes, watching carefully so they don’t burn. Thicker cookies need a couple extra minutes, while thinner ones will crisp up faster. You want them golden brown and your kitchen smelling like a cinnamon dream. Let cool completely on the baking sheets.
Assembling Your Valentine’s Day S’mores
Step 1: Melt the chocolate. Melt your 10 ounces of dark chocolate using a double boiler or microwave in 30-second bursts, stirring between each until silky smooth. If you’re using Ghirardelli melting wafers, they’ll melt like butter — if you’re tempering chocolate, follow your preferred tempering method for that gorgeous snap.
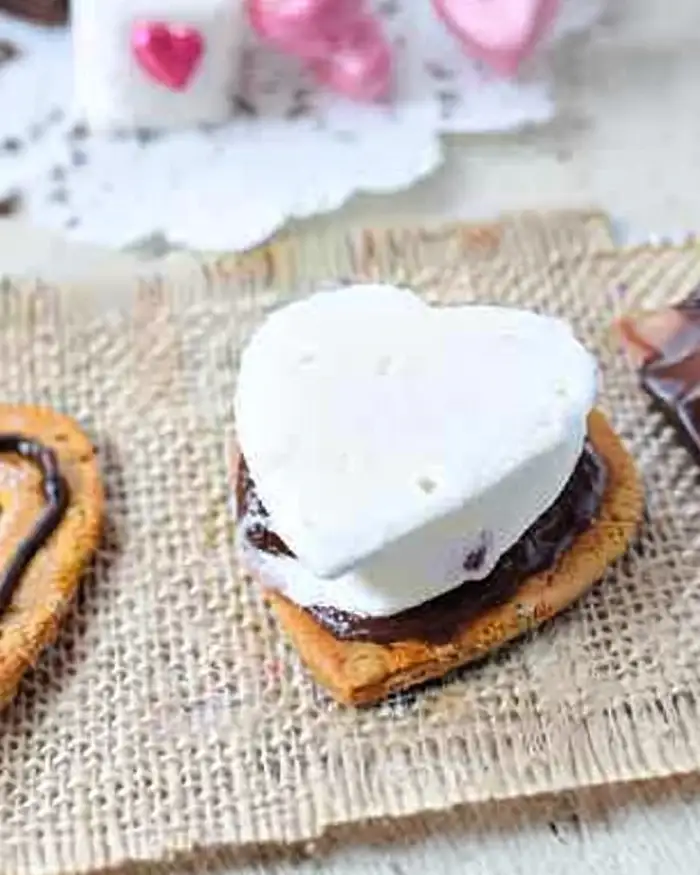
Step 2: Build the sandwiches. Place one graham cracker (without the cut-out) on your work surface. Dab a tiny bit of melted chocolate on the cookie, press a heart marshmallow on top, add another dab of chocolate, then top with a cut-out graham cracker so the marshmallow peeks through that adorable heart window.
Step 3: Dip in chocolate. Dip half of each assembled s’more into the melted chocolate at an angle, letting excess drip back into the bowl. Place dipped s’mores on wax or parchment paper and let the chocolate harden completely at room temperature (or pop them in the fridge for 10 minutes if you’re impatient like me).
Claire’s Pro Tips & Gentle Guidance
These Valentine’s sweets ideas are easier than they look, but a few insider tricks make all the difference. I’ve made these dozens of times, and trust me — these tips will save you from the mistakes I’ve already made for you.
Don’t rush the marshmallow setting time. I know 6 hours feels like forever, but marshmallows that haven’t fully set are sticky nightmares to cut. If you try cutting them too early, they’ll just squish and lose their pretty heart shape. Make them the night before and thank yourself later.
Keep your gelatin blooming bowl completely dry. Even a drop of water in that stand mixer bowl before adding the gelatin can throw off the ratios. I learned this the hard way when I had marshmallow soup instead of fluffy clouds.
Use a scale for the graham cracker dough. Those gram measurements aren’t just me being fancy — whole wheat pastry flour can pack differently depending on humidity and how you scoop it. Weighing ensures your dough has the right texture every single time.
Chill your cookie cutter between cuts. If your heart cutter gets sticky with dough, pop it in the freezer for 2 minutes between batches. Cold cutters make cleaner cuts, and you’ll waste less dough re-rolling.
According to Serious Eats in their comprehensive chocolate tempering guide, properly melted chocolate should flow like silk off a spoon — if it’s thick and gloopy, you’ve overheated it. For perfect dipping chocolate, keep your temperature between 88-90°F for dark chocolate, and consider using a thermometer if you’re tempering from scratch.
Save your marshmallow scraps. Those leftover bits after cutting hearts? Chop them up and use them in hot chocolate, stir them into homemade coffee creamer for a vanilla-marshmallow latte, or fold them into brownie batter. Waste not, want not!
Quick Fixes for Valentine’s Day S’mores
Problem: My marshmallows won’t cut cleanly and keep squishing. Make sure they’ve set for the full 6 hours minimum, and coat both your cutting board and the top of the marshmallow slab generously with that cornstarch-powdered sugar mixture.
Also, spray your cutter with non-stick spray before every single cut — it makes a huge difference.
Problem: The graham crackers spread too much and lost their shape. Your butter was probably too warm when you mixed the dough, or you didn’t chill it long enough. The dough needs that full 30 minutes in the fridge so the butter firms up and the cookies hold their shape during baking.
Problem: My chocolate coating looks streaky or dull. This usually means the chocolate seized from water contact or overheated.
Make sure all your tools are completely dry, and if using a microwave, heat in short 20-30 second bursts, stirring thoroughly between each. If it’s already seized, sometimes whisking in a teaspoon of vegetable oil can save it.
Problem: The marshmallows are too sticky and won’t release from the pan. You didn’t grease the pan thoroughly enough before pouring in the mixture. For now, run a knife under hot water, dry it completely, and use it to loosen the edges — the warmth helps release stubborn spots.
Variations & Fun Twists
Want to make these sweets to make for Valentines Day your own? Here are some ideas I absolutely love.
Chocolate marshmallows: Add 2 tablespoons cocoa powder to the sugar syrup mixture and reduce vanilla to 1 teaspoon — you’ll get gorgeous chocolate hearts that taste like hot cocoa in cloud form.
Strawberry marshmallows: Replace vanilla extract with 1 tablespoon strawberry extract and add pink gel food coloring during the final beating stage. They’re adorable and taste like Valentine’s Day in marshmallow form.
Gluten-free graham crackers: Swap the flours for a 1:1 gluten-free baking blend (about 2 cups total). You might need to add an extra tablespoon of milk if the dough feels too dry. They’re just as delicious, I promise.
White chocolate coating: Use white chocolate melting wafers instead of dark chocolate for a sweeter, more delicate flavor. You can even tint the white chocolate with pink gel food coloring for an extra Valentine’s touch.
Spiced graham crackers: Add ¼ teaspoon nutmeg and a pinch of ground ginger to the graham cracker dry ingredients for a more complex, almost chai-like flavor that pairs beautifully with the vanilla marshmallows.
Mini s’mores: Use 1-inch heart cutters for bite-sized versions that are perfect for parties or Valentine’s classroom treats. You’ll get about 40 mini s’mores instead of 20 regular ones.
Serving, Storage & Reheating
These easy Valentine day desserts are best enjoyed at room temperature when the marshmallows are soft and pillowy. Arrange them on a pretty platter, maybe add some fresh strawberries or raspberries around the edges, and watch them disappear faster than you can say “be mine.”
Store assembled s’mores in an airtight container at room temperature for up to 5 days, with parchment paper between layers to prevent sticking. The graham crackers might soften slightly over time, but honestly, that just makes them more s’more-like.
If you’re making components ahead, store marshmallows in an airtight container for up to 3 weeks, graham crackers in a sealed container for up to 1 week, and assemble with fresh chocolate right before serving. This is perfect if you’re prepping for a Valentine’s party and don’t want last-minute stress.
No-Waste Kitchen Magic
Got leftover marshmallow mixture that won’t fit in your pan? Pour it into a piping bag and pipe little dollops onto parchment paper dusted with your coating mixture — instant homemade marshmallow drops for hot chocolate.
Broken graham crackers that aren’t pretty enough for s’mores? Crush them up and use as a crust for strawberry cream puffs or layer them with yogurt and berries for breakfast parfaits. They’re basically fancy granola at that point.
Extra melted chocolate? Dip pretzels, strawberries, or old fashioned buttermilk donut bars for bonus treats. Or freeze it in ice cube trays and pop them out whenever you need melted chocolate for future projects.
Marshmallow scraps are gold — chop them and fold into rice crispy treats, swirl them into brownie batter before baking, or melt them with butter for an incredibly rich frosting that’ll make any cake taste expensive.
Valentine’s Day S’mores FAQs
Can I freeze Valentine’s Day S’mores?
Yes, but freeze the components separately for best results. Marshmallows can be frozen in airtight containers for up to 2 months, and graham crackers freeze beautifully for up to 3 months. Assemble with fresh chocolate after thawing to room temperature.
What’s the best way to store homemade marshmallows?
Layer them in an airtight container with parchment paper between each layer, and keep at room temperature. They’ll stay fluffy for 2-3 weeks. Don’t refrigerate them — cold temps make marshmallows weepy and sticky.
How do I know when my sugar syrup has reached 240°F?
Use a reliable candy thermometer clipped to the side of your pan, making sure the tip doesn’t touch the bottom. At 240°F (soft-ball stage), a small amount dropped into cold water will form a soft, pliable ball that flattens when removed.
Will these s’mores work for a kid’s Valentine’s party?
Absolutely! Kids go crazy for these. If you’re making them for school, check if there are any gelatin or egg restrictions first. You can skip the optional egg whites and they’ll still turn out great.
What can I substitute for corn syrup in the marshmallows?
You can use ⅓ cup invert syrup or even honey, though honey will add its own flavor. Corn syrup prevents crystallization and gives marshmallows that smooth texture, so if possible, stick with it for best results.
This recipe is just the beginning. Over in the Valentine’s & Spring collection, you’ll find even more dishes that are just as easy and packed with flavor. Go take a peek — your next favorite is waiting.
Time to Make Valentine’s Day S’mores Magic Happen
I’d love to see your spin on these Valentine’s Day S’mores! Drop a comment below with your photos — did you go with chocolate marshmallows or stick with classic vanilla?
These Valentine’s Day S’mores are so versatile; I bet you’ve already got amazing variations in mind. Maybe you’ll make them for your kids’ class party, or surprise your partner with breakfast in bed, or just treat yourself because you deserve something sweet and adorable.
Whether you’re making them for someone special or just because hearts make everything better, these easy Valentine day desserts prove that homemade really is the best kind of love language. Now go make some magic in that kitchen!
I’m Claire Whitmore — a dessert daydreamer from Asheville, NC, where I believe the best recipes are the ones that make you feel something. For me, baking isn’t about perfect pastries — it’s about creating moments that taste like love (and maybe sneaking an extra marshmallow when no one’s looking). 💕