No-Bake Oreo Icebox Cake
No-Bake Oreo Icebox Cake is the kind of dessert that makes you look like a total kitchen genius — no oven, no stress, and honestly, no real effort required. Just four ingredients, a loaf pan, and a little patience while it chills overnight.
We’re talking layers of fluffy homemade whipped cream and classic Oreo cookies that magically transform into a sliceable, dreamy cake in your refrigerator. It’s creamy, it’s cookies-and-cream perfection, and it’s the ultimate easy summer dessert your whole family will beg for on repeat.
Hey there, I’m Claire Whitmore — a pastry whisperer in Asheville, NC, where butter totally counts as self-care. This No-Bake Oreo Icebox Cake recipe has become my go-to whenever summer hits and the idea of turning on the oven sounds absolutely wild.
Table of Contents
Little Snapshot: What This Recipe Delivers
This No-Bake Oreo Icebox Cake is a layered, no-bake dessert made with just four ingredients: heavy whipping cream, powdered sugar, vanilla extract, and a full package of Oreo cookies.
It takes about 20 minutes of prep, chills overnight in the fridge, and serves 12 people beautifully. It’s an easy summer dessert that requires zero baking and delivers maximum wow factor at the table.
Why You’ll Love This Recipe
- This No-Bake Oreo Icebox Cake takes less time to assemble than it does to do a load of laundry — seriously, 20 minutes and you’re done.
- It’s the perfect make-ahead easy summer dessert — you literally have to let it sit overnight, which means dessert is already handled before your guests even arrive.
- With only four ingredients, this layered icebox cake is as minimal and fuss-free as it gets, yet it looks genuinely stunning on a serving plate.
- According to King Arthur Baking’s no-bake recipe collection, the best hot-weather desserts do all their magic in the refrigerator — and this cake is proof of exactly that.
Quick Facts
Here’s the quick scoop on this No-Bake Oreo Icebox Cake.
- CourseDessert
- Prep Time20 minutes
- Cook Time0 minutes
- Chill Time8 hours (overnight is best)
- Total Time8 hours 20 minutes
- Servings12 servings
- DifficultyEasy
Nutritional Peek
Here’s a general per-serving estimate based on 12 servings. Numbers may vary slightly depending on exact ingredient brands used.
| Nutrient | Amount Per Serving |
|---|---|
| Calories | ~310 kcal |
| Total Fat | ~20g |
| Saturated Fat | ~11g |
| Carbohydrates | ~30g |
| Sugar | ~18g |
| Protein | ~3g |
| Fiber | ~1g |
| Sodium | ~180mg |
Ingredients for This No-Bake Oreo Dessert
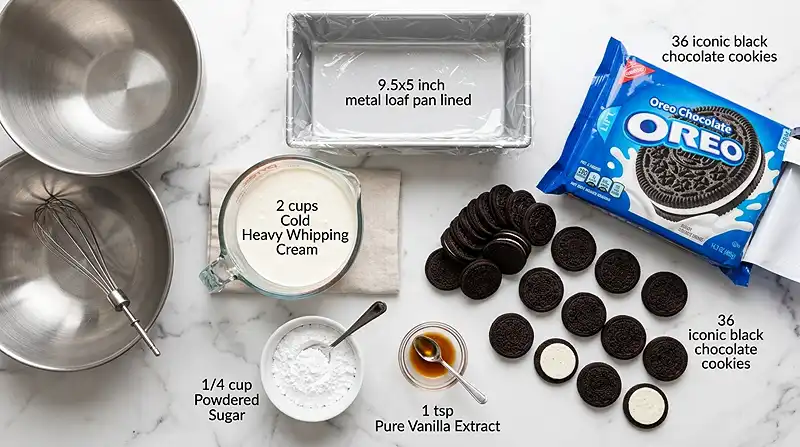
The beauty of this no-bake Oreo dessert is that it uses just four simple ingredients — nothing fancy, nothing hard to find.
For the whipped cream layer — cold heavy whipping cream, powdered sugar, and pure vanilla extract — you’ll want everything cold before you start for the fluffiest results. For the cookie layers, one standard 14.3 oz package of Oreos is exactly what you need, with a few extras set aside for crushing on top if you like a little crunch.
| Amount | Ingredient |
|---|---|
| 2 cups (480ml) | Heavy whipping cream, cold — don’t skimp here, cold cream whips so much better |
| 1/4 cup (30g) | Powdered sugar — it dissolves smoothly, no grittiness |
| 1 tsp | Pure vanilla extract — the real stuff, please |
| 36 cookies (1 standard 14.3 oz package) | Oreo cookies — classic works perfectly, but more on variations below |
There’s a whole world of delicious desserts waiting for you over at the Delicious Desserts collection. Each one is made with the same love and attention, and they’re all absolutely worth trying. Happy cooking!
Tools You’ll Actually Use
- Stand mixer with whisk attachment (or hand mixer with a large bowl)
- Large metal mixing bowl (chilled in the fridge before using)
- 9.5 x 5 inch loaf pan
- Plastic wrap
- Paring knife (for trimming Oreos to fit the edges)
- Rubber spatula
- Serving plate or board
How to Make This No-Bake Oreo Icebox Cake Step by Step
This No-Bake Oreo Icebox Cake comes together in just a few simple steps — the hardest part is genuinely waiting for it to chill.
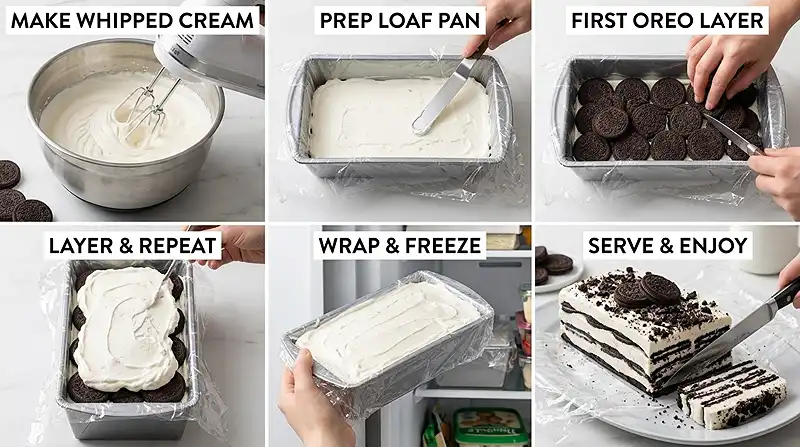
Step 1: Chill Your Bowl
Place the metal bowl of your stand mixer (or a large metal mixing bowl) into the refrigerator to chill for at least 15 to 30 minutes before you start. A cold bowl means your cream whips up faster and holds its shape better — it’s a small step that makes a real difference.
Step 2: Make the Whipped Cream
Add the cold heavy whipping cream, powdered sugar, and vanilla extract into the chilled bowl. Using the whisk attachment on your stand mixer (or a hand mixer), beat on high speed until stiff peaks form — this takes about 1 to 2 minutes. You want the whipped cream to be thick and cloud-like, holding its shape when you lift the whisk.
Step 3: Prep the Loaf Pan
Line your 9.5 x 5 inch loaf pan with plastic wrap, leaving a generous overhang on all four sides. This overhang is your best friend — it’s what lets you lift the whole cake out cleanly when it’s time to serve.
Step 4: Build Your First Layers
Add a thin layer (about 1/4 inch thick) of whipped cream to the bottom of the pan, spreading it all the way to the edges. Then add a layer of Oreo cookies on top. Use a paring knife to trim a few cookies as needed to fill the gaps at the edges — the fit doesn’t need to be perfect, just close.
Step 5: Keep Layering
Add about 1/3 of the remaining whipped cream (roughly 1 cup) on top of the first Oreo layer, spreading it evenly. Add a second layer of Oreos, then spread the next 1/3 of the whipped cream on top. Follow with a third Oreo layer, and finish with the remaining whipped cream on top. Smooth it out gently — this will become the pretty bottom of your cake when you flip it.
Step 6: Wrap and Chill
Fold the plastic wrap overhang over the top of the final whipped cream layer to cover it completely. Place the loaf pan into the refrigerator and let it chill for at least 8 hours — overnight is honestly the best. The cookies will soften into the cream, creating that perfect sliceable, cake-like texture you’re going for.
Step 7: Unmold and Serve
Once the Oreo icebox cake is fully set, place a serving plate upside down on top of the loaf pan. Flip it over confidently, then gently lift the pan away and peel off the plastic wrap. Top with a handful of crushed Oreo cookies for a little extra crunch and visual flair. Slice and enjoy — it’s even better than it looks.
Claire’s Pro Tips for the Perfect No-Bake Oreo Dessert
A few small tricks make this easy no-bake Oreo dessert go from good to genuinely unforgettable. These are the things I’ve learned after making this cake way more times than I can count.
Keep everything cold. This is the single most important tip. Cold cream, cold bowl, cold pan — all of it matters. Warm cream won’t whip properly, and warm equipment slows the whole process down. Pop your bowl in the fridge at least 30 minutes before you start.
Don’t rush the chill time. Eight hours is the minimum, but overnight is truly best. The longer the cake chills, the more the cookies soften into the cream, and the more beautifully it slices. I’ve tried cutting it at 6 hours and it’s just not quite there yet.
Trim your cookies with confidence. The edge Oreos won’t all fit perfectly — just use a sharp paring knife to cut them to size. Nobody’s grading you on the fit, and it all looks gorgeous once sliced.
Be generous with your plastic wrap overhang. Leave way more plastic wrap hanging over the sides than you think you need. You’ll thank yourself when it’s time to cover the top and unmold later.
Quick Fixes for No-Bake Oreo Icebox Cake
Problem: The whipped cream won’t thicken up. Your cream or bowl probably wasn’t cold enough. Pop everything back in the fridge for 15 minutes, then try again. Cold is truly non-negotiable here.
Problem: The cake won’t unmold cleanly. Give it a gentle wiggle before flipping — if it feels stuck, let it sit at room temperature for 2 to 3 minutes first. The plastic wrap lining should make it slide right out.
Problem: The cookies are still crunchy after chilling. It hasn’t chilled long enough. Pop it back in the fridge for another couple of hours. Overnight is always the safest bet for that perfect soft, cake-like texture.
Problem: The whipped cream looks curdled or grainy. You may have over-whipped it. Stop mixing immediately — slowly drizzle in a splash of cold, unwhipped heavy cream and fold gently to bring it back together.
Problem: Slices are falling apart when you cut. Your knife isn’t sharp enough, or the cake needs more chill time. Use a sharp, clean knife and wipe it between each slice for the cleanest cuts.
Variations and Fun Twists
This layered icebox cake is endlessly flexible — once you’ve got the base down, the variations are so fun to play with.
Different Oreo flavors: Golden Oreos, Mint Oreos, Peanut Butter Oreos, or Birthday Cake Oreos all work beautifully. Each one gives the cake a completely different personality.
Flavored whipped cream: Add a tablespoon of cocoa powder, a little espresso powder, or even some peanut butter to the whipped cream before beating for a fun twist on the classic.
Gluten-free version: Swap in your favorite gluten-free chocolate sandwich cookies — the technique stays exactly the same.
Fancy plating: Instead of a loaf pan, press it into a springform pan for a round cake presentation. Garnish with whole Oreos standing upright around the edges for a bakery-worthy look.
Seasonal add-ins: Layer in fresh strawberries or raspberries between the cream and cookies during summer for a fruity twist that’s absolutely gorgeous. For something similar but fruity all the way through, my no-bake strawberry cheesecake lasagna is another crowd-pleaser you’ll love.
Serving, Storage, and Reheating
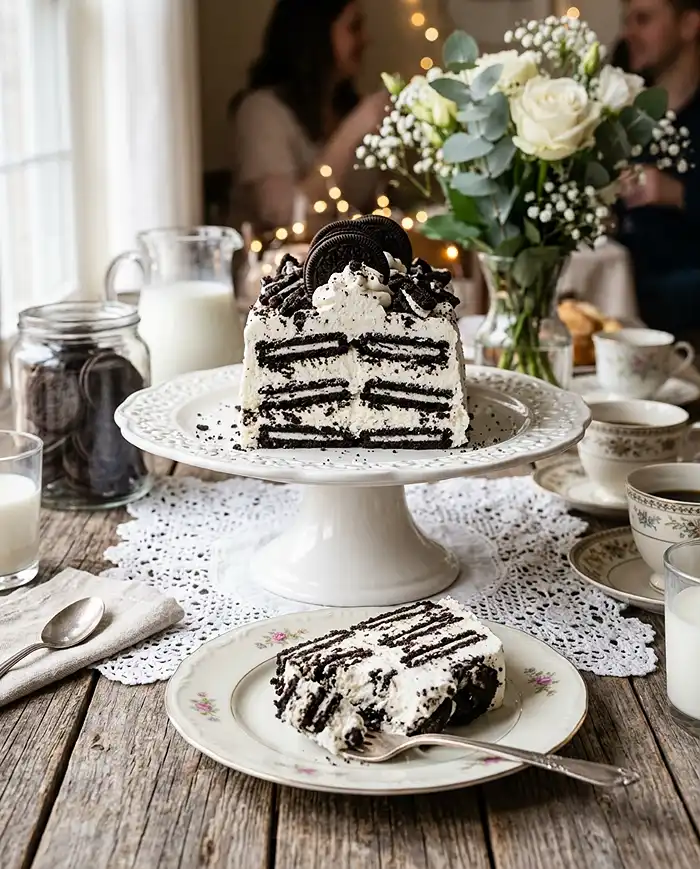
Serve this Oreo icebox cake straight from the fridge — it’s meant to be cold, and it slices best when it’s properly chilled. A warm serving plate will cause it to soften too quickly, so keep everything cool until the moment you’re ready to cut.
If you actually have leftovers (which I genuinely doubt), wrap the slices individually in plastic wrap or store them in an airtight container in the refrigerator. It keeps beautifully for up to 2 days — though the cookies will continue to soften over time, which some people actually love even more.
No reheating needed here — this is a cold dessert through and through. If the cake has been sitting out for a bit and feels too soft to slice neatly, pop it back in the fridge for 20 to 30 minutes and it’ll firm right back up.
No-Waste Kitchen Magic
Got a couple of broken Oreos left in the package? Don’t toss them — crush them up and use as a topping, or stir them into vanilla ice cream for a quick cookies-and-cream treat.
Leftover whipped cream (if you somehow have extra) is gorgeous on hot cocoa, fresh berries, or a bowl of fruit salad. It keeps in the fridge for up to 24 hours — just give it a quick re-whip if it softens slightly.
Serving this alongside a savory meal? Check out my sheet pan lemon herb chicken and potatoes for an easy, complete dinner-and-dessert pairing that requires almost zero cleanup.
FAQs About No-Bake Oreo Icebox Cake
Can I make this No-Bake Oreo Icebox Cake ahead of time?
Yes — and honestly, you should! This cake is best made the night before you plan to serve it. It needs at least 8 hours to chill, and overnight gives the cookies the perfect amount of time to soften into the whipped cream layers.
How long does No-Bake Oreo Icebox Cake last in the fridge?
It’s best eaten within 1 to 2 days of making it. After that, the cookies get quite soft and the whipped cream can start to weep a little. It’s still safe to eat, but the texture is at its peak within the first 48 hours.
Can I freeze this layered icebox cake?
You can, but the texture changes when thawed — the whipped cream can become a bit watery and the cookies lose their pleasant softness. For the best experience, keep it in the fridge and enjoy it fresh within two days.
What’s the best way to get clean slices from this Oreo icebox cake?
Use a sharp knife and wipe it clean between each slice. Run the blade under warm water and dry it, then cut — the warm blade glides through the chilled layers much more cleanly. Don’t saw back and forth; use one confident downward motion.
Why should I use heavy whipping cream instead of regular whipping cream?
Heavy whipping cream has a higher fat content (at least 36%), which means it whips up thicker, holds its shape better, and doesn’t weep as quickly as lighter cream. For a layered dessert that needs to hold structure for hours in the fridge, heavy cream is the only way to go.
A Sweet Close
I hope this No-Bake Oreo Icebox Cake becomes your new warm-weather staple — the one you pull out for backyard gatherings, birthday parties, or just a random Tuesday when you need a little something dreamy.
It’s simple, it’s showstopping, and it proves that some of the best desserts really do come from doing as little as possible. I’d love to see your version of this No-Bake Oreo Icebox Cake! Drop a comment below with your photos — did you try it with a different Oreo flavor? Add fresh berries? Go full extra with the crushed cookie topping? I’m so here for it.
This No-Bake Oreo Icebox Cake is endlessly yours to make your own — and I can’t wait to see how you do it.
I’m Claire Whitmore — a dessert daydreamer from Asheville, NC. For me, baking (and not baking!) isn’t about perfect pastries — it’s about the joy of sharing something sweet and watching the people you love go back for seconds.
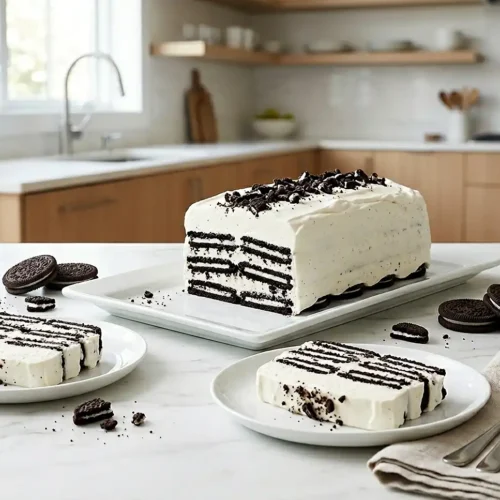
No-Bake Oreo Icebox Cake
Equipment
- Stand mixer or hand mixer
- mixing bowl
- loaf pan
- Plastic wrap
- Paring knife
- Rubber spatula
- Serving plate
Ingredients
Whipped Cream Layer
- 2 cups Heavy whipping cream cold
- ¼ cup Powdered sugar
- 1 tsp Vanilla extract
Cookie Layer
- 36 cookies Oreo cookies
Instructions
- Chill a metal mixing bowl in the refrigerator for 15–30 minutes before starting.
- In the chilled bowl, whip the heavy cream, powdered sugar, and vanilla extract until stiff peaks form.
- Line a loaf pan with plastic wrap, leaving overhang on all sides.
- Spread a thin layer of whipped cream on the bottom, then add a layer of Oreo cookies, trimming as needed to fit.
- Repeat layering with whipped cream and Oreos until all ingredients are used, finishing with whipped cream on top.
- Cover with plastic wrap and refrigerate for at least 8 hours or overnight.
- Flip onto a serving plate, remove plastic wrap, garnish with crushed Oreos if desired, slice, and serve chilled.