Graduation Party Slider Board
Graduation Party Slider Board season is officially here — and honestly? There’s no better way to feed a crowd of proud family members, excited friends, and hungry teenagers all at once.
We’re talking soft Hawaiian rolls, layered with deli meats, melty cheese, fresh toppings, and every spread imaginable — all arranged on one stunning board that looks like you spent hours (but definitely didn’t).
Hey there, I’m Claire Whitmore — a pastry whisperer turned party food obsessive from Asheville, NC, where butter absolutely counts as self-care. This Graduation Party Slider Board recipe is one of my all-time favorite ways to celebrate a milestone without losing your mind in the kitchen.
The first time I made this, it was for my niece’s high school graduation. I panicked, threw everything onto a board, and watched it disappear in under 15 minutes. That was all the confirmation I needed.
Table of Contents
What This Recipe Delivers
This Graduation Party Slider Board features warm, butter-brushed Hawaiian rolls loaded with your choice of deli turkey, ham, or roast beef, layered with cheddar, Swiss, or provolone cheese, and finished with fresh toppings like lettuce, tomato, and pickles.
Prep takes about 20 minutes, baking is just 10 to 12 minutes at 350 degrees F (180 degrees C), and the whole board serves 10 to 12 guests with ease. It’s a low-effort, high-impact graduation party food spread that works for any size crowd.
Why You’ll Love This Recipe
- This Graduation Party Slider Board looks like you hired a caterer — but it takes less effort than parallel parking.
- It’s totally customizable, so even your picky eaters (you know who they are) will find something they love on the board.
- Everything can be prepped the night before, which means less morning chaos and more time to actually enjoy the party.
- According to The Kitchn’s roundup of the best slider recipes for entertaining, build-your-own slider boards are the ultimate party food — and this graduation spread proves exactly why.
Quick Facts
Here’s the quick scoop on this Graduation Party Slider Board.
- CourseMain Dish / Party Appetizer
- Prep Time20 minutes
- Cook Time12 minutes
- Total Time32 minutes
- Servings10 to 12 servings
- DifficultyEasy
Nutritional Peek
Here’s a general estimate per serving (2 sliders), based on a classic turkey and cheddar combination with standard toppings:
| Nutrient | Amount Per Serving |
|---|---|
| Calories | 320 kcal |
| Protein | 18 g |
| Carbohydrates | 28 g |
| Total Fat | 14 g |
| Fiber | 1 g |
| Sugar | 6 g |
Values will vary depending on your protein and cheese choices, spread amounts, and any extras like avocado or bacon.
Ingredients for Your Graduation Party Slider Board
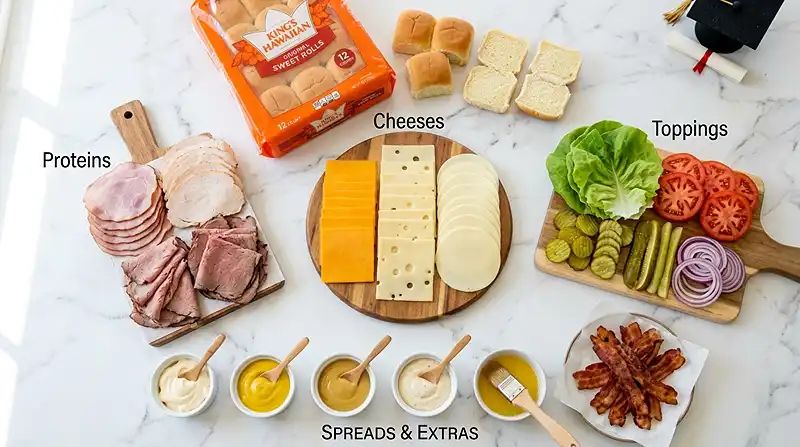
This slider board comes together with a few simple ingredient groups that all play nicely together. Think of it in three layers: your protein base, your cheese layer, and your toppings-and-spreads finishing touch.
For the buns, Hawaiian rolls or mini brioche give you that soft, slightly sweet base that makes sliders irresistible. For the proteins, pick two or three of your favorites — the more variety, the more fun the board looks. And for the toppings and spreads, this is where everyone gets to make it their own.
| Amount | Ingredient |
|---|---|
| 24 | Slider buns (Hawaiian rolls or mini brioche) — the soft, slightly sweet kind, not the fancy artisan sourdough your husband sneaks into the cart |
| 6 oz | Deli turkey, thinly sliced |
| 6 oz | Deli ham, thinly sliced |
| 6 oz | Roast beef, thinly sliced — or swap in grilled chicken if that’s your crowd |
| 6 slices | Cheddar cheese |
| 6 slices | Swiss cheese |
| 6 slices | Provolone cheese |
| 1 cup | Shredded lettuce |
| 2 | Medium tomatoes, thinly sliced |
| 1 cup | Pickle slices |
| 1/2 | Red onion, thinly sliced |
| 1/2 cup | Mayonnaise |
| 1/4 cup | Yellow mustard |
| 1/4 cup | Honey mustard or garlic aioli |
| 3 tbsp | Unsalted butter, melted — yes, real butter; margarine just doesn’t cut it here |
| 6 strips | Crispy bacon, optional but highly encouraged |
| 1 | Ripe avocado, sliced (optional) |
| 24 | Mini toothpicks, for serving |
Tools You’ll Actually Use
- Large baking dish or sheet pan (9×13-inch minimum)
- Sharp serrated knife for slicing buns cleanly
- Pastry brush for buttering the tops
- Aluminum foil
- Large wooden or slate board for assembly
- Small ramekins or bowls for spreads
- Mini toothpicks or decorative party picks
How to Make Your Graduation Party Slider Board Step by Step
This Graduation Party Slider Board comes together faster than you’d expect — here’s exactly how to do it.
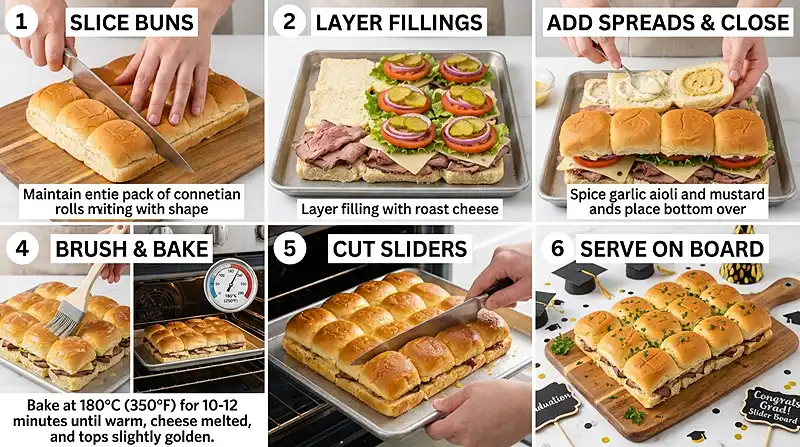
Step 1: Prep Your Buns
Preheat your oven to 180 degrees C (350 degrees F). Using a serrated knife, slice your 24 Hawaiian rolls in half horizontally. If they’re connected in a sheet (which most are), keep them connected — it makes layering so much easier. Place the bottom halves cut-side up in your baking dish.
Step 2: Layer the Proteins
Start with your protein base directly on top of the bottom buns. Layer 6 oz each of deli turkey, ham, and roast beef across the rolls. Distribute them so each section of the pan features a different protein — guests can grab their favorites from different spots on the board later.
Step 3: Add the Cheese
Layer your cheddar, Swiss, and provolone slices directly over the proteins. Overlapping is totally fine and actually helps everything melt together beautifully. The cheese acts as a barrier that keeps the toppings from making the buns soggy — sneaky little trick.
Step 4: Add Toppings
Pile on your lettuce, tomato slices, pickle slices, and red onion over the cheese. Keep the layering generous — this is a celebration, not a light salad situation.
Step 5: Spread the Sauces and Close
Spread mayo, mustard, and honey mustard or garlic aioli across the inside of the top buns. Press the tops down firmly over the fillings to close all the sliders. Don’t be shy about it — they should feel snug.
Step 6: Butter and Bake
Using your pastry brush, coat the tops of all the buns generously with 3 tablespoons of melted butter. Cover the baking dish tightly with aluminum foil and bake for 10 minutes. Then remove the foil and bake another 2 to 3 minutes until the tops are golden and your kitchen smells completely irresistible.
Step 7: Cut and Arrange the Board
Let the sliders cool for 2 to 3 minutes, then use your serrated knife to cut them into individual portions. Arrange them in rows or clusters on your large board. Nestle small bowls of extra spreads around the sliders, and fill in the gaps with chips, pickles, olives, and fresh fruit. Pop in mini graduation-themed toothpicks and you’re done — hello, party centerpiece.
Claire’s Pro Tips and Gentle Guidance
Nailing your graduation party food board is mostly about the prep. A few small choices make a huge difference between “oh that’s nice” and “can I have the recipe immediately?”
The good news: none of these tips require culinary school. Just a little planning and a lot of enthusiasm for feeding people well.
Toast the bottom buns before layering. Pop just the bottom halves in the oven for 3 to 4 minutes before adding the fillings. This creates a slight barrier so the bread doesn’t absorb moisture and go soft before your guests even arrive.
Pick proteins with contrast. Offering turkey, ham, and roast beef gives guests real variety in flavor and color. If you want to simplify, turkey and ham is the crowd-pleasing duo that almost no one says no to.
Make the butter brush count. A little garlic powder or dried Italian seasoning stirred into the melted butter takes those slider tops from basic to bakery-level. Trust me on this one.
Label your proteins on the board. Use small tent cards or write on little chalk tags. It sounds extra, but guests genuinely appreciate knowing what’s what — especially if anyone has dietary preferences. It also makes the board look super intentional and styled.
Quick Fixes for Your Graduation Party Slider Board
My sliders are soggy on the bottom
This usually happens when sauces soak into the bread during baking. Try spreading your sauces only on the inside of the top buns, never on the bottom. You can also lightly toast the bottom buns before assembling to give them a sturdier base.
The cheese isn’t melting properly
Make sure your foil is sealed tightly around the baking dish before the first bake. The trapped steam is what melts the cheese through to the center. If you’re finding the middle sliders still cold, add 2 to 3 extra minutes of covered bake time before pulling the foil.
The tops are getting too brown too quickly
Your oven might run hot — totally normal. Cover with foil for the entire bake and only remove it in the final 2 minutes. You want golden, not charred, so watch them closely that last stretch.
The board looks bare and unimpressive
Gaps are the enemy of a good board. Fill every empty space with something — chips, pickles, olives, fresh grapes, cherry tomatoes, or small herb sprigs like rosemary or basil. The more color and texture variation, the more stunning it looks without any extra effort.
I’m feeding a bigger crowd than expected
This recipe scales up beautifully. Simply double the ingredients and use two baking dishes. Keep the first batch warm in a low oven (around 90 degrees C / 200 degrees F) with foil on top while the second batch bakes. No one will wait long either way.
Variations and Fun Twists
One of the best things about a slider board for party food is how endlessly customizable it is. Here are a few ways to spin it for different crowds and occasions.
Go Italian: Swap in salami, pepperoni, and provolone with a drizzle of pesto aioli. Add roasted red peppers and banana peppers for color and kick.
Make it gluten-free: Substitute the Hawaiian rolls with your favorite gluten-free slider buns. The rest of the ingredients are naturally GF — just double-check your condiment labels.
Try a breakfast slider board: Scrambled eggs, crispy bacon, cheddar, and a smear of garlic butter make a show-stopping morning spread. Perfect for daytime graduation brunch parties.
Add a seasonal twist: In summer, avocado, fresh basil, and sun-dried tomato aioli take the board in a bright, garden-fresh direction. In fall, cranberry mustard and brie are an unexpected and totally delicious pairing with turkey sliders.
Upgrade for fancy guests: Drizzle a little truffle oil on the board, swap regular mayo for a whipped truffle aioli, and use mini brioche rolls. Suddenly it’s a very chic slider situation.
Serving, Storage and Reheating
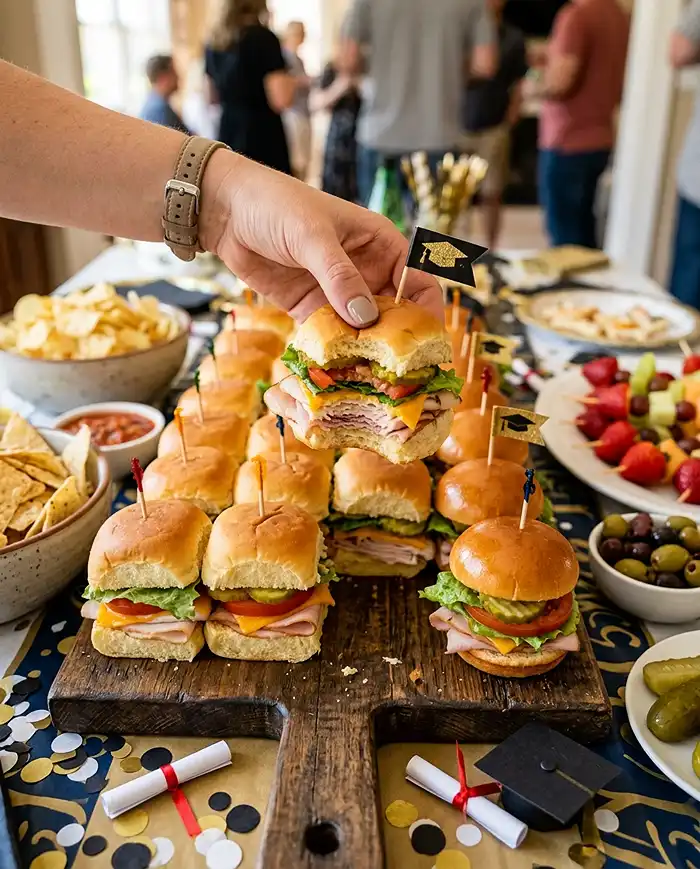
For serving, arrange sliders on your board right before guests arrive. Keep extra batches warm in a low oven covered with foil. Set the spreads, toppings, and sides out in small bowls so guests can customize as they go — this also makes the board interactive and fun.
If you actually have leftovers (which I genuinely doubt), store them in an airtight container in the refrigerator for up to 2 days. Keep any assembled sliders separate from the fresh toppings like lettuce and tomato so nothing goes soggy.
To reheat, pop the sliders (without fresh toppings) in a 160 degrees C (325 degrees F) oven covered with foil for 8 to 10 minutes until warmed through. The microwave works in a pinch — 30 to 45 seconds per slider — but the oven keeps them so much better.
This graduation party food board also pairs beautifully with a few easy sides. Check out this sheet pan lemon herb chicken and potatoes if you want to add a heartier main to the spread alongside your sliders.
Can’t get enough of these flavors? You’re going to love what’s waiting in the Seasonal Celebrations lineup. Every single recipe is made to impress without the stress. Happy cooking, friend!
No-Waste Kitchen Magic
Leftover slider buns? Cube them up and toast in a 180 degree C oven for 10 minutes for the crunchiest homemade croutons you’ve ever had. They’re incredible on soups and salads.
Extra deli meats and cheese make a perfect next-day lunch board — just slice, arrange, and you’ve got a quick antipasto-style plate with zero extra effort.
Any remaining spreads like garlic aioli and honey mustard store well in the fridge for up to a week. Use them as dipping sauces, sandwich spreads, or even a quick dressing base mixed with a little lemon juice and olive oil.
Soft leftover rolls that have lost their texture can be turned into a savory bread pudding bake — layer with egg, cheese, and whatever proteins are left, and bake until golden. Waste nothing, celebrate everything.
Frequently Asked Questions
Can I make this Graduation Party Slider Board the night before?
Yes, you absolutely can — and honestly, I recommend it. Assemble the sliders completely, including the butter brush on top, and cover the dish tightly with foil. Refrigerate overnight. The next day, bake as directed, adding 3 to 5 extra minutes of covered bake time since everything starts cold.
What’s the best way to keep sliders warm at a party?
The best way is to keep assembled sliders covered with foil in a low oven at around 90 degrees C (200 degrees F). They’ll stay warm and soft for up to an hour without drying out. A slow cooker on the warm setting with the lid slightly cracked also works great for longer parties.
How do I know when the sliders are done baking?
Your sliders are done when the tops are golden and slightly glossy from the butter, and the cheese is fully melted through to the center. Give the middle slider a gentle press — it should feel warm throughout. If the center still feels cold, cover and add 3 more minutes.
Will Hawaiian rolls work better than brioche buns for this recipe?
Hawaiian rolls are the classic choice for slider boards because their slight sweetness balances savory fillings perfectly. They also hold together better during baking and are easier to find in connected sheets, which makes assembly much faster. Mini brioche works beautifully too for a slightly richer, more indulgent result.
Is this slider board recipe good for large crowds?
It’s genuinely one of the best graduation party food ideas for feeding a crowd. The recipe doubles and triples easily, uses accessible ingredients, and can be partially prepped ahead. For groups over 30, batch-bake in waves and keep finished sliders warm in the oven while the next pan bakes.
Let’s Celebrate That Grad
This Graduation Party Slider Board is one of those recipes that just makes everyone happy — the host, the grad, the guests, the picky eaters, the hungry uncles, all of them.
It’s the kind of food that photographs beautifully, disappears quickly, and earns you the title of “person who always brings the best thing.” And if you’re looking for a sweet finish to round out your party spread, you have to see this no-bake strawberry cheesecake lasagna — it’s every bit as showstopping and just as easy to pull off.
I’d love to see your version of this Graduation Party Slider Board! Drop a comment below with your photos and any fun twists you made to the board. Did you go Italian? Add avocado? Use a different cheese situation? Tell me everything — I love hearing how you made it your own.
I’m Claire Whitmore — a dessert daydreamer and party food enthusiast from Asheville, NC. For me, cooking for a crowd isn’t about perfection — it’s about creating a table that feels warm, abundant, and full of love. Plus maybe sneaking one slider before the guests arrive. Just the one. Okay, two.
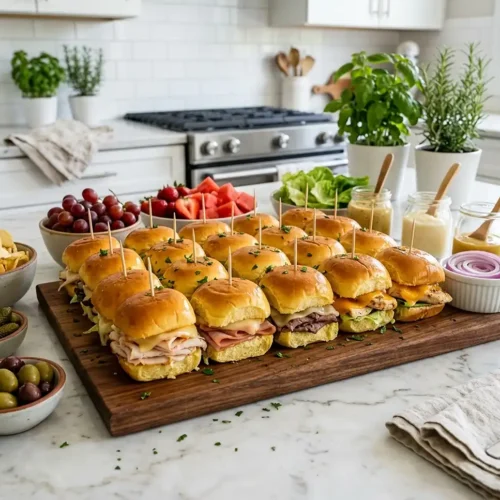
Graduation Party Slider Board
Equipment
- Large baking dish or sheet pan
- Serrated knife
- Pastry brush
- Aluminum foil
- Serving board
- Small bowls or ramekins
- Toothpicks
Ingredients
Slider Base
- 24 Slider buns Hawaiian rolls or mini brioche
Proteins
- 6 oz Deli turkey thinly sliced
- 6 oz Deli ham thinly sliced
- 6 oz Roast beef thinly sliced
Cheese
- 6 slices Cheddar cheese
- 6 slices Swiss cheese
- 6 slices Provolone cheese
Toppings
- 1 cup Shredded lettuce
- 2 Tomatoes thinly sliced
- 1 cup Pickle slices
- ½ Red onion thinly sliced
Spreads and Extras
- ½ cup Mayonnaise
- ¼ cup Yellow mustard
- ¼ cup Honey mustard or garlic aioli
- 3 tbsp Unsalted butter melted
- 6 strips Bacon cooked, optional
- 1 Avocado sliced, optional
- 24 Toothpicks for serving
Instructions
- Preheat the oven to 180°C (350°F). Slice the slider buns in half horizontally and place the bottom halves in a baking dish.
- Layer the deli turkey, ham, and roast beef evenly over the bottom buns.
- Add slices of cheddar, Swiss, and provolone cheese over the meats.
- Top with shredded lettuce, sliced tomatoes, pickles, and red onion.
- Spread mayonnaise, mustard, and honey mustard or aioli on the inside of the top buns, then place them over the sliders.
- Brush the tops with melted butter, cover with foil, and bake for 10 minutes. Remove foil and bake an additional 2–3 minutes until golden.
- Let cool slightly, cut into individual sliders, and arrange on a serving board with additional toppings and spreads.