Easy Peanut Butter Balls Recipe
These easy peanut butter balls require just 5 ingredients and 20 minutes to make the ultimate no-bake chocolate peanut butter treat. Perfect for busy holiday baking!
Hey there, I’m Claire Whitmore — a pastry whisperer in Asheville, NC, where butter totally counts as self-care. This easy peanut butter balls recipe is my go-to when I need something seriously delicious without the fuss. We’re talking creamy peanut butter centers wrapped in smooth chocolate, ready in under 30 minutes with just five simple ingredients.
These no-bake peanut butter balls are basically the Swiss Army knife of holiday treats — perfect for cookie exchanges, last-minute potlucks, or those moments when you need chocolate immediately. The best part? You probably already have everything sitting in your pantry right now.
Table of Contents
Little Snapshot: What This Recipe Delivers
So glad you tried this one! The Candy & Small Bites collection has even more recipes that are just as comforting and crowd-pleasing. Go ahead, take a look — your next favorite dish is right there.
These easy peanut butter balls combine creamy peanut butter, butter, and powdered sugar into smooth 1-inch truffles, then get dipped in melted chocolate for the ultimate sweet-and-salty treat. With just 20 minutes of prep and no oven required, you’ll have 36 crowd-pleasing chocolate peanut butter candies ready for any occasion.
Why You’ll Love This Recipe 🌸
- This easy peanut butter balls recipe takes less time than scrolling through your Instagram feed — seriously, 20 minutes and you’re done.
- Only five ingredients stand between you and chocolate-peanut butter bliss, and they’re all pantry staples you probably have right now.
- No oven means no waiting around, no burnt edges, and honestly? No stress — just mix, roll, dip, and devour.
- According to King Arthur Baking’s guide to effortless holiday candies, the best treats combine minimal ingredients with maximum flavor — and these peanut butter balls prove exactly why.
Quick Facts ⚡
Here’s the quick scoop on this easy peanut butter balls recipe.
- CourseDessert
- Prep Time20 minutes
- Cook Time0 minutes
- Total Time20 minutes (plus chilling)
- Servings36 balls
- DifficultyEasy

Easy Peanut Butter Balls
Equipment
- mixing bowl
- Hand mixer
- Cookie sheet
- Wax paper or parchment paper
- Cookie scoop (1-inch)
- Microwave-safe bowl
- Toothpicks
Ingredients
For the Peanut Butter Filling
- 1 cup creamy peanut butter 283g
- 6 tablespoons butter, softened 84g
- 2 ¾ cups powdered sugar 311g
- 1 teaspoon vanilla extract
For the Chocolate Coating
- 10 ounces chocolate melting wafers 1 package, Ghirardelli or Candiquik
Instructions
- In a mixing bowl, beat the 1 cup creamy peanut butter and 6 tablespoons softened butter together with a hand mixer until smooth and fluffy — about 2 minutes. You want it light and airy, not chunky.
- Slowly add the 2 ¾ cups powdered sugar to the peanut butter mixture, mixing on low speed to avoid a sugar tornado in your kitchen. Once it’s all incorporated, add the 1 teaspoon vanilla extract and beat until the mixture comes together into a thick, cookie-dough-like consistency.
- Line a large cookie sheet with wax paper or parchment paper — this prevents your peanut butter balls from sticking and makes cleanup a breeze.
- Using a 1-inch cookie scoop (or a tablespoon), scoop portions of the peanut butter mixture and roll them between your palms into smooth balls. Place each ball on the prepared cookie sheet. Continue until all the mixture is used — you should get about 36 balls.
- Pop the cookie sheet into the refrigerator for 20 minutes until the peanut butter balls are firm and slightly hardened. This step is crucial — cold balls dip way better and won’t fall apart in the chocolate.
- While the balls chill, place the 10 ounces of chocolate melting wafers in a microwave-safe bowl. Microwave for 30 seconds, then stir. If the chocolate isn’t completely melted, heat for another 10 seconds, stir, and repeat until smooth and glossy. Don’t rush this — overheating chocolate makes it grainy.
- Remove the chilled peanut butter balls from the refrigerator. Insert a toothpick into one ball, then dip it into the melted chocolate, turning gently until completely covered. Let any excess chocolate drip back into the bowl, then place the coated ball back on the lined cookie sheet. Repeat with remaining balls.
- Allow the chocolate coating to harden completely at room temperature (about 30 minutes) or speed things up by chilling them in the fridge for 10 minutes. Once set, gently remove any visible toothpick marks by smoothing them over with your finger or a tiny bit of melted chocolate.
- Transfer your gorgeous peanut butter balls to an airtight container. Store in the refrigerator for up to 5 days — if they last that long.
Notes
Nutritional Peek
Here’s a quick look at what you’re getting per peanut butter ball — because knowing never hurts, even when we’re indulging.
| Nutrient | Amount per Serving |
|---|---|
| Calories | 110 kcal |
| Protein | 2g |
| Carbohydrates | 12g |
| Fat | 6g |
| Fiber | 1g |
| Sugar | 10g |
Note: Nutritional values are approximate and may vary based on specific brands used.
Ingredients
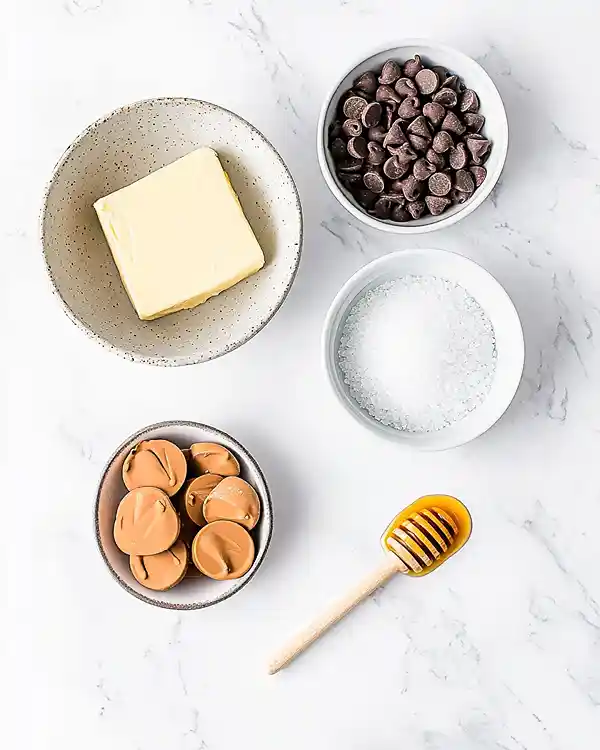
Let me walk you through what makes these chocolate candy ideas come to life — spoiler alert, it’s a tiny ingredient list that packs major flavor.
For the peanut butter filling, you’ll need creamy peanut butter, softened butter, and powdered sugar to create that melt-in-your-mouth center.
A splash of vanilla extract adds warmth and depth, while the chocolate coating — I’m talking quality melting wafers like Ghirardelli or Candiquik — gives you that smooth, professional finish without any tempering drama.
| Amount | Ingredient |
|---|---|
| 1 cup (283g) | Creamy peanut butter (yes, the smooth kind — chunky rebels can sit this one out) |
| 6 tablespoons (84g) | Butter, softened (real butter, not margarine — we’re not monsters here) |
| 2 ¾ cups (311g) | Powdered sugar |
| 1 teaspoon | Vanilla extract |
| 10 ounces (1 package) | Chocolate melting wafers (Ghirardelli or Candiquik work beautifully) |
Tools You’ll Actually Use
You won’t need fancy equipment for this peanut butter balls recipe — just a few basics you probably already own:
- Mixing bowl (medium or large)
- Hand mixer (or a strong arm and a wooden spoon)
- Cookie sheet (for chilling)
- Wax paper or parchment paper (to prevent sticking)
- Cookie scoop (1-inch size makes uniform balls so easy)
- Microwave-safe bowl (for melting chocolate)
- Toothpicks (your dipping assistants)
Step-by-Step Instructions
Let’s make these easy peanut butter balls happen — I promise, it’s ridiculously simple.
Step 1: Cream the peanut butter base
In a mixing bowl, beat the 1 cup creamy peanut butter and 6 tablespoons softened butter together with a hand mixer until smooth and fluffy — about 2 minutes. You want it light and airy, not chunky.
Step 2: Add the powdered sugar gradually
Slowly add the 2 ¾ cups powdered sugar to the peanut butter mixture, mixing on low speed to avoid a sugar tornado in your kitchen. Once it’s all incorporated, add the 1 teaspoon vanilla extract and beat until the mixture comes together into a thick, cookie-dough-like consistency.
Step 3: Prep your workspace
Line a large cookie sheet with wax paper or parchment paper — this prevents your peanut butter balls from sticking and makes cleanup a breeze.
Step 4: Roll the peanut butter balls
Using a 1-inch cookie scoop (or a tablespoon), scoop portions of the peanut butter mixture and roll them between your palms into smooth balls. Place each ball on the prepared cookie sheet. Continue until all the mixture is used — you should get about 36 balls.
Step 5: Chill the balls
Pop the cookie sheet into the refrigerator for 20 minutes until the peanut butter balls are firm and slightly hardened. This step is crucial — cold balls dip way better and won’t fall apart in the chocolate.
Step 6: Melt the chocolate
While the balls chill, place the 10 ounces of chocolate melting wafers in a microwave-safe bowl. Microwave for 30 seconds, then stir. If the chocolate isn’t completely melted, heat for another 10 seconds, stir, and repeat until smooth and glossy. Don’t rush this — overheating chocolate makes it grainy.
Step 7: Dip and coat
Remove the chilled peanut butter balls from the refrigerator. Insert a toothpick into one ball, then dip it into the melted chocolate, turning gently until completely covered. Let any excess chocolate drip back into the bowl, then place the coated ball back on the lined cookie sheet. Repeat with remaining balls.
Step 8: Let them set
Allow the chocolate coating to harden completely at room temperature (about 30 minutes) or speed things up by chilling them in the fridge for 10 minutes. Once set, gently remove any visible toothpick marks by smoothing them over with your finger or a tiny bit of melted chocolate.
Step 9: Serve and store
Transfer your gorgeous peanut butter balls to an airtight container. Store in the refrigerator for up to 5 days — if they last that long.
Claire’s Pro Tips & Gentle Guidance
Here’s where I share the little secrets that make your peanut butter balls recipe absolutely foolproof.
Soften that butter properly. Room-temperature butter blends way better with peanut butter — if yours is still cold, microwave it for just 5–10 seconds until softened but not melted.
Use a cookie scoop for uniformity. A 1-inch scoop ensures every peanut butter ball is the same size, which means they chill evenly and look professionally perfect when dipped.
Chill before dipping — seriously, don’t skip this. Cold peanut butter balls hold their shape in warm chocolate, while room-temp ones get mushy and slide right off the toothpick. Trust me, I learned this the messy way.
Work quickly with chocolate. Melted chocolate starts to thicken as it cools, so if it gets too thick while you’re dipping, just pop it back in the microwave for 10 seconds to loosen it up again.
For smoother chocolate coverage, use candy melts. According to Wilton‘s trusted candy-making techniques , candy melts are formulated to stay fluid longer than regular chocolate, giving you more working time and a professional finish — and this recipe proves exactly why they’re worth it.
Quick Fixes for Easy Peanut Butter Balls
Even the simplest recipes can throw you a curveball — here’s how to troubleshoot like a pro.
Problem: The peanut butter mixture is too dry and crumbly.
Add 1–2 tablespoons of softened butter or a splash of milk, mixing until the dough comes together. Sometimes peanut butter brands vary in oil content, so a little extra fat fixes everything.
Problem: The peanut butter balls keep falling off the toothpick while dipping.
Your balls aren’t cold enough — pop them back in the fridge for another 10 minutes. Cold = firm = easier dipping.
Problem: The chocolate coating is lumpy or grainy.
You overheated the chocolate, which causes it to seize. Start fresh with new melting wafers and heat in shorter 10-second bursts, stirring frequently.
Problem: There are toothpick holes visible on the finished balls.
After the chocolate sets, dab a tiny bit of melted chocolate over the hole with your fingertip or a toothpick to seal it smooth.
Variations & Fun Twists
Once you’ve mastered these easy peanut butter balls, the flavor possibilities are endless.
For a salty-sweet upgrade, sprinkle flaky sea salt on top of the wet chocolate coating before it sets — it’s literally addictive.
Make them gluten-free by using certified gluten-free powdered sugar and chocolate (most brands are naturally gluten-free, but always double-check labels).
Try different coatings like white chocolate, dark chocolate, or even a drizzle of contrasting chocolate on top for a fancy finish.
Add mix-ins to the peanut butter base like mini chocolate chips, crushed pretzels, or Rice Krispies for extra crunch and texture.
Go festive by rolling the chocolate-coated balls in sprinkles, crushed candy canes, or finely chopped nuts before the coating sets.
Serving, Storage & Reheating
Let’s talk about how to keep these chocolate peanut butter candies fresh and delicious.
Serve these peanut butter balls straight from the fridge for the best texture — they’re firm, smooth, and absolutely perfect for passing around at parties or stacking on a dessert table with these Oreo truffle stuffed strawberries.
Store your peanut butter balls in an airtight container in the refrigerator for up to 5 days. Layer them between sheets of wax paper to prevent sticking, and honestly, they taste even better on day two once the flavors have melded together.
Reheating isn’t necessary (or recommended) since these are meant to be enjoyed chilled. If you want a softer texture, just let them sit at room temperature for 5–10 minutes before serving — but don’t leave them out too long or the chocolate will get soft and fingerprint-y.
No-Waste Kitchen Magic
Got leftover ingredients or extras? Here’s how to use every bit.
Leftover melted chocolate? Drizzle it over chocolate strawberry yogurt clusters or use it to dip pretzels, graham crackers, or fresh fruit for instant snacks.
Extra peanut butter mixture? Roll it into smaller bite-sized balls, skip the chocolate coating, and roll them in cocoa powder or powdered sugar for simple peanut butter bites.
Day-old peanut butter balls that got a little too warm? Crumble them over vanilla ice cream, fold them into brownies before baking, or blend them into a milkshake for the ultimate treat.

Easy Peanut Butter Balls FAQs
Can I freeze these easy peanut butter balls?
Absolutely! Freeze them in a single layer on a cookie sheet until solid, then transfer to a freezer-safe container for up to 3 months. Thaw in the fridge before serving.
What’s the best way to store peanut butter balls?
Keep them in an airtight container in the refrigerator for up to 5 days. They need to stay cold to maintain that perfect firm-but-creamy texture.
Can I use natural peanut butter instead of regular?
I’d skip natural peanut butter for this recipe — the oil separation makes the mixture too loose and greasy. Stick with regular creamy peanut butter (like Jif or Skippy) for the best texture.
How do I know when the chocolate coating is ready?
The chocolate should be completely smooth, glossy, and easily drippable off a spoon. If it’s thick or clumpy, heat it for another 10 seconds and stir.
Why should I use melting wafers instead of chocolate chips?
Melting wafers are formulated to melt smoothly and set with a nice sheen, while chocolate chips contain stabilizers that keep them from melting evenly. For dipping, melting wafers give you that professional candy-shop finish.
What can I serve with peanut butter balls?
Pair them with fried strawberry cheesecake sandwiches for an indulgent dessert spread, or serve alongside this refreshing lava flow drink for a tropical-meets-chocolate party vibe.
Cozy Closing
And there you have it — the easiest peanut butter balls you’ll ever make, and probably the first dessert to disappear at any gathering. These little chocolate-covered bites are proof that the best recipes don’t need to be complicated to be absolutely crave-worthy.
I’d love to see your spin on this easy peanut butter balls recipe! Drop a comment below with your photos or any fun variations you tried — I seriously live for hearing how you made them your own. Did you add sprinkles? Try white chocolate? Sneak in some crushed Oreos? Tell me everything!
I’m Claire Whitmore — a dessert daydreamer from Asheville, NC. For me, baking isn’t about perfect pastries — it’s about the joy of sharing something sweet (and maybe sneaking an extra peanut butter ball when no one’s looking).