Old Time Fudge Recipe
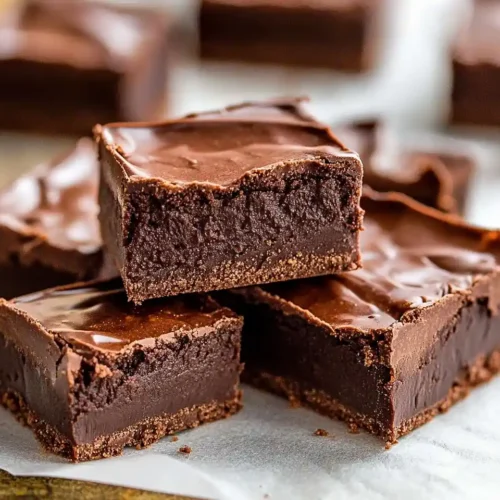
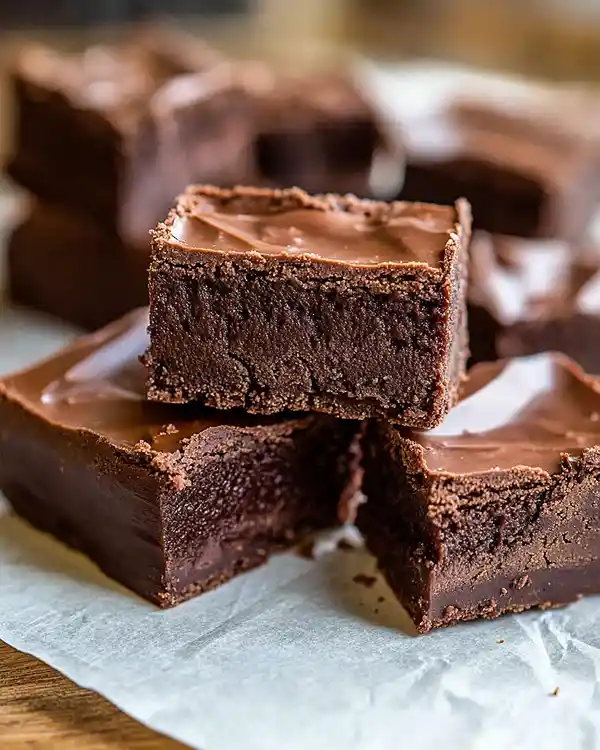
Old Time Fudge is a creamy, rich chocolate fudge made with simple ingredients and traditional candy-making techniques. This vintage recipe delivers smooth, melt-in-your-mouth fudge that’s perfect for gift-giving or satisfying your sweet tooth.
Hey there, I’m Claire Whitmore — a pastry whisperer in Asheville, NC, where butter totally counts as self-care. This Old Time Fudge recipe is everything you’d hope for in homemade chocolate fudge: silky-smooth, incredibly rich, and made with just six simple ingredients you probably already have in your pantry.
We’re talking granulated sugar, unsweetened cocoa powder, whole milk, butter, vanilla extract, and a pinch of salt — nothing fancy, just old-fashioned goodness that delivers a melt-in-your-mouth texture every single time.
This vintage-style fudge recipe relies on traditional candy thermometer techniques instead of marshmallow fluff shortcuts, which means you get that authentic grainy-yet-creamy texture that makes old fashioned chocolate fudge so nostalgic and comforting. It’s perfect for holiday gift boxes, potluck desserts, or those moments when you need chocolate therapy in its purest form.
Table of Contents
Little Snapshot: What This Recipe Delivers
Old Time Fudge is a classic chocolate fudge recipe that uses a candy thermometer and traditional beating method to create incredibly smooth, rich fudge in about 90 minutes (most of that is hands-off cooling time).
You’ll cook a simple mixture of sugar, cocoa, and milk to exactly 234°F, then beat it by hand until it thickens into that signature creamy-yet-slightly-grainy texture that makes homemade fudge so irresistible.
Why You’ll Love This Recipe 🌸
- This Old Time Fudge uses just six ingredients and tastes way better than anything you’d buy at the store — plus it makes your kitchen smell like a chocolate dream.
- It’s the perfect make-ahead treat for holidays, teacher gifts, or cookie swaps — you can whip up a batch and stash it for weeks (if it lasts that long).
- The traditional candy-making method means you get that authentic texture that’s silky but still has a little bite — not too soft, not too hard, just right.
- According to Serious Eats in their comprehensive fudge-making guide, controlling temperature and beating at the right time are the secrets to perfect fudge — and this recipe walks you through both with zero guesswork.
Quick Facts ⚡
Here’s the quick scoop on this Old Time Fudge.
- CourseDessert
- Prep Time10 minutes
- Cook Time45 minutes
- Total Time1 hour 25 minutes (includes cooling)
- Servings20 squares
- DifficultyMedium
Old Time Fudge
Equipment
- 8-inch square baking pan
- Parchment paper
- Medium heavy-bottomed saucepan
- Candy thermometer
- Wooden spoon
- mixing bowl
- Spatula
Ingredients
- 3 cups Granulated sugar
- ⅔ cup Unsweetened cocoa powder Dutch processed
- ⅛ teaspoon Salt increase to 1/4 teaspoon if using unsalted butter
- 1 ½ cups Whole milk
- ¼ cup Salted butter room temperature
- 1 teaspoon Pure vanilla extract
Instructions
- Line your 8-inch square pan with buttered parchment paper, making sure the paper hangs over the edges a bit so you can easily lift the fudge out later. This step saves you so much hassle when it’s time to cut your squares.
- In a medium heavy-bottomed saucepan, whisk together the 3 cups granulated sugar, 2/3 cup unsweetened cocoa powder, and 1/8 teaspoon salt until there are no lumps. Add the 1 1/2 cups whole milk and stir everything together with a wooden spoon (metal spoons can affect the cooking temperature).
- Place the saucepan over medium heat and stir constantly with your wooden spoon until the mixture reaches a strong, rolling boil — this usually takes about 15 minutes. You’ll see big bubbles breaking the surface, and the mixture will start to smell deeply chocolatey.
- Once boiling, reduce the heat to medium-low and clip your candy thermometer to the side of the pan (make sure the bulb isn’t touching the bottom). Stop stirring completely now — this is important! Let the mixture cook undisturbed until it reaches exactly 234°F (112°C), which takes around 30 minutes. This is the soft-ball stage, and it’s what gives fudge that perfect texture.
- Remove the pan from heat the moment it hits 234°F. Add the 1/4 cup room-temperature salted butter and 1 teaspoon vanilla extract on top, but don’t stir them in — just let them sit there. This seems weird, but it’s the secret to smooth fudge. Let the mixture cool completely at room temperature for about 30 minutes until it reaches 110°F (43°C).
- Once the mixture has cooled to 110°F, grab your wooden spoon and start beating vigorously. You’ll stir continuously for 6-8 minutes, and you’ll notice the fudge gradually lose its glossy shine and start to thicken. Your arm might get tired (this is your workout for the day), but keep going until the mixture starts to hold its shape and looks slightly matte.
- Quickly spread the beaten fudge into your prepared pan using a spatula — work fast because it sets up quickly once it loses that gloss. Smooth the top as best you can, then let it cool completely at room temperature. For the best texture, let it set overnight before cutting.
- Once your Old Time Fudge is completely set and cool, use the parchment paper to lift it out of the pan. Cut into 20 squares using a sharp knife (wipe the knife between cuts for clean edges). Now comes the hard part: not eating all of it in one sitting.
Notes
Old Time Fudge Nutritional Peek
| Nutrient | Amount per Serving |
|---|---|
| Calories | 145 kcal |
| Total Fat | 3g |
| Saturated Fat | 2g |
| Carbohydrates | 30g |
| Sugar | 28g |
| Protein | 1g |
| Fiber | 1g |
| Sodium | 35mg |
Note: Nutritional values are approximate and based on 20 servings.
One recipe down, and so many more to explore! Head over to our complete Delicious Desserts lineup for more delicious ideas that’ll keep your kitchen buzzing. Bookmark this one — you’ll thank yourself later.
Old Time Fudge Ingredients
The best homemade fudge recipes start with quality ingredients — and this one’s no exception. For the base mixture, you’ll need granulated sugar, unsweetened Dutch-processed cocoa powder, and a pinch of salt to balance the sweetness and deepen that chocolate flavor.
Whole milk creates the creamy texture, while room-temperature salted butter and pure vanilla extract add richness and that classic fudge aroma that’ll have everyone asking what you’re making.
| Amount | Ingredient |
|---|---|
| 3 cups | Granulated sugar |
| 2/3 cup | Unsweetened cocoa powder (Dutch processed) |
| 1/8 teaspoon | Salt (increase to 1/4 teaspoon if using unsalted butter) |
| 1 1/2 cups | Whole milk |
| 1/4 cup | Salted butter, room temperature |
| 1 teaspoon | Pure vanilla extract |
Yes, use real butter here — margarine just doesn’t give you that rich, melt-in-your-mouth quality. And if your cocoa powder has been sitting in the pantry for two years, maybe grab a fresh container. Trust me on this.
Tools You’ll Actually Use
- 8-inch square baking pan
- Parchment paper
- Medium heavy-bottomed saucepan
- Candy thermometer (this is non-negotiable!)
- Wooden spoon (avoid metal spoons for stirring)
- Mixing bowl or heatproof surface for cooling
- Butter or cooking spray for greasing
Step-by-Step Instructions
Making Old Time Fudge is all about patience and precision — but don’t worry, I’ll walk you through every step so you know exactly what to look for.
Step 1: Prep the Pan
Line your 8-inch square pan with buttered parchment paper, making sure the paper hangs over the edges a bit so you can easily lift the fudge out later. This step saves you so much hassle when it’s time to cut your squares.
Step 2: Mix the Base
In a medium heavy-bottomed saucepan, whisk together the 3 cups granulated sugar, 2/3 cup unsweetened cocoa powder, and 1/8 teaspoon salt until there are no lumps. Add the 1 1/2 cups whole milk and stir everything together with a wooden spoon (metal spoons can affect the cooking temperature).
Step 3: Boil the Mixture
Place the saucepan over medium heat and stir constantly with your wooden spoon until the mixture reaches a strong, rolling boil — this usually takes about 15 minutes. You’ll see big bubbles breaking the surface, and the mixture will start to smell deeply chocolatey.
Step 4: Simmer & Monitor Temperature
Once boiling, reduce the heat to medium-low and clip your candy thermometer to the side of the pan (make sure the bulb isn’t touching the bottom).
Stop stirring completely now — this is important! Let the mixture cook undisturbed until it reaches exactly 234°F (112°C), which takes around 30 minutes. This is the soft-ball stage, and it’s what gives fudge that perfect texture.
Step 5: Add Butter & Vanilla
Remove the pan from heat the moment it hits 234°F. Add the 1/4 cup room-temperature salted butter and 1 teaspoon vanilla extract on top, but don’t stir them in — just let them sit there. This seems weird, but it’s the secret to smooth fudge. Let the mixture cool completely at room temperature for about 30 minutes until it reaches 110°F (43°C).
Step 6: Beat the Fudge
Once the mixture has cooled to 110°F, grab your wooden spoon and start beating vigorously. You’ll stir continuously for 6-8 minutes, and you’ll notice the fudge gradually lose its glossy shine and start to thicken.
Your arm might get tired (this is your workout for the day), but keep going until the mixture starts to hold its shape and looks slightly matte.
Step 7: Set the Fudge
Quickly spread the beaten fudge into your prepared pan using a spatula — work fast because it sets up quickly once it loses that gloss. Smooth the top as best you can, then let it cool completely at room temperature. For the best texture, let it set overnight before cutting.
Step 8: Cut & Serve
Once your Old Time Fudge is completely set and cool, use the parchment paper to lift it out of the pan. Cut into 20 squares using a sharp knife (wipe the knife between cuts for clean edges). Now comes the hard part: not eating all of it in one sitting.
Claire’s Pro Tips & Gentle Guidance
These best homemade fudge recipes can be a little finicky, but I’ve got your back with the lessons I learned the hard way (so you don’t have to).
First things first: invest in a good candy thermometer if you don’t have one already. I tried making fudge “by feel” once, and it turned into chocolate soup. Temperature matters here more than almost any other recipe.
Don’t stir the fudge mixture once it starts simmering at medium-low heat. I know it’s tempting, but stirring can cause sugar crystals to form, which leads to grainy, crumbly fudge instead of that smooth, creamy texture we’re after.
The cooling step before beating is crucial — if you start beating too early while the mixture is still hot, your fudge won’t set properly. Wait until it hits 110°F (it should feel barely warm to the touch). If you don’t have a thermometer, wait until you can comfortably hold your hand against the bottom of the pan for a few seconds.
When you’re beating the fudge, you’ll know it’s ready when it starts to lose its shine and thicken noticeably. It should look slightly matte and hold its shape when you lift the spoon. If you beat it too long, it’ll become crumbly, so work it into the pan as soon as it thickens.
For even more expert candy-making guidance , King Arthur Baking’s detailed resource on candy techniques covers everything from humidity concerns to altitude adjustments — super helpful if you’re new to working with candy thermometers.
Quick Fixes for Old Time Fudge
Problem: My fudge turned out grainy and crumbly instead of smooth.
This usually happens when sugar crystals form during cooking — either from stirring too much during the simmering phase or from beating the fudge before it cooled enough.
Next time, resist the urge to stir once it’s simmering, and make absolutely sure the mixture cools to 110°F before beating.
Problem: My fudge never set up and stayed too soft.
You probably didn’t cook it to the full 234°F, which means there’s too much moisture left in the mixture.
A candy thermometer is essential here — eyeballing it just doesn’t work. If this happens, you can try reheating the mixture gently to reach the right temperature, then cool and beat again.
Problem: My fudge is too hard and dry.
You likely cooked it past 234°F or beat it for too long after cooling. Fudge has a pretty narrow window for perfection. If it’s too hard, you can try warming small pieces slightly to soften them, or crumble the fudge over ice cream (not a total loss!).
Problem: The fudge seized up too fast when I was trying to spread it.
This happens when you wait too long to pour after beating. As soon as the fudge loses its gloss and thickens, get it into the pan immediately — it sets up fast. Keep your prepared pan right next to you so you’re ready to go.
Variations & Fun Twists
This old fashioned chocolate fudge is delicious as-is, but here are some fun ways to make it your own.
Nutty Old Time Fudge: Stir in 1 cup of chopped walnuts, pecans, or toasted almonds right after beating the fudge and before pouring it into the pan. The crunch is amazing against that smooth chocolate.
Peppermint Fudge: Add 1/2 teaspoon peppermint extract along with the vanilla, and fold in 1/2 cup crushed candy canes or peppermint candies after beating. Perfect for Christmas gift boxes.
Espresso Fudge: Add 1 tablespoon instant espresso powder to the cocoa mixture before cooking. The coffee deepens the chocolate flavor and adds a sophisticated edge.
Salted Caramel Swirl: Drizzle 1/4 cup store-bought or homemade caramel sauce over the fudge right after spreading it in the pan, then swirl with a knife. Sprinkle with flaky sea salt for a sweet-salty combo.
Peanut Butter Fudge: Stir in 1/2 cup creamy peanut butter along with the butter and vanilla. You’ll get a chocolate-peanut butter hybrid that’s seriously addictive — kind of like these easy peanut butter blossoms but in fudge form.
Serving, Storage & Reheating
This best homemade fudge is perfect for serving at holiday parties, packing into gift boxes, or just keeping on the counter for whenever a chocolate craving hits. Cut it into small squares since it’s rich — a little goes a long way. It also pairs beautifully with these Oreo truffle stuffed strawberries if you’re putting together a dessert platter.
Store your Old Time Fudge in an airtight container at room temperature for up to 2 weeks. Layer pieces between parchment or wax paper so they don’t stick together. If your kitchen is particularly warm, you can refrigerate it for 2-3 weeks, though it might firm up a bit more in the fridge.
For longer storage, wrap individual pieces or the whole batch tightly in plastic wrap, then place in a freezer-safe bag or container. Freeze for up to 3 months. Thaw at room temperature for about 30 minutes before serving — it’ll taste just as good as the day you made it.
No-Waste Kitchen Magic
If you somehow end up with fudge that didn’t set properly or turned out too crumbly, don’t toss it — you’ve got options.
Crumble soft or grainy fudge over vanilla ice cream or fold it into homemade milkshakes for an instant upgrade. You can also warm failed fudge gently with a splash of cream to make a killer chocolate sauce for drizzling over brownies or pancakes.
If your fudge turned out too hard, chop it into chunks and fold it into cookie dough, brownie batter, or homemade trail mix. It’s basically fancy chocolate chips at that point.
Got leftover cocoa powder from this recipe? Use it for hot chocolate, dust it over these healthy air fryer churro bites, or add it to your morning smoothie for a chocolate kick.
Old Time Fudge FAQs
Can I make Old Time Fudge without a candy thermometer?
Technically yes, but I really don’t recommend it. You can test for the soft-ball stage by dropping a small amount of the hot mixture into cold water — it should form a soft ball that flattens when you remove it. But honestly, a candy thermometer costs about $10 and takes all the guesswork out.
What’s the best way to cut fudge into clean squares?
Use a large, sharp knife and wipe it clean with a damp cloth between each cut. Some people like to warm the knife slightly under hot water first, which helps it glide through the fudge without dragging.
Why do I need to use a wooden spoon instead of a metal one?
Metal spoons can conduct heat and affect the temperature of your mixture, which matters when you’re working with precise candy-making temperatures. Wooden spoons are also gentler and less likely to cause crystallization when you’re stirring.
Can I double this Old Time Fudge recipe?
You can, but you’ll need a much larger, heavy-bottomed pot and you’ll need to adjust your cooking time — a bigger batch takes longer to reach temperature. I’d recommend making two separate batches if you need a lot of fudge; it’s more reliable.
Is Dutch-processed cocoa really necessary for this recipe?
Dutch-processed cocoa gives you a deeper, smoother chocolate flavor and a darker color, but natural cocoa will work in a pinch. The texture and taste will be slightly different — a bit more acidic and lighter in color — but it’ll still be delicious.
Can I freeze Old Time Fudge?
Absolutely! Wrap it well in plastic wrap or place pieces in a freezer-safe container with parchment between layers. It freezes beautifully for up to 3 months. Just thaw at room temperature before serving.
Cozy Closing
I’d love to see your spin on this Old Time Fudge! Drop a comment below with your fudge photos or let me know if you tried any of the variations — I’m always curious to hear how people make this recipe their own.
Whether you’re making it for holiday gifts or just because you need chocolate ASAP, this old fashioned chocolate fudge is such a keeper. Plus, there’s something really satisfying about making candy from scratch — you’ll feel like a kitchen wizard.
I’m Claire Whitmore — a dessert daydreamer from Asheville, NC. For me, baking isn’t about perfect pastries — it’s about the joy of sharing something sweet (and maybe sneaking an extra square of fudge when no one’s looking).