Toll House Chocolate Chip Pie
Hey there, I’m Claire Whitmore — a pastry whisperer in Asheville, NC, where butter totally counts as self-care. This Toll House Chocolate Chip Pie recipe is proof that dessert doesn’t have to be complicated to feel special.
I’ll be honest — the first time I made this, I thought I was just making another pie. But when I pulled it out of the oven and that golden, gooey center hit me with all the nostalgia of warm chocolate chip cookies straight from the oven? Game changer.
It’s like someone took the iconic Tollhouse Chocolate Chip Cookies and said, “What if we made this bigger, sliceable, and even more shareable?”
This became my go-to when I needed something impressive but didn’t have the energy for anything fancy. It’s the dessert equivalent of a warm hug — comforting, familiar, and always a crowd-pleaser.
Little Snapshot: What This Recipe Delivers
This Toll House Chocolate Chip Pie is a gooey, buttery dessert that tastes exactly like a giant chocolate chip cookie baked into a flaky pie crust. It’s quick to prep, uses pantry staples, and delivers that perfect combo of crispy edges and a soft, melty center — ideal with a scoop of vanilla ice cream.
Why You’ll Love This Recipe 🌸
- This Chocolate Chip Pie takes less time than folding laundry and tastes like you spent all afternoon in the kitchen.
- It’s got that magic combo of crispy edges and a gooey center — basically everything you love about cookies, but in pie form.
- You can throw it together with stuff you probably already have in your pantry (no fancy ingredients or last-minute grocery runs).
- According to King Arthur Baking, cookie pies are having a moment because they’re nostalgic and comforting — and this recipe proves exactly why.
Quick Facts ⚡
Here’s the quick scoop on this Toll House Chocolate Chip Pie.
- CourseDessert
- Prep Time15 minutes
- Cook Time50-60 minutes
- Total Time1 hour 15 minutes
- Servings8 servings
- DifficultyEasy
Table of Contents
Nutritional Peek
Look, I’m not gonna pretend this is a health food — but knowing what you’re working with never hurts. Here’s the breakdown per slice (and honestly, it’s worth every bite):
| Nutrient | Amount per Serving |
|---|---|
| Calories | 520 kcal |
| Protein | 7g |
| Carbohydrates | 55g |
| Total Fat | 32g |
| Saturated Fat | 14g |
| Fiber | 2g |
| Sugar | 38g |
Toll House Chocolate Chip Pie Ingredients
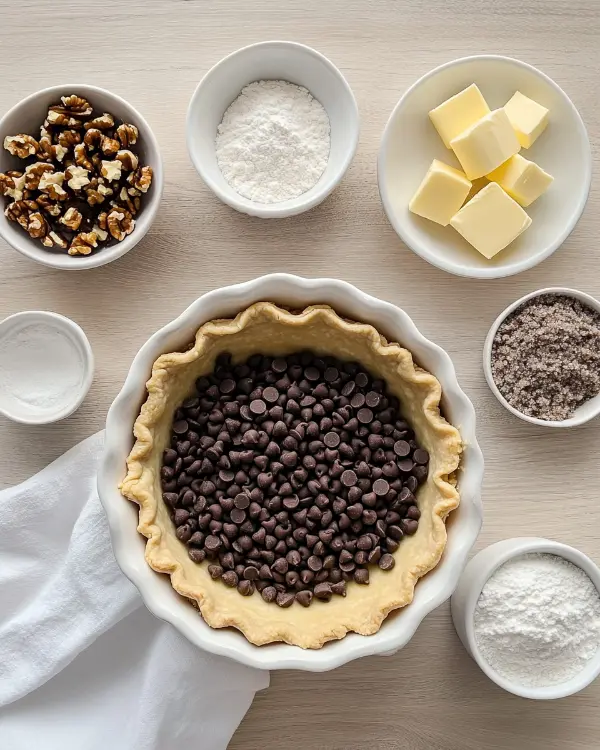
The beauty of this Chocolate Chip Cookie pie is that you don’t need anything exotic. Just grab these simple ingredients, and you’re halfway to dessert heaven:
| Amount | Ingredient |
|---|---|
| 1 | Unbaked 9-inch deep-dish pie shell |
| 2 | Eggs |
| 1/2 cup | All-purpose flour |
| 1/2 cup | Granulated sugar |
| 1/2 cup | Packed brown sugar |
| 3/4 cup (1 1/2 sticks) | Butter, softened to room temperature (yes, real butter — margarine just doesn’t cut it here) |
| 1 cup | Semi-sweet chocolate chips |
| 1 cup | Chopped walnuts |
| Optional | Vanilla ice cream (optional but highly recommended, for serving) |
Tools You’ll Actually Use
You won’t need anything fancy for this one — just the basics:
- 9-inch deep-dish pie plate
- Mixing bowl (medium-sized works great)
- Electric mixer (or a whisk and some arm strength)
- Measuring cups and spoons
- Rubber spatula for mixing
- Wire cooling rack
Step-by-Step Instructions
Alright, let’s make this Toll House Chocolate Chip Pie happen. I promise it’s easier than you think.
Step 1: Prep Your Oven and Pie Shell
Preheat your oven to 325°F. Line your deep-dish pie plate with that unbaked pie crust, and crimp the edges so they look pretty (or don’t — rustic is totally in). Set it aside while you work on the filling.
Step 2: Whip Up Those Eggs
Grab a mixing bowl and beat the eggs on high speed until they’re light, foamy, and looking like they’ve had their morning coffee. This step adds some airiness to the filling, so don’t skip it.
Step 3: Mix in the Flour and Sugars
Add the all-purpose flour, granulated sugar, and brown sugar to the bowl. Mix until everything’s combined and you’ve got a smooth, sweet base happening.
Step 4: Add the Butter
Toss in that softened butter (make sure it’s actually soft — not melted, not cold) and mix until it’s completely blended in. The batter should be thick, rich, and smell absolutely amazing.
Step 5: Fold in the Good Stuff
Stir in the chocolate chips and chopped walnuts. Mix until they’re evenly distributed throughout the batter. This is where it starts looking like cookie dough, and yes, you can absolutely sneak a taste.
Step 6: Fill That Pie Shell
Spoon the batter into your prepared pie crust. Smooth it out a little with your spatula, but don’t stress about making it perfect — it’ll settle as it bakes.
Step 7: Bake Until Golden
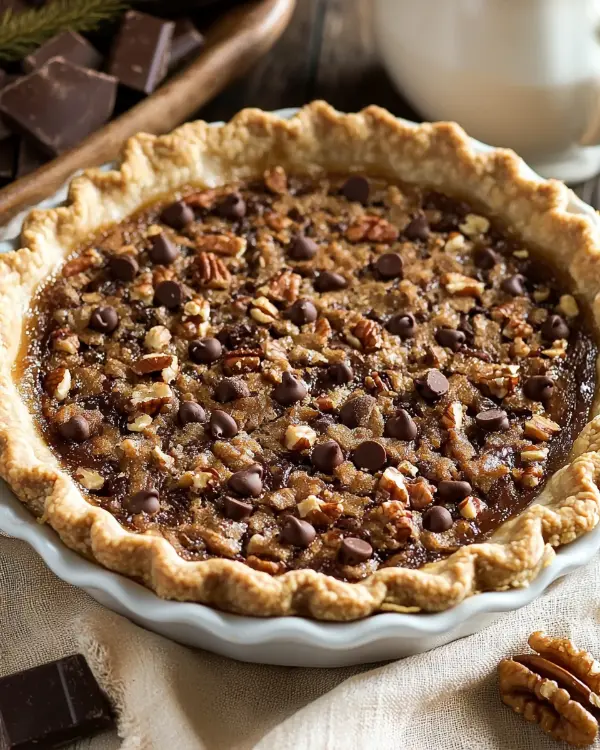
Pop it in the oven and bake for 50 to 60 minutes. You’ll know it’s done when a sharp knife inserted halfway between the edge and center comes out clean. The edges should be golden and crispy, and your kitchen should smell like a cozy bakery.
Step 8: Cool and Serve
Let the pie cool on a wire rack for about 30 minutes. Serve it warm (trust me on this) with a big scoop of vanilla ice cream melting on top.
Claire’s Pro Tips & Gentle Guidance
Making this Toll House Chocolate Chip pie is pretty foolproof, but here are a few things I’ve learned along the way:
- Room temperature butter is key. If your butter’s too cold, it won’t mix properly. If it’s melted, your texture will be off. Set it out about an hour before you start.
- Don’t overbake. The center should still look slightly soft when you pull it out — it’ll firm up as it cools. Overbaking gives you a dry, cakey texture instead of that gooey cookie vibe.
- Nuts are optional. If you’re not a walnut person (or someone in your house has allergies), just leave them out or swap in pecans.
- Chill your dough if using homemade crust. The folks at Epicurious swear by chilling pie dough before baking — and I couldn’t agree more. It prevents shrinkage and gives you a flakier crust.
Quick Fixes for Toll House Chocolate Chip Pie
Even the easiest recipes can throw you a curveball. Here’s how to handle the most common hiccups:
Problem: The center is still jiggly after an hour.
Fix: Keep baking in 5-minute increments. Every oven is different, and deep-dish pies sometimes need a little extra time. Just keep an eye on the edges so they don’t burn.
Problem: The crust is browning too fast.
Fix: Cover the edges with aluminum foil or a pie shield about halfway through baking. This protects the crust while the filling finishes cooking.
Problem: The pie is too sweet.
Fix: Next time, try using dark chocolate chips instead of semi-sweet. They’ll cut some of that sweetness and add a richer flavor.
Problem: The filling seems dry or crumbly.
Fix: You might’ve overbaked it, or your butter wasn’t soft enough. Make sure to pull it out as soon as that knife test comes back clean, not before.
Variations & Fun Twists
This pie is already pretty perfect, but here are some ways to make it your own:
Go Dark: Swap the semi-sweet chocolate chips for dark chocolate or a mix of both for a more grown-up flavor.
Peanut Butter Lovers: Stir in 1/4 cup of creamy peanut butter with the butter. You can also use peanut butter chips instead of some of the chocolate chips.
Make It Seasonal: Add a teaspoon of cinnamon or pumpkin pie spice to the batter in the fall. In summer, toss in some white chocolate chips and a handful of dried cranberries.
Gluten-Free Option: Use a gluten-free pie crust and swap the all-purpose flour for a 1:1 gluten-free baking blend.
Skip the Nuts: If you’re nut-free, just leave out the walnuts and add an extra 1/2 cup of chocolate chips. Or try toffee bits for some crunch.
Serving, Storage & Reheating
This Chocolate Chip Pie is best served warm with a big scoop of vanilla ice cream melting all over it. But let’s talk about what to do if you actually have leftovers (which I doubt).
Serving: Slice it up and serve warm or at room temperature. A drizzle of chocolate sauce or caramel never hurt anyone either.
Storage: Cover the pie tightly with plastic wrap or foil and keep it at room temperature for up to 2 days, or refrigerate for up to 5 days.
Reheating: Warm individual slices in the microwave for about 20-30 seconds, or reheat the whole pie in a 300°F oven for 10-15 minutes. That fresh-baked magic comes right back.
Freezing: Wrap the cooled pie (or individual slices) tightly in plastic wrap, then in aluminum foil. Freeze for up to 3 months. Thaw overnight in the fridge and reheat before serving.
No-Waste Kitchen Magic
Got extra pie or leftover ingredients? Here’s how to make the most of everything:
Leftover Pie: Crumble up day-old slices and layer them in a glass with vanilla ice cream and whipped cream for an easy parfait situation.
Extra Chocolate Chips: Toss them into your morning pancakes, muffins, or even trail mix. Or just snack on them — no judgment here.
Walnuts: If you’ve got extra walnuts, toast them and toss them into salads, oatmeal, or this Apple Crumble for some added crunch.
Day-Old Pie Shell: If you’ve got an extra unbaked crust, freeze it for up to 3 months. Future you will thank you.
I have a feeling you’ll love what’s next. The Pies & Tarts favorites are packed with recipes that disappear fast at every gathering. Go check them out before someone else snags them!
Toll House Chocolate Chip Pie FAQs
Can I freeze this Toll House Chocolate Chip Pie?
Absolutely! Just wrap it up really well (plastic wrap, then foil) and freeze for up to 3 months. Thaw it in the fridge overnight, then warm it up before serving.
Can I use a store-bought pie crust?
Girl, yes. I use store-bought all the time. No shame in making life easier. Just make sure it’s a deep-dish crust so you have enough room for all that gooey filling.
Do I have to use walnuts?
Nope! You can leave them out completely, swap in pecans, or add extra chocolate chips instead. Make it work for you.
Why is my pie still jiggly in the middle?
It might need a few more minutes in the oven. The center should be mostly set, with just a slight jiggle. It’ll firm up as it cools.
Can I make this ahead of time?
You can! Bake it a day ahead, store it covered at room temp, and reheat before serving. It’s actually great for potlucks and holidays.
What’s the difference between this and a regular chocolate chip cookie?
The texture! This Tollhouse Chocolate Chip Cookies-inspired pie has a denser, almost brownie-like center with crispy edges. It’s meant to be sliced and served like pie, not grabbed and eaten like a cookie (though I won’t stop you).
Cozy Closing
So there you have it — a Toll House Chocolate Chip Pie that tastes like nostalgia, looks impressive, and comes together with ingredients you probably already have. It’s the kind of dessert that makes people think you spent way more time on it than you actually did.
I’d love to see your spin on this recipe! Leave a note below or tag me on Instagram so we can share a sweet moment together. And if you’re on a chocolate kick, you’ve gotta try these Best Ever Chocolate Chip Cookies next — they’re just as easy and twice as addictive.
I’m Claire Whitmore — a dessert daydreamer from Asheville, NC. For me, baking isn’t about perfect pastries — it’s about the joy of sharing something sweet (and maybe sneaking an extra scoop of icing).

Toll House Chocolate Chip Pie
Equipment
- 9-inch deep-dish pie plate
- mixing bowl
- Electric mixer
- Measuring cups and spoons
- Rubber spatula
- Wire cooling rack
Ingredients
- 1 Unbaked 9-inch deep-dish pie shell
- 2 Eggs
- ½ cup All-purpose flour
- ½ cup Granulated sugar
- ½ cup Brown sugar packed
- ¾ cup Butter softened to room temperature (1 1/2 sticks)
- 1 cup Semi-sweet chocolate chips
- 1 cup Chopped walnuts
- Vanilla ice cream optional but highly recommended, for serving
Instructions
- Preheat your oven to 325°F. Line your deep-dish pie plate with that unbaked pie crust, and crimp the edges. Set it aside while you work on the filling.
- Grab a mixing bowl and beat the eggs on high speed until they’re light, foamy, and looking like they’ve had their morning coffee. This step adds some airiness to the filling.
- Add the all-purpose flour, granulated sugar, and brown sugar to the bowl. Mix until everything’s combined and you’ve got a smooth, sweet base.
- Toss in that softened butter and mix until it’s completely blended in. The batter should be thick, rich, and smell absolutely amazing.
- Stir in the chocolate chips and chopped walnuts. Mix until they’re evenly distributed throughout the batter.
- Spoon the batter into your prepared pie crust. Smooth it out a little with your spatula.
- Bake for 50 to 60 minutes. You’ll know it’s done when a sharp knife inserted halfway between the edge and center comes out clean. The edges should be golden and crispy.
- Let the pie cool on a wire rack for about 30 minutes. Serve it warm with a big scoop of vanilla ice cream melting on top.