Homemade Cinnamon Rolls
Best Homemade Cinnamon Rolls made from scratch with buttery dough, rich cinnamon filling, and cream cheese frosting. Easy to follow steps for soft, fluffy rolls every time!
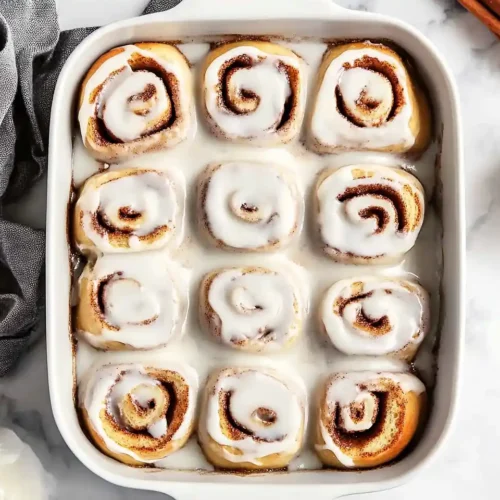
BEST Homemade Cinnamon Rolls — these soft, pillowy beauties are exactly what your weekend mornings have been missing. With their buttery swirls of cinnamon sugar and luscious cream cheese frosting, these rolls deliver that bakery-style magic right from your own kitchen.
They use instant yeast for a quicker rise, simple everyday ingredients, and a technique that actually works (no disappointment here). Plus, they stay incredibly soft for days — if they last that long!
Hey there, I’m Claire Whitmore — a dessert daydreamer from Asheville, NC, where butter totally counts as self-care. This Best Homemade Cinnamon Rolls recipe is my go-to for lazy weekend mornings, special brunches, or basically any time I need my house to smell like a cozy bakery.
Table of Contents
Little Snapshot: What This Recipe Delivers
These Best Homemade Cinnamon Rolls deliver soft, fluffy texture with perfectly gooey centers, rich cinnamon-sugar filling, and tangy cream cheese frosting. Made with instant yeast, butter, and common pantry ingredients, they’re easier than you’d think and stay fresh for days — though they’re so delicious, leftovers rarely happen.
Why You’ll Love This Recipe 🌸
- These Best Homemade Cinnamon Rolls look bakery-fancy but take less hands-on time than doing a load of laundry.
- They stay soft and pillowy for days (no rock-hard day-old disappointment here).
- The cream cheese frosting is tangy, sweet, and literally melts into all those warm cinnamon swirls.
- According to King Arthur Baking’s guide to keeping cinnamon rolls soft, using butter and eggs creates that rich, tender crumb we all crave — and this recipe proves exactly why.
Quick Facts ⚡
Here’s the quick scoop on these Best Homemade Cinnamon Rolls.
- CourseBreakfast/Dessert
- Prep Time30 minutes
- Rise Time65 minutes
- Bake Time25-30 minutes
- Total Time2 hours
- Servings12 rolls
- DifficultyMedium

Best Homemade Cinnamon Rolls
Equipment
- Large mixing bowl
- Medium microwave-safe bowl
- Whisk
- Wooden spoon
- Rolling Pin
- 9×13 inch baking dish
- Sharp serrated knife or unflavored dental floss
- Electric mixer
- Measuring cups and spoons
- Kitchen towel or plastic wrap
Ingredients
For the Dough
- 4-5 cups all-purpose flour 520g-650g, spooned and leveled
- ¼ cup granulated sugar 50g
- 2 ¼ teaspoons instant yeast 1 package
- ½ teaspoon salt
- ¾ cup water 180mL
- ½ cup whole milk 120mL
- ¼ cup unsalted butter 60g, cut into 4 slices
- 1 large egg at room temperature
For the Filling
- 6 tablespoons unsalted butter 85g, very soft
- ¾ cup packed brown sugar 150g, light or dark
- 1 ½ tablespoons ground cinnamon
For the Cream Cheese Icing
- 4 oz full-fat block cream cheese 115g, room temperature
- 5 tablespoons unsalted butter 70g, room temperature
- 1 ½ cups powdered sugar 195g
- 1 teaspoon pure vanilla extract
Instructions
- In a large bowl, whisk together 3 cups of all-purpose flour, granulated sugar, instant yeast, and salt until everything’s nicely combined. Set this aside while you prep the wet ingredients.
- In a medium microwave-safe bowl, combine the water, whole milk, and sliced butter. Microwave in 10-second bursts until the butter just melts and the mixture feels warm to the touch but not hot (think baby-bottle temperature). You can also do this on the stovetop over low heat if you prefer.
- Whisk the room-temperature egg into the warm water-milk-butter mixture until it’s fully incorporated and smooth.
- Pour the wet ingredients over your flour mixture. Using a wooden spoon, mix everything together until you’ve got a very thick, sticky dough situation happening.
- Add another 1 cup of flour to the dough and mix until it starts coming together into a shaggy ball. Knead the dough either directly in your bowl or on a lightly floured work surface, adding flour as needed (you might use the remaining 1/2 to 1 cup) to keep it from sticking to your hands. Keep kneading until the dough is smooth, elastic, and just slightly tacky to the touch. Do the poke test — if you gently press the top of the dough and it springs back, you’re golden.
- Cover the dough with a clean kitchen towel and set it aside for about 20 minutes. It’ll puff up slightly but won’t double in size — this short rest just relaxes the gluten so your dough won’t fight you when you roll it out.
- Turn your rested dough onto a lightly floured work surface and roll it into a roughly 14×10 inch rectangle. Use your hands to press and pull the edges into a nice rectangular shape.
- Spread the softened butter all over the dough, leaving about a 1/2 inch border along the edges. Sprinkle the brown sugar evenly on top and use your hands to spread it into an even layer over the butter. Finally, sprinkle the ground cinnamon all over everything.
- Starting from the longer side of the dough (the 14-inch side), carefully roll the dough up into a tight log. Try to keep it snug but not so tight that you’re squishing all the filling out the sides.
- Cut about 1/2 inch off each end of the log. Use a sharp serrated knife with a gentle sawing motion, or grab some unflavored dental floss for the cleanest cuts. Cut the log into 12 even rolls.
- Arrange the rolls cut side up in your greased 9×13 inch baking dish. There should be a tiny bit of space between each roll. Cover them and set aside in a warm, draft-free spot for about 45 minutes, or until they’ve roughly doubled in size.
- Remove the rolls from the oven and preheat your oven to 350°F.
- Uncover the rolls and slide them into the center of your preheated oven. Bake for 25 to 30 minutes until they’re a gorgeous golden brown on top and your kitchen smells like a Paris café.
- While the rolls are baking, make your cream cheese frosting. In a medium bowl, combine the room-temperature cream cheese, butter, powdered sugar, and vanilla extract. Use an electric mixer on low speed just to incorporate everything, then whip on medium speed until the mixture is smooth and fluffy.
- While the cinnamon rolls are still warm from the oven, spread that luscious frosting all over the top. It’ll melt slightly into all the nooks and crannies, making them extra gooey and irresistible.
Notes
Nutritional Peek
Here’s a quick nutritional snapshot per roll (because we all like to know, even if we’re eating them anyway):
| Nutrient | Amount per Serving |
|---|---|
| Calories | 385 |
| Protein | 6g |
| Carbohydrates | 58g |
| Fat | 15g |
| Fiber | 2g |
| Sugar | 28g |
Note: Values are approximate and will vary based on exact measurements and brands used.
Homemade Cinnamon Rolls Ingredients
These Easy Cinnamon Rolls start with simple ingredients you probably already have hanging out in your pantry. For the wet ingredients — water, milk, butter, and egg — you’ll want everything at a comfortable room temperature so they blend smoothly and activate the yeast properly.
For the dry mix — flour, sugar, yeast, and salt — measure carefully but don’t stress about perfection. The brown sugar filling gets caramelized and gooey as it bakes, while the cream cheese frosting adds that signature tangy sweetness.
For the Dough:
| Amount | Ingredient |
|---|---|
| 4-5 cups (520g-650g) | all-purpose flour, spooned and leveled |
| ¼ cup (50g) | granulated sugar |
| 2 ¼ teaspoons (1 package) | instant yeast |
| ½ teaspoon | salt |
| ¾ cup (180mL) | water |
| ½ cup (120mL) | whole milk |
| ¼ cup (60g) | unsalted butter, cut into 4 slices (yes, real butter — margarine just doesn’t deliver that rich flavor) |
| 1 large | egg, at room temperature |
For the Filling:
| Amount | Ingredient |
|---|---|
| 6 tablespoons (85g) | unsalted butter, very soft |
| ¾ cup (150g) | packed brown sugar, light or dark |
| 1 ½ tablespoons | ground cinnamon |
For the Cream Cheese Icing:
| Amount | Ingredient |
|---|---|
| 4 oz (115g) | full-fat block cream cheese, room temperature (don’t skimp here — room temp is key for smooth frosting) |
| 5 tablespoons (70g) | unsalted butter, room temperature |
| 1 ½ cups (195g) | powdered sugar |
| 1 teaspoon | pure vanilla extract |
Tools You’ll Actually Use
Here’s what you’ll need to whip up these beauties:
- Large mixing bowl
- Medium microwave-safe bowl
- Whisk and wooden spoon
- Rolling pin (or a wine bottle in a pinch!)
- 9×13 inch baking dish
- Sharp serrated knife or unflavored dental floss
- Electric mixer (or strong arm muscles for hand mixing)
- Measuring cups and spoons
- Kitchen towel or plastic wrap
Step-by-Step Instructions
Making these Best Homemade Cinnamon Rolls is easier than you’d think. Here’s how it all comes together:
Step 1: Mix the dry ingredients In a large bowl, whisk together 3 cups of all-purpose flour, granulated sugar, instant yeast, and salt until everything’s nicely combined. Set this aside while you prep the wet ingredients.
Step 2: Warm the liquids In a medium microwave-safe bowl, combine the water, whole milk, and sliced butter. Microwave in 10-second bursts until the butter just melts and the mixture feels warm to the touch but not hot (think baby-bottle temperature — if it’s too hot, it’ll kill your yeast). You can also do this on the stovetop over low heat if you prefer.
Step 3: Add the egg Whisk the room-temperature egg into the warm water-milk-butter mixture until it’s fully incorporated and smooth.
Step 4: Combine wet and dry Pour the wet ingredients over your flour mixture. Using a wooden spoon, mix everything together until you’ve got a very thick, sticky dough situation happening. Don’t worry — it’s supposed to look like a hot mess at this stage.

Step 5: Add more flour and knead Add another 1 cup of flour to the dough and mix until it starts coming together into a shaggy ball. Now here’s where the magic happens: knead the dough either directly in your bowl or on a lightly floured work surface, adding flour as needed (you might use the remaining ½ to 1 cup) to keep it from sticking to your hands.
Keep kneading until the dough is smooth, elastic, and just slightly tacky to the touch. Do the poke test — if you gently press the top of the dough and it springs back, you’re golden. If the indent just sits there, keep kneading a bit more.
Step 6: Let it rest Cover the dough with a clean kitchen towel and set it aside for about 20 minutes. It’ll puff up slightly but won’t double in size — this short rest just relaxes the gluten so your dough won’t fight you when you roll it out.
Step 7: Roll out the dough Turn your rested dough onto a lightly floured work surface and roll it into a roughly 14×10 inch rectangle. Use your hands to press and pull the edges into a nice rectangular shape. It doesn’t have to be perfect — rustic is totally fine here!
Step 8: Add the filling Spread the softened butter all over the dough, leaving about a ½ inch border along the edges. Sprinkle the brown sugar evenly on top and use your hands to spread it into an even layer over the butter.
Finally, sprinkle the ground cinnamon all over everything like you’re dusting the world’s most delicious snow.
Step 9: Roll it up Starting from the longer side of the dough (the 14-inch side), carefully roll the dough up into a tight log. Try to keep it snug but not so tight that you’re squishing all the filling out the sides.
Step 10: Slice the rolls Cut about ½ inch off each end of the log — this just makes for prettier, more uniform rolls. Use a sharp serrated knife with a gentle sawing motion, or grab some unflavored dental floss for the cleanest cuts ever.
To use the floss, wiggle a long piece under your log where you want to cut, lift the ends up and over, cross them to form an X, and pull to slice through. Cut the log into 12 even rolls.
Step 11: Second rise Arrange the rolls cut side up in your greased 9×13 inch baking dish. There should be a tiny bit of space between each roll, but it’s totally fine if they’re touching. Cover them and set aside in a warm, draft-free spot for about 45 minutes, or until they’ve roughly doubled in size.
My favorite hack? Keep them in your turned-off oven to protect them from any cold kitchen drafts. Once they puff up, they’ll be all pressed up against each other — that’s exactly what you want!
Step 12: Bake Remove the rolls from the oven and preheat your oven to 350°F. Once hot, uncover the rolls and slide them into the center of your oven. Bake for 25 to 30 minutes until they’re a gorgeous golden brown on top and your kitchen smells like a Paris café.
Step 13: Make the frosting While the rolls are baking, make your cream cheese frosting. In a medium bowl, combine the room-temperature cream cheese, butter, powdered sugar, and vanilla extract.
Use an electric mixer on low speed just to incorporate everything, then whip on medium speed until the mixture is smooth and fluffy. No lumps allowed!
Step 14: Frost and serve While the cinnamon rolls are still warm from the oven, spread that luscious frosting all over the top. It’ll melt slightly into all the nooks and crannies, making them extra gooey and irresistible. Try not to eat them all at once (no judgment if you do, though).
Claire’s Pro Tips & Gentle Guidance
These Quick Cinnamon Rolls are pretty forgiving, but here are my hard-won secrets for making them absolutely perfect every time.
Don’t stress about exact measurements on the flour. Humidity, how you measure, and even the brand can affect how much you need. Start with less and add more as you knead — you’re looking for a soft, slightly tacky dough, not a dry ball.
Room temperature ingredients are your best friend here. Cold butter and eggs won’t incorporate smoothly, and your dough will fight you. I usually set mine out about 30-45 minutes before I start baking.
The dental floss trick is a total game-changer for slicing rolls. According to King Arthur Baking’s detailed slicing guide , dental floss gives you cleaner cuts than even the sharpest knife because you’re not pressing down and squishing the delicate dough.
If your kitchen is cold, create a warm spot for rising by turning your oven on for just one minute, then turning it off. That gentle warmth is perfect for encouraging your dough to puff up beautifully.
Want to make these ahead? Assemble the rolls through Step 11, then cover and refrigerate overnight. In the morning, let them sit at room temperature for about 30 minutes, then bake as directed. Fresh cinnamon rolls with minimal morning effort? Yes, please!
Quick Fixes for Best Homemade Cinnamon Rolls
Problem: My dough isn’t rising. Solution: Your yeast might be old or the liquid was too hot (which killed it) or too cold (which didn’t activate it). Make sure your water-milk mixture is around 110°F — warm but not hot to the touch.
Problem: The filling leaked out everywhere. Solution: Don’t overfill, and make sure you leave that ½-inch border. Also, try rolling the dough a bit tighter next time so the filling has nowhere to escape.
Problem: My rolls are dense and heavy. Solution: You probably added too much flour or didn’t let them rise long enough. The dough should be slightly tacky, and the rolls should really puff up during that second rise. Be patient!
Problem: The centers are doughy but the edges are done. Solution: Your oven might be running hot, or the rolls were sliced too thick. Use an oven thermometer to check your temp, and aim for rolls that are about 1 to 1 ½ inches thick.
Variations & Fun Twists
These Easy Cinnamon Rolls No Yeast alternatives are perfect for when you want to get creative or accommodate different dietary needs.
Orange-Kissed Rolls: Add 1 teaspoon of orange zest to the filling for a bright, citrusy twist that pairs beautifully with the cinnamon. Trust me, it’s amazing with morning coffee!
Nutty Delight: Sprinkle ½ cup of chopped pecans or walnuts over the filling before rolling. The crunch is such a nice contrast to the soft dough.
Maple Glaze: Swap the cream cheese frosting for a simple maple glaze made with powdered sugar, maple syrup, and a splash of milk. Very fall-cozy vibes.
Chocolate Lovers: Add ½ cup of mini chocolate chips scattered over the cinnamon filling. It’s like a cinnamon roll and a chocolate chip cookie had the most delicious baby.
Make Them Mini: Cut the log into 18-20 smaller rolls instead of 12, reduce baking time to 18-22 minutes, and you’ve got adorable bite-sized treats perfect for parties.
I have a feeling you’ll love what’s next. The Classic Comfort Foods favorites are packed with recipes that disappear fast at every gathering. Go check them out before someone else snags them!
Serving, Storage & Reheating
These Quick Cinnamon Rolls No Yeast (okay, with yeast, but quick!) are best served warm when the frosting is still melty and the dough is at peak softness. Grab a fork, or just go ahead and use your hands — no judgment here.
Storage: Keep any leftovers (if you actually have leftovers, which I doubt) covered at room temperature for up to 3 days. They stay surprisingly soft thanks to all that butter and the egg in the dough. For longer storage, wrap them tightly and freeze for up to 2 months.
Reheating: Pop individual rolls in the microwave for 15-20 seconds for a quick warm-up. For a whole batch, tent them with foil and warm in a 350°F oven for about 10 minutes. They’ll taste fresh-baked all over again!
No-Waste Kitchen Magic
Got leftover cinnamon rolls? Here are some creative ways to give them new life.
Cinnamon Roll French Toast: Slice day-old rolls in half, dip in egg-milk mixture, and pan-fry until golden. Top with maple syrup and you’ve basically created breakfast heaven.
Bread Pudding: Cube up those leftover rolls, soak them in a custard mixture, and bake. It’s like a cinnamon roll got even more decadent.
Ice Cream Sundae Base: Warm up a roll, top with vanilla ice cream, caramel sauce, and maybe some toasted pecans. Dessert just got real.
Cinnamon Roll Trifle: Layer torn pieces of cinnamon rolls with vanilla pudding, whipped cream, and fresh berries. It’s retro in the best possible way.
Homemade Cinnamon Rolls FAQs
Can I freeze these Best Homemade Cinnamon Rolls?
Absolutely! Freeze them after baking and cooling completely, or freeze the unbaked rolls after slicing and let them thaw and rise before baking. Both methods work great — I usually frost them after reheating for the freshest taste.
What’s the best way to store cinnamon rolls?
Store them in an airtight container at room temperature for up to 3 days. The butter and egg in the dough help keep them soft, so they won’t get stale quickly like lean dough recipes might.
How do I know when my cinnamon rolls are done baking?
They should be golden brown on top and spring back lightly when touched. If you have a digital thermometer, the internal temperature should read about 190°F. Overbaking makes them dry, so keep an eye on them!
Why should I use instant yeast in these Best Homemade Cinnamon Rolls?
Instant yeast can be mixed directly into your dry ingredients without proofing, which saves time and reduces the chance of killing your yeast with water that’s too hot. It’s just easier and more foolproof for home bakers.
Can I make the dough the night before?
Yes! After the first rise, cover the dough tightly and refrigerate overnight. The next morning, let it come to room temperature for about 30 minutes, then roll out and proceed with the recipe. Cold dough actually makes for easier rolling!
What can I use instead of cream cheese frosting?
Try a simple vanilla glaze (powdered sugar + milk + vanilla), maple frosting, or even just a dusting of powdered sugar. Some people love a drizzle of salted caramel too!
Can I add raisins or nuts to the filling?
Of course! Sprinkle about ½ cup of raisins, chopped pecans, or walnuts over the cinnamon-sugar filling before rolling. Just chop nuts fairly fine so they don’t create lumpy spots.
Cozy Closing
There you have it — the Best Homemade Cinnamon Rolls that’ll make your kitchen smell like a bakery and your heart feel happy. These soft, gooey, perfectly spiced rolls are worth every minute of rising time, and honestly, they’re so much easier than you’d think.
I’d love to see your spin on these Best Homemade Cinnamon Rolls! Drop a comment below or tag me with your cinnamon roll photos — I’d love to see how you made them your own. Did you try the orange zest? Go wild with chocolate chips? I bet you’ve got amazing variations already in mind!
If you loved these, you might also enjoy my Blueberry Cinnamon Rolls or these fun Choco Tacos for another creative dessert.
About the Author: I’m Claire Whitmore — a dessert daydreamer from Asheville, NC. For me, baking isn’t about perfect pastries — it’s about the joy of sharing something sweet (and maybe sneaking an extra swirl of cream cheese frosting when nobody’s looking).