Easy 4-Ingredient Buckeye Peanut Butter Balls
Easy 4-Ingredient Buckeye Peanut Butter Balls are the ultimate no-fuss holiday treat! Just peanut butter, powdered sugar, butter, and chocolate create these iconic Ohio confections in under an hour.
Easy 4-Ingredient Buckeye Peanut Butter Balls are those adorable little peanut butter truffles dipped in chocolate that look just like the nut from Ohio’s buckeye tree. Hey there, I’m Claire Whitmore — a pastry whisperer in Asheville, NC, where butter totally counts as self-care.
This Buckeye Balls Easy recipe brings together creamy peanut butter, powdered sugar, salted butter, and dark chocolate melting wafers for a sweet-salty combo that disappears faster than you can say “Go Buckeyes!”
Table of Contents
Little Snapshot: What This Recipe Delivers
So glad you tried this one! The Candy & Small Bites collection has even more recipes that are just as comforting and crowd-pleasing. Go ahead, take a look — your next favorite dish is right there.
Easy Buckeyes are no-bake peanut butter balls coated in dark chocolate, made with just four simple ingredients in about 45 minutes. They’re perfect for holiday cookie trays, game day parties, or whenever you need a quick homemade treat that tastes like you spent hours in the kitchen.
Why You’ll Love This Recipe 🌸
- This Easy 4-Ingredient Buckeye Peanut Butter Balls recipe takes less time than waiting for your online grocery order to arrive.
- You don’t need any special equipment — just a bowl, a spoon, and some toothpicks you probably already have in your kitchen drawer.
- They look totally fancy on a dessert tray, but nobody needs to know you made them during naptime.
- According to King Arthur Baking’s guide to simple holiday candies, no-bake treats with minimal ingredients often become the most requested recipes — and this Buckeyes Dessert proves exactly why.
Quick Facts ⚡
Here’s the quick scoop on this Easy 4-Ingredient Buckeye Peanut Butter Balls.
- CourseDessert
- Prep Time15 minutes
- Chill Time30 minutes
- Total Time45 minutes
- Servings24 balls
- DifficultyEasy

Easy 4-Ingredient Buckeye Peanut Butter Balls
Equipment
- Small mixing bowl
- Spoon or hand mixer
- Baking sheet
- Wax paper or parchment paper
- Toothpicks
- Microwave-safe bowl
- Refrigerator or freezer
Ingredients
Ingredients
- 3 tablespoons Salted butter softened
- ½ cup Creamy peanut butter not natural or chunky
- 1 cup Powdered sugar sift if lumpy
- 10 ounces Dark chocolate melting wafers
Instructions
- Mix the softened salted butter, creamy peanut butter, and powdered sugar until smooth and thick.
- Roll the mixture into 1-inch balls and place on a lined baking sheet.
- Insert a toothpick into each ball and chill for 30 minutes until firm.
- Melt the dark chocolate melting wafers until smooth.
- Dip each cold peanut butter ball into the melted chocolate, leaving a small circle exposed.
- Remove toothpicks, smooth the holes, and refrigerate until chocolate is fully set.
Notes
Nutritional Peek
Here’s a quick nutritional snapshot per Buckeye Ball, so you can enjoy these little treats guilt-free (or at least guilt-informed):
| Nutrient | Amount per serving |
|---|---|
| Calories | 95 kcal |
| Protein | 2g |
| Carbohydrates | 10g |
| Fat | 6g |
| Fiber | 1g |
| Sugar | 8g |
Easy 4-Ingredient Buckeye Peanut Butter Balls Ingredients
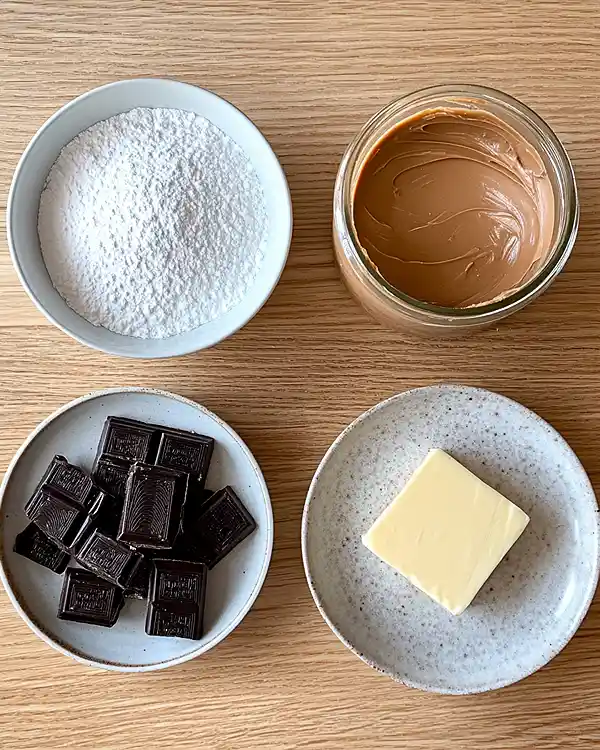
These Buckeye Balls Easy come together with pantry staples you probably already have on hand. For the peanut butter filling, you’ll want softened salted butter, creamy peanut butter, and powdered sugar — these three create that signature smooth, sweet center.
For the chocolate coating, dark chocolate melting wafers make dipping a breeze since they melt evenly and set up beautifully without tempering.
| Amount | Ingredient |
|---|---|
| 3 tablespoons | Salted butter, softened (yes, real butter — margarine just doesn’t give you that rich flavor here) |
| 1/2 cup | Creamy peanut butter (not natural or chunky — you want the smooth, sweetened kind for the right texture) |
| 1 cup | Powdered sugar (also called confectioners’ sugar — sift it if it’s lumpy) |
| 10 ounces | Dark chocolate melting wafers (you can also use chocolate chips, but melting wafers are smoother for dipping) |
Tools You’ll Actually Use
- Small mixing bowl
- Spoon or hand mixer
- Baking sheet
- Wax paper or parchment paper
- Toothpicks (the regular kind from your kitchen drawer)
- Microwave-safe bowl (for melting chocolate)
- Refrigerator or freezer space
Step-by-Step Instructions
Making Easy 4-Ingredient Buckeye Peanut Butter Balls is seriously straightforward — there’s no baking involved, just mixing, rolling, chilling, and dipping.
Step 1: Mix the peanut butter filling In a small mixing bowl, combine the softened salted butter, creamy peanut butter, and powdered sugar. Use a spoon or hand mixer to blend everything together until you get a smooth, thick mixture that holds together when you press it. It should look like cookie dough and smell like peanut butter heaven.
Step 2: Shape into balls Take about a tablespoon of the peanut butter mixture and roll it between your palms to form a ball about 1 inch in diameter. Place each ball on a baking sheet lined with wax paper or parchment paper. Don’t worry if they’re not perfectly round — rustic charm is totally in.
Step 3: Add toothpicks and chill Gently insert a toothpick into the top of each peanut butter ball — this makes dipping SO much easier later and gives you that classic buckeye look with the little peanut butter circle showing on top. Pop the whole baking sheet into the fridge or freezer for about 30 minutes until the balls are firm and cold.
Step 4: Melt the chocolate While the peanut butter balls are chilling, melt your dark chocolate melting wafers according to the package directions. I usually microwave them in 30-second bursts, stirring between each round, until they’re smooth and glossy. Don’t overheat or the chocolate can seize up.
Step 5: Dip those beauties Once your peanut butter balls are nice and firm, hold each one by its toothpick and dip it into the melted chocolate, leaving just a small circle of peanut butter exposed at the top (that’s the “buckeye” part!).
Let any excess chocolate drip off, then place the dipped ball back on the wax paper. When all the balls are dipped, carefully remove the toothpicks and smooth over any holes with your fingertip or a small offset spatula.
Step 6: Let them set Return the chocolate-dipped Buckeyes to the fridge for about 10-15 minutes until the chocolate is completely set and firm. Then they’re ready to devour or gift to someone you really like.

Claire’s Pro Tips & Gentle Guidance
These Easy Buckeyes are pretty foolproof, but I’ve picked up a few tricks along the way that’ll make your life even easier.
Make sure your butter is truly softened to room temperature before mixing — cold butter creates lumps, and nobody wants a chunky peanut butter filling. I usually leave mine on the counter for about 30 minutes before starting.
If your peanut butter mixture feels too sticky to roll, pop it in the fridge for 10 minutes to firm up. If it’s too dry and crumbly, add a tiny bit more peanut butter (like a teaspoon at a time) until it comes together.
For the smoothest chocolate coating, make sure your peanut butter balls are super cold before dipping — warm balls can melt into the chocolate and create a mess. I actually prefer freezing them for 30 minutes rather than just refrigerating.
When you’re dipping, work quickly and don’t double-dip (unless you want really thick chocolate, which honestly isn’t a bad thing). According to Sally’s Baking Addiction’s detailed chocolate melting guide , keeping your chocolate at the right temperature (slightly warm, not hot) ensures the smoothest coating and prevents streaks.
Quick Fixes for Easy 4-Ingredient Buckeye Peanut Butter Balls
Problem: My peanut butter mixture is too crumbly and won’t hold together. Add a little more softened butter (about a teaspoon at a time) or an extra tablespoon of peanut butter until the mixture binds together when you press it. Sometimes powdered sugar measurements can vary, so don’t be afraid to adjust.
Problem: The chocolate coating looks streaky or has white spots. This usually means the chocolate got too hot or cooled down too much while you were dipping. Reheat it gently in 10-second bursts, stirring well, until it’s smooth again.
Also make sure your peanut butter balls aren’t TOO cold — straight from the freezer can sometimes cause condensation.
Problem: The peanut butter balls are sliding off the toothpicks when I dip them. Insert the toothpicks a bit deeper (about halfway through the ball) and make sure the balls are super firm before dipping. If they’re still slipping, freeze them for an extra 15 minutes.
Problem: I can see toothpick holes after removing them. While the chocolate is still slightly soft, use your fingertip or a small spatula dipped in a tiny bit of melted chocolate to smooth over the hole. It’ll blend right in once it sets.
Variations & Fun Twists
Want to jazz up your Buckeyes Dessert? Here are some ideas I love:
Crunchy Buckeyes: Mix 2 tablespoons of finely crushed pretzels or graham crackers into the peanut butter filling for a fun textured twist.
White Chocolate Version: Swap the dark chocolate melting wafers for white chocolate or even milk chocolate if that’s more your style. You could also do half in dark and half in white for variety.
Mini Buckeyes: Roll the peanut butter mixture into smaller balls (about 1/2 inch) for bite-sized versions that are perfect for topping cupcakes or chocolate strawberry yogurt clusters.
Drizzle Magic: After the chocolate sets, drizzle melted white chocolate or caramel over the top for an extra-fancy look that’ll make people think you went to pastry school.
Festive Buckeyes: Add a few drops of peppermint extract to the peanut butter mixture during the holidays, or roll the finished buckeyes in festive sprinkles before the chocolate fully sets.
Serving, Storage & Reheating
These Easy Buckeyes are perfect straight from the fridge — that’s when the chocolate is nice and snappy and the peanut butter filling is firm but still creamy. Serve them on a pretty platter alongside other no-bake treats like Oreo truffle stuffed strawberries for an impressive dessert spread.
Store your Buckeye Balls Easy in an airtight container in the refrigerator for up to 2 weeks (if they last that long, which they probably won’t). Layer them between sheets of wax paper so they don’t stick together.
You can also freeze these beauties for up to 3 months in a freezer-safe container — just thaw them in the fridge for a few hours before serving. They’re actually delicious straight from the freezer too, kind of like frozen peanut butter cups!
No-Waste Kitchen Magic

Got leftover peanut butter mixture? Roll it into little energy balls and skip the chocolate coating for a quick protein-packed snack. You can also mix in some oats, chia seeds, or mini chocolate chips.
If your chocolate coating has leftovers, drizzle it over popcorn, pretzels, or graham crackers for an instant treat. Or use it to make a quick batch of fried strawberry cheesecake sandwiches even more decadent.
Broken or misshapen Buckeyes? Chop them up and sprinkle over ice cream, blend them into milkshakes, or crumble them as a topping for brownies. Nobody needs to know they weren’t perfect.
Easy 4-Ingredient Buckeye Peanut Butter Balls FAQs
Can I freeze these Easy 4-Ingredient Buckeye Peanut Butter Balls?
Absolutely! These freeze beautifully for up to 3 months in an airtight container. Just layer them between sheets of wax paper so they don’t stick together, and thaw in the fridge when you’re ready to enjoy them.
What’s the best way to store Buckeyes so they stay fresh?
Keep them in an airtight container in the refrigerator for up to 2 weeks. The cool temperature keeps the peanut butter filling firm and the chocolate coating from getting soft or melty.
Will chocolate chips work instead of melting wafers?
Yes, but they won’t be quite as smooth. Chocolate chips have stabilizers that help them hold their shape, so they don’t melt as silkily as melting wafers. If you use chips, add a teaspoon of coconut oil or shortening to help them melt smoother.
Is there a vegan version of Easy Buckeyes?
Totally! Use vegan butter and make sure your chocolate melting wafers are dairy-free (many dark chocolate varieties are naturally vegan). The recipe works exactly the same way.
Can I make these ahead for a holiday party?
These are actually the perfect make-ahead treat! Prepare them up to a week in advance and store them in the fridge, or freeze them up to 3 months ahead. They thaw quickly and taste freshly made.
Cozy Closing
And there you have it — your foolproof guide to Easy 4-Ingredient Buckeye Peanut Butter Balls! These little chocolate-peanut butter gems are proof that the best recipes don’t need a mile-long ingredient list or fancy techniques.
I’d love to see your spin on this Easy 4-Ingredient Buckeye Peanut Butter Balls recipe! Drop a comment below with your Buckeye Balls photos — I’d love to see how you made them your own. This Buckeyes Dessert is so versatile; I bet you’ve got amazing variations already in mind!
Whether you’re making them for game day, gift-giving, or just because it’s Tuesday and you deserve something sweet, these Buckeyes never disappoint. Grab that peanut butter and let’s get rolling!
I’m Claire Whitmore — a dessert daydreamer from Asheville, NC. For me, baking isn’t about perfect pastries — it’s about the joy of sharing something sweet (and maybe sneaking an extra scoop of icing). Or in this case, an extra Buckeye or three.