No Bake Peanut Butter Balls
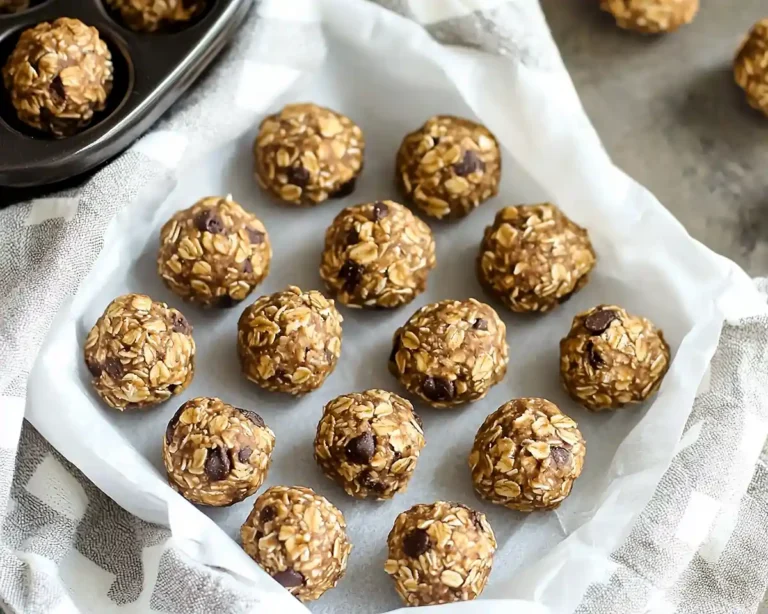
No Bake Peanut Butter Balls combine creamy peanut butter, butter, and Rice Krispies coated in chocolate for an easy no-bake treat that’s ready in 30 minutes—perfect for holidays or weeknight dessert cravings.
No Bake Peanut Butter Balls are about to become your new favorite treat, and honestly, I’m not even a little bit sorry about that. Hey there, I’m Claire Whitmore—a dessert daydreamer from Asheville, NC, where every good day includes chocolate and zero judgment about double-dipping the spoon.
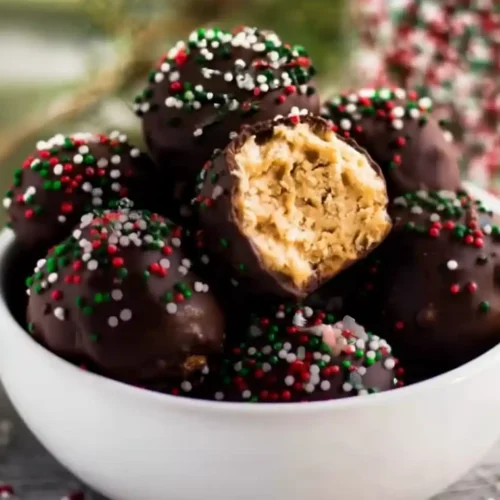
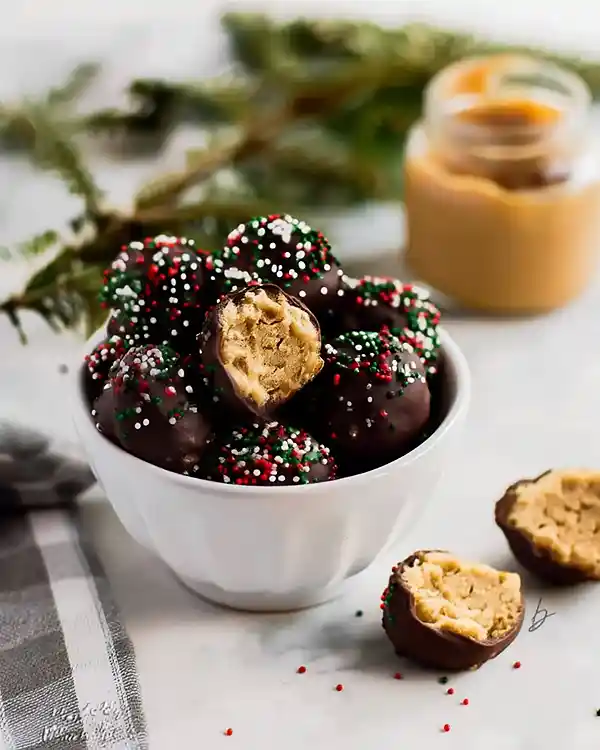
This peanut butter balls recipe is a total game-changer: five simple ingredients, no oven required, and that irresistible combo of creamy peanut butter filling with a crispy Rice Krispies crunch, all wrapped up in a gorgeous dark chocolate shell.
These chocolate bonbons are basically the love child of a buckeye and a Rice Krispie treat—except easier, because you’re not dealing with anything messy or complicated. Just mix, chill, dip, and devour.
They’re perfect for Christmas candy recipes, Valentine’s Day gifts, or those random Tuesday nights when you need something sweet without turning on the oven.
Table of Contents
Little Snapshot: What This Recipe Delivers
No Bake Peanut Butter Balls are bite-sized treats made with creamy peanut butter, butter, powdered sugar, and Rice Krispies, then dipped in melted chocolate for a crunchy-creamy dessert that needs just 30 minutes of hands-on time.
They’re perfect for beginner bakers, busy moms, or anyone who wants homemade holiday candy without the fuss—no baking, no candy thermometer, just pure chocolatey peanut butter bliss.
Why You’ll Love This Recipe 🌸
- This peanut butter balls recipe takes less time than scrolling through your social media feed—seriously, you’ll have these mixed, rolled, and chilling before you know it.
- They’re ridiculously forgiving—no tempering chocolate, no precise temperatures, and if your balls aren’t perfectly round, guess what? They still taste amazing.
- The Rice Krispies add this surprise crunch that makes every bite feel a little fancy, like you secretly went to pastry school (spoiler: you didn’t, and that’s totally fine).
- According to King Arthur Baking’s guide to simple holiday confections, the best holiday treats are the ones that bring joy without stress—and these chocolate bonbons are exhibit A.
Quick Facts ⚡
Here’s the quick scoop on this No Bake Peanut Butter Balls recipe.
- Course: Dessert
- Prep Time: 15 minutes
- Chill Time: 1 hour 15 minutes
- Total Time: 1 hour 30 minutes
- Servings: 40 balls
- Difficulty: Easy
No Bake Peanut Butter Balls
Equipment
- Stand mixer or handheld electric mixer
- Large mixing bowl
- Cookie scoop or tablespoon
- Baking sheets
- Parchment paper or wax paper
- Microwave-safe bowl
- Fork or dipping tool
Ingredients
Main Ingredients
- 1 ½ cups no-stir creamy peanut butter 400g, one 15-ounce jar
- 3 cups confectioners’ sugar 360g, powdered sugar
- ½ cup unsalted butter 113g or 1 stick, room temperature
- 2 cups Rice Krispies 50g
- 2 cups dark or semisweet chocolate chips 350g, for dipping
- ¼ cup sprinkles optional
Instructions
- In the bowl of a stand mixer fitted with a paddle attachment (or just a big bowl with a hand mixer), combine 1 ½ cups of no-stir creamy peanut butter with ½ cup of room-temperature unsalted butter. Beat them together until they’re smooth and creamy, like you’re making the world’s best frosting. Slowly add in 3 cups of confectioners’ sugar, mixing on low speed so you don’t create a powdered sugar snowstorm in your kitchen. Once the sugar is fully incorporated and the mixture looks thick and dough-like, gently fold in 2 cups of Rice Krispies until they’re evenly distributed throughout the dough.
- Cover the bowl with plastic wrap or a clean kitchen towel and pop it in the fridge for 1 hour. This chilling step is key—it firms up the dough so it’s way less sticky and much easier to roll into those perfectly round peanut butter balls. I know waiting is hard (believe me, I get it), but this step makes all the difference between smooth, professional-looking truffles and a sticky mess.
- Line a baking sheet with parchment paper or wax paper. Using a cookie scoop or tablespoon, scoop out about 1 tablespoon of the chilled dough and roll it between your palms into a 1-inch ball. Place each ball on the prepared baking sheet, leaving a little space between them. Repeat until you’ve rolled all the dough—you should get about 40 chocolate bonbons out of this batch. Once they’re all rolled, place the baking sheet in the freezer for at least 15 minutes so the balls hold their shape perfectly when you dip them in chocolate.
- Place 2 cups of dark or semisweet chocolate chips in a microwave-safe bowl. Microwave on 50% power for 1 minute, then stir the chocolate. Continue microwaving on 50% power in 15-second intervals, stirring after each interval, until the chocolate is completely smooth and glossy. Don’t rush this step by cranking up the power—slow and steady prevents the chocolate from seizing or burning, and you’ll end up with that gorgeous, bakery-quality coating.
- Remove the peanut butter balls from the freezer. Using a fork or a dipping tool, dip each ball into the melted chocolate, letting any excess chocolate drip back into the bowl. Transfer the chocolate-covered ball back to the lined baking sheet. If you’re adding sprinkles (and honestly, why wouldn’t you?), sprinkle them on immediately while the chocolate is still wet so they stick. Repeat with the remaining balls, working quickly so the chocolate doesn’t harden before you’re done.
- Let the chocolate harden completely at room temperature, or pop the baking sheet back in the fridge for about 10 minutes to speed things up. Once the chocolate shell is firm and glossy, your no bake peanut butter balls are ready to serve, gift, or devour straight off the tray (no judgment here).
Notes
Nutritional Peek
Listen, I’m all about balance—and sometimes balance means knowing exactly how many of these you can sneak before dinner. Here’s what you’re working with per ball (because let’s be real, nobody stops at just one).
| Nutrient | Amount per Serving |
|---|---|
| Calories | 120 kcal |
| Protein | 2g |
| Carbohydrates | 14g |
| Total Fat | 7g |
| Saturated Fat | 3g |
| Fiber | 1g |
| Sugar | 11g |
These numbers are approximate and will vary slightly depending on the chocolate you use.
No Bake Peanut Butter Balls Ingredients
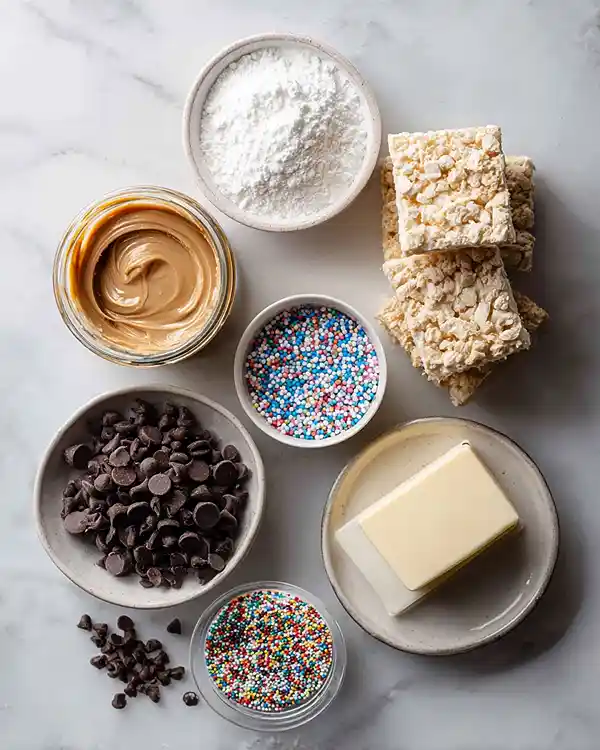
This chocolate peanut butter balls recipe starts with ingredients you probably already have hanging out in your pantry—no specialty shops or weird substitutions required. For the base, you’ll want room-temperature butter and no-stir creamy peanut butter (trust me, the no-stir kind makes all the difference in texture).
The confectioners’ sugar sweetens everything up and gives that classic candy coating feel, while Rice Krispies add a delightful crunch that makes these totally addictive. Finally, dark or semisweet chocolate chips create that gorgeous, glossy shell.
| Amount | Ingredient |
|---|---|
| 1 ½ cups (400g) | No-stir creamy peanut butter (one 15-ounce jar—yes, real peanut butter, not the natural kind that separates) |
| 3 cups (360g) | Confectioners’ sugar (powdered sugar, the fluffy cloud kind) |
| ½ cup (113g) | Unsalted butter, room temperature (margarine just doesn’t cut it here, trust me) |
| 2 cups (50g) | Rice Krispies (the secret to that addictive crunch) |
| 2 cups (350g) | Dark or semisweet chocolate chips, for dipping (go dark if you want that fancy bakery vibe) |
| ¼ cup | Sprinkles, optional (but honestly, sprinkles make everything better) |
Tools You’ll Actually Use
You don’t need a fancy kitchen arsenal for these—just a few trusty basics that make the whole process smooth and stress-free.
- Stand mixer or handheld electric mixer (makes mixing a breeze, though you could totally do this by hand if you’re feeling strong)
- Large mixing bowl
- Cookie scoop or tablespoon (for perfectly sized balls every time)
- Baking sheets
- Parchment paper or wax paper (keeps everything from sticking)
- Microwave-safe bowl (for melting chocolate without drama)
- Fork or dipping tool (for dunking those balls like a pro)
Step-by-Step Instructions
Alright, let’s make some No Bake Peanut Butter Balls magic happen. This recipe is so simple that you’ll feel like you’re getting away with something—no oven, no stress, just mix, chill, dip, and enjoy.
Step 1: Mix the peanut butter base In the bowl of a stand mixer fitted with a paddle attachment (or just a big bowl with a hand mixer), combine 1 ½ cups of no-stir creamy peanut butter with ½ cup of room-temperature unsalted butter.
Beat them together until they’re smooth and creamy, like you’re making the world’s best frosting. Slowly add in 3 cups of confectioners’ sugar, mixing on low speed so you don’t create a powdered sugar snowstorm in your kitchen.
Once the sugar is fully incorporated and the mixture looks thick and dough-like, gently fold in 2 cups of Rice Krispies until they’re evenly distributed throughout the dough.
Step 2: Chill the dough Cover the bowl with plastic wrap or a clean kitchen towel and pop it in the fridge for 1 hour. This chilling step is key—it firms up the dough so it’s way less sticky and much easier to roll into those perfectly round peanut butter balls.
I know waiting is hard (believe me, I get it), but this step makes all the difference between smooth, professional-looking truffles and a sticky mess.
Step 3: Roll into balls Line a baking sheet with parchment paper or wax paper. Using a cookie scoop or tablespoon, scoop out about 1 tablespoon of the chilled dough and roll it between your palms into a 1-inch ball. Place each ball on the prepared baking sheet, leaving a little space between them.
Repeat until you’ve rolled all the dough—you should get about 40 chocolate bonbons out of this batch. Once they’re all rolled, place the baking sheet in the freezer for at least 15 minutes so the balls hold their shape perfectly when you dip them in chocolate.
Step 4: Melt the chocolate Place 2 cups of dark or semisweet chocolate chips in a microwave-safe bowl. Microwave on 50% power for 1 minute, then stir the chocolate. Continue microwaving on 50% power in 15-second intervals, stirring after each interval, until the chocolate is completely smooth and glossy.
Don’t rush this step by cranking up the power—slow and steady prevents the chocolate from seizing or burning, and you’ll end up with that gorgeous, bakery-quality coating.
Step 5: Dip and decorate Remove the peanut butter balls from the freezer. Using a fork or a dipping tool, dip each ball into the melted chocolate, letting any excess chocolate drip back into the bowl. Transfer the chocolate-covered ball back to the lined baking sheet.
If you’re adding sprinkles (and honestly, why wouldn’t you?), sprinkle them on immediately while the chocolate is still wet so they stick. Repeat with the remaining balls, working quickly so the chocolate doesn’t harden before you’re done.
Step 6: Let them set Let the chocolate harden completely at room temperature, or pop the baking sheet back in the fridge for about 10 minutes to speed things up. Once the chocolate shell is firm and glossy, your no bake peanut butter balls are ready to serve, gift, or devour straight off the tray (no judgment here).
Claire’s Pro Tips & Gentle Guidance
Let me share a few little secrets I’ve picked up over the years—because even the easiest Christmas candy recipes have their tricks. These tips will help you nail this peanut butter balls recipe every single time, whether you’re a first-timer or a seasoned candy-maker.
Use no-stir peanut butter for the best texture. Natural peanut butter sounds healthy and wholesome, but it’s way too oily for this recipe and won’t give you that smooth, fudgy filling we’re going for. Stick with brands like Jif or Skippy—the kind that stays blended and creamy without needing a stir.
Room-temperature butter is your best friend. Cold butter won’t blend smoothly with the peanut butter, and you’ll end up with lumps. Let your butter sit out for about 30 minutes before you start so it’s soft enough to mix easily but not melted.
Don’t skip the freezer step before dipping. I know it’s tempting to rush straight to the chocolate, but freezing the balls for at least 15 minutes means they’ll hold their shape beautifully when you dip them. Otherwise, they might fall apart or slide off the fork—total buzzkill.
Melt chocolate slowly on low power. Chocolate can be a little dramatic and seize up if you overheat it, so microwaving on 50% power is the way to go. It takes a couple extra minutes, but it’s worth it for that smooth, glossy coating.
According to Ghirardelli’s expert chocolate melting guide, patience is the secret to professional-looking chocolate work—and I couldn’t agree more.
Add a little coconut oil for extra-smooth chocolate. If your melted chocolate seems too thick for dipping, stir in ½ teaspoon of coconut oil to thin it out slightly. It makes the chocolate flow beautifully and gives your peanut butter balls that gorgeous, glossy finish.
Quick Fixes for No Bake Peanut Butter Balls
Even the easiest recipes can throw a little curveball now and then. Here’s how to troubleshoot the most common hiccups so your chocolate peanut butter balls turn out perfect every time.
Problem: The dough is too sticky to roll. If your dough feels like it’s sticking to everything, pop it back in the fridge for another 15–20 minutes. Sometimes room temperature or humidity can make the dough softer than expected, and a quick chill firms everything right up.
Problem: The chocolate coating is too thick. Thick chocolate can make dipping frustrating and leave you with clunky, uneven coats. Stir in ½ teaspoon of coconut oil or a tiny bit of vegetable shortening to thin out the chocolate without affecting the flavor.
Problem: The peanut butter balls fall apart when dipping. This usually means they weren’t frozen long enough before dipping, or the chocolate is too hot. Make sure the balls are frozen solid for at least 15 minutes, and let your melted chocolate cool slightly (it should be warm, not hot) before you start dipping.
Problem: The Rice Krispies aren’t evenly distributed. If you’re finding pockets of plain peanut butter or clumps of cereal, fold the Rice Krispies in more gently and thoroughly. Use a spatula to scrape the sides and bottom of the bowl, making sure every bit of dough gets some of that addictive crunch.
Variations & Fun Twists
Once you’ve mastered the classic no bake peanut butter balls, it’s time to get a little creative. These variations are perfect for switching things up based on what you’re craving or what you’ve got in the pantry.
Holiday sprinkle edition: Swap the plain sprinkles for festive holiday colors—red and green for Christmas, pastel for Easter, or red and pink for Valentine’s Day. It’s the easiest way to make your chocolate bonbons match the season without changing a single ingredient.
Double chocolate version: Use chocolate peanut butter instead of regular creamy peanut butter, and dip the balls in white chocolate instead of dark. You’ll get this gorgeous contrast and an extra layer of chocolatey richness.
Gluten-free and allergy-friendly: This recipe is naturally gluten-free if you use gluten-free Rice Krispies (most brands are, but double-check the label). For a nut-free version, swap the peanut butter for sunflower seed butter or tahini—it’s a little earthier, but still totally delicious.
Almond joy twist: Add ½ cup of sweetened shredded coconut to the dough along with the Rice Krispies, and press a whole almond on top of each ball before the chocolate hardens. Instant tropical candy bar vibes.
Boozy grown-up version: Stir 1–2 tablespoons of bourbon or Baileys into the peanut butter mixture for a sophisticated twist on this classic Christmas candy recipe. Just know these won’t be kid-friendly anymore, so label them accordingly.
This is just one of the many gems in our Classic Baked Dinners series. Every recipe there has been tested and loved in real kitchens, and I promise there’s something for every craving. Go see for yourself.
Serving, Storage & Reheating
These peanut butter balls are pretty much perfect straight from the fridge, but here’s how to keep them tasting their best long after you’ve made them.
Serving suggestions: Serve these chocolate-covered treats chilled or at room temperature—they’re delicious either way. I love arranging them on a pretty platter with a dusting of extra powdered sugar or a few fresh mint leaves for a fancy presentation. They’re also amazing alongside a mug of hot cocoa or a strong cup of coffee.
Storage: Store your no bake peanut butter balls in an airtight container in the fridge for up to 2 weeks. Layer them between sheets of parchment paper so they don’t stick together, and keep the container sealed tight so the chocolate doesn’t absorb any funky fridge odors.
Freezing: These freeze beautifully for up to 3 months. Arrange them in a single layer on a baking sheet, freeze until solid, then transfer to a freezer-safe container or zip-top bag. When you’re ready to enjoy, let them thaw in the fridge for about an hour—they’ll taste just as fresh and delicious as the day you made them.
No-Waste Kitchen Magic
I’m all about making the most of what you’ve got, and this recipe practically begs for a little creative repurposing. Here’s how to use up every last bit.
Leftover melted chocolate: Don’t toss that extra chocolate—drizzle it over pretzels, graham crackers, or strawberries for an instant bonus treat. Or pour it into a parchment-lined pan, let it harden, and break it into bark. Boom, two desserts for the effort of one.
Day-old peanut butter balls: If your peanut butter balls have been hanging out for a few days and lost a little of their magic, crumble them up and use them as a topping for ice cream, yogurt parfaits, or even brownies. That crunchy-creamy texture is still totally there, just in a new form.
Extra Rice Krispies: If you’ve got leftover cereal, make a quick batch of Rice Krispie treats or sprinkle them over your morning yogurt for added crunch. They’re way too good to waste.
No Bake Peanut Butter Balls FAQs
Can I use natural peanut butter for this peanut butter balls recipe?
I’d skip the natural stuff for this one. Natural peanut butter is too oily and won’t hold together the way no-stir peanut butter does, so you’ll end up with greasy, crumbly balls instead of smooth, fudgy ones. Stick with Jif, Skippy, or any brand where the oil doesn’t separate.
What’s the best way to store chocolate bonbons so they stay fresh?
Keep them in an airtight container in the fridge for up to 2 weeks, layered between sheets of parchment paper so the chocolate doesn’t stick. If you want to freeze them for longer storage, arrange them in a single layer on a baking sheet, freeze until solid, then transfer to a freezer-safe container for up to 3 months.
How do I know when the chocolate coating is the right consistency?
The melted chocolate should be smooth, glossy, and flow easily off a spoon without being too thick or clumpy. If it’s too thick, stir in ½ teaspoon of coconut oil to thin it out slightly. If it’s too runny, let it cool for a minute or two before dipping.
Why should I chill the dough before rolling it into balls?
Chilling firms up the peanut butter mixture so it’s way less sticky and much easier to roll into smooth, round balls. Without that chill time, the dough is soft and messy, and your chocolate-covered peanut butter balls won’t hold their shape as well when you dip them in chocolate.
Can I make these no bake peanut butter balls ahead of time for the holidays?
Absolutely! These are the perfect make-ahead Christmas candy recipe. Prepare them up to 2 weeks in advance and store them in the fridge, or freeze them for up to 3 months. Just let them thaw in the fridge for about an hour before serving, and they’ll taste just as fresh as the day you made them.
What can I use instead of Rice Krispies for a different texture?
Try crushed graham crackers, crushed pretzels for a sweet-salty vibe, or even finely chopped nuts if you want extra crunch. Each swap gives a slightly different texture, but they all work beautifully with the creamy peanut butter base.
Cozy Closing
So there you have it—your new go-to no bake peanut butter balls recipe that’s as easy as it is delicious. These little chocolate-covered bites are perfect for holiday gifting, last-minute party trays, or just keeping a stash in the fridge for when you need something sweet (which, let’s be honest, is basically always).
I’d love to see your spin on this peanut butter balls recipe! Drop a comment below with your chocolate bonbon photos—I’d love to see how you made it your own.
And if you’re looking for more easy no-bake treats, check out my Easy 4-Ingredient Buckeye Peanut Butter Balls, Oreo Truffle Stuffed Strawberries, Chocolate Strawberry Yogurt Clusters, or Fried Strawberry Cheesecake Sandwiches for even more sweet inspiration.
Happy baking (or not baking, in this case)!
I’m Claire Whitmore—a dessert daydreamer from Asheville, NC. For me, baking isn’t about perfect pastries—it’s about the joy of sharing something sweet (and maybe sneaking an extra scoop of icing).