Easy Japanese Cheesecake
Japanese Cheesecake — light, fluffy, and borderline magical — is exactly the kind of dessert that makes you look like a pastry genius without needing an actual degree in baking.
Hey there, I’m Claire Whitmore — a pastry whisperer in Asheville, NC, where butter totally counts as self-care. This Japanese Cheesecake recipe is proof that dessert doesn’t have to be complicated to feel special.
I first fell in love with this dreamy cake at a little café tucked away in the mountains. It was so delicate, so impossibly soft, I thought it might actually float off my plate.
Fast forward to a rainy Sunday in my kitchen, and I decided to recreate that magic — and honestly? It worked. Now it’s one of my absolute go-to’s when I want something that tastes fancy but won’t wreck my day.
Little Snapshot: What This Recipe Delivers
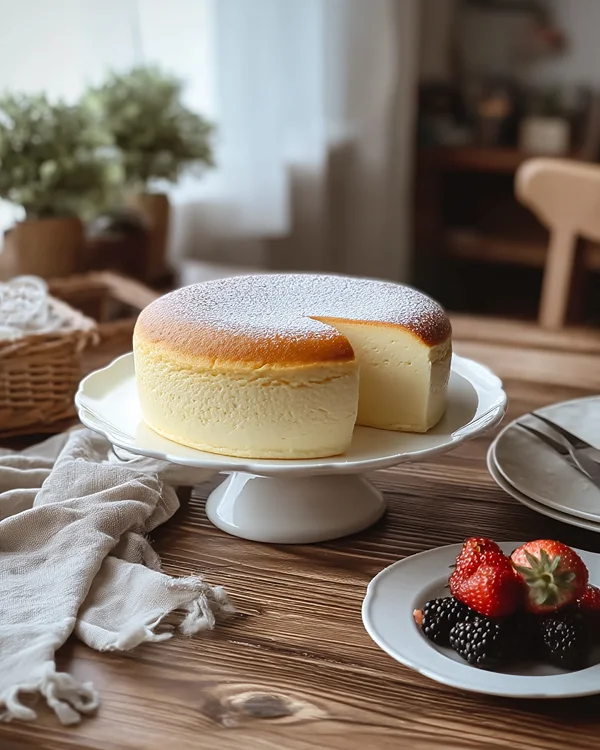
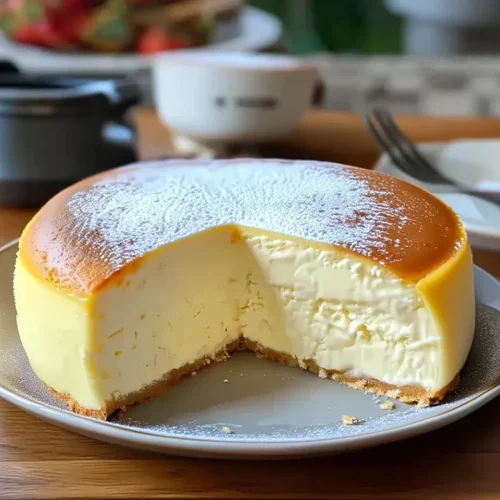
This Japanese Cheesecake is a cloud-like dessert that combines the richness of cream cheese with the airy texture of a sponge cake.
It’s baked in a gentle water bath to keep it incredibly moist and jiggly, and the result is a lightly sweet, melt-in-your-mouth treat that’ll make everyone think you trained in Tokyo.
Why You’ll Love This Recipe 🌸
- This Jiggly Cheesecake Recipe looks fancy but takes less time than folding laundry (and is way more satisfying).
- It’s lighter than traditional cheesecake, so you can totally justify a second slice — no guilt, just joy.
- The texture is pure magic — soft, fluffy, and it actually jiggles when you move the pan.
- According to King Arthur Baking, texture is everything in baking — and this recipe proves exactly why.
Quick Facts ⚡
Here’s the quick scoop on this Japanese Cheesecake.
- CourseDessert
- Prep Time25 minutes
- Cook Time75 minutes
- Total Time1 hour 40 minutes (plus cooling)
- Servings8 slices
- DifficultyMedium
Table of Contents
Nutritional Peek
Here’s what you’re working with per slice — because knowledge is power, and also because sometimes you just want to know if there’s room for ice cream on the side.
| Nutrient | Amount per Serving |
|---|---|
| Calories | 245 kcal |
| Protein | 7g |
| Carbohydrates | 22g |
| Total Fat | 14g |
| Saturated Fat | 8g |
| Fiber | 0g |
| Sugar | 14g |
Japanese Cheesecake Ingredients
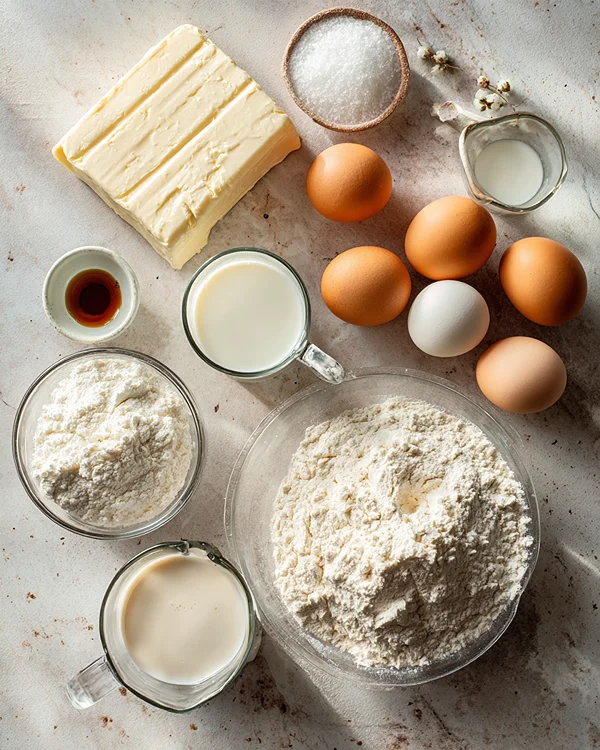
If you’ve ever wanted to make a Chinese Cheesecake Recipe that feels like a hug in dessert form, this ingredient list is your starting point. Nothing too wild here — just the good stuff that probably already lives in your fridge and pantry.
| Amount | Ingredient |
|---|---|
| 7 oz (200g) | Cream cheese, softened (Yes, real cream cheese — not the spreadable kind in a tub!) |
| 4 tbsp (60g) | Unsalted butter |
| ½ cup (120ml) | Milk (whole milk works best for richness) |
| ½ cup (65g) | Cake flour, sifted (If you don’t have cake flour, you can make your own — just Google it real quick!) |
| 2 tbsp (20g) | Cornstarch |
| 5 large | Eggs, separated (this is key — you’ll need both yolks and whites) |
| ½ cup (100g) | Granulated sugar |
| 1 tsp | Vanilla extract |
| 1 tbsp | Lemon juice (freshly squeezed is best) |
| ¼ tsp | Salt |
Tools You’ll Actually Use
You don’t need a fancy kitchen to pull this off, but having the right tools makes everything smoother (literally):
- 8-inch round springform pan — This is non-negotiable for easy removal
- Parchment paper — For lining the pan so nothing sticks
- Aluminum foil — To wrap the bottom of your pan for the water bath
- Large roasting pan — For creating that all-important water bath
- Electric mixer — Hand or stand mixer both work great
- Heatproof bowl — For melting your cream cheese mixture
- Mixing bowls (at least 2)
- Whisk and spatula
- Sifter — Don’t skip this; lumpy batter is a no-go
Step-by-Step Instructions
Alright, let’s make some Japanese Cheesecake magic happen. Take a deep breath — this is easier than it looks, I promise.
Step 1: Prepare Your Baking Tools
Before you dive in, get everything ready. Trust me, you don’t want to be scrambling for parchment paper while your egg whites are deflating.
Grab your 8-inch springform pan and line the bottom and sides with parchment paper. Wrap the bottom with aluminum foil — this keeps water from sneaking in during the water bath.
Preheat your oven to 320°F (160°C). Fill a kettle with water and set it to boil (you’ll need this for the water bath later).
Step 2: Make the Cheesecake Batter
Start by melting your cream cheese, butter, and milk together in a heatproof bowl over a double boiler. Stir gently until everything’s smooth and dreamy. Remove from heat and let it cool for a few minutes — you don’t want to scramble those egg yolks later!
In a separate bowl, sift together your cake flour and cornstarch. This step is huge for keeping your Chinese Cheesecake super light and lump-free.
Add the vanilla extract and lemon juice to your melted cream cheese mixture, then gradually whisk in those sifted dry ingredients until everything’s fully combined. Now whisk in the egg yolks one at a time. Set this aside while you work on the egg whites.
Step 3: Whip the Egg Whites
Here’s where the magic really starts. In a super clean, dry bowl (any grease will ruin your meringue), beat the egg whites with your electric mixer on medium speed until they look foamy.
Add that sugar gradually — like a tablespoon at a time — while you keep beating. Crank it up to high speed and beat until you see soft peaks forming. They should be glossy and curl over gently when you lift the beaters.
Pro tip: Don’t overbeat! You want soft peaks, not stiff ones. If you go too far, your Jiggly Cheesecake Recipe won’t have that signature wobble.
Step 4: Fold Everything Together
This is the gentle part. Take about one-third of your whipped egg whites and fold them into the cheesecake batter. This lightens everything up and makes the next step way easier.
Then add the rest of the egg whites in two more batches, folding gently from the bottom up with a spatula. The goal? Keep all that beautiful air you just whipped in there. Be patient and don’t rush this part.
Step 5: Bake in a Water Bath
Pour your batter into the prepared pan and give it a gentle tap on the counter to release any big air bubbles.
Place your springform pan inside that large roasting pan, then carefully pour hot water into the roasting pan until it comes about 1 inch up the side of your cheesecake pan.
Slide the whole setup into your preheated oven. Bake at 320°F (160°C) for 25 minutes, then reduce the temperature to 275°F (135°C) and bake for another 50 minutes. Your kitchen will smell absolutely incredible.
Step 6: Cooling the Cheesecake
When time’s up, don’t just yank it out. Turn off the oven and crack the door open slightly.
Let your Japanese Cheesecake hang out in there for about 15 minutes — this gradual cool-down prevents it from deflating dramatically . Then remove it from the oven and let it cool completely on a wire rack before unmolding.
This is just one of the many gems in our Cakes & Cupcakes series. Every recipe there has been tested and loved in real kitchens, and I promise there’s something for every craving. Go see for yourself.
Claire’s Pro Tips & Gentle Guidance
Making a Chinese Cheesecake is all about technique, but don’t stress — here’s what I’ve learned from my (many) attempts:
Room temperature is your friend. Make sure your cream cheese and eggs are at room temp before you start. Cold ingredients don’t blend as smoothly, and you’ll end up with lumps.
The water bath is non-negotiable. I know it seems fussy, but that gentle, moist heat is what gives this cake its signature texture. According to the folks at Epicurious, water baths create even heat distribution and prevent cracking — and I couldn’t agree more.
Folding is an art. When you’re incorporating those egg whites, pretend you’re tucking a baby into bed — gentle and deliberate. If you stir aggressively, you’ll deflate all that air you worked so hard to whip in.
Don’t panic if it deflates a little. Japanese Cheesecake naturally settles as it cools. A slight dip in the center is totally normal and honestly kind of charming.
The jiggle test is real. When you gently shake the pan, the center should jiggle like… well, like a cloud. If it’s still super liquidy, give it another 5-10 minutes.
Quick Fixes for Japanese Cheesecake
Even the best bakers hit snags. Here’s how to troubleshoot the most common issues:
Problem: My cheesecake cracked on top.
This usually means the oven was too hot or it cooled too quickly. Make sure you’re using an oven thermometer (ovens lie!) and follow that gradual cooling step religiously.
Problem: It’s dense instead of fluffy.
You either deflated the egg whites while folding or overbeat them into stiff peaks. Remember: soft peaks and gentle hands.
Problem: The bottom is soggy.
Water probably snuck into your pan during the water bath. Double-check that foil wrap next time and make sure it’s sealed tight.
Problem: It collapsed dramatically after cooling.
This can happen if the cake wasn’t fully baked or if the oven door was opened too early. Resist peeking until at least 60 minutes in!
Problem: It tastes eggy.
Make sure you’re using fresh eggs and don’t skip the lemon juice — it helps balance those flavors beautifully.
Variations & Fun Twists
Once you’ve nailed the classic Jiggly Cheesecake Recipe, here are some ways to mix things up:
Matcha Japanese Cheesecake: Add 1-2 tablespoons of matcha powder to the flour mixture for a gorgeous green color and earthy flavor.
Chocolate Swirl: Melt 2 oz of dark chocolate and swirl it gently through the batter before baking. Don’t overmix — you want those pretty ribbons.
Lemon Zest Boost: Add the zest of one lemon to the batter for extra brightness. It pairs so well with the creamy tang of the cheese.
Berry Topping: Serve with fresh berries and a dusting of powdered sugar for a summery vibe.
Mini Cheesecakes: Divide the batter into muffin tins lined with cupcake papers. Reduce baking time to about 25-30 minutes total.
Serving, Storage & Reheating
Let’s talk about what happens after this Chinese Cheesecake comes out of the oven — if you can resist diving in immediately, that is.
Serving: This cake is best served slightly chilled or at room temperature. Dust it with powdered sugar right before serving for that bakery-fresh look. A dollop of whipped cream and fresh berries make it feel extra special.
Storage: Cover loosely with plastic wrap (don’t press it directly onto the cake) and store in the fridge for up to 4 days. The texture stays pretty incredible, though it’s definitely best within the first two days.
Reheating: Honestly, I don’t recommend reheating this one — it’s meant to be enjoyed cold or at room temp. If you want to take the chill off a cold slice, just let it sit out for 15-20 minutes.
Freezing: You can freeze individual slices wrapped tightly in plastic wrap and then foil for up to 2 months. Thaw overnight in the fridge.
No-Waste Kitchen Magic
Got leftovers or extras? Here’s how to make the most of everything:
Day-old slices: If your cheesecake has lost some of its fluff after a few days, cut it into cubes and layer it in a trifle with whipped cream and fruit. Total game-changer.
Extra egg yolks: If you somehow end up with leftover yolks (though this recipe uses them all), make a simple custard or homemade mayo.
Leftover cream cheese: Use it in frosting, spread it on bagels with jam, or fold it into scrambled eggs for extra creaminess.
Cake scraps: If you trim the edges for a cleaner look, those scraps are perfect crumbled over ice cream or yogurt.
Japanese Cheesecake FAQs
Can I make Japanese Cheesecake ahead of time?
Absolutely! It actually tastes even better the next day once the flavors have settled. Just make sure it’s fully cooled before covering and refrigerating.
What’s the difference between Japanese Cheesecake and regular cheesecake?
Japanese Cheesecake (also called Chinese Cheesecake) is way lighter and fluffier because of all those whipped egg whites. Regular cheesecake is dense and creamy. Both are delicious, just totally different vibes.
Why is my Japanese Cheesecake not jiggly?
It might be overbaked. The center should still have a gentle wobble when you take it out of the oven — it’ll set more as it cools.
Can I use a different size pan?
You can, but you’ll need to adjust the baking time. A smaller, deeper pan will take longer; a larger, shallower pan will bake faster. Keep an eye on it.
Do I have to use cake flour?
Cake flour gives the lightest texture, but if you’re in a pinch, you can substitute all-purpose flour. Just use 2 tablespoons less per cup and sift it really well.
Cozy Closing
There’s something almost magical about pulling a perfect Japanese Cheesecake out of the oven and watching it jiggle like a happy little cloud. It’s one of those recipes that looks way more impressive than the effort it actually takes — and honestly, isn’t that the dream?
I’d love to see your spin on this Jiggly Cheesecake Recipe! Leave a note below or tag me on Instagram so we can share a sweet moment together. And if you’re feeling adventurous, try it with that matcha variation — it’s absolutely gorgeous.
For more Japanese-inspired treats, check out my Yaki Onigiri, Easy Dango Recipe, and Japanese Cotton Candy Swiss Cake Roll.
I’m Claire Whitmore — a dessert daydreamer from Asheville, NC. For me, baking isn’t about perfect pastries — it’s about the joy of sharing something sweet (and maybe sneaking an extra scoop of icing).
Japanese Cheesecake
Equipment
- 8-inch round springform pan
- Parchment paper
- Aluminum foil
- Large roasting pan
- Electric mixer
- Heatproof bowl
- Mixing bowls
- Whisk
- Spatula
- sifter
Ingredients
- 7 oz cream cheese 200g, softened
- 4 tbsp unsalted butter 60g
- ½ cup milk 120ml
- ½ cup cake flour 65g, sifted
- 2 tbsp cornstarch 20g
- 5 large eggs separated
- ½ cup granulated sugar 100g
- 1 tsp vanilla extract
- 1 tbsp lemon juice
- ¼ tsp salt
Instructions
- Preheat your oven to 320°F (160°C). Line the bottom and sides of your 8-inch springform pan with parchment paper. Wrap the bottom with aluminum foil to prevent water from seeping in during the water bath. Fill a kettle with water and set it to boil.
- Melt the cream cheese, butter, and milk together in a heatproof bowl over a double boiler. Stir gently until smooth and well combined. Remove from heat and let it cool for a few minutes.
- In a separate bowl, sift together the cake flour and cornstarch. Add the vanilla extract and lemon juice to the melted cream cheese mixture, then gradually whisk in the sifted dry ingredients until fully combined. Whisk in the egg yolks one at a time. Set aside.
- In a clean, dry bowl, beat the egg whites with an electric mixer on medium speed until foamy. Add the sugar gradually, a tablespoon at a time, while continuing to beat. Increase to high speed and beat until soft peaks form. The meringue should be glossy and curl over gently.
- Take about one-third of the whipped egg whites and fold them into the cheesecake batter to lighten it. Add the remaining egg whites in two more batches, folding gently from the bottom up with a spatula. Be gentle to keep all the air in the batter.
- Pour the batter into the prepared pan and tap it gently on the counter to release any large air bubbles. Place the springform pan inside a large roasting pan, then carefully pour hot water into the roasting pan until it comes about 1 inch up the side of the cheesecake pan.
- Bake at 320°F (160°C) for 25 minutes, then reduce the temperature to 275°F (135°C) and bake for another 50 minutes.
- Turn off the oven and crack the door open slightly. Let the cheesecake cool in the oven for about 15 minutes. Then remove it from the oven and let it cool completely on a wire rack before unmolding.