Cute Valentine’s Day Oreo Pops
These cute Valentine’s Day Oreo pops transform store-bought cookies into adorable treats in under 30 minutes. Perfect for classroom parties, Galentine’s Day, or sweet surprises—no baking required!
Hey there, I’m Claire Whitmore—a pastry whisperer in Asheville, NC, where butter totally counts as self-care. These cute Valentine’s Day Oreo pops are my secret weapon when I want to look like a Pinterest mom without actually spending hours in the kitchen.
You get all the “aww” factor with basically zero stress, which is exactly my kind of Valentine’s Day magic.
Table of Contents
Little Snapshot: What This Recipe Delivers
These cute Valentine’s Day Oreo pops are no-bake chocolate sandwich cookies dipped in colorful candy melts and decorated with heart sprinkles—ready in 30 minutes total with just 6 simple ingredients. They’re perfect for classroom parties, easy enough for kids to help make, and adorable enough to gift without any fancy packaging.
Why You’ll Love This Recipe 🌸
- These Valentine’s Day Oreo pops require zero baking skills—if you can dip a cookie, you’re basically a decorated dessert expert.
- They’re done in less time than it takes to find matching socks, which means you can whip up a batch even when Valentine’s Day sneaks up on you.
- Kids can totally help with this one—the dipping and sprinkling parts are basically designed for little hands (and big messes, but the fun kind).
- According to Wilton’s candy melting guide, using quality candy melts creates a smooth, professional-looking coating—and these Oreo Valentine ideas prove exactly why.
Quick Facts ⚡
Here’s the quick scoop on this cute Valentine’s Day Oreo pop recipe.
- CourseDessert/Treat
- Prep Time20 minutes
- Cook Time10 minutes (cooling)
- Total Time30 minutes
- Servings4 pops
- DifficultyEasy
Nutritional Peek
Here’s what you’re working with per Oreo pop—because even treats deserve a little transparency.
| Nutrient | Amount per Serving |
|---|---|
| Calories | 180 |
| Protein | 1g |
| Carbohydrates | 26g |
| Total Fat | 8g |
| Sugar | 20g |
| Fiber | 0.5g |
There’s a whole world of valentine’s & spring waiting for you over at the Valentine’s & Spring collection. Each one is made with the same love and attention, and they’re all absolutely worth trying. Happy cooking!
Ingredients
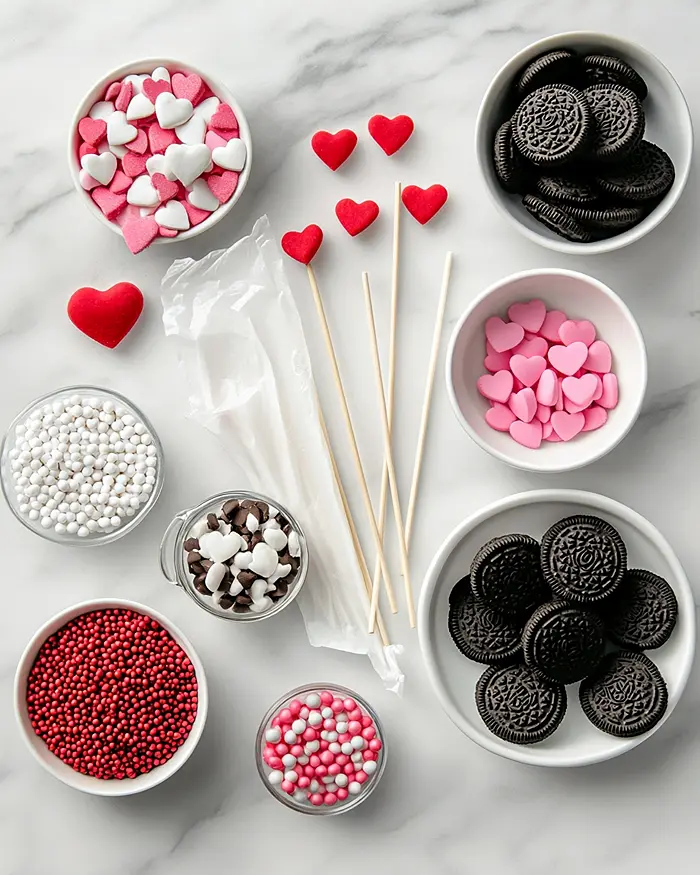
These Oreo cookies Valentines Day treats start with ingredients you can grab at any grocery store—no specialty shops required. For the cookie base, you’ll use regular Oreo cookies (the classic kind works perfectly).
For the coating, candy melts in red, bright pink, and bright white create that adorable Valentine’s vibe. The decorations—jumbo hearts, mini hearts, and sugar pearls—add the finishing touch that makes these look bakery-fancy.
| Amount | Ingredient |
|---|---|
| 4 | Oreo cookies (classic flavor) |
| 4 | 4-inch lollipop sticks |
| 1½ cups total | Candy melts (red, bright pink, and bright white—split however you like) |
| As desired | Sprinkles (jumbo hearts, mini hearts, and sugar pearls—yes, you can go wild here) |
| 3 | Microwave-safe cups (one for each candy color) |
| 1 | Disposable candy piping bag (optional, for drizzle decorations) |
| 1 sheet | Parchment paper (to save your countertops) |
Tools You’ll Actually Use
Essential:
- 3 microwave-safe cups or bowls
- Baking sheet
- Parchment paper
- Spoon for stirring
Optional but Helpful:
- Disposable piping bag (for fancy drizzles)
- Freezer (speeds up cooling time when you’re impatient like me)
- Toothpicks (for fixing any candy drip mistakes)
Step-by-Step Instructions
Making these cute Valentine’s Day Oreo pops is honestly more fun than complicated—promise.
Step 1: Prep Your Oreos Start by gently twisting and separating your Oreo cookies into two halves, keeping both the cream-filled side and the plain side intact. Try not to break them (but if you do, that’s what taste-testing is for). Lay them out on a clean surface so you’re ready to assemble.
Step 2: Create the Oreo-Stick Bond In a microwave-safe cup, melt a small amount of candy melts—about 2 tablespoons of any color you’re using—in 20-second bursts, stirring well after each interval until completely smooth.
Dip the tip of a lollipop stick about half an inch into the melted candy, then immediately sandwich it between both halves of an Oreo cookie, pressing gently. Let the candy cool and firm completely before moving on. Pro tip: a quick 5-minute trip to the freezer will speed this up if you’re working on party-prep time.
Step 3: Melt Your Main Candy Colors Fill a microwave-safe cup about two-thirds full with your first candy melt color—let’s start with red because it’s classic Valentine vibes. Microwave in 20-second increments, stirring thoroughly after each round until the candy is completely smooth and drizzly. Don’t rush this part—burnt candy melts taste like sadness and regret.
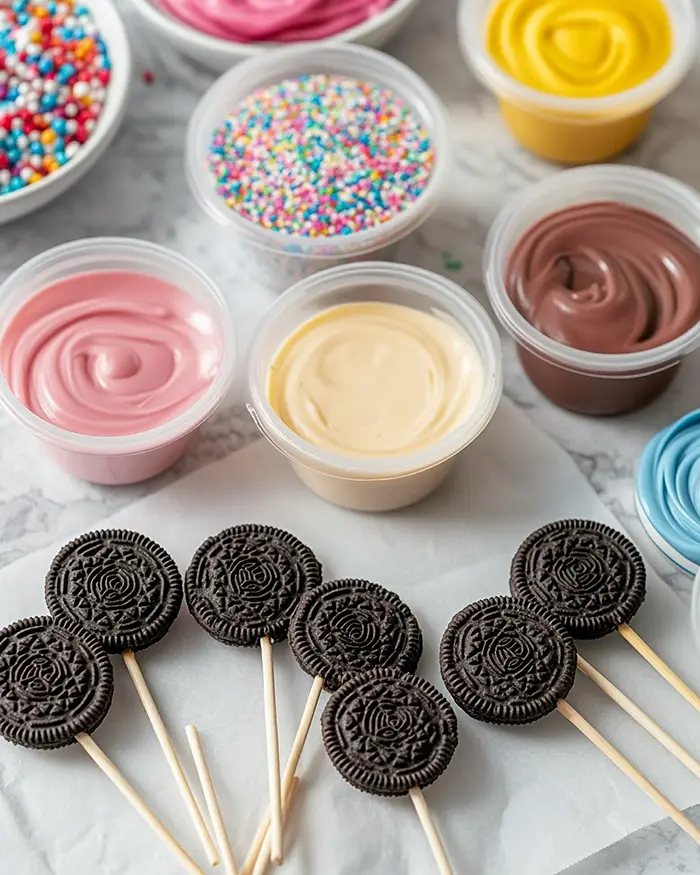
Step 4: Dip and Decorate Hold your Oreo pop by the stick and dip it straight down into the melted red candy, letting the candy completely cover the entire cookie. Gently tap the stick against the side of the cup to let excess candy drip off, then lay the pop flat on a sheet of parchment paper.
While the candy coating is still wet and glossy, sprinkle on your jumbo hearts, mini hearts, or sugar pearls—this is where the magic happens. Let it cool and firm up completely before touching.
Step 5: Repeat with Other Colors Repeat this exact dipping process with bright pink and bright white candy melts for your remaining Oreo pops, creating a beautiful Valentine’s Day variety. If you’re feeling fancy, you can drizzle a contrasting candy color over the top using a disposable piping bag once the base coat has firmed up.
Claire’s Pro Tips & Gentle Guidance
These Valentine Oreos are pretty forgiving, but I’ve learned a few tricks that’ll save you from my early mistakes.
Temperature matters more than you think. Room temperature Oreos work way better than cold ones straight from the pantry—the candy coating sticks more evenly and doesn’t crack as easily. If your kitchen is super warm, though, a quick chill in the fridge before dipping helps the candy set faster.
Don’t overheat your candy melts. I’ve definitely nuked them too long and ended up with a thick, clumpy mess that wouldn’t coat anything. Stick to those 20-second bursts and stir between each one.
According to the expert chocolate melting techniques at Ghirardelli, patience during the melting process creates the smoothest, most workable coating—and these Oreo Valentine ideas definitely benefit from that advice.
Add sprinkles immediately. Once that candy coating starts to set, sprinkles won’t stick anymore—they’ll just bounce right off like they’re personally offended. Decorate while the coating is still shiny and wet.
Use a styrofoam block for drying. If you want your pops to stand upright while drying instead of laying flat, poke the sticks into a styrofoam block. This also works great if you’re adding drizzle decorations and don’t want to smudge your base coat.
Quick Fixes for Valentine’s Day Oreo Pops
Problem: The candy coating is too thick and clumpy. Add a teaspoon of vegetable oil or coconut oil to your melted candy and stir well—this thins it out without affecting the flavor. Sometimes candy melts just need a little help getting to that perfect dipping consistency.
Problem: The Oreo keeps sliding off the stick. You didn’t let the “glue” candy set long enough before dipping. Pop it in the freezer for 5 minutes to firm up that bond, then try dipping again. Patience is annoying but effective.
Problem: The candy coating cracked after it dried. Your Oreos were probably too cold when you dipped them. Let them come to room temperature next time, and make sure your melted candy isn’t too hot either—extreme temperature differences cause cracking.
Problem: My sprinkles won’t stick. The candy coating has already started to set. Work faster next time, or gently reheat the surface with a hair dryer on low for just a second or two to make it tacky again.
Variations & Fun Twists
These Oreo cookies Valentines Day treats are super versatile once you’ve got the basic technique down.
Color Play: Swap the traditional Valentine’s colors for pastels (think lavender, mint, and soft yellow) for a more modern, springy vibe. Or go full-on classic with just pink and white for an elegant, bakery-style look.
Flavor Swap: Use Golden Oreos instead of chocolate for a vanilla base, or try the red velvet Oreos for an extra Valentine’s Day punch. Peanut butter Oreos dipped in chocolate candy melts are also ridiculously good if you’re team chocolate-PB.
Drizzle Designs: Once your base coat is set, use a contrasting color in a piping bag to create zigzags, polka dots, or even little heart shapes on top. White drizzle over pink or red looks especially pretty.
Make It Fancy: Add edible gold dust or luster spray for a glam finish that looks way more complicated than it actually is. Perfect for adult Galentine’s parties where you want to look like you totally have your life together.
Allergy-Friendly: Use dairy-free Oreos (the regular ones are actually vegan!) and check your candy melt labels—many brands offer dairy-free options that work just as well.
Serving, Storage & Reheating

These Valentine Oreos are ready to serve immediately once the candy coating has firmed up completely—no waiting required. Stand them upright in a pretty jar, arrange them on a platter, or package them individually in clear cellophane bags tied with ribbon for the cutest classroom valentines ever.
Store your finished Oreo pops in an airtight container at room temperature for up to 2 weeks—the candy coating actually protects the cookies and keeps them from getting stale. Layer them between sheets of parchment paper if you’re stacking them so the decorations don’t smudge.
If you live somewhere ridiculously hot and humid, you can refrigerate them, but let them come to room temperature before serving so you don’t get condensation on the candy coating. There’s no reheating needed here—these cuties are perfect served at room temp.
No-Waste Kitchen Magic
Got extra candy melts? Don’t let them go to waste just sitting in the pantry.
Leftover candy melts: Pour them into silicone molds to create little heart-shaped candies, or drizzle them over pretzels and popcorn for quick snacks. They’ll keep for months if stored properly in a cool, dry place.
Extra sprinkles: Mix different Valentine’s sprinkles together to create a custom blend you can use on my Strawberry Cream Cheese Heart Danishes or any other Valentine’s treats you’re making.
Broken Oreos: The ones that cracked during the twisting process are perfect for crushing up and using as a topping for ice cream, or you can fold them into my Homemade Reese’s Peanut Butter Cups for a cookies-and-cream variation.
Day-old pops: If somehow these last more than a day (which, in my house, is basically impossible), chop them up and fold them into vanilla ice cream for an Oreo pop ice cream that’ll blow your mind.
These cute Valentine’s Day Oreo pops FAQs
Can I freeze these Valentine’s Day Oreo pops?
Absolutely! Freeze them in a single layer on a baking sheet until solid, then transfer to a freezer-safe container or bag for up to 2 months. They actually taste amazing straight from the freezer—the candy coating stays firm and the Oreo gets almost ice cream sandwich-like.
What’s the best way to store Oreo pops so they stay fresh?
Keep them in an airtight container at room temperature, layered between parchment paper sheets so the decorations don’t get smooshed. They’ll stay fresh and the candy coating will stay crisp for up to 2 weeks.
How do I know when the candy melts are ready for dipping?
The candy should be completely smooth, drizzly, and fall off your spoon in a ribbon-like stream. If it’s thick and gloppy, it needs more heating or a splash of vegetable oil to thin it out.
Could I make these with my kids, or is it too messy?
These are actually perfect for kids! The dipping part might need some supervision (hot candy melts and all), but kids can totally help with twisting the Oreos, adding sprinkles, and decorating. Just embrace the mess and maybe lay down some parchment paper first.
Cozy Closing
I’d love to see your spin on these cute Valentine’s Day Oreo pops! Drop a comment below with your Oreo pop photos—I’d love to see how you made them your own. These Valentine’s Day Oreo pops are so versatile; I bet you’ve got amazing color combinations and sprinkle ideas already in mind!
And if you’re looking for more easy Valentine’s treats that won’t stress you out, check out my 5-Ingredient Cheesy Sour Cream Beef Noodle Bake for a dinner that frees up time for dessert-making, or browse through more Valentine’s inspiration that keeps things simple and sweet.
I’m Claire Whitmore—a dessert daydreamer from Asheville, NC. For me, baking isn’t about perfect pastries—it’s about the joy of sharing something sweet (and maybe sneaking an extra taste while the kids aren’t looking).

Valentine’s Day Oreo Pops
Equipment
- 3 microwave-safe cups or bowls
- Baking sheet
- Parchment paper
- Spoon for stirring
- Disposable piping bag (optional)
- Toothpicks (optional)
Ingredients
- 4 Oreo cookies classic flavor
- 4 4-inch lollipop sticks
- 1½ cups Candy melts red, bright pink, and bright white—split however you like
- Sprinkles jumbo hearts, mini hearts, and sugar pearls—as desired
- 3 Microwave-safe cups one for each candy color
- 1 Disposable candy piping bag optional, for drizzle decorations
- 1 sheet Parchment paper
Instructions
- Start by gently twisting and separating your Oreo cookies into two halves, keeping both the cream-filled side and the plain side intact. Try not to break them (but if you do, that’s what taste-testing is for). Lay them out on a clean surface so you’re ready to assemble.
- In a microwave-safe cup, melt a small amount of candy melts—about 2 tablespoons of any color you’re using—in 20-second bursts, stirring well after each interval until completely smooth. Dip the tip of a lollipop stick about half an inch into the melted candy, then immediately sandwich it between both halves of an Oreo cookie, pressing gently. Let the candy cool and firm completely before moving on. Pro tip: a quick 5-minute trip to the freezer will speed this up if you’re working on party-prep time.
- Fill a microwave-safe cup about two-thirds full with your first candy melt color—let’s start with red because it’s classic Valentine vibes. Microwave in 20-second increments, stirring thoroughly after each round until the candy is completely smooth and drizzly. Don’t rush this part—burnt candy melts taste like sadness and regret.
- Hold your Oreo pop by the stick and dip it straight down into the melted red candy, letting the candy completely cover the entire cookie. Gently tap the stick against the side of the cup to let excess candy drip off, then lay the pop flat on a sheet of parchment paper. While the candy coating is still wet and glossy, sprinkle on your jumbo hearts, mini hearts, or sugar pearls—this is where the magic happens. Let it cool and firm up completely before touching.
- Repeat this exact dipping process with bright pink and bright white candy melts for your remaining Oreo pops, creating a beautiful Valentine’s Day variety. If you’re feeling fancy, you can drizzle a contrasting candy color over the top using a disposable piping bag once the base coat has firmed up.