Strawberry Cream Cheese Heart Danishes
This Strawberry Cream Cheese Heart Danishes recipe is exactly what your Valentine’s Day (or any random Tuesday) needs: flaky puff pastry, creamy pink filling, and fresh strawberries that look like you spent hours in the kitchen when you really just spent 30 minutes.
These homemade danishes use store-bought puff pastry, simple cream cheese filling, and fresh fruit for an easy yet impressive valentines baking project that screams “I love you” without the stress.
I’ll be honest — I stumbled onto this recipe when I was trying to impress my sister-in-law during her visit last February. I wanted something that looked bakery-level gorgeous but didn’t require me to wake up at 5 AM. Turns out, heart-shaped danishes are the ultimate cheat code for looking like a baking genius.
Table of Contents
Little Snapshot: What This Recipe Delivers
These Strawberry Cream Cheese Heart Danishes combine buttery puff pastry with a sweetened cream cheese filling and fresh strawberries for a beautiful Valentine’s Day breakfast or dessert that takes just 30 minutes from start to finish.
They’re beginner-friendly, require no fancy techniques, and look absolutely stunning on a brunch table.
Why You’ll Love This Recipe 🌸
- This Strawberry Cream Cheese Heart Danishes recipe takes less time than scrolling through your feed — seriously, 30 minutes and you’re done.
- They look like you ordered them from a fancy bakery, but you’ll spend about $8 on ingredients (and keep all the credit).
- Perfect for Valentine’s Day baking with kids — the heart shapes are forgiving, and the mess is half the fun.
- According to King Arthur Baking’s guide to simple Valentine’s treats, the best holiday desserts balance simplicity with wow-factor — and these heart danishes prove exactly why.
Quick Facts ⚡
Here’s the quick scoop on this Strawberry Cream Cheese Heart Danishes recipe.
- CourseDessert / Breakfast
- Prep Time15 minutes
- Cook Time17 minutes
- Total Time32 minutes
- Servings7-9 danishes
- DifficultyEasy
Nutritional Peek
Here’s a quick nutritional snapshot per danish (based on 7 servings) — because knowing what you’re eating can be just as comforting as the pastry itself.
| Nutrient | Amount per Serving |
|---|---|
| Calories | 185 kcal |
| Protein | 3g |
| Carbohydrates | 18g |
| Total Fat | 11g |
| Saturated Fat | 5g |
| Fiber | 1g |
| Sugar | 5g |
Ingredients
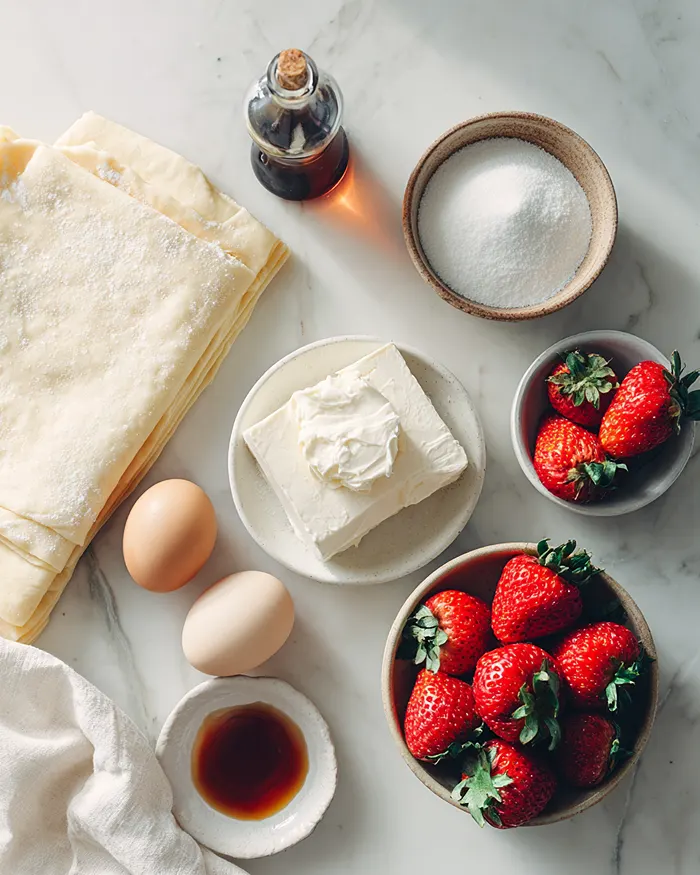
Let me walk you through what makes these valentines recipes desserts so ridiculously easy and delicious.
For the pastry base, you’ll use store-bought puff pastry — and yes, this is 100% the move here because homemade puff pastry is a weekend project, not a Tuesday morning vibe.
For the cream cheese filling, you’ll need room-temperature cream cheese, white sugar, and vanilla extract to create that tangy-sweet base, plus a few drops of red food coloring for that Valentine’s Day pink swirl.
Fresh diced strawberries add brightness and texture, while a simple egg wash made from one egg and cold water gives you that golden, bakery-style finish.
| Amount | Ingredient |
|---|---|
| 1 sheet | Store-bought puff pastry, thawed to package directions |
| Cream Cheese Filling | |
| 4 oz | Cream cheese, at room temperature (yes, this matters — cold cream cheese = lumpy filling) |
| 2 tbsp | White sugar |
| 1/2 tsp | Vanilla extract |
| Few drops | Red food coloring |
| 1/2 cup | Diced strawberries, fresh and ripe |
| Egg Wash | |
| 1 large | Egg |
| 1 tbsp | Cold water |
Tools You’ll Actually Use
You don’t need a fancy kitchen for this — just a few basics:
- Large baking sheet
- Parchment paper (trust me, saves cleanup time)
- 3-inch heart-shaped cookie cutter
- Medium mixing bowl
- Small bowl for egg wash
- Sharp knife or smaller heart cookie cutter (for scoring)
- Small pastry brush or your very clean finger (for egg wash)
- Measuring spoons and cups
Step-by-Step Instructions
Making Strawberry Cream Cheese Heart Danishes is way easier than you’d think — here’s exactly how to pull it off.
Step 1: Thaw the puff pastry. Thaw your puff pastry sheet according to the package directions — some brands say leave it on the counter for 2 hours, others recommend thawing in the fridge overnight.
I usually do the fridge method because I’m a planner (and also because I forget things on the counter). Just make sure it’s pliable but still cold when you work with it.
Step 2: Preheat and prep. Preheat your oven to 400°F and line a large baking sheet with parchment paper. This temperature is hot enough to puff the pastry into those beautiful golden layers without burning the edges.
Step 3: Make the cream cheese filling. In a medium bowl, mix the room-temperature cream cheese, white sugar, and vanilla extract together until the mixture is light, fluffy, and completely smooth — no lumps allowed here.
Add a few drops of red food coloring and mix until you get that pretty pink Valentine’s shade. Set this aside while you prep the pastry.
Step 4: Cut out heart shapes. Unfold your thawed puff pastry on a clean surface. Using a 3-inch heart-shaped cookie cutter, cut out 7 hearts and place them on your prepared baking sheet about 1 inch apart.
Depending on your puff pastry size and cookie cutter, you might squeeze out 9 hearts — just reroll scraps gently if needed.
Step 5: Score the border. Using a sharp knife or a smaller heart-shaped cookie cutter, carefully score a border about 1/4 inch from the edge of each heart. This is a shallow cut — you’re not slicing all the way through, just creating a little frame that’ll puff up around your filling. It’s like giving each danish its own built-in bowl.
Step 6: Add the filling. Spoon about 1/2 tablespoon of the pink cream cheese mixture onto each heart and gently spread it inside the scored border you just made. Don’t overfill — less is more here, or you’ll have a bubbly mess in the oven.
Step 7: Top with strawberries. Divide your diced strawberries evenly among the danishes, sprinkling them on top of the cream cheese layer. Try to keep the strawberries inside that outlined border so they don’t slide off during baking.
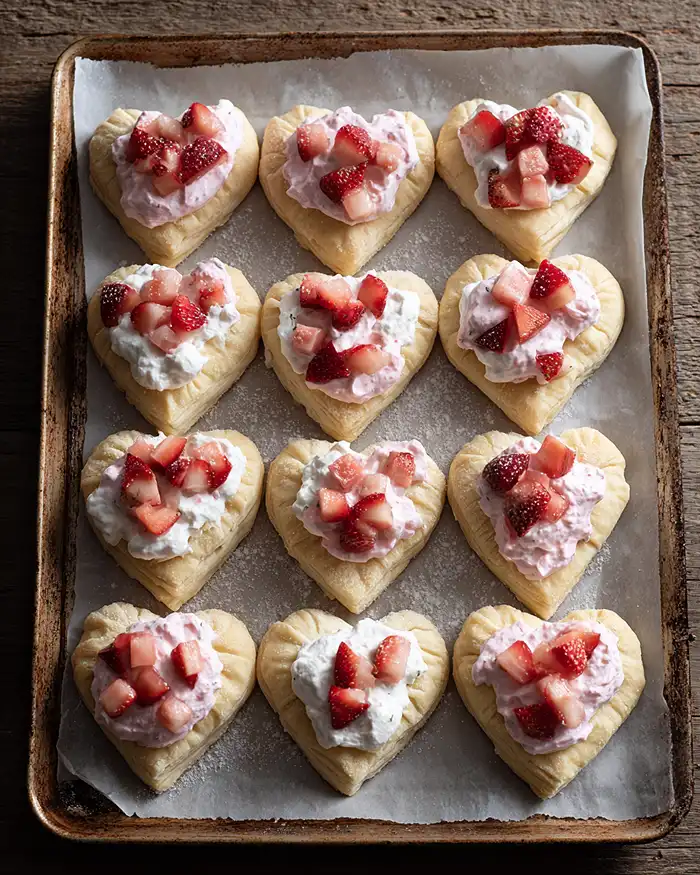
Step 8: Apply egg wash. In a small bowl, whisk together the egg and cold water to create an egg wash. Using a small pastry brush (or your finger if you’re going rogue), apply the egg wash only on the outside border of each heart. This is what gives you that gorgeous golden-brown finish.
Step 9: Bake. Bake for 15-17 minutes, or until the edges are turning a beautiful golden brown and your kitchen smells like a Parisian café. The pastry should be puffed and crispy, with the filling slightly set but still creamy.
Step 10: Cool and serve. Let the danishes cool on the pan for about 5 minutes before digging in. They’re best enjoyed warm when the pastry is at its flakiest and the cream cheese is still soft and dreamy.
Claire’s Pro Tips & Gentle Guidance
Here’s where I share the little secrets that make these valentines baking danishes even better.
Room temperature cream cheese is non-negotiable. Cold cream cheese won’t blend smoothly, and you’ll end up with lumps in your filling that no amount of stirring will fix. I usually pull mine out about 30 minutes before I start baking.
Don’t skip the scoring step — it might feel fussy, but that shallow border is what keeps your filling from spreading everywhere and creates that professional-looking puffed frame. Just be gentle and don’t cut all the way through the pastry.
If your puff pastry gets too warm while you’re working with it, pop it back in the fridge for 10 minutes. Warm pastry = less puff = sad danishes. You want it cold enough to hold its shape but pliable enough to cut cleanly.
For extra bakery vibes, dust your finished danishes with a light sprinkle of powdered sugar right before serving. It’s optional, but it makes them look even more gorgeous on a Valentine’s Day brunch table.
According to Serious Eats’ comprehensive puff pastry techniques guide, keeping pastry cold and working quickly are the two most important factors for achieving maximum flakiness — and trust me, it’s worth the extra fridge time.
Quick Fixes for Strawberry Cream Cheese Heart Danishes
Problem: My filling leaked everywhere. You probably overfilled or didn’t score the border deep enough. Next time, use a lighter hand with the cream cheese (1/2 tablespoon really is enough) and make sure your scored border is visible before filling.
Problem: The pastry didn’t puff up. This usually means your puff pastry was too warm when it went into the oven, or your oven wasn’t hot enough. Always preheat fully to 400°F and keep that pastry cold until baking.
Problem: The edges burned but the center is still pale. Your oven might run hot. Try dropping the temperature to 375°F and baking a few minutes longer, or tent the edges with foil halfway through if they’re browning too quickly.
Problem: The cream cheese filling looks curdled. You likely used cold cream cheese or overmixed it. Make sure it’s truly at room temperature and mix just until smooth — no need to whip it for five minutes.
Variations & Fun Twists
These Strawberry Cream Cheese Heart Danishes are super versatile, so feel free to make them your own.
For a different berry vibe, swap strawberries for fresh raspberries or blueberries — both pair beautifully with cream cheese. You could also try a mixed berry combo for a colorful twist.
Want to make these more decadent? Add a drizzle of melted white chocolate or a simple powdered sugar glaze on top once they’ve cooled slightly. It’s not necessary, but it’s definitely delicious.
For a citrus variation, add a teaspoon of lemon zest to your cream cheese filling and use fresh blueberries instead of strawberries. It’s like sunshine in pastry form.
Not a Valentine’s Day baker? Cut these into circles or squares instead of hearts and swap the red food coloring for whatever color fits your occasion. Same delicious recipe, different shape.
This is just one of the many gems in our Classic Comfort Foods series. Every recipe there has been tested and loved in real kitchens, and I promise there’s something for every craving. Go see for yourself.
Serving, Storage & Reheating

Let’s talk about how to enjoy these valentines recipes desserts at their absolute best.
These danishes are meant to be enjoyed fresh and warm, ideally within a few hours of baking. Serve them for breakfast with coffee, as a Valentine’s Day dessert with a scoop of vanilla ice cream, or as an afternoon treat with tea. They’re perfect for impressing your Valentine or just treating yourself on a random Wednesday.
If you somehow have leftovers, store them in an airtight container at room temperature for up to 1 day. I’ll warn you though — the pastry loses its flakiness pretty quickly, so they’re definitely best the day you bake them.
To reheat, pop them in a 350°F oven for about 5 minutes to crisp up the pastry again. Don’t microwave them — you’ll end up with soggy, sad danishes, and nobody wants that.
No-Waste Kitchen Magic
Here’s how to make the most of every ingredient and avoid waste.
If you have puff pastry scraps after cutting your hearts, gently press them together (don’t overwork the dough) and cut out a few more shapes. You can even make mini danishes or use them for a quick cinnamon sugar twist.
Leftover cream cheese filling? Spread it on bagels, swirl it into your morning oatmeal, or use it as a fruit dip. It’s delicious and lasts about 3-4 days in the fridge.
Got extra strawberries? Toss them into smoothies, make a quick fruit mocktail, or freeze them for future baking projects. Fresh berries are too precious to waste.
Day-old danishes that have lost their crispness can be broken up and used as a base for a fruit parfait — layer with yogurt, fresh berries, and granola for a fun breakfast twist.
FAQs
Can I freeze Strawberry Cream Cheese Heart Danishes?
I wouldn’t recommend freezing these once they’re baked — the cream cheese filling and strawberries don’t freeze and thaw well, and the pastry loses its flakiness.
However, you can freeze the unbaked, assembled danishes on a baking sheet, then transfer to a freezer bag once solid. Bake from frozen, adding 3-5 extra minutes to the baking time.
What’s the best way to store leftover danishes?
Store them in an airtight container at room temperature for up to 1 day. They’re honestly best enjoyed within a few hours of baking when the pastry is still crispy and flaky. If you need to keep them longer, refrigerate them, but know that the texture won’t be quite the same.
How do I know when my Strawberry Cream Cheese Heart Danishes are done baking?
Look for golden-brown edges on the puff pastry and a slightly set cream cheese filling — it should look creamy but not liquidy. The pastry should be puffed and crispy, usually around 15-17 minutes at 400°F.
Every oven is different, so start checking at the 15-minute mark.
Why should I use room temperature cream cheese in these danishes?
Room temperature cream cheese blends smoothly into a creamy, lump-free filling that spreads easily and looks professional. Cold cream cheese will leave you with chunks and frustration, and nobody has time for that. Pull it out 30 minutes before you start baking.
Cozy Closing
I hope you love these Strawberry Cream Cheese Heart Danishes as much as I do! They’ve become my go-to for Valentine’s morning because they make everyone feel special without making me stressed. Plus, there’s something magical about pulling a tray of heart-shaped pastries out of the oven — instant mood boost.
I’d love to see your spin on this Strawberry Cream Cheese Heart Danishes recipe! Drop a comment below with your photos or tell me how you made them your own. Did you try a different berry? Add a chocolate drizzle? Make them for a special someone? I want to hear all about it.
And if you’re looking for more Valentine’s Day inspiration, check out my Cherry Pie Mocktail for a festive drink, or try these danishes alongside a savory brunch spread like my Texas Caviar. Balance is everything, right?
Happy baking, and remember — if the hearts aren’t perfect, they’re just “rustic.” That’s my story and I’m sticking to it.
I’m Claire Whitmore — a dessert daydreamer from Asheville, NC. For me, baking isn’t about perfect pastries — it’s about the joy of sharing something sweet (and maybe sneaking an extra taste of cream cheese filling when no one’s looking). Life’s too short for complicated recipes and stress baking — let’s keep it cozy, delicious, and real.

Strawberry Cream Cheese Heart Danishes
Equipment
- Large baking sheet
- Parchment paper
- 3-inch heart-shaped cookie cutter
- Medium mixing bowl
- Small bowl
- Sharp knife
- Pastry brush
- Measuring spoons
- Measuring cups
Ingredients
Pastry
- 1 sheet store-bought puff pastry thawed to package directions
Cream Cheese Filling
- 4 oz cream cheese at room temperature
- 2 tbsp white sugar
- ½ tsp vanilla extract
- red food coloring few drops
- ½ cup diced strawberries fresh and ripe
Egg Wash
- 1 large egg
- 1 tbsp cold water
Instructions
- Thaw your puff pastry sheet according to the package directions — some brands say leave it on the counter for 2 hours, others recommend thawing in the fridge overnight. Just make sure it’s pliable but still cold when you work with it.
- Preheat your oven to 400°F and line a large baking sheet with parchment paper.
- In a medium bowl, mix the room-temperature cream cheese, white sugar, and vanilla extract together until the mixture is light, fluffy, and completely smooth. Add a few drops of red food coloring and mix until you get that pretty pink Valentine’s shade. Set this aside while you prep the pastry.
- Unfold your thawed puff pastry on a clean surface. Using a 3-inch heart-shaped cookie cutter, cut out 7 hearts and place them on your prepared baking sheet about 1 inch apart. Depending on your puff pastry size and cookie cutter, you might squeeze out 9 hearts.
- Using a sharp knife or a smaller heart-shaped cookie cutter, carefully score a border about 1/4 inch from the edge of each heart. This is a shallow cut — you’re not slicing all the way through, just creating a little frame that’ll puff up around your filling.
- Spoon about 1/2 tablespoon of the pink cream cheese mixture onto each heart and gently spread it inside the scored border. Don’t overfill.
- Divide your diced strawberries evenly among the danishes, sprinkling them on top of the cream cheese layer. Try to keep the strawberries inside that outlined border so they don’t slide off during baking.
- In a small bowl, whisk together the egg and cold water to create an egg wash. Using a small pastry brush, apply the egg wash only on the outside border of each heart.
- Bake for 15-17 minutes, or until the edges are turning a beautiful golden brown and the pastry is puffed and crispy.
- Let the danishes cool on the pan for about 5 minutes before serving. They’re best enjoyed warm when the pastry is at its flakiest.