Cheesy Garlic Rolls Recipe
I’m Linda Sandra — a Charleston home cook who believes every meal should feel like a hug — and these cheesy garlic rolls are proof that the best comfort food doesn’t need to be complicated. You know that moment when you walk into a bakery and the smell of fresh bread just wraps around you? That’s what we’re making today.
These rolls combine buttery roasted garlic, gooey mozzarella, and soft homemade dough into pull-apart perfection. They’re fancy enough for holiday dinners but easy enough for a cozy Tuesday night when you just want something warm and wonderful. Plus, roasting the garlic makes your kitchen smell absolutely dreamy.
I started making these after a girls’ night when we demolished an entire basket of garlic bread in, like, eight minutes. I figured if we loved store-bought that much, imagine what homemade could do. Spoiler: it’s dangerous. The good kind of dangerous.
Table of Contents
Little Snapshot: What This Recipe Delivers
This cheesy garlic rolls recipe gives you six fluffy, golden rolls stuffed with roasted garlic butter and melted mozzarella in about 3 hours (mostly hands-off proofing time). Perfect for beginners ready to try yeast dough — the steps are simple, the payoff is huge, and your kitchen will smell like a French bakery.
Why You’ll Love This Recipe 🌸
- These cheesy garlic rolls take less time than binge-watching two episodes of your favorite show — and they’re way more satisfying.
- Roasted garlic gives you all that deep, sweet, caramelized flavor without any of the sharp bite (your breath will thank you).
- They look bakery-level impressive but use pantry staples and simple techniques — no fancy equipment required.
- According to King Arthur Baking in their guide to better yeast bread, patience during proofing is what separates good rolls from great ones — and this recipe proves exactly why.
Quick Facts ⚡
Here’s the quick scoop on these cheesy garlic rolls.
- CourseAppetizer / Side Dish
- Prep Time30 minutes
- Cook Time2 hours 45 minutes
- Total Time3 hours 15 minutes
- Servings6 rolls
- DifficultyMedium
Nutritional Peek
Here’s what you’re working with per roll (because knowing is half the battle, right?). These numbers are estimates based on the recipe as written — your actual values might vary slightly depending on brands and portion sizes.
| Nutrient | Amount per Roll |
|---|---|
| Calories | 320 kcal |
| Protein | 12g |
| Carbohydrates | 38g |
| Total Fat | 14g |
| Saturated Fat | 8g |
| Fiber | 2g |
| Sugar | 5g |
| Sodium | 650mg |
Ingredients for Cheesy Rolls Recipes
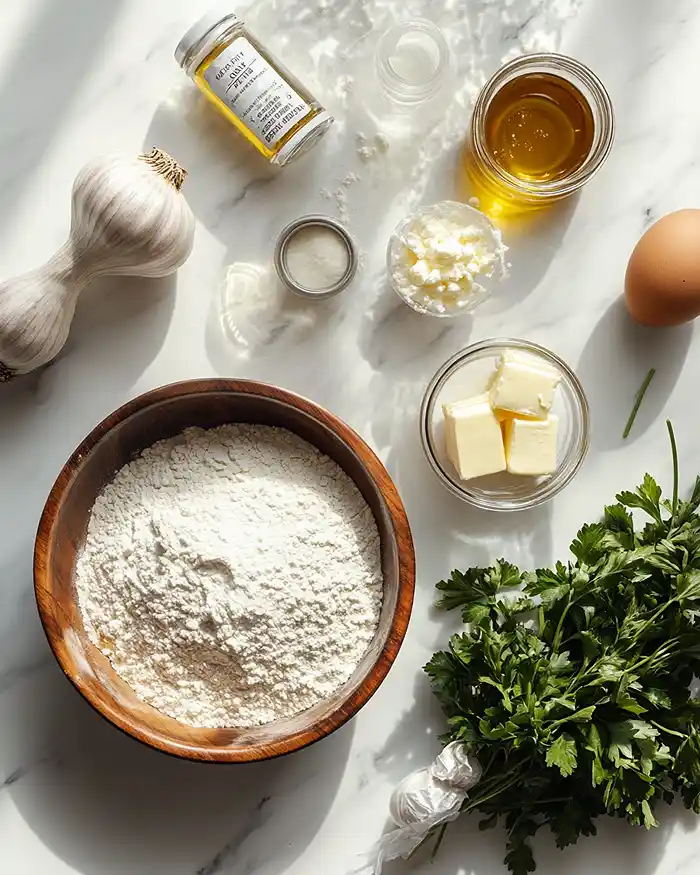
For the garlic butter — roasted garlic, softened butter, fresh parsley, and that golden garlic oil from roasting — you’ll want everything at room temperature so it blends into this smooth, spreadable magic.
For the dough — warm milk, active dry yeast, honey, all-purpose flour, bread flour, milk powder (totally optional but adds extra softness), butter, egg yolks, salt, and sugar — these come together into the softest, most pillowy base you’ve ever worked with.
Garlic Butter
| Amount | Ingredient |
|---|---|
| 1 head | Garlic (whole head) |
| Pinch | Salt |
| 3 tbsp | Olive oil |
| 50g (1/4 cup) | Butter, softened — real butter, because it just makes everything better |
| 1 tbsp | Fresh parsley, chopped |
Dough
| Amount | Ingredient |
|---|---|
| 90g (1/3 cup) | Warm milk (not hot — just warm to the touch) |
| 7g (2 1/4 tsp) | Active dry yeast |
| 1 tbsp | Honey |
| 200g (1 1/2 cups) | All-purpose flour |
| 50g (1/2 cup) | Bread flour |
| 20g (3 tbsp) | Milk powder (optional but makes them extra soft) |
| 25g (2 tbsp) | Butter, softened |
| 2 | Egg yolks |
| 1 1/2 tsp | Salt |
| 1 tbsp | Sugar |
Filling
| Amount | Ingredient |
|---|---|
| 200g (2 cups) | Mozzarella cheese, shredded |
| As needed | Garlic butter (from above) |
Egg Wash
| Amount | Ingredient |
|---|---|
| 1 | Egg, beaten |
Tools You’ll Actually Use
Nothing fancy here — just the basics you probably already have tucked in your cabinets. Here’s what you’ll need to pull these rolls together:
- Small ramekin or oven-safe dish for roasting garlic
- Aluminum foil
- Mixing bowls (at least two)
- Stand mixer with dough hook (or strong arms and patience)
- Rolling pin
- Sharp knife or dental floss (for cutting rolls)
- Baking sheet lined with parchment
- Pastry brush
- Clean kitchen towel or plastic wrap for covering dough
How to Make Garlic Bread Rolls: Step-by-Step
Okay, let’s get into making these cheesy garlic rolls! The process is straightforward, but there’s some waiting time while the dough does its thing. I promise it’s worth every minute of anticipation — your kitchen’s about to smell incredible.
Step 1: Roast the Garlic
Preheat your oven to 160°C (320°F). Slice the top off one whole garlic head so the cloves are exposed, place it in a small ramekin, and drizzle generously with olive oil. Sprinkle with a pinch of salt, cover tightly with aluminum foil, and roast for 2 hours until the cloves are soft, golden, and smell like heaven.
Once it’s cool enough to handle, squeeze those buttery cloves right out of their skins. Save that golden garlic oil in the ramekin — it’s liquid gold.
Step 2: Make the Garlic Butter
In a small bowl, mash the roasted garlic cloves with softened butter, chopped fresh parsley, and 2 tablespoons of that garlic-infused olive oil from roasting. Mix until smooth and spreadable. Set this aside — you’ll use it twice (once for the filling, once for brushing at the end).
Step 3: Activate the Yeast
In a bowl, combine warm milk (not hot — just warm to the touch), active dry yeast, and honey. Give it a gentle stir and let it sit for about 10 minutes until it’s frothy and bubbly on top. That froth means your yeast is awake and ready to work magic.
Step 4: Mix the Dough
In your stand mixer bowl (or a large mixing bowl if you’re going the hand-kneading route), combine all-purpose flour, bread flour, sugar, milk powder, softened butter, salt, two egg yolks, and the yeast mixture. Use the dough hook attachment and start mixing on low speed until everything comes together into a shaggy dough.
Step 5: Knead Until Smooth
Increase the mixer speed to medium and knead for 15-20 minutes until the dough is soft, smooth, and slightly elastic. It should pull away from the sides of the bowl and feel tacky but not sticky. If you’re kneading by hand, plan for about 10 minutes of good arm workout — put on a podcast and zone out.
Step 6: First Proof
Shape the dough into a ball, place it in a lightly greased bowl, cover with a clean kitchen towel or plastic wrap, and let it proof in a warm spot (around 29°C or 85°F — I stick mine near the stovetop or in a slightly warm oven) for about 1 hour and 30 minutes.
You’re looking for it to double in size. This is where the magic happens — the yeast is doing all the work while you kick back.
Step 7: Roll and Fill
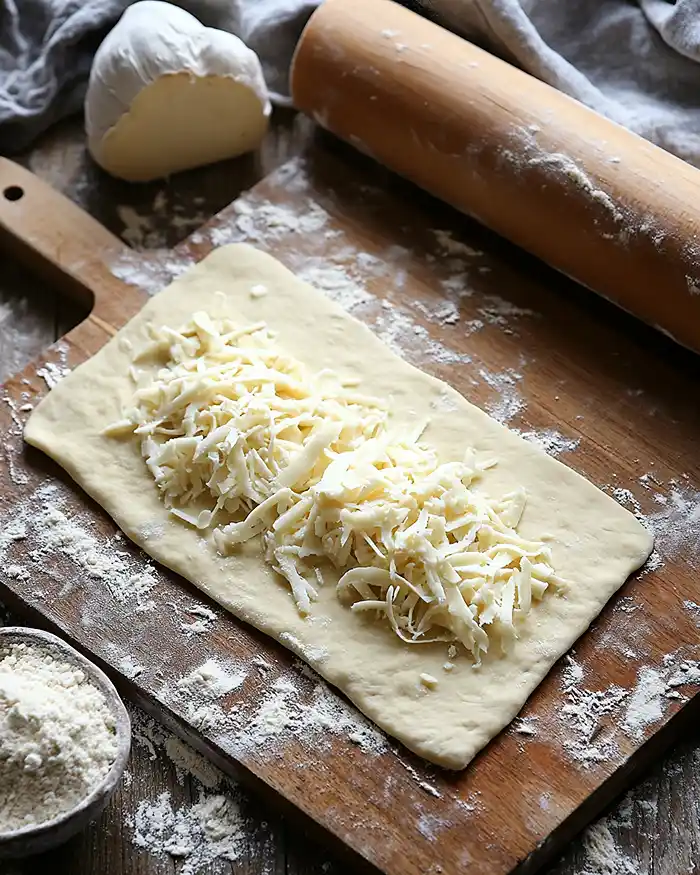
Once the dough has doubled, punch it down gently and turn it out onto a lightly floured surface. Roll it into a rectangle about 1/4 cm (or 1/8 inch) thick.
Spread the garlic butter evenly over the entire surface — don’t be shy — then sprinkle the shredded mozzarella cheese generously on top. Roll the dough tightly from one long edge to form a log, keeping it as even as possible.
Step 8: Cut the Rolls
Using a sharp knife or dental floss (pro trick: slide floss under the log, cross the ends, and pull — clean cuts every time), divide the log into 6 equal portions. Place them cut-side up on a parchment-lined baking sheet with a little space between each one.
Step 9: Second Proof
Cover the rolls loosely with a towel or plastic wrap and let them proof again for 30 minutes until they’re puffy and visibly larger. This second rise gives them that light, airy texture.
Step 10: Bake to Golden Perfection
Preheat your oven to 175°C (350°F). Brush the tops of the rolls with beaten egg wash for that glossy, golden finish. Bake for 20-25 minutes, checking at the 20-minute mark. They should be golden brown on top and smell absolutely dreamy. If the tops are browning too fast, tent them loosely with foil.
Step 11: Finish with Garlic Butter
As soon as the rolls come out of the oven, brush them generously with the remaining garlic butter and sprinkle with extra chopped parsley. Serve them warm while the cheese is still gooey and stretchy.
Pro Tips & Gentle Guidance for How to Make Garlic Bread
These little tips are what I’ve picked up over the years making batch after batch of rolls. Nothing fancy — just the kind of tricks that save you a headache and make your rolls turn out even better.
Room temperature ingredients are your friend. Cold butter and eggs don’t mix well into dough — let them sit on the counter for 30 minutes before you start. It makes a huge difference in how smooth your dough comes together.
Don’t skip the second proof. I know it’s tempting to rush, but that extra 30 minutes gives the rolls their signature fluffiness. Think of it as the difference between good rolls and bakery-level rolls.
Use dental floss to cut the rolls for clean, even slices. A knife can squish the dough and make messy cuts. Slide the floss under the log, cross the ends over the top, and pull tight — perfect slices every time.
If you’re new to working with yeast dough, Serious Eats has a comprehensive bread-making guide that walks through the science of proofing and kneading — it’s a game-changer if you want to really understand what’s happening at each step.
Save some garlic butter for the end. Brushing hot rolls with extra garlic butter right out of the oven adds another layer of flavor and makes them irresistibly shiny.
Quick Fixes for Cheesy Garlic Rolls
Even the best bakers run into hiccups. Here’s how to fix the most common issues without stressing:
Problem: Dough won’t rise or stays flat.
Your yeast might be dead or your milk was too hot. Make sure your yeast is fresh (check the expiration date) and that your milk is just warm to the touch — not hot. Hot liquid kills yeast instantly.
Problem: Rolls are dense or heavy.
This usually means the dough was under-kneaded or under-proofed. Knead until the dough is smooth and elastic (15-20 minutes), and don’t rush the proofing times. Let the dough fully double in size during the first rise.
Problem: Cheese leaked out during baking.
Make sure you’re rolling the dough tightly and sealing the edges well before cutting. Also, don’t overfill — too much cheese has nowhere to go and will ooze out. A generous but not excessive sprinkle works best.
Problem: Tops are browning too fast.
Tent the rolls loosely with aluminum foil about halfway through baking. This keeps them from over-browning while the insides finish cooking.
Problem: Rolls stuck together after baking.
Give them a bit more space on the baking sheet during the second proof. They’ll expand and touch slightly, which is fine, but too close and they’ll bake into one big loaf.
Variations & Adaptations
These cheesy garlic rolls are endlessly customizable. Once you’ve nailed the base recipe, try one of these fun twists to keep things interesting:
Herb Lovers Version: Add fresh rosemary, thyme, or oregano to the garlic butter for an herby punch.
Spicy Kick: Mix red pepper flakes or a pinch of cayenne into the garlic butter for a little heat.
Cheese Swap: Try cheddar, Gruyère, or a mix of Italian cheeses instead of mozzarella for different flavor profiles.
Whole Wheat Version: Substitute half the all-purpose flour with whole wheat flour for a heartier, slightly nutty flavor. You might need a bit more liquid.
Dairy-Free Adaptation: Use plant-based butter and dairy-free mozzarella. Swap the milk with almond or oat milk. The texture stays pretty close to the original.
Stuffed Pizza Rolls: Add pepperoni slices or cooked sausage crumbles along with the cheese for a pizza-inspired twist.
Serving, Storage & Reheating Your Cheesy Rolls

These rolls are best served warm, straight from the oven while the cheese is still gooey and stretchy. Pair them with marinara sauce for dipping, or serve alongside soup, salad, or pasta for a cozy meal. They’re also perfect as an appetizer for game day or dinner parties — trust me, they disappear fast.
If you somehow manage not to eat them all at once, store leftovers in an airtight container at room temperature for up to 2 days, or refrigerate for up to 5 days. They’ll lose a bit of their softness, but reheating brings them back to life.
To reheat, wrap rolls in foil and warm in a 160°C (320°F) oven for 10-15 minutes, or microwave individual rolls for 20-30 seconds until heated through. For extra crispness, pop them under the broiler for a minute or two after reheating. You can also freeze baked rolls for up to 3 months — thaw overnight in the fridge and reheat as directed.
This recipe is just the start of something delicious. Browse the entire Classic Comfort Foods collection and discover all the ways you can bring more flavor to your table. Your family will thank you.
No-Waste Kitchen Magic
Got leftover rolls or ingredients? Here’s how to stretch every bit:
Day-old rolls: Slice them in half, toast them under the broiler with extra cheese on top, and you’ve got garlic bread croutons for salads or soup.
Extra garlic butter: Freeze it in an ice cube tray and pop a cube into pasta, roasted veggies, or scrambled eggs for instant flavor.
Leftover dough: If you have extra dough after cutting rolls, shape it into breadsticks, sprinkle with salt and parmesan, and bake alongside the rolls.
Egg whites: Save those leftover whites from the egg yolks and make a simple meringue, add them to smoothies, or use them for an egg white omelet the next morning.
FAQs About Cheesy Garlic Rolls
What’s the best way to store cheesy garlic rolls?
Store them in an airtight container at room temperature for up to 2 days, or in the fridge for up to 5 days. For longer storage, freeze them. They stay soft and delicious if you reheat them properly with a little moisture (wrap in foil or cover with a damp paper towel in the microwave).
Can I make the dough ahead of time?
Absolutely! After the first proof, punch down the dough, cover tightly, and refrigerate for up to 24 hours. When you’re ready, let it come to room temperature for about 30 minutes, then roll, fill, and continue with the recipe as written.
What can I serve with these cheesy garlic rolls?
They’re perfect alongside marinara sauce for dipping, or served with soups, salads, and pasta dishes. I also love them as a game day snack or appetizer — they pair beautifully with a low-carb chicken casserole, easy vegetable upma, or even easy pizza eggs for a cozy brunch spread.
Can I use instant yeast instead of active dry yeast?
Yes! Instant yeast works great and you can skip the proofing step — just mix it directly into the dry ingredients. Use the same amount and follow the rest of the recipe as written.
Will this recipe work without a stand mixer?
Definitely! Kneading by hand takes about 10 minutes of consistent work, but it’s totally doable. The dough should feel smooth, elastic, and slightly tacky when it’s ready. Put on some music or a podcast and enjoy the process — it’s surprisingly therapeutic.
Final Thoughts on These Cheesy Garlic Rolls
So there you go — cheesy garlic rolls that look fancy but are secretly easy, taste bakery-level but use pantry staples, and make your kitchen smell like you’ve been cooking all day (even though most of it is just waiting around). They’re the kind of recipe that makes you feel like a kitchen rockstar without breaking a sweat.
I’d love to see your spin on these cheesy garlic rolls! Drop a comment below with your photos or tell me what variations you tried — I bet you’ve got some amazing ideas already. This recipe is so versatile; there’s no wrong way to make it your own.
Happy baking, and may your rolls always be fluffy, your cheese always melty, and your kitchen always smell like roasted garlic heaven.
I’m Linda Sandra — a Charleston home chef and comfort-food daydreamer. Around here, cooking’s not about perfection — it’s about cozy vibes, creative twists, and food that feels like love.

Cheesy Garlic Rolls
Equipment
- Small ramekin or oven-safe dish
- Aluminum foil
- Mixing bowls
- Stand mixer with dough hook
- Rolling Pin
- Sharp knife or dental floss
- Baking sheet
- Parchment paper
- Pastry brush
- Kitchen towel or plastic wrap
Ingredients
Garlic Butter
- 1 head Garlic whole head
- 1 pinch Salt
- 3 tbsp Olive oil
- 50 g Butter softened (1/4 cup)
- 1 tbsp Fresh parsley chopped
Dough
- 90 g Warm milk 1/3 cup, not hot
- 7 g Active dry yeast 2 1/4 tsp
- 1 tbsp Honey
- 200 g All-purpose flour 1 1/2 cups
- 50 g Bread flour 1/2 cup
- 20 g Milk powder 3 tbsp, optional
- 25 g Butter 2 tbsp, softened
- 2 Egg yolks
- 1.5 tsp Salt
- 1 tbsp Sugar
Filling
- 200 g Mozzarella cheese 2 cups, shredded
- Garlic butter from above
Egg Wash
- 1 Egg beaten
Instructions
- Preheat your oven to 160°C (320°F). Slice the top off one whole garlic head so the cloves are exposed, place it in a small ramekin, and drizzle generously with olive oil. Sprinkle with a pinch of salt, cover tightly with aluminum foil, and roast for 2 hours until the cloves are soft, golden, and smell like heaven. Once it’s cool enough to handle, squeeze those buttery cloves right out of their skins. Save that golden garlic oil in the ramekin.
- In a small bowl, mash the roasted garlic cloves with softened butter, chopped fresh parsley, and 2 tablespoons of that garlic-infused olive oil from roasting. Mix until smooth and spreadable. Set this aside.
- In a bowl, combine warm milk (not hot — just warm to the touch), active dry yeast, and honey. Give it a gentle stir and let it sit for about 10 minutes until it’s frothy and bubbly on top.
- In your stand mixer bowl, combine all-purpose flour, bread flour, sugar, milk powder, softened butter, salt, two egg yolks, and the yeast mixture. Use the dough hook attachment and start mixing on low speed until everything comes together into a shaggy dough.
- Increase the mixer speed to medium and knead for 15-20 minutes until the dough is soft, smooth, and slightly elastic. It should pull away from the sides of the bowl and feel tacky but not sticky.
- Shape the dough into a ball, place it in a lightly greased bowl, cover with a clean kitchen towel or plastic wrap, and let it proof in a warm spot (around 29°C or 85°F) for about 1 hour and 30 minutes. You’re looking for it to double in size.
- Once the dough has doubled, punch it down gently and turn it out onto a lightly floured surface. Roll it into a rectangle about 1/4 cm (or 1/8 inch) thick. Spread the garlic butter evenly over the entire surface, then sprinkle the shredded mozzarella cheese generously on top. Roll the dough tightly from one long edge to form a log.
- Using a sharp knife or dental floss, divide the log into 6 equal portions. Place them cut-side up on a parchment-lined baking sheet with a little space between each one.
- Cover the rolls loosely with a towel or plastic wrap and let them proof again for 30 minutes until they’re puffy and visibly larger.
- Preheat your oven to 175°C (350°F). Brush the tops of the rolls with beaten egg wash. Bake for 20-25 minutes, checking at the 20-minute mark. They should be golden brown on top and smell absolutely dreamy.
- As soon as the rolls come out of the oven, brush them generously with the remaining garlic butter and sprinkle with extra chopped parsley. Serve them warm while the cheese is still gooey and stretchy.