Charcuterie-Style Fruit & Nut Board
Charcuterie-Style Fruit & Nut Board — just saying it sounds fancy, right? But honestly, this gorgeous snack board is one of the easiest things you can put together, whether you’re hosting a holiday gathering, prepping a Passover spread, or just want a stunning snack that doubles as a centerpiece.
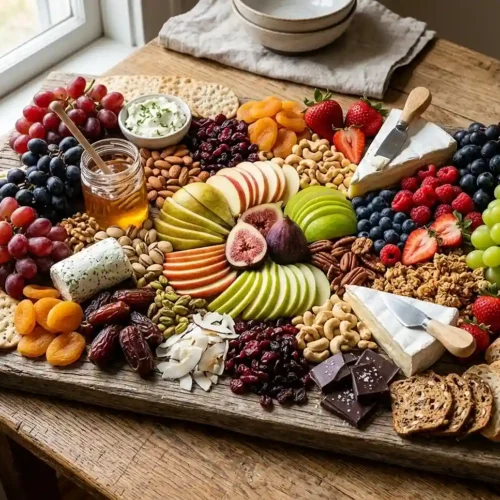
Hey there, I’m Claire Whitmore — a food enthusiast based in Asheville, NC, where a well-styled snack board totally counts as a love language. This fruit board is loaded with fresh grapes, strawberries, figs, and apple slices, alongside chewy dried apricots, dates, and cranberries, a generous handful of mixed nuts, and optional creamy cheese. Add a drizzle of honey and a few dark chocolate pieces — and you’ve got a crowd-pleasing snack board idea that takes about 15 minutes, no cooking required.
I first made a version of this board for a spring dinner party, and my guests thought I’d spent hours on it. Spoiler: I hadn’t. That’s the magic of a well-assembled fruit board — it looks like you tried really hard, but it’s basically just thoughtful arranging. It’s been a go-to in my kitchen ever since, especially around Passover and spring entertaining season.
Table of Contents
What This Recipe Delivers
This Charcuterie-Style Fruit & Nut Board is a no-cook, visually stunning snack board featuring a colorful mix of fresh and dried fruits, mixed nuts, optional cheese, and sweet additions like honey and dark chocolate. It comes together in 15 minutes, serves 6–8 people, and works beautifully as an appetizer, dessert board, or a Passover-friendly centerpiece.
Why You’ll Love This Recipe
- This Charcuterie-Style Fruit & Nut Board looks like it took hours but comes together faster than deciding what to watch on Netflix.
- It’s endlessly flexible — swap fruits by season, skip the cheese for a dairy-free version, or go all-in with brie and biscotti for something extra indulgent.
- No cooking, no cleanup stress, and it doubles as table decor. Winning on all fronts.
- According to the International Nut & Dried Fruit Council’s guide to healthy snacking, pairing nuts with dried fruits creates a complementary nutrient profile — so this snack board idea is as nourishing as it is beautiful.
Quick Facts
Here’s the quick scoop on this Charcuterie-Style Fruit & Nut Board.
- Course: Appetizer / Snack Board
- Prep Time: 15 minutes
- Cook Time: 0 minutes
- Total Time: 15 minutes
- Servings: 6–8 servings
- Difficulty: Easy
Nutritional Peek
Here’s a rough nutritional breakdown per serving (based on a board with cheese and honey). Keep in mind this will vary depending on your specific ingredient choices and portion sizes.
| Nutrient | Amount Per Serving |
|---|---|
| Calories | ~280 kcal |
| Protein | 7g |
| Carbohydrates | 28g |
| Fat | 16g |
| Fiber | 4g |
| Sugar | 18g |
Ingredients
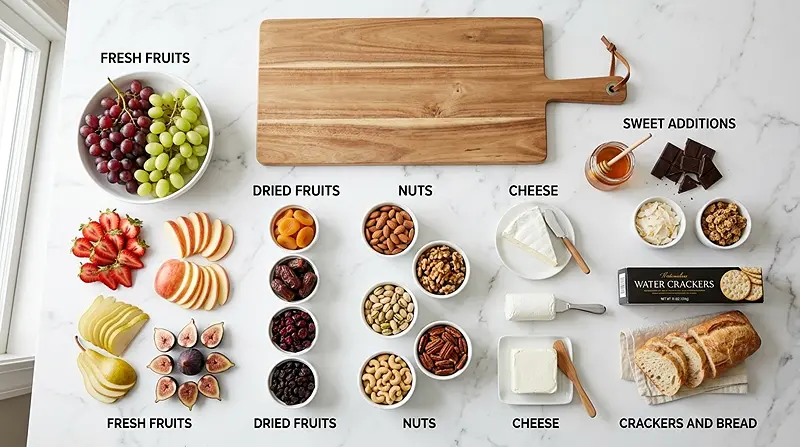
Here’s everything you’ll need for this stunning fruit board and snack board idea. For the fresh fruits — grapes, strawberries, apple slices, pear slices, and figs — you’ll want them washed, dried, and sliced just before assembling for the best color and freshness.
For the dried fruits and nuts — apricots, dates, cranberries, almonds, walnuts, pistachios, cashews, and pecans — these can be prepped ahead and stored in small bowls until you’re ready to build.
| Amount | Ingredient |
|---|---|
| 1 cup | Red or green grapes |
| 1 cup | Fresh strawberries, hulled |
| 1 medium | Apple, thinly sliced (toss in lemon juice to prevent browning) |
| 1 medium | Pear, thinly sliced |
| 4–6 | Fresh figs, halved (when in season) |
| 1/2 cup | Dried apricots |
| 1/2 cup | Medjool dates, pitted |
| 1/4 cup | Dried cranberries |
| 2 tbsp | Raisins |
| 1/4 cup | Almonds (roasted or raw) |
| 1/4 cup | Walnuts halves |
| 1/4 cup | Pistachios, shelled |
| 1/4 cup | Cashews |
| 1/4 cup | Pecans |
| 3–4 oz | Brie or goat cheese (optional but highly recommended) |
| 2 oz | Cream cheese (optional, for spreading) |
| 2 tbsp | Honey or maple syrup, in a small dish |
| 1/3 cup | Dark chocolate pieces or chips |
| 2 tbsp | Coconut flakes (toasted if you like) |
| 1/4 cup | Granola clusters |
| As needed | Crackers, sliced baguette, or biscotti (optional) |
This is the kind of recipe that makes you want to cook everything in sight. Lucky for you, the Classic Comfort Foods collection is full of exactly that. Go explore and find your new go-to dish.
Tools You’ll Actually Use
- Large wooden board, marble slab, or serving platter (the bigger the better!)
- Small ramekins or pinch bowls for honey, dips, and smaller items
- Sharp knife and cutting board for slicing fruits
- Small spoons or honey dipper
- Cheese knife (if using cheese)
- Damp cloth or paper towels for cleaning up the board edges before serving
Step-by-Step Instructions for Your Charcuterie-Style Fruit & Nut Board
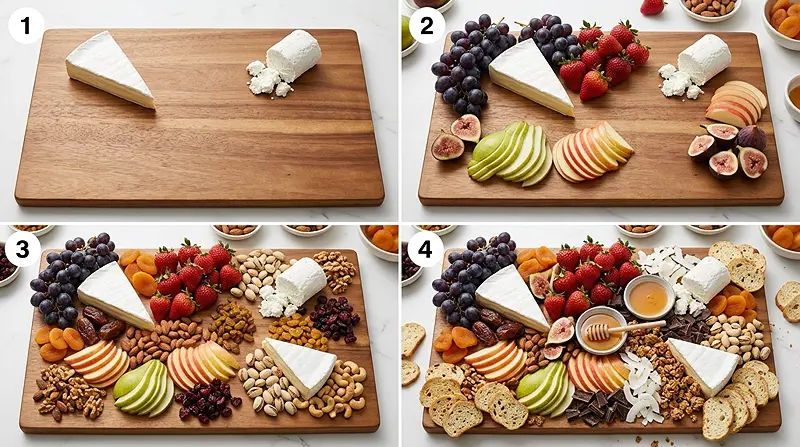
Building a Charcuterie-Style Fruit & Nut Board is more about flow and color placement than any strict technique. Think of it like painting — you’re layering textures and colors to create something that’s as pretty to look at as it is to eat. Here’s how to do it:
Step 1: Place Your Cheese Anchors
If you’re using cheese — and I really hope you are — start by placing the brie, goat cheese, or cream cheese on the board first. Space them apart to create natural “zones.” These become your anchor points for building outward. A wheel of brie in the center with goat cheese in one corner looks absolutely effortless.
Step 2: Arrange Your Fresh Fruit in Clusters
Fan out your thinly sliced apples and pears in a gentle arc near the cheese. Halve the fresh figs and place them cut-side up so you get that gorgeous jewel-like interior showing. Tuck clusters of grapes and whole strawberries into the gaps — aim for color variety so you get pops of red, green, and purple throughout.
Step 3: Add the Dried Fruits in Small Piles
Scatter small piles of dried apricots, pitted dates, dried cranberries, and raisins around the board. Don’t spread them too thin — little concentrated clusters look more abundant and intentional than scattered single pieces. Fold the apricots in half for a more polished look.
Step 4: Fill the Gaps with Nuts
Now here’s where it gets really satisfying. Fill any visible empty spaces with your almonds, walnuts, pistachios, cashews, and pecans. You can scatter them loosely or nestle them in small pinch bowls if you prefer a cleaner look. The mix of textures here is what makes the board feel so lush.
Step 5: Add Your Sweet Elements
Place a small ramekin of honey or maple syrup on the board (it becomes a little dipping station everyone loves). Tuck in the dark chocolate pieces, a sprinkle of coconut flakes, and a few spoonfuls of granola clusters. These tiny sweet touches elevate the board from snack to something really special.
Step 6: Finish with Crackers or Bread
If you’re using crackers, sliced baguette, or biscotti, arrange them around the outer edges of the board in small fanned stacks. This keeps them from going soggy and makes it easy for guests to grab them without disturbing the pretty arrangement in the center.
Step 7: Serve Right Away
This fruit board is best served immediately after assembling, especially if you have fresh-cut fruits on there. If you need to prep ahead, hold off on the apple and pear slices until the last moment. Your guests will ooh and aah — I promise.
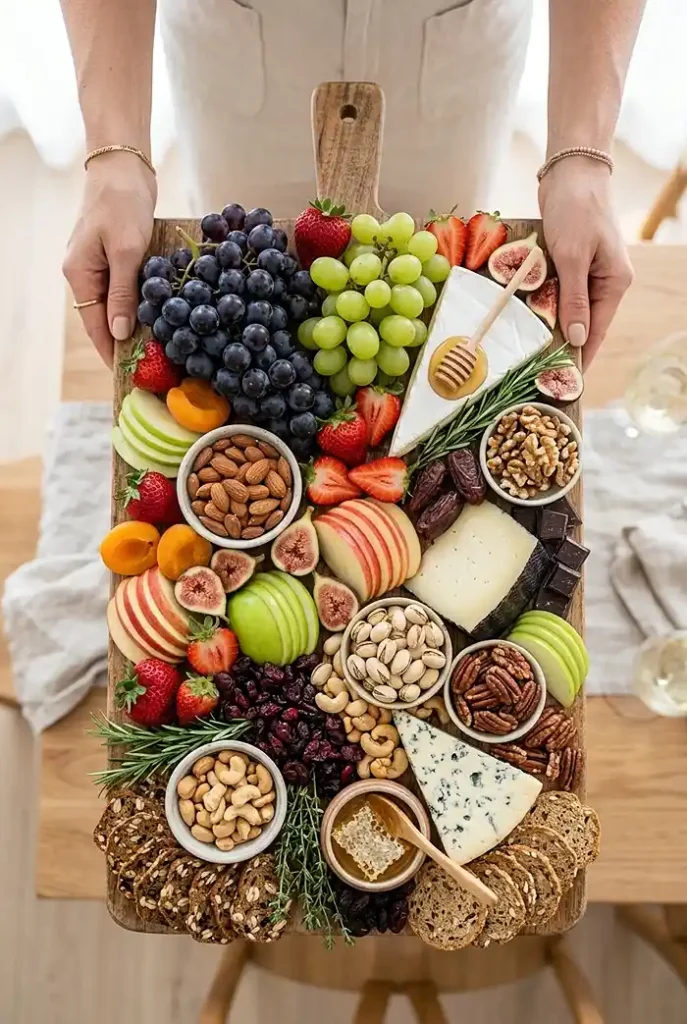
Claire’s Pro Tips for the Best Fruit Board
One of the things I love most about a snack board is that there’s truly no wrong way to do it — but there are a few little tricks that take it from “nice” to “actually stunning.” Here are my go-to tips for nailing this fruit board every time.
Start with odd numbers. When grouping items, clusters of 3 or 5 look more natural and visually appealing than even groups. It’s a small thing, but it makes the board feel artful rather than just assembled.
Vary your heights and textures. Prop up a folded apricot next to a flat cracker, or lean a fig half against a chunk of brie. Playing with elevation adds dimension and keeps the eye moving around the board.
Color balance matters. Try to distribute your reds (strawberries, cranberries), greens (grapes, pistachios), and warm tones (apricots, honey, walnuts) evenly across the board so no one section looks too heavy or dull.
Don’t skip the honey. I know it seems like a small detail, but a little ramekin of honey in the center of the board is genuinely one of the most-used elements. People drizzle it over the cheese, dip fruit in it — it just ties everything together.
Quick Fixes for Your Charcuterie-Style Fruit & Nut Board
Problem: Apple and pear slices are turning brown.
Toss them in a little fresh lemon juice right after slicing. It won’t affect the flavor much and keeps everything looking fresh and bright. You can also slice them just before serving if timing allows.
Problem: The board looks sparse or flat.
Add more volume with extra crackers or biscotti fanned out along the edges, and use small pinch bowls to add height. Folding dried apricots or stacking crackers in little towers adds instant visual depth without needing more ingredients.
Problem: Everything is sliding around on the board.
Start with your larger anchor items (cheese, bowls of honey) first, then build around them. You can also use a small piece of parchment paper under wetter items like grapes to keep moisture from spreading to crackers.
Problem: The board looks too “safe” or boring.
Add contrast! A drizzle of honey directly over the brie before serving, a sprinkle of flaky sea salt over the dark chocolate, or a small pile of toasted coconut flakes adds color and unexpected detail that makes people stop and say “ooh.”
Problem: Not enough food for a larger crowd.
Simply scale up the nuts and dried fruits first — they’re the most cost-effective way to add volume. Add another type of cheese and a second cluster of grapes. This board scales beautifully without losing its aesthetic.
Variations & Fun Twists on This Fruit Board
One of the best things about a snack board idea like this is how endlessly adaptable it is. Here are a few of my favorite ways to remix it:
Passover-friendly version: Skip the baguette and crackers and serve with matzah instead. This fruit board makes a gorgeous centerpiece for a Passover Seder table — colorful, symbolic, and something everyone can snack on between courses.
Spring & summer board: Swap in fresh cherries, peaches, and blueberries for a bright seasonal version. Pair with a light honeydew and a drizzle of lavender honey for something really special.
Dessert board twist: Double up on the dark chocolate pieces, add some caramel dip alongside the honey, and toss in a few shortbread cookies or mini brownies. This instantly transforms the fruit board into a dessert-forward crowd-pleaser.
Dairy-free version: Simply skip the cheese entirely — the board is just as beautiful and satisfying without it. Add a small bowl of almond butter or coconut yogurt for a creamy element that’s completely plant-based.
Charcuterie mashup: Want the full charcuterie experience? Add a few slices of prosciutto or salami folded into little roses alongside the fruit. It’s a gorgeous flavor contrast and makes the board feel even more abundant.
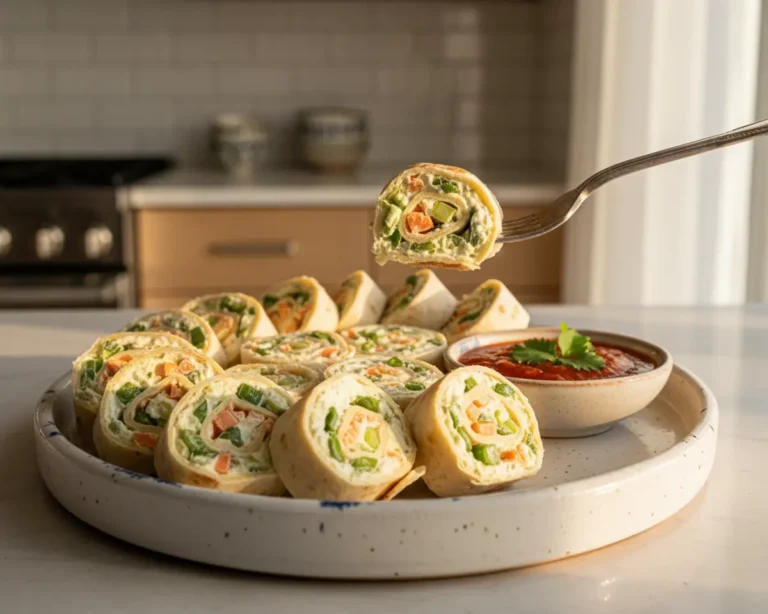
Love board-style entertaining? You might also enjoy this fresh spring rolls with peanut sauce recipe — another great crowd-pleaser that’s as fun to make as it is to eat.
Serving, Storage & Reheating
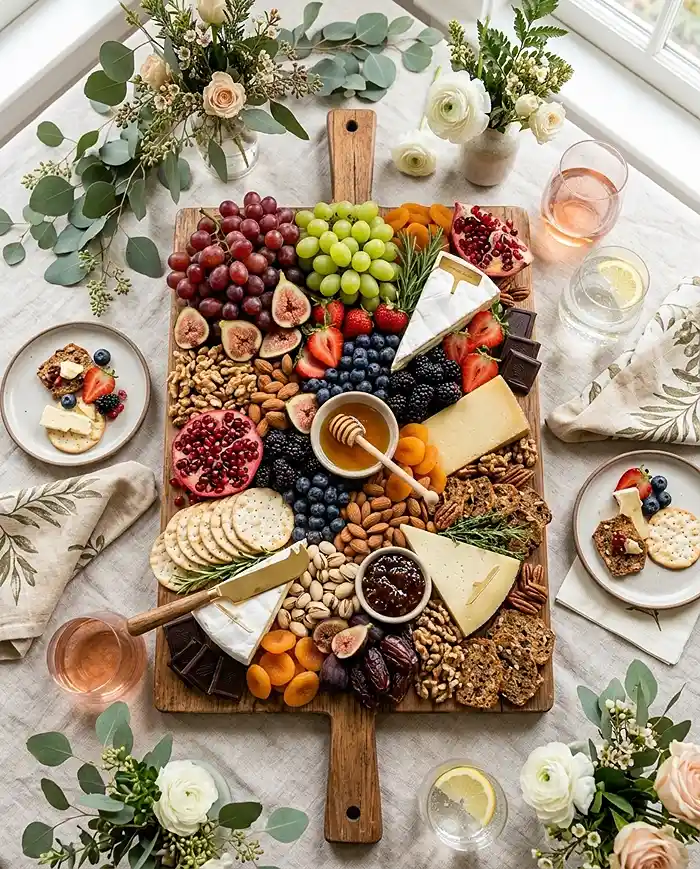
This fruit board is honestly best enjoyed fresh — like, right after you’ve assembled it and done your little happy dance about how good it looks. Set it out as a grazing board so guests can help themselves throughout the gathering.
If you have leftover components, store them separately in airtight containers. Fresh fruit should be refrigerated and consumed within 1–2 days. Nuts and dried fruits will keep at room temperature for several weeks in a sealed container or jar.
Since this is a no-cook board, there’s nothing to reheat! If your cheese has been sitting out for a while and you want to bring it back to its creamy best, let it come to room temperature for about 20–30 minutes before serving.
No-Waste Kitchen Magic
Got leftover nuts and dried fruits after the board is done? Mix them together into a homemade trail mix with a few dark chocolate chips and store in a jar on the counter for easy weekday snacking.
Leftover fresh fruit that’s getting a little past its prime? Toss it into a smoothie, layer it into overnight oats, or roast it with a little honey for a warm topping over yogurt.
Day-old baguette slices or crackers can be toasted in the oven at 300°F for 10 minutes to crisp them back up. A little olive oil and flaky sea salt and they’re totally snack-worthy again.
And if you ended up with extra cheese, melt it over scrambled eggs in the morning or stir it into a warm bowl of pasta. Brie especially does wonderful things to pasta. Trust me on this one.
FAQs About This Charcuterie-Style Fruit & Nut Board
Can I make this Charcuterie-Style Fruit & Nut Board ahead of time?
You can prep most components ahead — wash and dry your fruits, portion your nuts and dried fruits into bowls, and slice your cheese. Hold off on slicing apples and pears until right before serving to avoid browning. Assemble the full board no more than 30–60 minutes before guests arrive for the freshest look.
What’s the best way to store leftover fruit board components?
Store fresh fruits, cheese, and any opened crackers separately in airtight containers in the fridge. Nuts and dried fruits are shelf-stable and can be stored at room temperature. Avoid storing assembled board leftovers together — the moisture from fresh fruit will make crackers soggy quickly.
How do I keep apple slices from browning on the board?
Toss the slices in fresh lemon juice or a mix of lemon juice and cold water right after cutting. This slows oxidation and keeps them looking fresh and bright. They’ll still be totally fine to eat even if they get a little color — it’s just an aesthetic thing.
Will this fruit board work as a Passover food centerpiece?
Absolutely — it’s one of my favorite ways to use it! Simply swap crackers and baguette for matzah to make it fully Passover-friendly. The mix of fresh fruits, dried fruits, honey, and nuts feels festive and meaningful, and it gives guests something beautiful to graze on throughout the Seder.
Is there a vegan version of this snack board?
Yes! Just skip the cheese entirely and swap the honey for maple syrup. The board is naturally plant-based in every other way and is just as gorgeous and satisfying without the dairy. You can also add a small bowl of cashew cream or almond butter for a creamy dipping element.
Bring This Fruit Board to Your Next Gathering
And there you have it — your new go-to Charcuterie-Style Fruit & Nut Board! Whether you’re pulling it out for a casual weeknight snack, a Passover table, or a spring brunch with friends, this board delivers every single time.
I’d love to see your version of this fruit board! Drop a comment below with your photos — did you add something unexpected? Go extra on the chocolate? Skip the cheese entirely? Tell me everything. This snack board idea is so versatile, and I just know you’ve got gorgeous variations already forming in your head.
I’m Claire Whitmore — a food stylist and recipe developer from Asheville, NC. For me, food isn’t about perfection — it’s about the joy of putting something beautiful on the table and watching the people you love dig in (and maybe sneaking a few extra chocolate pieces while you arrange everything).
Charcuterie-Style Fruit & Nut Board
Equipment
- Large serving board or platter
- Small ramekins or bowls
- Knife
- Cutting board
- Cheese knife
Ingredients
Fresh Fruits
- 1 cup Grapes
- 1 cup Strawberries hulled
- 1 medium Apple thinly sliced
- 1 medium Pear thinly sliced
- 4-6 Fresh figs halved
Dried Fruits
- 0.5 cup Dried apricots
- 0.5 cup Medjool dates pitted
- 0.25 cup Dried cranberries
- 2 tbsp Raisins
Nuts
- 0.25 cup Almonds
- 0.25 cup Walnuts
- 0.25 cup Pistachios shelled
- 0.25 cup Cashews
- 0.25 cup Pecans
Extras
- 3-4 oz Brie or goat cheese optional
- 2 oz Cream cheese optional
- 2 tbsp Honey or maple syrup
- 0.33 cup Dark chocolate pieces
- 2 tbsp Coconut flakes
- 0.25 cup Granola clusters
- Crackers or sliced baguette optional
Instructions
- Place cheese on the board first, spacing it out to create anchor points.
- Arrange fresh fruits in clusters, fanning sliced apples and pears and placing grapes and strawberries in gaps.
- Add dried fruits in small piles around the board for visual balance.
- Fill empty spaces with mixed nuts to create texture and fullness.
- Add sweet elements like honey, dark chocolate, coconut flakes, and granola.
- Arrange crackers or bread along the edges of the board.
- Serve immediately for the freshest presentation.