The Viral TikTok Chicken Cobbler Recipe
Okay, so this Chicken Cobbler Recipe is literally everywhere right now — and for good reason. I’m Linda Sandra, a Charleston home cook who’s always hunting for meals that feel like a warm hug without the drama, and this viral TikTok chicken casserole just gets it right.
This isn’t your grandma’s pot pie (though we love her dearly). It’s got all the cozy comfort vibes with rotisserie chicken, creamy filling, fluffy Cheddar Bay biscuit topping, and that magical garlic butter brushed on top that makes everything smell like heaven.
I first tried this when I was knee-deep in a busy week and needed something that looked impressive but didn’t require me to stand over the stove for an hour. Spoiler: it worked. My family devoured it, and now it’s on repeat in our house.
Table of Contents
Little Snapshot: What This Recipe Delivers
This Chicken Cobbler Recipe layers rotisserie chicken, frozen veggies, and creamy chicken broth under a fluffy Cheddar Bay biscuit crust, all finished with garlic butter. It takes about 15 minutes to prep, bakes in an hour, and serves 9 people with zero fancy techniques required.
Why You’ll Love This Recipe 🌸
- This Chicken Cobbler Recipe uses rotisserie chicken and frozen veggies, so prep takes less time than scrolling TikTok.
- The Cheddar Bay biscuit topping is basically a cheat code for making dinner look fancy when you’re really just layering things in a pan.
- It feeds a crowd (or gives you amazing leftovers) without requiring you to dirty a million dishes — we’re reusing bowls like champions here.
- According to King Arthur Baking’s guide to easy comfort food, the best cozy meals are often the simplest — and this viral TikTok chicken casserole proves exactly why.
Quick Facts ⚡
Here’s the quick scoop on this Chicken Cobbler Recipe.
- CourseMain Dish
- Prep Time15 minutes
- Cook Time50-60 minutes
- Total TimeAbout 1 hour 15 minutes
- Servings9 servings
- DifficultyEasy

Chicken Cobbler Recipe
Equipment
- 9×13 inch baking dish
- Medium mixing bowl
- Whisk
- Small bowl
- Pastry brush
- Measuring cups and spoons
Ingredients
For the Cobbler
- 4 Tablespoons salted butter melted
- 1 whole rotisserie chicken meat removed and chopped (about 3-4 cups)
- 12 ounce bag frozen peas and carrots or mixed vegetables
- 10.5 ounce can cream of chicken soup with herbs or regular cream of chicken
- 2 cups chicken broth
- 1 teaspoon garlic powder
- 1 teaspoon onion powder
- ½ teaspoon black pepper
- 11.36 ounce box Cheddar Bay Biscuit Mix reserve seasoning packet for later
- 2 cups milk 2% or higher
- ½ cup shredded cheddar cheese
For the Butter Topping
- 2 Tablespoons salted butter melted
- 1 packet seasoning packet from biscuit mix box
Instructions
- Preheat your oven to 350°F because we’re about to make your kitchen smell incredible.
- Pour 4 tablespoons of melted salted butter into the bottom of your 9×13-inch baking dish, tilting it around so the butter coats the bottom evenly. This creates that golden, buttery base we’re all here for.
- Layer the chopped rotisserie chicken (about 3-4 cups of meat) evenly over the melted butter. Don’t stir — just let it chill there in an even layer.
- Sprinkle the entire 12-ounce bag of frozen peas and carrots over the chicken layer. Again, no stirring. We’re building layers like a delicious, savory lasagna situation.
- In a separate bowl, whisk together the 10.5-ounce can of cream of chicken soup, 2 cups of chicken broth, 1 teaspoon garlic powder, 1 teaspoon onion powder, and ½ teaspoon black pepper until smooth and creamy.
- Pour this creamy soup mixture over the chicken and veggie layers, letting it seep down into all the nooks and crannies. Still no stirring. (Pro tip: rinse and dry that bowl now so you can reuse it for the next step and avoid extra dishes.)
- In that same bowl, stir together the Cheddar Bay Biscuit Mix (but NOT the seasoning packet — save that for later!), 2 cups of milk, and ½ cup of shredded cheddar cheese until everything’s combined and looks like thick pancake batter.
- Pour this biscuit mixture as evenly as possible over all the layers in the baking dish. It’ll spread as it bakes, so don’t stress if it’s not perfect. And yep, still no stirring.
- Slide the whole thing into your preheated 350°F oven and bake uncovered for 50-60 minutes, until the top is golden brown and the edges are bubbling like crazy. Every oven’s a little different, so just watch for that beautiful golden color on top.
- While it’s baking (or right when it comes out), make the butter topping by mixing 2 tablespoons of melted butter with that seasoning packet you saved from the biscuit mix.
- Brush this garlic butter mixture all over the top of your hot cobbler. If you want to get fancy, sprinkle a little dried parsley on top for color, but it’s totally optional.
- Let the cobbler rest for at least 10 minutes before serving. I know it’s tempting to dive right in, but this resting time helps the filling thicken up so it’s not super runny when you scoop it out.
Notes
Nutritional Peek
Here’s what you’re looking at per serving — no judgment, just the facts so you can plan your day.
| Nutrient | Amount per Serving |
|---|---|
| Calories | 385 kcal |
| Protein | 24g |
| Carbohydrates | 28g |
| Fat | 19g |
| Fiber | 2g |
| Sugar | 6g |
Chicken Cobbler Recipe Ingredients
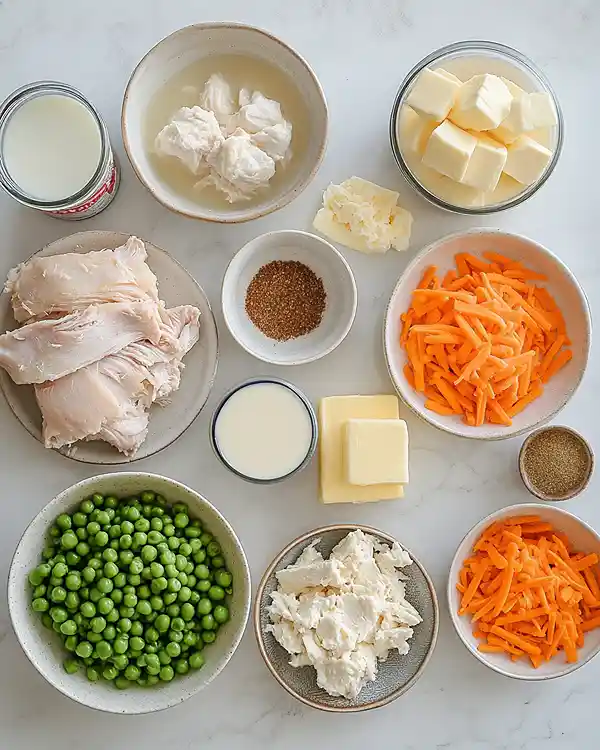
This easy comfort meal comes together with stuff you probably already have (or can grab on a quick grocery run). Let me break it down for you.
For the creamy filling — rotisserie chicken, frozen peas and carrots, cream of chicken soup, and chicken broth — you’re building that cozy base that makes this feel like a hug in a dish.
For the biscuit topping — Cheddar Bay Biscuit Mix, milk, and shredded cheddar cheese — you’re getting that fluffy, cheesy crust without making biscuits from scratch.
| Amount | Ingredient |
|---|---|
| 4 Tablespoons | salted butter, melted (for the base) |
| 1 whole | rotisserie chicken, meat removed and chopped (about 3-4 cups) |
| 12 ounce bag | frozen peas and carrots (or mixed vegetables) |
| 10.5 ounce can | cream of chicken soup with herbs (or regular cream of chicken) |
| 2 cups | chicken broth |
| 1 teaspoon | garlic powder |
| 1 teaspoon | onion powder |
| ½ teaspoon | black pepper |
| 11.36 ounce box | Cheddar Bay Biscuit Mix (save that seasoning packet!) |
| 2 cups | milk (2% or higher — don’t skimp here) |
| ½ cup | shredded cheddar cheese |
| 2 Tablespoons | salted butter, melted (for the topping) |
| 1 packet | seasoning from the biscuit mix box |
Tools You’ll Actually Use
You don’t need anything fancy for this — just your trusty basics:
- 9×13-inch baking dish
- Medium mixing bowl
- Whisk
- Small bowl (for the butter topping)
- Pastry brush (or just use a spoon)
- Measuring cups and spoons
Step-by-Step Instructions
Alright, let’s make this Chicken Cobbler Recipe happen. It’s all about layering — no stirring required, which honestly feels like magic.
Step 1: Preheat your oven to 350°F because we’re about to make your kitchen smell incredible.
Step 2: Pour 4 tablespoons of melted salted butter into the bottom of your 9×13-inch baking dish, tilting it around so the butter coats the bottom evenly. This creates that golden, buttery base we’re all here for.
Step 3: Layer the chopped rotisserie chicken (about 3-4 cups of meat) evenly over the melted butter. Don’t stir — just let it chill there in an even layer.
Step 4: Sprinkle the entire 12-ounce bag of frozen peas and carrots over the chicken layer. Again, no stirring. We’re building layers like a delicious, savory lasagna situation.
Step 5: In a separate bowl, whisk together the 10.5-ounce can of cream of chicken soup, 2 cups of chicken broth, 1 teaspoon garlic powder, 1 teaspoon onion powder, and ½ teaspoon black pepper until smooth and creamy.
Step 6: Pour this creamy soup mixture over the chicken and veggie layers, letting it seep down into all the nooks and crannies. Still no stirring. (Pro tip: rinse and dry that bowl now so you can reuse it for the next step and avoid extra dishes.)
Step 7: In that same bowl, stir together the Cheddar Bay Biscuit Mix (but NOT the seasoning packet — save that for later!), 2 cups of milk, and ½ cup of shredded cheddar cheese until everything’s combined and looks like thick pancake batter.
Step 8: Pour this biscuit mixture as evenly as possible over all the layers in the baking dish. It’ll spread as it bakes, so don’t stress if it’s not perfect. And yep, still no stirring.
Step 9: Slide the whole thing into your preheated 350°F oven and bake uncovered for 50-60 minutes, until the top is golden brown and the edges are bubbling like crazy. Every oven’s a little different, so just watch for that beautiful golden color on top.
Step 10: While it’s baking (or right when it comes out), make the butter topping by mixing 2 tablespoons of melted butter with that seasoning packet you saved from the biscuit mix.
Step 11: Brush this garlic butter mixture all over the top of your hot cobbler. If you want to get fancy, sprinkle a little dried parsley on top for color, but it’s totally optional.
Step 12: Let the cobbler rest for at least 10 minutes before serving. I know it’s tempting to dive right in, but this resting time helps the filling thicken up so it’s not super runny when you scoop it out.

Pro Tips & Gentle Guidance
This viral TikTok chicken casserole is pretty foolproof, but here are some tips to make it even better.
Use rotisserie chicken from the deli section to save yourself a ton of time. You can also use leftover cooked chicken, shredded turkey, or even a couple cans of drained chicken if that’s what you’ve got.
Don’t stir the layers — this is crucial! The magic happens when everything bakes together in distinct layers, and then the biscuit topping gets all golden and crispy on top while staying soft underneath.
If you can’t find Cheddar Bay Biscuit Mix, you can use regular Bisquick and add ½ cup of shredded cheddar and ½ teaspoon of garlic powder to the mix. It won’t be exactly the same, but it’ll still be delicious.
The filling will be on the thinner side even after resting, so when you serve it, scoop up a portion and then spoon any extra filling from the dish over the top. It’s more like a saucy pot pie than a thick casserole.
For more guidance on comfort food techniques, Allrecipes has a fantastic resource on creating the best casseroles that I reference all the time.
If this recipe made your day, you’re in for a treat. The full Classic Chicken Dinners guide is filled with tried-and-true favorites that real home cooks swear by. Trust me, you won’t be able to pick just one.
Quick Fixes for Chicken Cobbler Recipe
Problem: The biscuit topping is browning too fast but the inside isn’t done yet. Solution: Tent a piece of foil loosely over the top for the last 15-20 minutes of baking. This protects the crust while everything underneath finishes cooking.
Problem: The filling is too runny even after resting. Solution: Let it sit for 15-20 minutes instead of 10. The filling will continue to thicken as it cools slightly. Also, make sure you’re using 2% or whole milk, not skim — the fat content helps thicken things up.
Problem: The biscuit layer sank into the filling. Solution: Make sure your biscuit batter isn’t too thin (it should be thick like pancake batter, not watery). Also, pour it slowly and evenly over the entire surface so it has a better chance of staying on top.
Problem: The bottom is soggy. Solution: Make sure you’re baking at 350°F and give it the full 50-60 minutes. If your oven runs cool, you might need an extra 5-10 minutes. The edges should be bubbling vigorously when it’s done.
Variations & Adaptations
Want to switch up this Chicken Cobbler Recipe? Here are some fun twists:
Gluten-Free: Use a gluten-free biscuit mix (like King Arthur or Bob’s Red Mill) instead of the Cheddar Bay mix, and make sure your cream of chicken soup is gluten-free too.
Dairy-Free: Swap the butter for dairy-free butter, use unsweetened almond or oat milk, skip the cheese in the biscuit layer (or use dairy-free cheese), and check that your biscuit mix is dairy-free.
Veggie-Loaded: Add a cup of diced mushrooms, corn, or green beans to the veggie layer. You can also throw in some fresh spinach or kale.
Turkey Cobbler: Use leftover Thanksgiving turkey instead of chicken — this is an amazing way to use up holiday leftovers without making another boring turkey sandwich.
Spicy Version: Add ½ teaspoon of cayenne pepper to the soup mixture, or stir in some diced jalapeños with the veggies.
Serving, Storage & Reheating
This easy comfort meal is best served hot and fresh, with a big spoonful of that creamy filling drizzled over each serving. I love pairing it with a simple green salad or some roasted green beans to balance out all that cozy richness.
Store leftovers in an airtight container in the fridge for up to 3-4 days. The biscuit topping will soften as it sits, but it still tastes amazing.
To reheat, pop individual servings in the microwave for 1-2 minutes, or reheat the whole dish covered with foil in a 350°F oven for about 20 minutes until warmed through. You can also freeze this for up to 2 months — just thaw it in the fridge overnight before reheating.
Check Out This Delish Recipe:
Crispy Shrimp Balls with Sweet Chili Sauce
No-Waste Kitchen Magic
Got leftover cobbler that’s getting a little sad? Here’s how to give it new life:
Turn it into hand pies by scooping the filling into store-bought pie dough, folding them into little pockets, and baking at 375°F until golden. Instant lunch situation.
Use leftover rotisserie chicken bones to make a quick chicken stock — just simmer them with onion, celery, and carrots for an hour, then freeze the stock for your next batch.
If your biscuit topping gets too brown or crusty after a day or two, crumble it up and use it as a crunchy topping for a salad or soup. Waste not, want not!
Chicken Cobbler Recipe FAQs
What’s the best way to store leftover Chicken Cobbler?
Keep it in an airtight container in the fridge for 3-4 days. The biscuit topping will soften, but it reheats beautifully in the microwave or oven.
How do I know when the Chicken Cobbler is done baking?
Look for a golden brown crust on top and bubbling around the edges. If you insert a knife into the center, the biscuit topping should be cooked through (not doughy). Oven times vary, so use visual cues rather than just the timer.
Can I use a different type of biscuit mix?
Absolutely! Regular Bisquick works great — just add ½ cup shredded cheddar and ½ teaspoon garlic powder to mimic the Cheddar Bay flavor. You can also use any cheese biscuit mix you love.
Will this Chicken Cobbler work in a smaller baking dish?
If you use an 8×8 or 9×9 pan, you’ll have a thicker cobbler with a higher filling-to-crust ratio. The baking time might be slightly longer (check around 60-70 minutes), and you’ll get fewer servings — probably 6 instead of 9.
Is the filling supposed to be runny?
Yes, this cobbler has a thinner, saucier filling compared to a traditional pot pie. Let it rest for 10-15 minutes after baking, and it’ll thicken up a bit. When you serve it, scoop it up and spoon extra sauce over the top — that’s the best part!
Closing
So there you go — a Chicken Cobbler Recipe that feels fancy but is secretly easy, feeds a crowd, and makes your kitchen smell like pure comfort. This viral TikTok chicken casserole has earned its hype, and I’m betting it’s about to become a regular in your dinner rotation too.
I’d love to see your spin on this Chicken Cobbler Recipe! Drop a comment below with your photos or any fun variations you tried — did you add extra veggies? Use turkey instead? Make it spicy? I’m here for all of it. This Chicken Cobbler is so versatile; I bet you’ve got amazing ideas already brewing.
Now go layer some comfort food magic and enjoy every cozy bite. You’ve got this!
I’m Linda Sandra — a Charleston home chef and comfort-food daydreamer. Around here, cooking’s not about perfection — it’s about cozy vibes, creative twists, and food that feels like love.