Peppermint Bark Candy Recipe
This Peppermint Bark Candy recipe is my holiday secret weapon when I need something that looks seriously impressive but won’t have me stress-baking at midnight.
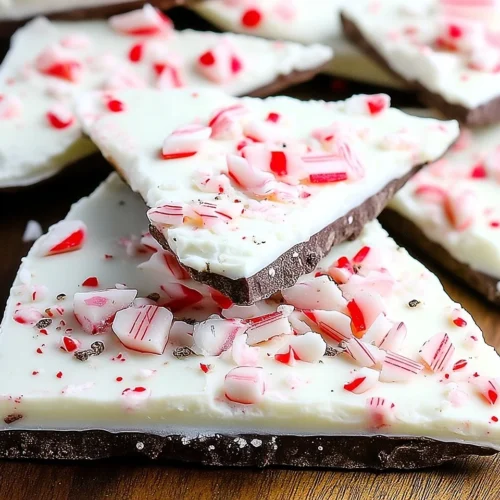
With its layers of rich chocolate almond bark, creamy white chocolate, refreshing peppermint extract, and festive crushed candy canes, this easy candy recipe transforms simple pantry staples into a crowd-pleasing treat that takes just minutes of active prep time and delivers that perfect balance of sweet chocolate and cool mint in every bite.
Here’s the thing about making peppermint bark — it’s basically the poster child for “looks fancy, actually super chill.” No candy thermometer drama, no tempering nightmares, just two types of chocolate almond bark living their best life together with a little peppermint magic sprinkled on top.
I started making this bark candy about five years ago when I realized buying those bougie holiday tins was eating my entire gift budget. Now? I whip up batches in December, stack them in cute jars with ribbon, and suddenly I’m everyone’s favorite baker friend. The best part is watching people’s faces when they bite into that first piece — the satisfying snap, the burst of peppermint, the way chocolate and white chocolate just work together.
Little Snapshot: What This Recipe Delivers
This Peppermint Bark Candy gives you restaurant-quality holiday treats with just four ingredients and about 12 minutes of hands-on time. You’ll layer smooth chocolate almond bark with creamy white chocolate, add a hint of peppermint extract for that festive kick, then top everything with crushed candy canes that give each piece a gorgeous finish and satisfying crunch.
Why You’ll Love This Recipe 🌸
- This Peppermint Bark Candy takes less time than wrapping presents — seriously, you’ll be done before the second Christmas movie starts.
- Only four ingredients stand between you and holiday magic, which means less grocery shopping and more time for cookie decorating marathons.
- It’s completely make-ahead friendly, so you can stash batches in the fridge and actually enjoy your holiday gatherings instead of being stuck in the kitchen.
- According to King Arthur Baking’s guide to effortless holiday treats, the best seasonal sweets combine simplicity with wow factor — and this peppermint bark recipe delivers exactly that.
Quick Facts ⚡
Here’s the quick scoop on this Peppermint Bark Candy.
- CourseDessert
- Prep Time10 minutes
- Cook Time2 minutes
- Total Time2 hours 12 minutes (includes chilling)
- Servings24 pieces
- DifficultyEasy
Table of Contents
Peppermint Bark Candy
Equipment
- Rimmed baking sheet
- Parchment paper
- microwave-safe bowls
- spatulas
- zip-top bag
- Rolling Pin
- Sharp knife
Ingredients
Peppermint Bark Candy
- 16 ounces chocolate almond bark
- 16 ounces white chocolate almond bark
- 1 teaspoon peppermint extract divided
- ⅓ cup candy canes crushed
Instructions
- Line a rimmed 18×13-inch baking sheet with parchment paper, leaving a 2–3 inch overhang on both short ends.
- Melt the chocolate almond bark in a microwave-safe bowl for 1 minute, then stir. Continue heating in 10–20 second intervals, stirring after each, until smooth.
- Stir in 1/2 teaspoon peppermint extract until fully incorporated.
- Spread the melted chocolate evenly over the parchment-lined baking sheet to create the bottom layer.
- Repeat the melting process for the white chocolate almond bark using the same method.
- Stir in the remaining 1/2 teaspoon peppermint extract into the melted white chocolate.
- Spread the white chocolate evenly over the chocolate layer while still soft.
- Sprinkle crushed candy canes over the white chocolate and gently press them in.
- Chill the bark in the refrigerator for 2 hours until fully set.
- Lift the bark out using the parchment overhang and break or cut into pieces.
Notes
Nutritional Peek
Here’s what you’re looking at per piece (because we’re all about informed treat decisions around here):
| Nutrient | Amount per Serving |
|---|---|
| Calories | 145 kcal |
| Protein | 1g |
| Carbohydrates | 18g |
| Total Fat | 8g |
| Saturated Fat | 5g |
| Fiber | 0g |
| Sugar | 16g |
| Sodium | 15mg |
Ingredients

Let’s talk about what makes this bark candy so ridiculously easy to pull off. You’re working with chocolate almond bark and white chocolate almond bark — these coating chocolates melt like a dream and set up perfectly without any fussy tempering.
For your chocolate layers, you’ll need equal amounts of both types of almond bark so they balance beautifully. The peppermint extract gets divided between the layers, giving you that refreshing mint flavor without overwhelming the chocolate. And those crushed candy canes? They’re not just pretty — they add texture and that classic holiday crunch.
| Amount | Ingredient |
|---|---|
| 16 ounces | chocolate almond bark |
| 16 ounces | white chocolate almond bark |
| 1 teaspoon | peppermint extract, divided |
| ⅓ cup | candy canes, crushed (yes, you get to smash things — therapeutic bonus!) |
Tools You’ll Actually Use
You probably have everything already, but here’s what’ll make your peppermint candy journey smooth:
- Rimmed baking sheet (18×13-inch works perfectly)
- Parchment paper (because nobody wants to chisel bark off a pan)
- Two medium microwave-safe bowls (one for each chocolate type)
- Spatulas (offset ones are dreamy but regular works fine)
- Zip-top bag and rolling pin (for candy cane crushing therapy)
- Sharp knife (optional, if you want neat pieces instead of rustic breaks)
This recipe is just the start of something delicious. Browse the entire Cookies & Brownies collection and discover all the ways you can bring more flavor to your table. Your family will thank you.
How to Make Peppermint Bark Candy
Making this Peppermint Bark Candy is seriously therapeutic, and I’m about to walk you through every detail so your first batch turns out absolutely gorgeous.
Prep your pan first — line that rimmed 18×13-inch baking sheet with parchment paper, leaving a 2-3 inch overhang on both short ends. This overhang is your secret weapon for lifting out the finished bark without any stress or broken pieces. Trust me, I learned this the hard way after trying to pry bark off a pan like some kind of chocolate archaeologist.
Melt the chocolate almond bark by adding all 16 ounces to a medium microwave-safe bowl. Zap it for 1 minute, then stir everything around to distribute the heat. Keep heating in 10-20 second bursts, stirring thoroughly after each interval until the chocolate is completely smooth and glossy with no lumps hiding in there. This gradual melting prevents scorching and keeps your chocolate silky instead of seized up and grainy.
Add half the peppermint magic by stirring ½ teaspoon of peppermint extract into your melted chocolate almond bark until it’s completely incorporated. You’ll smell that minty goodness immediately — it’s when my kitchen starts feeling like a winter wonderland instead of just another Tuesday.
Spread your chocolate layer evenly across the prepared parchment-lined baking sheet, using a spatula to create a smooth, uniform base that reaches close to the edges. Don’t stress if it’s not absolutely perfect — we’re making homemade bark, not performing surgery. This chocolate layer will be your foundation, so just aim for relatively even thickness throughout.

Repeat the melting process for the white chocolate almond bark — same gentle microwave method with 1 minute first, then 10-20 second intervals with stirring between each burst until smooth. White chocolate can be slightly more temperamental than dark, so keep a close eye and stir frequently to prevent any scorching at the edges of the bowl.
Stir in the remaining peppermint extract (that last ½ teaspoon) into your melted white chocolate almond bark until completely combined. The extract will thin out the white chocolate slightly, which actually helps it spread more easily over the chocolate layer.
Carefully spread the white chocolate evenly over your chocolate base layer while it’s still soft and pliable. Work relatively quickly here but don’t panic — you’ve got a few minutes before the bottom layer starts setting up. Use a clean spatula or the back of a spoon to gently spread the white chocolate from center outward, being careful not to disturb or mix too much into the chocolate layer beneath.
Sprinkle those crushed candy canes immediately over the white chocolate layer before it begins to set. Gently press them down with your fingertips so they actually stick instead of just rolling off later. This is where you get to be artistic — go heavy on the candy canes for max crunch and visual impact, or keep it lighter for a more subtle look. Move confidently but quickly since that white chocolate starts firming up faster than you’d think.
Chill for 2 hours in the refrigerator until the chocolate layers are completely set and firm to the touch. I know waiting is hard when your kitchen smells like a peppermint dream, but this chilling time ensures clean breaks and prevents the layers from separating when you cut into pieces.
Remove and break the chilled peppermint bark using those parchment overhangs to lift the entire sheet out of the pan in one gorgeous piece. You can either break it into rustic irregular pieces with your hands (my preferred method for that authentic homemade look), or use a sharp knife to cut neat squares or rectangles if you’re going for more polished presentation.

Claire’s Pro Tips & Gentle Guidance
Here’s where I share the little secrets that’ll take your peppermint bark from good to “wait, you actually made this yourself?” level. These are the things I wish someone had told me before my first batch back in 2019.
Room temperature matters for spreading. If your kitchen is super cold, that chocolate layer will start firming up before you get the white chocolate on top, making spreading nearly impossible without creating a marbled mess. Work in a normal room temperature space, and if needed, wait just 30-60 seconds after spreading the chocolate layer to let it barely begin setting — this creates a slightly tacky surface that the white chocolate grips onto better.
Crush candy canes strategically by placing them in a sturdy zip-top bag and using a rolling pin or meat mallet to smash them into varied sizes — some fine powder, some small chunks, some larger pieces. This variety creates the prettiest visual effect and gives you different textures in every bite. Also, this is genuinely excellent stress relief during holiday season, just saying.
The peppermint extract amount is flexible based on how intense you want that mint flavor. Start with the recipe amounts, but if you’re a mint fanatic like my sister-in-law, you can bump it up to ¾ teaspoon per layer. Just don’t go overboard — too much extract can make the chocolate seize or taste medicinal instead of festive.
Use quality almond bark for best results. I typically grab the brands in the baking aisle that come in those flat rectangular packages — they’re specifically formulated to melt smoothly and set up with a nice snap. According to Serious Eats’ comprehensive chocolate melting guide, coating chocolates like almond bark contain stabilizers that make them more forgiving than pure chocolate, which is exactly why they’re perfect for beginner candy makers.
Watch your microwave power settings. If you’re working with a super powerful microwave (1000+ watts), start with just 30-45 seconds for that initial heating instead of a full minute. I melted my first batch into a scorched disaster because I didn’t realize my microwave was basically a chocolate incinerator on the default setting.
Layer thickness affects texture. Thinner layers give you more snap and work better for gift-giving since they’re easier to break into neat pieces. Thicker layers feel more luxurious and substantial but can sometimes separate if you’re not careful with the spreading technique. I aim for about ¼-inch thick chocolate layer with slightly thinner white chocolate on top.
Quick Fixes for Peppermint Bark Candy
Problem: Your white chocolate looks grainy or seized up. This happens when moisture gets introduced or when you overheat the chocolate. Try stirring in a teaspoon of neutral oil (like vegetable or coconut) to help smooth it back out. If it’s beyond saving, you can still use it — the texture will be slightly different but the flavor stays delicious. Next time, make absolutely sure your bowl and utensils are bone dry and heat in shorter intervals.
Problem: The layers separated when you broke the bark into pieces. Your chocolate layer was probably too set before you added the white chocolate, so they never really bonded. Next time, work a bit faster or let that chocolate layer cool for just 30-45 seconds so it’s slightly tacky when the white chocolate goes on. For this batch, you can melt the separated pieces and remix them into “cookies and cream” style bark — different than planned but still tasty.
Problem: Candy canes slid right off the top. You either waited too long to add them or didn’t press them in. The white chocolate needs to be freshly spread and still quite soft for the candy pieces to stick properly. Gently but firmly press those candy cane pieces into the white chocolate immediately after sprinkling — you want them embedded, not just sitting on the surface.
Problem: Your bark won’t set even after hours in the fridge. Either the chocolate wasn’t fully melted and combined before spreading (leaving temperature inconsistencies), or your fridge might not be cold enough. Try moving it to the freezer for 30-45 minutes as a shortcut. If the bark still seems soft, you might have gotten a batch of old almond bark that lost its ability to set properly — unfortunately happens sometimes with coating chocolates that have been sitting on store shelves too long.
Variations & Fun Twists
This bark candy is basically a blank canvas for your creativity once you nail the basic technique.
Go dark and sophisticated by swapping the chocolate almond bark for dark chocolate almond bark (yes, that’s a thing and it’s glorious). The more intense chocolate flavor pairs beautifully with peppermint and feels a bit more grown-up. Perfect if you’re making bark for a holiday office party where not everyone’s into super sweet treats.
Make it festive and colorful by adding crushed Oreos, mini chocolate chips, or festive sprinkles along with the candy canes. My daughter goes wild for “everything bark” where we throw basically every holiday candy topping we can find onto that white chocolate layer. It’s chaotic but delicious.
Try different flavor extracts if peppermint isn’t your thing — almond extract with sliced almonds on top, orange extract with dried cranberries for a chocolate-orange situation, or even maple extract with toasted pecans for something totally unexpected. Each variation brings completely different vibes to your holiday treat table.
Make it gluten-free and allergy-friendly by checking that your almond bark brands are certified gluten-free (most are but always verify). Skip the candy canes and use crushed peppermint candies that don’t contain wheat ingredients if you’re dealing with celiac-safe requirements. The base recipe is already dairy-free if you choose almond bark made without milk products.
Create a marbled effect instead of distinct layers by dropping spoonfuls of white chocolate onto the chocolate layer, then using a knife or skewer to swirl them together into gorgeous patterns. This technique is slightly more advanced but creates that high-end bakery look that photographs beautifully for your Christmas cookie spread.
Serving, Storage & Reheating
This Peppermint Bark Candy is perfect for basically any holiday situation you can imagine. Serve it on a pretty platter alongside other treats like Cranberry Pistachio White Chocolate Bark, arrange pieces in decorative tins for neighbor gifts, or pack them into cellophane bags tied with ribbons for party favors. I love setting out a bowl during holiday gatherings — it disappears faster than you’d believe possible.
Store your peppermint bark in an airtight container with parchment paper between layers to prevent sticking. It’ll keep at room temperature for up to a week (if it lasts that long), in the fridge for up to 3 weeks, or in the freezer for up to 3 months. Just make sure it’s completely sealed so it doesn’t absorb any weird fridge odors or develop condensation that makes the candy canes sticky.
This bark doesn’t need reheating since it’s meant to be enjoyed at room temperature or slightly chilled. If you’ve stored it in the fridge, let pieces sit out for about 10 minutes before serving so the chocolate softens to the perfect texture. Some people actually prefer it straight from the freezer on hot days for an ultra-refreshing peppermint chocolate treat that snaps beautifully between your teeth.
No-Waste Kitchen Magic
Got extra crushed candy canes after making your peppermint candy? Stir them into hot chocolate, sprinkle over vanilla ice cream, or mix into sugar cookie dough for an instant holiday upgrade. Those fine candy cane dust bits at the bottom of the bag make gorgeous rimming sugar for peppermint martinis or white chocolate mochas.
If you somehow end up with leftover peppermint bark (genuinely rare in my house), chop it into chunks and fold into homemade brownies before baking, melt it down and drizzle over pound cake, or crush it completely and use as a topping for your maple bourbon glazed desserts. The peppermint-chocolate combination plays surprisingly well with bourbon and maple flavors.
Day-old bark that’s lost its snap? Break it into smaller pieces and mix into vanilla ice cream while it’s soft, creating a homemade peppermint bark ice cream situation that’s honestly better than the original bark. Or chop it up and sprinkle over chocolate cupcakes as fancy decoration — no one needs to know it was “leftover” instead of intentionally made that way.
Peppermint Bark Candy FAQs
What is Christmas peppermint bark?
Christmas peppermint bark is a classic holiday candy made with layers of chocolate and white chocolate topped with crushed candy canes or peppermint candies. It became hugely popular in the 1990s when Williams Sonoma started selling their version, and now it’s a holiday staple that people make at home or gift during the festive season.
Is peppermint bark an American thing?
Yes, peppermint bark is pretty distinctly American, especially as a holiday tradition. While chocolate and peppermint combinations exist in other countries, the specific layered bark format with candy cane topping became popular in the U.S. in the late 20th century. It’s now so associated with American Christmas celebrations that it’s basically shorthand for “cozy holiday season.”
Is it healthy to eat peppermint candy?
Peppermint candy is definitely a treat rather than health food — it’s high in sugar and contains chocolate with saturated fats. That said, enjoying it in moderation as part of your holiday celebrations is totally fine and brings joy, which counts for something! Peppermint itself can have some digestive benefits, but you’re not eating candy bark for the health perks, let’s be real.
What peppermint candy is popular during Christmas time?
Candy canes are the most iconic Christmas peppermint candy, followed closely by peppermint bark, Andes mints, and those red-and-white striped starlight mints. Peppermint chocolates in various forms — from Peppermint Patties to fancy truffles — also see huge popularity spikes during the holiday season. Basically, if it combines chocolate and peppermint, it’s flying off shelves between Thanksgiving and New Year’s.
Can I freeze this Peppermint Bark Candy?
Absolutely! This bark freezes beautifully for up to 3 months when stored in an airtight container with parchment paper between layers. I actually prefer making big batches early in the season and pulling out pieces as needed for last-minute gifts or dessert emergencies. Just let frozen pieces sit at room temperature for 5-10 minutes before serving for the best texture.
This Peppermint Bark Candy Is Your New Holiday Tradition
Listen, if you’ve been putting off making Peppermint Bark Candy because you thought it required pastry school training or some kind of chocolate whisperer certification, I’m here to tell you that’s absolutely not the case. This recipe is genuinely beginner-friendly, crazy forgiving, and produces results that make you look like you’ve been doing this for years.
I’d love to see your spin on this Peppermint Bark Candy! Drop a comment below or tag me with your photos — especially if you tried any of the variations because I’m always hunting for new flavor combinations to test in my kitchen. This bark candy is so versatile that I bet you’ve got amazing twists already brewing in your mind.
Whether you’re making it for holiday gifts, bringing it to cookie swaps, or just keeping a stash in your fridge for those moments when you need a little peppermint chocolate magic, this recipe is going to become your go-to. It’s quick, impressive, and tastes like the holidays should taste — simple, sweet, and totally worth sharing.
Now go make some bark, friend. Your kitchen’s about to smell absolutely amazing.
I’m Claire Whitmore — a dessert daydreamer from Asheville, NC. For me, baking isn’t about perfect pastries — it’s about the joy of sharing something sweet (and maybe sneaking an extra piece of peppermint bark when nobody’s looking).