No-Bake S’mores Bars
No-Bake S’mores Bars are everything you love about a classic campfire treat — gooey marshmallow, melty chocolate, and that signature Golden Grahams crunch — no fire, no oven, no drama required.
Hey there, I’m Claire Whitmore — a pastry whisperer in Asheville, NC, where butter totally counts as self-care. This no-bake s’mores bars recipe is one of my all-time go-to summer dessert recipes: five simple ingredients, zero oven time, and ready to slice in under an hour.
I first made these campfire dessert bars on a night when my kids were absolutely begging for s’mores, but a real campfire just wasn’t happening. One melted pot and some excited little hands later, these bars became a permanent fixture in our kitchen.
They’ve been on repeat every summer since — and honestly, I might like them even more than the original.
Table of Contents
What These No-Bake S’mores Bars Deliver
Craving even more delightful sweet treats after these easy S’mores Bars? Dive into our full collection of scrumptious cakes and cupcakes for more baking (and no-baking!) inspiration that’s sure to satisfy any sweet tooth!
These no-bake s’mores bars come together in about 15 minutes of prep time, set in the fridge in 30, and make 15 generous servings. They’re an easy, no-oven dessert made with Golden Grahams cereal, mini marshmallows, chocolate chips, and salted butter — delivering that chewy, gooey, chocolatey campfire flavor in every single bite.
Why You’ll Love This Recipe
- These no-bake s’mores bars take less time to make than it does to find the bag of marshmallows at the back of your pantry — seriously, 15 minutes of actual effort.
- No oven, no campfire, no fuss — just a pot on the stove and a pan in the fridge, which means you can make these even in the middle of July without sweating through your kitchen.
- They’re crowd-pleaser royalty: kids go wild, adults sneak seconds, and nobody can believe something this good is also this simple.
- According to The Kitchn’s complete guide to irresistible dessert bars, the best dessert bars combine ease with maximum crowd appeal — and these no-bake s’mores bars prove that point perfectly.
Quick Facts
Here’s the quick scoop on this no-bake s’mores bars recipe.
- CourseDessert
- Prep Time15 minutes
- Cook Time5 minutes
- Total Time50 minutes (including 30 min chill time)
- Servings15 bars
- DifficultyEasy
Nutritional Peek
Here’s a quick look at what one of these no-bake s’mores bars brings to the table — because knowing what you’re enjoying is always a good thing.
| Nutrient | Amount per Serving |
|---|---|
| Calories | ~195 kcal |
| Carbohydrates | ~35g |
| Protein | ~2g |
| Total Fat | ~6g |
| Saturated Fat | ~3.5g |
| Fiber | ~0.5g |
| Sugar | ~20g |
Nutritional values are estimates based on standard ingredients and may vary by brand.
Ingredients for No-Bake S’mores Bars
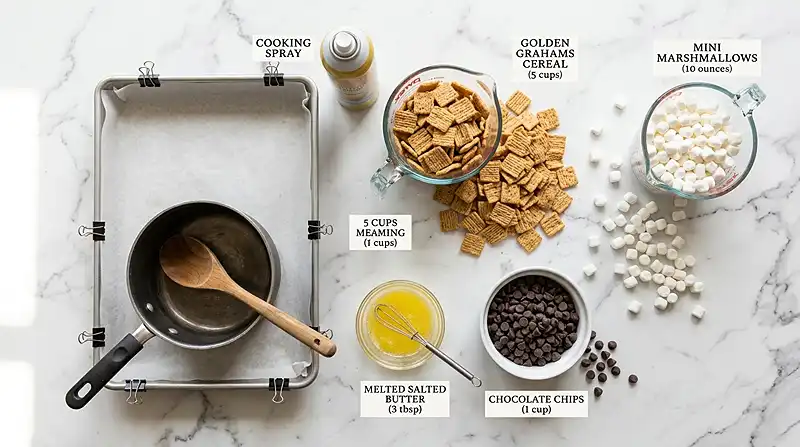
This summer dessert recipe keeps the ingredient list beautifully short and sweet. You’ve got your base components — salted butter and mini marshmallows — doing the heavy lifting for that classic chewy, sticky texture. Then the mix-ins — Golden Grahams cereal and chocolate chips — bring the crunch and the chocolate magic.
| Amount | Ingredient |
|---|---|
| Cooking spray | For pan and spoon (don’t skip this one!) |
| 3 tablespoons | Salted butter, melted (yes, salted — the contrast is everything) |
| 10 ounces | Mini marshmallows, divided (reserve 1 cup + a small handful for the top) |
| 5 cups | Golden Grahams cereal (the graham cracker flavor is the secret weapon) |
| 1 cup + 1 small handful | Chocolate chips, divided (save that extra handful for topping) |
Tools You’ll Actually Use
- 13 x 9 inch baking pan
- Parchment paper
- Medium to large pot or saucepan
- Rubber spatula or mixing spoon (spray it with cooking spray!)
- Cooking spray
- Refrigerator for setting
- Sharp knife or bench scraper for slicing
How to Make No-Bake S’mores Bars: Step-by-Step
Ready to make the easiest no-bake s’mores bars of your life? Let’s walk through it together — it’s genuinely hard to mess up.
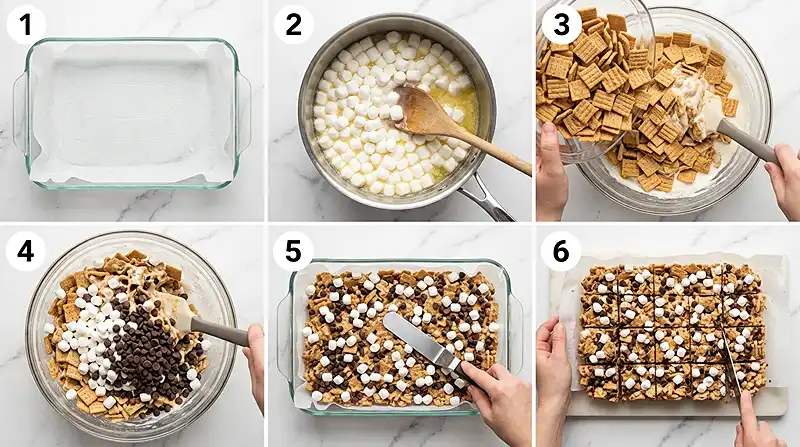
Step 1: Prep your pan. Spray a 13 x 9 inch pan with cooking spray, then line it with parchment paper, leaving a few inches of overhang on the sides. That overhang is your best friend — it lets you lift the entire slab out of the pan in one beautiful piece once it’s set.
Step 2: Melt the butter. Melt 3 tablespoons of salted butter in a pot over medium heat. Once fully melted, reduce the heat to low — you want a gentle, steady warmth from here on out.
Step 3: Reserve marshmallows and melt the rest. Set aside 1 cup of mini marshmallows plus a small handful (these go on top later). Add all the remaining marshmallows from the 10 oz bag to the pot. Spray your mixing spoon with cooking spray and stir continuously until the marshmallows are completely melted and smooth — this takes about 3 to 5 minutes on low heat.
Step 4: Add the Golden Grahams. Remove the pot from the heat. Pour in all 5 cups of Golden Grahams cereal and stir well until every piece is coated in that glossy marshmallow mixture. Your kitchen will smell absolutely incredible at this point.
Step 5: Fold in the marshmallows and chocolate chips. Add the reserved 1 cup of mini marshmallows and 1 cup of chocolate chips (keeping that extra handful aside for the top). Stir once more to combine — you want them distributed through the mix but not fully melted.
Step 6: Press into the pan. Transfer the mixture into your prepared 13 x 9 pan. Use your hands or the back of a greased spoon to gently press it into an even layer — don’t pack it too tightly or the bars get dense.
Step 7: Top and chill. Scatter the reserved marshmallows and extra chocolate chips across the top to your heart’s content. Refrigerate for at least 30 minutes — longer is better if you can wait (I rarely can). Once set, lift the slab out using the parchment paper, transfer to a cutting board, and slice into 15 bars.
Step 8: Store and enjoy. Store in an airtight container and try not to eat them all in one sitting. No judgment if you do.
Claire’s Pro Tips for Perfect S’mores Bars
As a no-bake dessert, this campfire dessert bar recipe is pretty forgiving — but a few little tricks will take yours from great to absolutely irresistible.
Keep the heat low once the butter is melted. Rushing the marshmallow melting process over too-high heat leads to stiff, sticky bars that are hard to press and harder to eat. Low and slow is the move here.
Spray everything that touches the marshmallow mixture. Your spoon, your hands, even the back of a measuring cup — marshmallow is basically glue, and cooking spray is your only defense. Don’t skip this step or you’ll be scrubbing your pot for days.
Work quickly after removing the pot from the heat. Marshmallow mixture starts to stiffen fast, so have your pan ready before you take the pot off the stove. The whole “add cereal, stir, add mix-ins, press into pan” sequence should happen in about 2 minutes.
Don’t over-press the bars into the pan. A gentle press is all you need to even them out. Pressing too firmly compresses all that air and gives you a brick-like texture instead of a chewy, dreamy bar.
If you love bar desserts, you might also want to check out these chewy and tangy lemon brownie bars — they’re another no-fuss crowd-pleaser from our EdenPlate collection.
Quick Fixes for No-Bake S’mores Bars
My bars are too hard and dry. This usually means the marshmallow mixture was overheated or cooked too long. Next time, keep the heat on low and pull the pot off the heat as soon as everything is melted and smooth. You can also try pressing them a little less firmly into the pan.
My bars are too sticky and won’t slice cleanly. They probably need more chill time. Pop them back in the fridge for another 30 to 60 minutes. Running your knife under hot water and drying it before each cut also helps get cleaner slices.
The mixture hardened in the pot before I could get it in the pan. It happens! If the mixture seizes up before you press it into the pan, put the pot back on very low heat for 30 seconds and stir gently — it usually loosens back up just enough to work with.
My bars are falling apart when I slice them. Make sure you’re using the parchment paper overhang to lift the slab out completely before cutting. Trying to cut bars while still in the pan makes it hard to get clean pieces. Also let them chill fully — at least 1 hour for the cleanest results.
The chocolate chips melted completely into the bars. This happens when the mixture is still very hot when you stir them in. Let the cereal mixture cool for a minute or two after adding the Golden Grahams, then fold in your chocolate chips and reserved marshmallows. That way you keep pockets of whole chocolate throughout.
Variations and Fun Twists
One of the best things about these no-bake s’mores bars is how easy they are to riff on depending on the season, your mood, or what’s in your pantry.
Peanut butter s’mores: Stir 2 tablespoons of creamy peanut butter into the melted marshmallow mixture right before adding the cereal. It adds a nutty depth that pairs beautifully with the chocolate chips.
Dark chocolate version: Swap the regular chocolate chips for dark chocolate chips or chopped dark chocolate. The slight bitterness balances the sweetness of the marshmallow perfectly.
Salted caramel twist: Drizzle the top with a little store-bought salted caramel sauce right before the bars go into the fridge. It sets into a gorgeous, slightly sticky glaze.
Holiday version: Swap regular chocolate chips for seasonal ones — red and green for Christmas, pastel for spring, or orange and black for Halloween. These bars take on a whole new vibe just with different mix-ins.
Extra crunchy: Add a handful of crushed graham crackers on top alongside the marshmallows and chocolate chips for an extra layer of crunch and that classic s’mores texture.
Serving, Storage, and Reheating
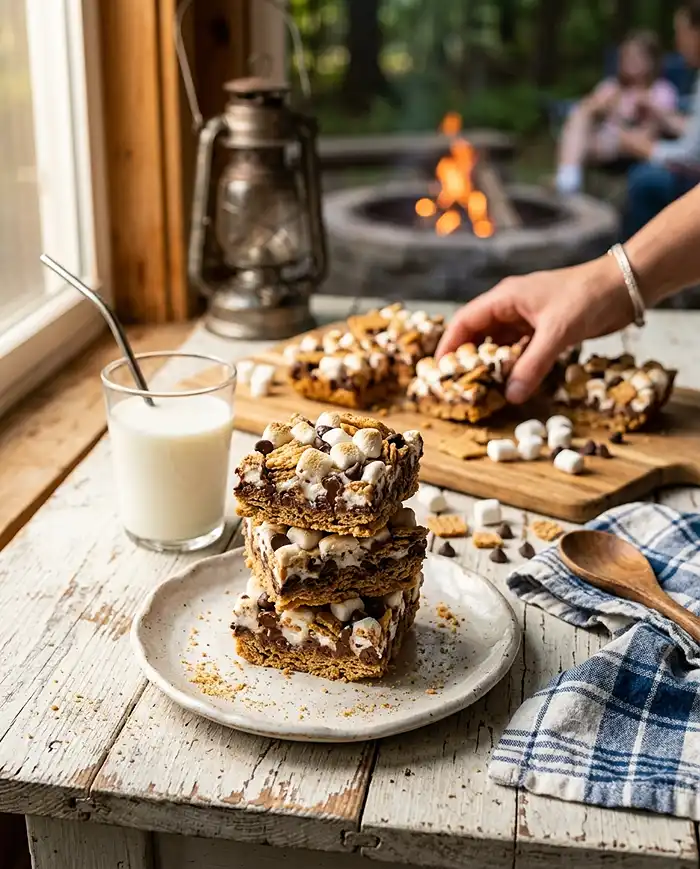
These no-bake campfire dessert bars are perfect served cold straight from the fridge, cut into squares. They hold their shape best when kept cool, so if you’re serving them at an outdoor party, keep them on a tray over ice or pull them out right before serving.
Store leftover bars in an airtight container. They keep well at room temperature for up to 2 days, or in the refrigerator for up to 5 days. I personally like them cold from the fridge — there’s something about that firm, chewy texture that is so satisfying.
These bars don’t really need reheating — in fact, warming them up softens them too much and makes them difficult to handle. If you prefer a slightly softer texture, just let them sit at room temperature for 5 to 10 minutes before serving rather than microwaving.
No-Waste Kitchen Magic
Got leftover bars that have gotten a little too soft or crumbly to serve as-is? Crumble them up and use them as a topping for vanilla ice cream or yogurt. It’s basically a s’mores sundae situation, and it is exceptional.
Any extra Golden Grahams cereal can go straight into a snack bag for lunchboxes. And if you have leftover chocolate chips, melt them with a splash of cream for a quick ganache you can drizzle over anything.
Need a little dinner inspiration after all this dessert talk? This ground beef zucchini skillet is a weeknight lifesaver — quick, filling, and totally delicious.
A Sweet Send-Off
I’d love to see your spin on these no-bake s’mores bars! Drop a comment below with your photos — did you add peanut butter? Go heavy on the chocolate? I genuinely want to know.
These no-bake s’mores bars are so versatile, I bet you’ve already got a fun twist in mind. Whether you’re making them for a summer cookout, a birthday party, or just a Tuesday-night treat, they never disappoint.
Happy (no) baking, friend.
I’m Claire Whitmore — a dessert daydreamer from Asheville, NC. For me, baking isn’t about perfect pastries — it’s about the joy of sharing something sweet (and maybe sneaking an extra handful of chocolate chips straight from the bag).
Frequently Asked Questions
Can I make no-bake s’mores bars ahead of time?
Yes, absolutely! These bars are actually better when made the night before. Make them, cover the pan, and refrigerate overnight. They firm up beautifully and slice even more cleanly after a full chill.
What is the best way to store no-bake s’mores bars?
Store them in an airtight container at room temperature for up to 2 days, or in the refrigerator for up to 5 days. Place a piece of parchment between layers if stacking so they do not stick together.
Will no-bake s’mores bars freeze well?
They can be frozen, but the cereal may lose some crispness after thawing. Wrap individual bars tightly in plastic wrap, store in a freezer bag for up to one month, and thaw overnight in the fridge before serving.
Should I use salted or unsalted butter in this recipe?
Salted butter is the way to go here. That little hint of salt balances the sweetness of the marshmallows and chocolate chips beautifully. If you only have unsalted, add a small pinch of flaky sea salt to the mixture.
How do I know when no-bake s’mores bars are set and ready to cut?
Give the pan a gentle press in the center — when the bars feel firm and no longer sticky to the touch, they are ready. This usually happens after at least 30 to 60 minutes in the fridge, but longer always gives cleaner slices.
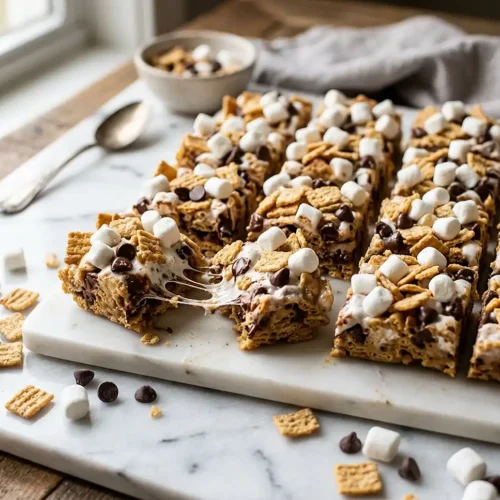
No-Bake S’mores Bars
Equipment
- 13 x 9 inch baking pan
- Parchment paper
- Medium to large pot or saucepan
- Rubber spatula or mixing spoon
- Cooking spray
- Sharp knife for slicing
Ingredients
Base Ingredients
- Cooking spray, for pan and spoon Do not skip — marshmallow sticks to everything
- 3 tbsp Salted butter, melted Salted preferred for flavor balance
- 10 oz Mini marshmallows, divided Reserve 1 cup plus a small handful for topping
- 5 cup Golden Grahams cereal
Mix-Ins and Topping
- 1 cup Chocolate chips Plus 1 small handful reserved for topping
Instructions
- Spray a 13 x 9 inch pan with cooking spray and line it with parchment paper, leaving extra paper over the sides to act as handles for easy removal once set.
- Melt 3 tablespoons of salted butter in a pot over medium heat. Once fully melted, reduce the heat to low.
- Set aside 1 cup of mini marshmallows plus a small handful from the 10 oz bag. Add the remaining marshmallows to the pot. Spray a mixing spoon with cooking spray and stir continuously until the marshmallows are completely melted and smooth, about 3 to 5 minutes on low heat.
- Remove the pot from the heat. Add all 5 cups of Golden Grahams cereal and stir well until every piece is coated in the marshmallow mixture.
- Add the reserved 1 cup of mini marshmallows and 1 cup of chocolate chips (keeping the extra handful aside for topping). Stir once more to distribute evenly throughout the mixture.
- Transfer the mixture to the prepared pan. Using greased hands or the back of a greased spoon, gently press into an even layer — do not pack too firmly or the bars will be dense.
- Scatter the reserved marshmallows and extra chocolate chips over the top. Refrigerate for at least 30 minutes — longer gives cleaner slices. Once set, lift the slab out using the parchment paper and slice into 15 bars.
- Store in an airtight container at room temperature for up to 2 days or in the refrigerator for up to 5 days.