Strawberry Cheesecake Cups
Strawberry Cheesecake Cups are the kind of dessert that makes people think you spent way more time in the kitchen than you actually did.
We’re talking a buttery graham cracker crust, velvety no-bake cheesecake filling, and piles of fresh strawberries — all layered into adorable little cups. No oven. No fuss. Just pure, creamy joy.
Hey there, I’m Claire Whitmore — a pastry whisperer in Asheville, NC, where butter totally counts as self-care. These Strawberry Cheesecake Cups came into my life on a sweltering July afternoon when turning on the oven felt like a personal offense.
I threw together what I had, and honestly? My family hasn’t stopped asking for them since. They’re that good.
Table of Contents
Little Snapshot: What This Recipe Delivers
These no-bake Strawberry Cheesecake Cups come together in about 20 minutes with just a handful of simple ingredients — fresh strawberries, cream cheese, sweetened condensed milk, and a buttery graham cracker crust.
They’re creamy, fruity, and perfectly portioned for parties, potlucks, or a sneaky midnight treat. Easy enough for beginners, impressive enough for guests.
Why You’ll Love This Recipe
- These no-bake cheesecake cups take less time to assemble than it does to find matching Tupperware lids.
- They’re individually portioned — which means no awkward slicing, no serving drama, and secretly, a built-in excuse to have two.
- You only need one bowl for the cheesecake filling, which means cleanup is basically a non-event. Busy mamas, this one’s for you.
- According to Bon Appetit’s guide to effortless no-bake desserts, the best summer sweets skip the oven entirely — and this recipe is living proof.
Quick Facts
Here’s the quick scoop on this Strawberry Cheesecake Cups recipe.
- Course: Dessert
- Prep Time: 20 minutes
- Cook Time: 0 minutes (no-bake!)
- Total Time: 20 minutes + 1 hour chilling
- Servings: 3 servings
- Difficulty: Easy
Nutritional Peek
Here’s an approximate nutritional breakdown per serving of these Strawberry Cheesecake Cups (based on the recipe as written, without optional toppings).
| Nutrient | Amount Per Serving |
|---|---|
| Calories | ~620 kcal |
| Protein | ~12g |
| Carbohydrates | ~58g |
| Fat | ~38g |
| Fiber | ~2g |
| Sugar | ~44g |
Nutritional values are estimates and will vary based on specific brands and optional toppings used.
Ingredients for Strawberry Cheesecake Cups
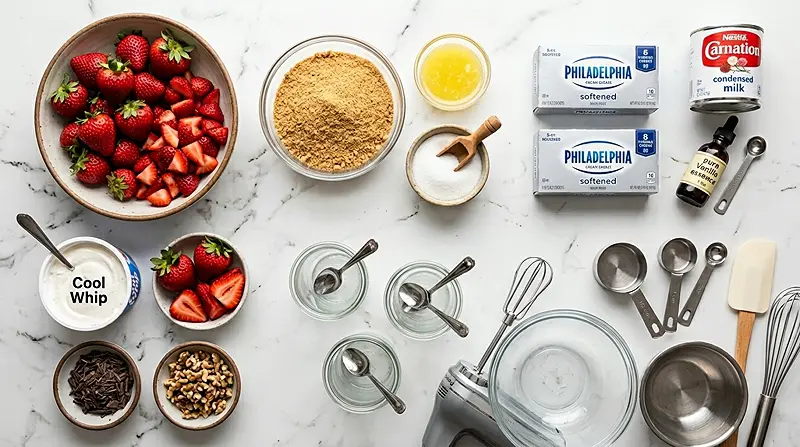
For the no-bake cheesecake filling, you’ll need two blocks of softened cream cheese and a can of sweetened condensed milk — make sure that cream cheese is truly room temp, or you’ll end up with lumps instead of silk.
For the crust layer, graham cracker crumbs and melted butter do all the heavy lifting. And for the star of the show? Fresh, chopped strawberries — sweet, juicy, and absolutely non-negotiable.
| Amount | Ingredient |
|---|---|
| 1 lb. | Fresh strawberries, chopped |
| Graham Cracker Crust | |
| 2 cups | Graham cracker crumbs (sub with digestives or ginger snaps) |
| 1/4 cup | Melted butter (yes, real butter — margarine just doesn’t cut it here) |
| 1 tbsp | Granulated sugar (optional, but adds a lovely touch) |
| Cream Cheese Mixture | |
| 2 blocks (8 oz each) | Cream cheese, softened |
| 14 oz can | Sweetened condensed milk |
| 1 tsp | Vanilla essence |
| Toppings & Garnish (Optional) | |
| As needed | Cool Whip or whipped cream |
| As needed | Extra strawberries, chocolate shavings, or chopped nuts |
This recipe is just the beginning. Over in the Cakes & Cupcakes collection, you’ll find even more dishes that are just as easy and packed with flavor. Go take a peek — your next favorite is waiting.
Tools You’ll Actually Use
- Large mixing bowl
- Medium mixing bowl
- Hand mixer or stand mixer
- Rubber spatula
- Measuring cups and spoons
- 3 individual serving cups or dessert glasses
- Knife and cutting board (for strawberries)
How to Make Strawberry Cheesecake Cups (Step-by-Step)
These Strawberry Cheesecake Cups come together in just a few simple layers — no baking, no stress, and absolutely no special skills required.
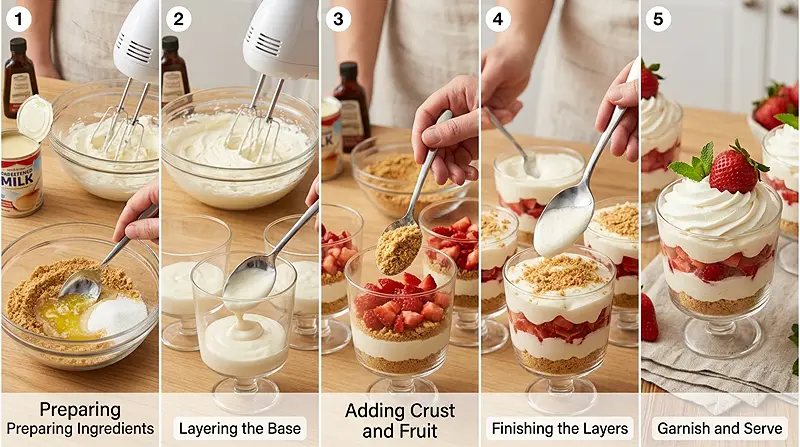
Step 1: Make the Graham Cracker Crust
In a medium mixing bowl, stir together 2 cups of graham cracker crumbs, 1/4 cup of melted butter, and 1 tbsp of granulated sugar (if using) until the mixture looks like damp sand and holds together when pressed.
Set the crust mixture aside — you’ll use it for two separate layers, so don’t go eating it straight from the bowl. (I won’t judge if you do, though.)
Step 2: Make the Cream Cheese Filling
In a large mixing bowl, beat 2 softened blocks of cream cheese with a hand mixer on medium speed until completely smooth with no lumps — about 2 minutes.
Add the 14 oz can of sweetened condensed milk and 1 tsp of vanilla essence, then mix on medium speed until everything is fully combined and silky smooth. The filling should be thick, creamy, and gloriously lickable.
Step 3: Layer Your Cheesecake Cups
Start each cup with a small spoonful of the cream cheese mixture as the base — this anchors everything beautifully. Then add half of your graham cracker crumb mixture, pressing it down gently into an even layer.
Next, add a generous layer of freshly chopped strawberries. Follow with another layer of the cream cheese filling, then finish with a final layer of the remaining graham cracker mixture on top.
Step 4: Add Toppings and Chill
If you’d like, crown each cup with a swirl of Cool Whip or fresh whipped cream, a few whole strawberries, chocolate shavings, or a sprinkle of chopped nuts.
Pop the cups in the fridge for at least 1 hour before serving — this gives the filling time to firm up and the flavors a chance to get cozy with each other. Worth every minute of the wait.
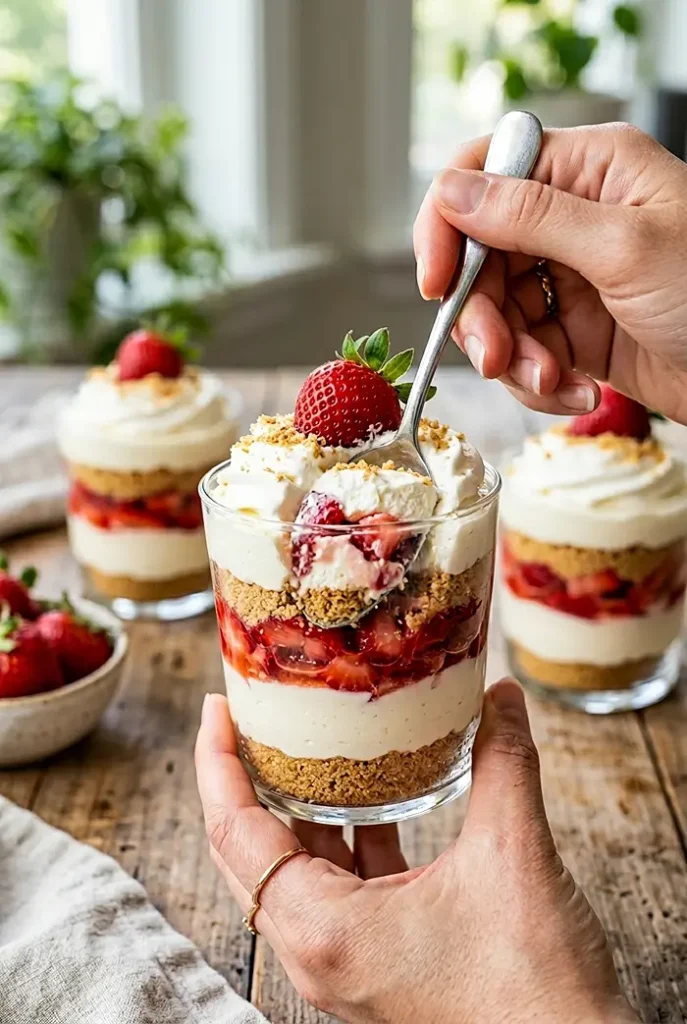
Claire’s Pro Tips for Perfect No-Bake Cheesecake Cups
Making these mini desserts is genuinely hard to mess up, but a few little tricks will take yours from good to absolutely unforgettable.
Here are my favorite insider notes after making these more times than I can count:
Room temperature cream cheese is non-negotiable. Cold cream cheese will leave you with a lumpy filling no matter how long you beat it. Pull it out of the fridge at least 30–45 minutes before you start. Trust me on this one — I learned the lumpy way.
Press the crust layers firmly. Use the back of a spoon to press the graham cracker mixture into compact layers. A loose crust means crumbles flying everywhere when you dig in.
Pat your strawberries dry. After chopping, blot them lightly with a paper towel. Excess moisture from the berries can make the filling a little watery over time — especially if the cups sit in the fridge overnight.
Make it ahead. These cups actually taste better after an overnight chill. The layers settle, the flavors deepen, and it’s one less thing to do the day of your event.
Quick Fixes for Strawberry Cheesecake Cups
Problem: My filling is lumpy. This almost always means the cream cheese wasn’t soft enough before mixing. Next time, let it come to room temp fully. For now, keep beating on medium-high — it may smooth out with more mixing time.
Problem: The filling is too soft and won’t hold its shape. Give it more chill time — at least 1–2 hours in the fridge. If it’s still too loose after chilling, the cream cheese may have been over-whipped. A gentle, steady hand next time will help.
Problem: The crust layer is falling apart. You may need a touch more melted butter. The crumbs should clump when you squeeze them. Add another tablespoon of butter, mix, and try again.
Problem: The cups taste too sweet. Balance it out with a little lemon zest or a pinch of salt in the cream cheese mixture. Fresh strawberries also help cut through the sweetness naturally.
Problem: The strawberries are releasing too much liquid. Blot them with a paper towel before layering. If using frozen strawberries, thaw and drain them thoroughly before adding to the cups.
Variations and Fun Twists
One of the best things about these no-bake cheesecake cups is how ridiculously easy they are to customize.
Swap the crust. Use crushed digestive biscuits for a more buttery, mellow base, or ginger snaps for a warm, spiced kick that pairs beautifully with the strawberries. Oreo crumbs also work if you want to go full indulgent.
Switch up the fruit. Fresh blueberries, raspberries, sliced peaches, or a mixed berry medley all work wonderfully here. Try a lemon blueberry version for something bright and tangy — it’s every bit as dreamy as my lemon blueberry crumble bars.
Make it vegan. Swap in vegan cream cheese and coconut condensed milk for a fully plant-based version. The texture won’t be identical, but it’ll still be deeply satisfying.
Dress it up for a party. Layer in a thin drizzle of strawberry jam between the cheesecake layers for a more intense berry flavor. A dusting of freeze-dried strawberry powder on top looks absolutely stunning.
Serving, Storage, and Reheating
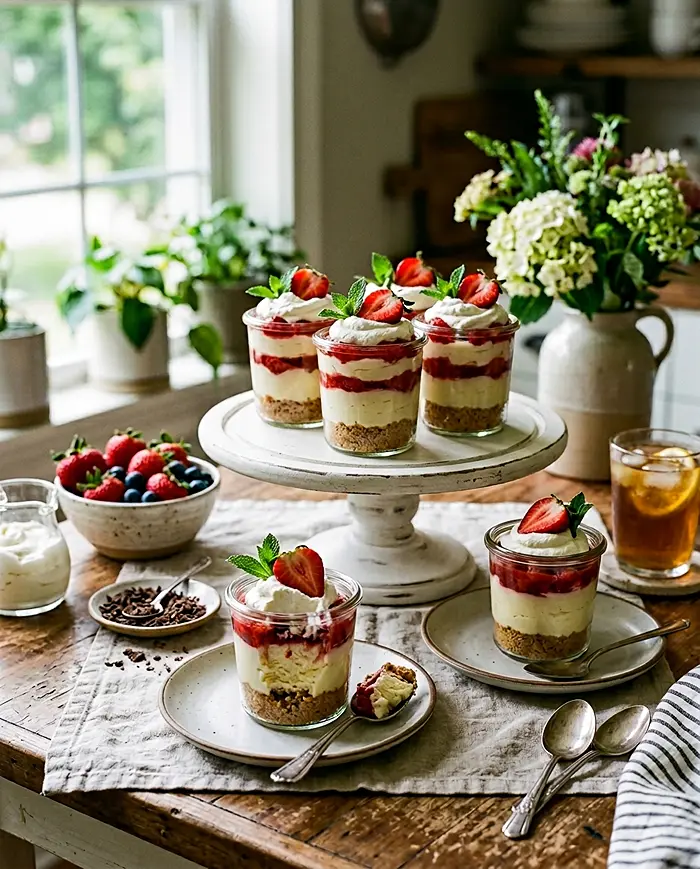
Serve these Strawberry Cheesecake Cups straight from the fridge — they’re best enjoyed cold, topped with a fresh swirl of whipped cream and a few whole strawberries right before serving.
These also look gorgeous on a dessert table alongside other mini bites like my crispy pretzel chicken bites for a sweet-and-savory spread that covers all the bases.
Store any leftover cups covered in the fridge for up to 3 days. The filling stays creamy and the crust holds up reasonably well, though the longer they sit, the softer the crust layers become. Still delicious — just a little more spoonable.
These cups are not meant to be reheated (please don’t microwave your cheesecake). They’re a cold dessert through and through. If you’re making them ahead, just add the whipped cream and fresh toppings right before serving so everything stays fresh and pretty.
No-Waste Kitchen Magic
Got leftover graham cracker crumbs? Sprinkle them over yogurt in the morning for an instant cheesecake-vibes breakfast. You’re welcome.
Extra cream cheese filling? Spread it on toast, swirl it into oatmeal, or use it as a dip for apple slices. It’s basically just fancy cream cheese — it goes with everything.
Strawberries on their last legs? Hull them, freeze them flat on a baking sheet, then store in a zip-lock bag. They’re perfect for blending into smoothies or stirring into future cheesecake batches.
Leftover condensed milk? Use it to make a quick caramel drizzle, add it to your morning coffee, or whip up a batch of savory party sliders for your next gathering — a sweet meal deserves a savory follow-up.
FAQs About Strawberry Cheesecake Cups
Can I make Strawberry Cheesecake Cups ahead of time?
Yes, absolutely — and honestly, you should. These cups taste even better after sitting in the fridge overnight, as the layers settle and the flavors develop. Just hold off on adding the whipped cream and fresh toppings until right before serving.
Can I freeze these no-bake cheesecake cups?
You can freeze them, but the texture of the cream cheese filling changes a little after thawing — it can become slightly grainy. If you do freeze them, wrap each cup tightly and thaw in the fridge overnight. They’re still tasty, just best enjoyed fresh.
What’s the best way to store Strawberry Cheesecake Cups?
Store them covered in the refrigerator for up to 3 days. Use plastic wrap pressed directly over the surface or airtight lids to prevent the cups from absorbing fridge odors. The crust softens a bit over time, but the flavor stays delicious.
How do I know when the cheesecake filling is ready?
The filling is ready when it’s completely smooth, thick, and holds its shape when you lift the beaters. It should look silky with no lumps at all. If you see lumps, keep beating — the cream cheese just needs a little more time.
Why should I use sweetened condensed milk in this no-bake cheesecake?
Sweetened condensed milk does double duty — it sweetens the filling AND helps it set without any gelatin or baking required. It creates that signature dense, creamy texture that makes no-bake cheesecake so satisfying. Regular milk or cream won’t give you the same result.
Let’s Make These Strawberry Cheesecake Cups Together
I genuinely hope these Strawberry Cheesecake Cups become your new go-to for every warm-weather gathering, last-minute dessert request, and “I need something sweet RIGHT NOW” moment.
They’re everything a dessert should be — easy, beautiful, creamy, and made with love (and a very generous amount of cream cheese).
I’d love to see your spin on these Strawberry Cheesecake Cups! Drop a comment below with your photos — I’d love to see how you made them your own. Did you try a fun crust swap? A different fruit topping? These mini desserts are so versatile; I bet you’ve already got amazing ideas brewing.
I’m Claire Whitmore — a dessert daydreamer from Asheville, NC. For me, baking isn’t about perfect pastries — it’s about the joy of sharing something sweet (and maybe sneaking an extra spoonful of cheesecake filling before it even makes it into the cups).
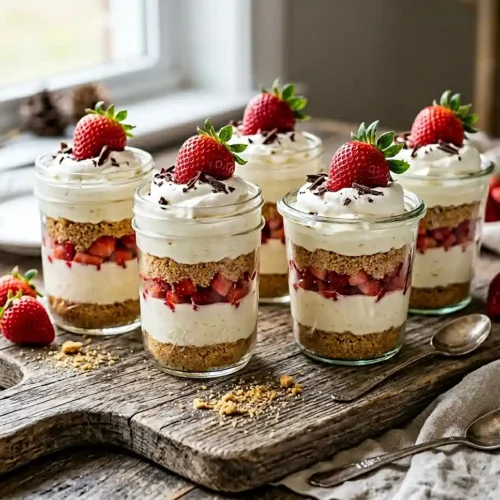
Strawberry Cheesecake Cups
Equipment
- Large mixing bowl
- Medium mixing bowl
- Hand mixer or stand mixer
- Rubber spatula
- Measuring cups and spoons
- 3 individual serving cups or dessert glasses
- Knife and cutting board
Ingredients
Fresh Fruit
- 1 lb fresh strawberries chopped
Graham Cracker Crust
- 2 cups graham cracker crumbs sub with digestives or ginger snaps
- ¼ cup melted butter
- 1 tbsp granulated sugar optional
Cream Cheese Mixture
- 2 blocks cream cheese 8 oz each, softened to room temperature
- 14 oz sweetened condensed milk one can
- 1 tsp vanilla essence
Toppings and Garnish (Optional)
- Cool Whip or whipped cream optional, for topping
- extra strawberries optional garnish
- chocolate shavings or chopped nuts optional garnish
Instructions
- In a medium mixing bowl, stir together 2 cups of graham cracker crumbs, 1/4 cup of melted butter, and 1 tbsp of granulated sugar (if using) until the mixture resembles damp sand and holds together when pressed. Set aside — you will use it for two separate layers.
- In a large mixing bowl, beat 2 softened blocks of cream cheese with a hand mixer on medium speed until completely smooth with no lumps, about 2 minutes.
- Add the 14 oz can of sweetened condensed milk and 1 tsp of vanilla essence to the cream cheese, then mix on medium speed until fully combined and silky smooth. The filling should be thick and creamy.
- Start each cup with a small spoonful of the cream cheese mixture as the base. Then add half of the graham cracker crumb mixture, pressing it down gently into an even layer.
- Add a generous layer of freshly chopped strawberries over the crust, followed by another layer of the cream cheese filling. Finish with a final layer of the remaining graham cracker mixture on top.
- If desired, top each cup with a swirl of Cool Whip or fresh whipped cream, whole strawberries, chocolate shavings, or chopped nuts. Refrigerate for at least 1 hour before serving to allow the filling to firm up.