Lemon Poppy Seed Loaf (Glazed)
Lemon Poppy Seed Loaf (Glazed) is one of those recipes that just makes life feel a little sunnier. I’m Claire Whitmore — a pastry whisperer in Asheville, NC, where butter totally counts as self-care. This glazed lemon bread is tender, citrusy, and topped with the most dreamy lemon glaze you’ve ever drizzled.
We’re talking a moist, buttery crumb packed with bright lemon zest, a gentle crunch from poppy seeds, and a semi-thick glaze that makes every slice look like it came straight from a bakery window. It’s a spring dessert that works just as well for weekend brunch as it does for a cozy afternoon treat.
I first made this lemon poppy seed loaf on a rainy Tuesday when I needed something cheerful, stat. One bite in and I was completely sold. Now it’s my go-to glazed lemon bread whenever I need to impress someone — or just treat myself, which honestly counts more.
Table of Contents
Little Snapshot: What This Recipe Delivers
This glazed lemon poppy seed loaf is a buttery, golden quick bread made with fresh lemon juice, lemon zest, poppy seeds, and a simple two-ingredient lemon glaze. It comes together in about 15 minutes of prep, bakes in under an hour, and serves 10. It’s the kind of easy spring dessert that looks fancy but asks very little of you.
Why You’ll Love This Recipe
- This lemon poppy seed loaf takes less time to prep than it does to find matching Tupperware — seriously, 15 minutes flat.
- That glossy lemon glaze on top makes it look like a bakery showstopper, but you made it in your kitchen in yoga pants. Win.
- It’s a crowd-pleaser for brunches, baby showers, potlucks, or just a slow Sunday with a good cup of tea.
- According to King Arthur Baking in their lemon poppy seed cake guide, the magic of this flavor combo has been delighting bakers for generations — and this glazed loaf proves exactly why it never gets old.
Quick Facts
Here’s the quick scoop on this lemon poppy seed loaf.
- CourseDessert / Brunch
- Prep Time15 minutes
- Cook Time45–60 minutes
- Total TimeAbout 1 hour 15 minutes
- Servings10 servings
- DifficultyEasy
Nutritional Peek
Here’s a rough per-serving breakdown for this glazed lemon bread — because knowing what’s in your slice is always a good idea.
| Nutrient | Amount per Serving |
|---|---|
| Calories | ~265 kcal |
| Carbohydrates | ~38 g |
| Protein | ~4 g |
| Fat | ~11 g |
| Fiber | ~0.7 g |
| Sugar | ~23 g |
Ingredients
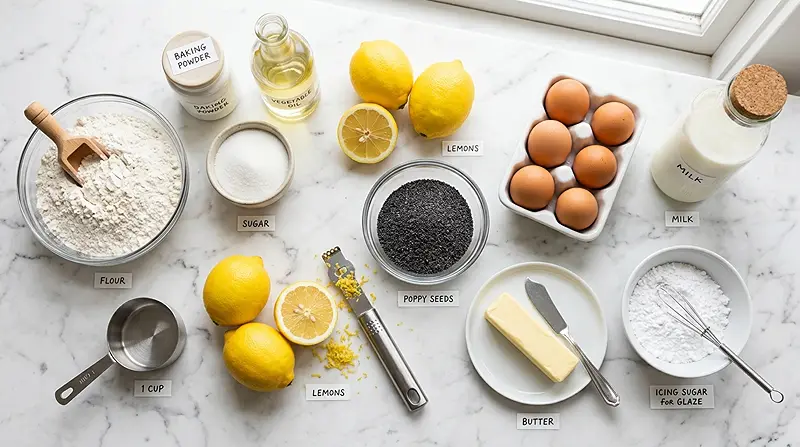
Here’s everything you need for this glazed lemon bread — and yes, it’s a short, approachable list.
For the wet base — butter, vegetable oil, eggs, milk, and fresh lemon juice — room temperature is your best friend here. Everything blends faster and the crumb stays tender. For the dry mix — flour, sugar, baking powder, and poppy seeds — a quick stir before combining keeps things even and lump-free. The glaze is just icing sugar and lemon juice, which is almost unfairly simple for how good it looks.
For the Loaf
| Amount | Ingredient |
|---|---|
| 90 g | Unsalted butter, at room temperature (yes, real butter — margarine just won’t do here) |
| 1 tsp | Salt |
| Zest of 1 lemon | Fresh lemon zest — don’t skip this, it’s where the magic lives |
| 25 g | Vegetable oil |
| 170 g | Granulated sugar |
| 2 | Eggs |
| 90 ml | Milk |
| 30 ml | Fresh lemon juice |
| 200 g | All-purpose flour |
| 1 tsp | Baking powder |
| 2 tbsp | Poppy seeds |
For the Centre Line (Optional but Beautiful)
| Amount | Ingredient |
|---|---|
| 10 g | Unsalted butter, sliced thin |
For the Glaze
| Amount | Ingredient |
|---|---|
| 100 g | Icing sugar (powdered sugar) |
| Juice of 1–2 lemons | Fresh lemon juice — add slowly until you hit the right consistency |
| 1 tbsp | Poppy seeds, for topping |
Tools You’ll Actually Use
- 9×5 inch loaf pan
- Electric hand mixer or stand mixer (a whisk works too if you’re feeling old-school)
- Mixing bowls (at least two)
- Zester or fine grater
- Rubber spatula
- Pastry brush (for buttering the pan)
- Sieve or fine mesh strainer (optional, for flouring the pan)
- Wire cooling rack
- Small bowl for the glaze
- Tin foil (for tenting if the top browns early)
Step-by-Step Instructions for This Lemon Poppy Seed Loaf
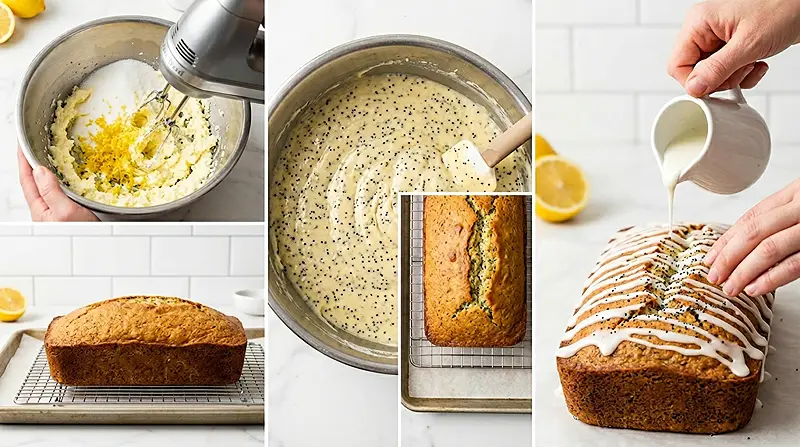
Preheat your oven to 180°C / 350°F before you do anything else. Getting that oven hot and ready means your lemon poppy seed loaf bakes evenly from the moment it goes in.
Step 1 — Cream the butter base. In a large bowl, beat the 90 g of room-temperature butter with the 170 g of granulated sugar, 1 tsp of salt, the lemon zest, and the 25 g of vegetable oil until the mixture is noticeably lighter in color. Use an electric mixer or a good whisk and give it a solid 2–3 minutes. That color change means air is going in — and that’s exactly what gives this glazed lemon bread its lovely, tender crumb.
Step 2 — Add the eggs. Add the 2 eggs to your butter mixture and beat again until everything is well incorporated and the batter looks thick, glossy, and slightly aerated. Don’t rush this step — a well-beaten egg mixture means a beautifully risen loaf later.
Step 3 — Mix in the liquid ingredients. Pour in the 90 ml of milk and the 30 ml of fresh lemon juice, then mix until just combined. The batter might look a little curdled at this point — that’s totally normal and nothing to panic about. It’ll smooth right out once the flour goes in.
Step 4 — Fold in the dry ingredients. Add the 200 g of all-purpose flour, the 2 tbsp of poppy seeds, and the 1 tsp of baking powder to the bowl. Mix until just combined — no over-mixing allowed here! Stop as soon as you can no longer see streaks of flour. Overmixing develops gluten and makes your lemon poppy seed loaf dense and tough instead of tender and soft.
Step 5 — Prepare your loaf pan. Brush your 9×5 inch loaf pan generously with melted butter, making sure to get into every corner. Sprinkle in a small handful of flour, then turn the pan over and tap it on the counter to shake out the excess. This old-school method works better than parchment for getting clean, even sides on your loaf.
Step 6 — Fill and level the pan. Pour the batter into your prepared loaf pan and use your spatula to level the top so it bakes evenly. Give the pan a gentle tap on the counter to release any big air bubbles hiding in there.
Step 7 — Optional: create that gorgeous centre split. If you want that beautiful, even crack running down the centre of your glazed lemon bread (and you absolutely do), cut the 10 g of butter into 2–3 mm thin slices and lay them in a single line along the very centre of the batter from end to end. As the loaf bakes, the butter melts and guides the crack in a perfectly straight, photogenic line.
Step 8 — Bake the loaf. Slide the pan into your preheated 180°C / 350°F oven and bake for 45 minutes to 1 hour. At the 30-minute mark, check on your loaf — if the top is already turning deep golden brown, loosely tent it with a piece of tin foil or switch the oven heat to bottom-only. Your loaf is done when a skewer or toothpick inserted into the centre comes out clean and your kitchen smells absolutely incredible.
Step 9 — Cool completely before glazing. This part requires patience (I know, I know). Let the loaf cool fully on a wire rack before you even think about the glaze — if the loaf is even slightly warm, the glaze will just melt right off instead of setting into that beautiful glossy coating.
Step 10 — Make the glaze. In a small bowl, add the lemon juice to the 100 g of icing sugar a little at a time, stirring as you go. You’re aiming for a semi-thick glaze that pours slowly — thick enough to coat the top without running off the sides like water. Start with the juice of one lemon, then add more drop by drop until you hit the right consistency.
Step 11 — Glaze and finish. Pour the glaze over your completely cooled lemon poppy seed loaf and use a spoon or offset spatula to nudge it gently to the edges. While the glaze is still wet, scatter the 1 tbsp of poppy seeds over the top. Now step back and admire your work — you made something gorgeous.

Claire’s Pro Tips for Glazed Lemon Bread
This lemon poppy seed loaf is forgiving, but a few little tricks will take it from really good to ridiculously good. I’ve made every mistake you can make so you don’t have to.
Room-temperature butter is non-negotiable. Cold butter won’t cream properly with the sugar and oil, which means you’ll miss that airy, pale mixture that gives the loaf its lift. If you forgot to take it out, just cut it into cubes and microwave in 5-second bursts until it’s soft but not melted.
Don’t open the oven door in the first 25 minutes. I know the smell is intoxicating and you just want a little peek — resist. Opening the door too early can cause the loaf to sink in the middle, and that is a heartbreak nobody needs.
Add glaze to a completely cold loaf. Completely. Cold. If you’re even slightly impatient (hi, same), pop the loaf in the fridge for 15 minutes after it reaches room temperature. The glaze will set beautifully and look exactly like the pictures.
For a more intense lemon flavor, try soaking the warm loaf with a simple syrup of equal parts lemon juice and sugar before it cools. It adds an extra layer of moisture and tartness that is genuinely hard to stop eating.
Quick Fixes for Lemon Poppy Seed Loaf
My loaf sank in the middle
This usually happens when the loaf was underbaked or the oven door was opened too soon. Always do the skewer test — if it comes out with wet batter, give it another 5–10 minutes. Tenting with foil means you can keep baking without the top burning.
The top is browning too fast
Completely normal with buttery loaves! Just lay a piece of tin foil loosely over the top at the 30-minute mark and continue baking. Alternatively, switch your oven to bottom heat only for the remainder of the bake time.
My glaze is too runny
You added too much lemon juice too quickly — it happens to everyone. Just add more icing sugar, a tablespoon at a time, and stir until it thickens up again. The sweet spot is a glaze that ribbons slowly off a spoon rather than dripping in a thin stream.
My loaf is dry
It likely baked a little too long, or the butter wasn’t fully incorporated at the start. Next time, pull it at the 45-minute mark and test early. You can also soak a slightly dry loaf with a simple lemon syrup while it’s still warm — it’ll absorb right in and taste intentional.
The centre crack isn’t even
If you skipped the butter slices on top, the loaf will still crack — it just might not be perfectly straight. For that bakery-perfect line, don’t skip Step 7. It’s a tiny effort for a very satisfying visual payoff.
Variations and Fun Twists
Once you’ve nailed this glazed lemon bread, the variations are genuinely endless. This recipe is a beautiful blank canvas.
For a spring dessert twist, swap the regular glaze for a lavender-lemon glaze — just steep a teaspoon of dried lavender in warm lemon juice before straining and mixing with the icing sugar. Dreamy.
Going dairy-free? Use a plant-based butter and oat milk in equal amounts and the loaf still comes out beautifully tender. The glaze is already dairy-free, so you’re set.
For a citrus medley version, use half lemon and half orange zest in the batter. It adds a rounder, more complex flavor that’s especially lovely in winter months.
Want it extra indulgent? Stir 50 g of white chocolate chips into the batter before baking. They melt into little pockets of sweetness that play really well with the lemon tang.
For a rustic, no-fuss finish, skip the glaze entirely and dust with icing sugar right before serving. Simple, unfussy, and still completely delicious.
Serving, Storage, and Reheating

This lemon poppy seed loaf is genuinely best on the day the glaze sets — that’s when the texture is at its most perfect and the glaze has that satisfying slight crunch. Slice it thick, put the kettle on, and serve it alongside a cup of Earl Grey or a good coffee. It also pairs beautifully with a dollop of clotted cream if you’re feeling fancy.
If you actually have leftovers (impressive self-control, truly), store the loaf in an airtight container at room temperature for up to 3 days. If your kitchen runs warm, pop it in the fridge — just bring slices to room temperature before eating so the crumb softens back up. You can also check out these bright and refreshing watermelon fries for another easy treat to serve alongside it at brunch.
This loaf freezes really well without the glaze. Wrap individual slices tightly in cling film, then in a layer of foil, and freeze for up to 2 months. Thaw at room temperature for a couple of hours, then glaze fresh before serving. It’ll taste like you just baked it.
No-Waste Kitchen Magic
Got leftover glaze? Drizzle it over Greek yogurt and fresh berries for the most effortless fancy breakfast you’ve ever made.
Day-old lemon poppy seed loaf makes absolutely brilliant French toast. Dip thick slices in an egg-and-milk mixture and fry in butter — the lemon flavor comes through beautifully and it’s a completely different (and wonderful) experience.
If your loaf is starting to dry out, cube it, toss with a little melted butter and powdered sugar, and bake at 160°C until lightly toasted. Instant lemon loaf croutons for topping fruit salads or yogurt bowls — trust me on this one.
Leftover lemon zest from this recipe can be frozen in a small zip-lock bag and used in future bakes. It keeps for months and is ready to go whenever you need a citrus hit.
FAQs About Lemon Poppy Seed Loaf
Can I freeze this lemon poppy seed loaf?
Yes, absolutely — this glazed lemon bread freezes beautifully. Freeze it without the glaze for best results, wrapping individual slices tightly in cling film and then foil. It keeps well for up to 2 months. Thaw at room temperature and add fresh glaze before serving.
What’s the best way to store glazed lemon bread?
Store it in an airtight container at room temperature for up to 3 days. If your home is warm, refrigerate it and bring slices back to room temperature before eating. Avoid leaving it uncovered — it dries out quickly once sliced.
How do I know when the lemon poppy seed loaf is done baking?
Insert a wooden skewer or toothpick into the deepest part of the centre. If it comes out clean with no wet batter, your loaf is done. Start checking at the 45-minute mark to avoid over-baking. The top should be deep golden and the edges will just be starting to pull away from the pan.
Why should I use real butter in this lemon poppy seed loaf?
Real butter gives this loaf its richness, flavor, and that perfect tender crumb. Margarine has a higher water content and different fat composition that changes how the batter behaves — the result is a flatter, less flavorful loaf. This recipe also uses a little vegetable oil alongside the butter for extra moisture, so you really do get the best of both.
Is this glazed lemon bread a good make-ahead recipe?
It’s one of the best make-ahead bakes around. Bake the loaf the day before, let it cool completely, wrap tightly, and store at room temperature. Make and pour the glaze fresh the morning you plan to serve it — the 10 minutes of effort makes it look like you baked it that morning.
Make It, Love It, Share It
This lemon poppy seed loaf has become one of my most-made recipes, and I genuinely hope it earns a permanent spot in your rotation too. Whether you’re baking it as a spring dessert, a weekend brunch treat, or just because Tuesday deserves something special — this glazed lemon bread always delivers.
I’d love to see your spin on this lemon poppy seed loaf! Drop a comment below with your photos — I love seeing how everyone makes it their own. Have you tried it with a lavender glaze? White chocolate chips? A double citrus twist? I bet you’ve got amazing variations already in mind.
And if you’re in a citrusy, bright-flavored mood, you might also love this easy chocolate blueberry bark — another simple, crowd-pleasing treat that comes together in minutes.
Happy baking — and don’t skimp on the glaze. You’ve earned it.
I’m Claire Whitmore — a dessert daydreamer from Asheville, NC. For me, baking isn’t about perfect pastries — it’s about the joy of sharing something sweet (and maybe sneaking an extra drizzle of glaze when nobody’s looking).

Lemon Poppy Seed Loaf (Glazed)
Equipment
- 9×5-inch loaf pan
- Electric mixer or whisk
- Mixing bowls
- Zester or grater
- Rubber spatula
- Pastry brush
- Sieve or strainer
- Wire rack
- Small bowl
- Foil
Ingredients
For the Loaf
- 90 g unsalted butter room temperature
- 1 tsp salt
- 1 lemon zest zest of 1 lemon
- 25 g vegetable oil
- 170 g granulated sugar
- 2 eggs
- 90 ml milk
- 30 ml lemon juice fresh
- 200 g all-purpose flour
- 1 tsp baking powder
- 2 tbsp poppy seeds
For the Centre Line
- 10 g unsalted butter sliced thin
For the Glaze
- 100 g icing sugar
- 1-2 lemons juice
- 1 tbsp poppy seeds for topping
Instructions
- Preheat oven to 180°C / 350°F.
- Cream butter, sugar, salt, lemon zest, and oil until light and fluffy.
- Add eggs and beat until smooth and glossy.
- Mix in milk and lemon juice until combined.
- Fold in flour, baking powder, and poppy seeds until just combined.
- Grease and flour a loaf pan.
- Pour batter into pan and level the top.
- Optional: place thin butter slices along the center for a clean crack.
- Bake for 45–60 minutes until a skewer comes out clean.
- Cool completely on a wire rack.
- Mix glaze ingredients to desired consistency, pour over cooled loaf, and top with poppy seeds.