No-Bake Cookie Butter Icebox Cake
No-Bake Cookie Butter Icebox Cake is a dreamy dessert made with layers of Biscoff cookies and whipped cookie butter cream — perfect for busy moms who want impressive results without turning on the oven.
Hey there, I’m Claire Whitmore — a pastry whisperer in Asheville, NC, where butter totally counts as self-care. This No-Bake Cookie Butter Icebox Cake is my secret weapon when I want to look like I spent all day in the kitchen but really just stacked cookies and cream in a loaf pan.
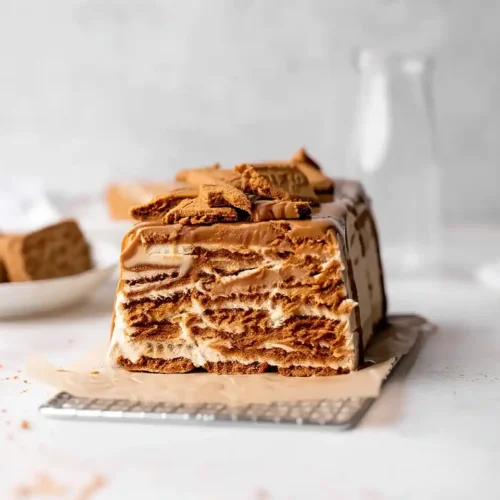
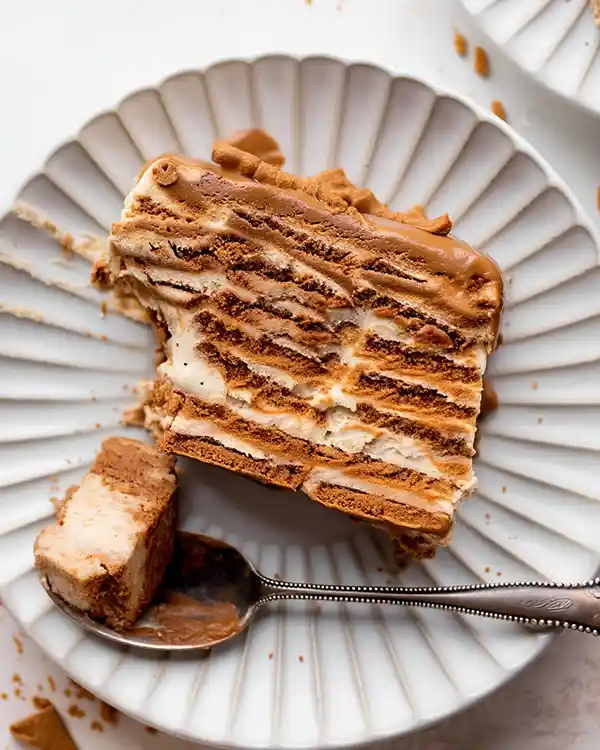
We’re talking layers of crispy Biscoff cookies softened into cake-like heaven, whipped mascarpone cookie butter cream, and a drizzle of warm Biscoff spread that’ll make you wonder why you ever bothered with actual baking.
This recipe brings together easy pantry ingredients like heavy cream and mascarpone, requires zero oven time, and delivers crowd-pleasing caramelized cookie flavors that taste like a fancy European bakery.
It’s the kind of make-ahead dessert that gets better as it sits, with quick prep time and minimal cleanup — basically, it’s designed for real life.
I stumbled onto this beauty during a summer heat wave when turning on my oven felt like a personal attack. I had a sleeve of Biscoff cookies (okay, fine, two packages), some heavy cream, and a dream.
Table of Contents
Little Snapshot: What This Recipe Delivers
This No-Bake Cookie Butter Icebox Cake layers Lotus Biscoff cookies with whipped mascarpone and cookie butter cream, then chills for 24 hours until the cookies soften into tender cake layers. It serves 8-10, takes just 20 minutes of active prep, and requires zero baking — just patience while it sets in the fridge.
Why You’ll Love This Recipe 🌸
- This Biscoff Icebox Cake No Bake takes less time to assemble than folding a load of laundry — and tastes infinitely better.
- You get to look like a dessert genius without turning on your oven, which is basically a summer miracle for busy moms.
- The cookies magically transform into cake layers overnight, so you’re literally making dessert while you sleep.
- According to Serious Eats’ guide to achieving perfect texture in desserts, resting time allows ingredients to hydrate and flavors to meld — and this recipe proves exactly why.
Quick Facts ⚡
Here’s the quick scoop on this No-Bake Cookie Butter Icebox Cake.
- CourseDessert
- Prep Time20 minutes
- Chill Time24 hours
- Total Time24 hours 20 minutes
- Servings8-10 servings
- DifficultyEasy
No-Bake Cookie Butter Icebox Cake
Equipment
- Stand mixer with whisk attachment or hand mixer
- 9×5-inch loaf pan
- Plastic wrap
- Rubber spatula
- offset spatula
- Small saucepan or microwave-safe bowl
Ingredients
- 2 cups Heavy cream cold (1 pint)
- ½ cup Lotus Biscoff spread 150g, plus 1/3 cup warmed for serving
- ⅓ cup Mascarpone cheese 80g, room temperature
- 1 tsp Pure vanilla extract
- 1 pinch Kosher salt
- 2 Tbsp Confectioner’s sugar
- 2 packages Lotus Biscoff cookies 32 cookies per package
Instructions
- Pour 2 cups of cold heavy cream into the bowl of a stand mixer fitted with the whisk attachment. Whisk on medium-high speed until you see medium peaks form — they should hold their shape but still have a slight droop at the tips, about 3-4 minutes. Don’t overbeat or you’ll end up with butter.
- With the mixer on low, add 1/2 cup (150g) Biscoff spread, 1/3 cup (80g) room-temperature mascarpone cheese, 1 teaspoon pure vanilla extract, a generous pinch of Kosher salt, and 2 tablespoons confectioner’s sugar. Mix until everything is well incorporated and the cream turns into a gorgeous caramel-colored cloud — you’ll know it’s ready when it’s smooth, fluffy, and completely combined.
- Line your 9×5-inch loaf pan with a generous piece of plastic wrap, leaving plenty of overhang on all sides. Place a single layer of Biscoff cookies along the bottom — you’ll fit about 7-8 cookies per layer, and you can break a few to fill gaps. Spread a layer of the Biscoff cream mixture on top of the cookies so it’s roughly the same thickness as the cookie layer itself, about 1/4 to 1/3 inch thick. Repeat this layering process — cookies, cream, cookies, cream — until you reach the top of the pan, ending with a final layer of cookies on top.
- Fold the plastic wrap overhang loosely over the top of the cake, then cover the whole pan with an additional piece of plastic wrap to seal it completely. Slide it into the fridge and let it rest for a full 24 hours — this is when the magic happens and those crispy cookies absorb moisture from the cream, transforming into tender cake layers. When you’re ready to serve, unwrap the cake, use the plastic wrap to lift it out of the pan, and unmold it onto a serving plate or tray. Warm the remaining 1/3 cup Biscoff spread in the microwave for about 20-30 seconds until it’s pourable, then drizzle it over the top. Crush a few extra Biscoff cookies and sprinkle them over the drizzle for texture.
Notes
Nutritional Peek
Here’s what you’re working with per slice — because we believe in enjoying dessert AND knowing what’s in it.
| Nutrient | Amount per Serving |
|---|---|
| Calories | 420 |
| Protein | 4g |
| Carbohydrates | 38g |
| Fat | 28g |
| Saturated Fat | 16g |
| Fiber | 1g |
| Sugar | 24g |
No-Bake Cookie Butter Icebox Cake Ingredients
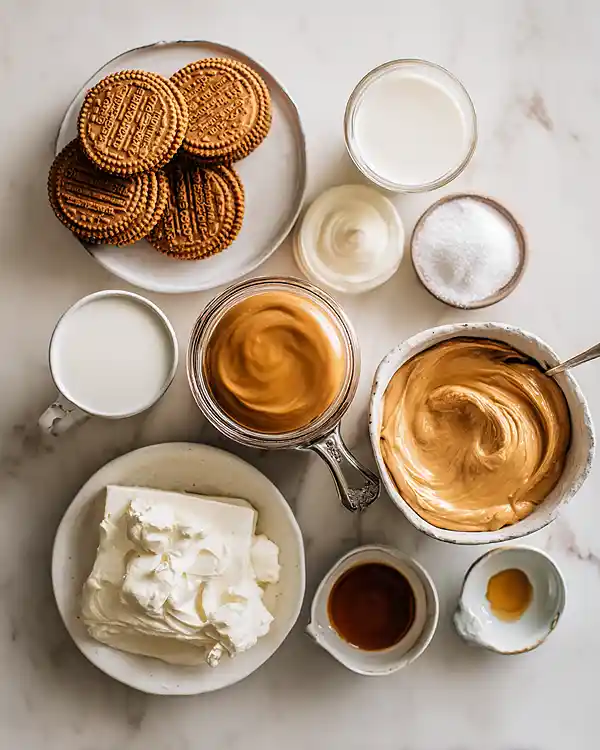
When you’re learning how to make Biscoff Icebox Cake, the ingredient list is refreshingly short — mostly dairy and those iconic caramelized cookies. For the whipped cream base, you’ll want cold heavy cream straight from the fridge for maximum fluffiness.
The cookie butter mixture — Biscoff spread, mascarpone, and vanilla — adds that signature spiced sweetness. And for structure, you’ll layer in crispy Lotus Biscoff cookies that’ll soften into tender cake layers overnight.
| Amount | Ingredient |
|---|---|
| 2 cups (1 pint) | Heavy cream, cold |
| ½ cup (150g) | Lotus Biscoff spread (plus ⅓ cup warmed for serving) |
| ⅓ cup (80g) | Mascarpone cheese, room temperature |
| 1 tsp | Pure vanilla extract |
| Pinch | Kosher salt |
| 2 Tbsp | Confectioner’s sugar |
| 2 packages | Lotus Biscoff cookies (32 cookies per package) — yes, you need both packages, trust me |
Tools You’ll Actually Use
- Stand mixer with whisk attachment (or a hand mixer and some determination)
- 9×5-inch loaf pan
- Plastic wrap (lots of it for lining and covering)
- Rubber spatula
- Offset spatula (optional, but makes spreading cream so much easier)
- Small saucepan or microwave-safe bowl (for warming the Biscoff drizzle)
Step-by-Step Instructions
Making this Speculoos Cookie Butter Cake is honestly more about patience than skill — the fridge does most of the heavy lifting.
Step 1: Whip the heavy cream. Pour 2 cups of cold heavy cream into the bowl of a stand mixer fitted with the whisk attachment. Whisk on medium-high speed until you see medium peaks form — they should hold their shape but still have a slight droop at the tips, about 3-4 minutes.
Don’t overbeat or you’ll end up with butter (which, honestly, wouldn’t be the worst thing).
Step 2: Add the cookie butter mixture. With the mixer on low, add ½ cup (150g) Biscoff spread, ⅓ cup (80g) room-temperature mascarpone cheese, 1 teaspoon pure vanilla extract, a generous pinch of Kosher salt, and 2 tablespoons confectioner’s sugar.
Mix until everything is well incorporated and the cream turns into this gorgeous caramel-colored cloud — you’ll know it’s ready when it’s smooth, fluffy, and you’re already sneaking tastes with the spatula.
Step 3: Assemble the icebox cake. Line your 9×5-inch loaf pan with a generous piece of plastic wrap, leaving plenty of overhang on all sides (this is your ejector seat for unmolding later).
Place a single layer of Biscoff cookies along the bottom — you’ll fit about 7-8 cookies per layer, and you can break a few to fill gaps. Spread a layer of the Biscoff cream mixture on top of the cookies so it’s roughly the same thickness as the cookie layer itself, about ¼ to ⅓ inch thick.
Repeat this layering process — cookies, cream, cookies, cream — until you reach the top of the pan, ending with a final layer of cookies on top.
Step 4: Refrigerate for 24 hours. Fold the plastic wrap overhang loosely over the top of the cake, then cover the whole pan with an additional piece of plastic wrap to seal it completely.
Slide it into the fridge and let it rest for a full 24 hours — this is when the magic happens and those crispy cookies absorb moisture from the cream, transforming into tender cake layers. When you’re ready to serve, unwrap the cake, use the plastic wrap to lift it out of the pan, and unmold it onto a serving plate or tray.
Warm the remaining ⅓ cup Biscoff spread in the microwave for about 20-30 seconds until it’s pourable, then drizzle it over the top. Crush a few extra Biscoff cookies and sprinkle them over the drizzle for texture and that “I totally planned this” look.
Claire’s Pro Tips & Gentle Guidance
Listen, I’ve made this Biscoff Icebox Cake No Bake more times than I can count, and I’ve learned a few things the hard way so you don’t have to.
Don’t skimp on the chill time — I know 24 hours feels like forever, but this is one recipe where patience actually pays off. At 12 hours, the cookies are still too crispy. At 18 hours, you’re getting close but not quite there. At 24 hours? Pure cake-like perfection.
Room-temperature mascarpone is your friend here. If it’s too cold, it’ll clump up in the whipped cream and you’ll get little cheese pebbles instead of silky smoothness. Let it sit on the counter for about 30 minutes before you start.
When spreading the cream layers, use an offset spatula and work gently — you want even layers, but you don’t want to press so hard that you’re shoving cream out the sides. Think of it like frosting a cake, not spackling drywall.
For extra insurance against the dreaded “dry cake” situation, you can brush each cookie layer with a tablespoon of whole milk before adding the cream. According to King Arthur Baking’s comprehensive icebox cake guidance , this extra moisture helps the cookies soften more evenly and consistently.
Quick Fixes for No-Bake Cookie Butter Icebox Cake
Problem: The cookies are still too crunchy after 24 hours. This usually means your cream layers were too thin, so there wasn’t enough moisture to soften the cookies fully.
Next time, make your cream layers slightly thicker — they should be about the same height as the cookie layer itself. You can also brush each cookie layer with a tiny bit of milk before adding the cream.
Problem: The cake is falling apart when you try to slice it. Your cream was probably overwhipped, which makes it more prone to weeping and losing structure.
Whip to medium peaks only — they should hold their shape but still have a slight droop. Also, make sure you’re using a sharp knife dipped in hot water and wiped dry between each slice.
Problem: The Biscoff spread won’t incorporate smoothly into the cream. The spread was likely too cold or too thick. Microwave it for about 10-15 seconds to soften it slightly before adding it to the whipped cream. It should be pourable but not hot — you don’t want to deflate your beautiful cream.
Problem: The cake is too sweet. Cut back on the confectioner’s sugar to 1 tablespoon instead of 2, or add an extra pinch of Kosher salt to balance the sweetness. You can also serve it with unsweetened whipped cream on the side or a handful of fresh berries for contrast.
One recipe down, and so many more to explore! Head over to our complete Delicious Desserts lineup for more delicious ideas that’ll keep your kitchen buzzing. Bookmark this one — you’ll thank yourself later.
Variations & Fun Twists
Once you’ve mastered this how to make Biscoff Icebox Cake technique, you can play around with it endlessly.
Chocolate Lover’s Version: Add 2 tablespoons of cocoa powder to the cream mixture and alternate layers with chocolate wafer cookies. Drizzle with melted dark chocolate instead of warmed Biscoff spread.
Berry Fresh Twist: Layer in thin slices of fresh strawberries or raspberries between the cream and cookies. The fruit adds brightness and cuts through the richness beautifully.
Espresso Kick: Dissolve 1 tablespoon of instant espresso powder in 1 teaspoon of hot water, then fold it into the whipped cream. Coffee and Biscoff are basically soulmates.
Individual Servings: Skip the loaf pan and assemble this in small mason jars or glasses for cute single-serve portions. Layer cookies (broken into pieces), cream, cookies, cream, and top with crushed cookies. These are perfect for picnics or potlucks where slicing is a hassle.
Gluten-Free Option: Use gluten-free gingersnaps or graham crackers instead of Biscoff cookies. The texture will be slightly different, but the concept works beautifully.
Serving, Storage & Reheating
This Speculoos Cookie Butter Cake is best served cold, straight from the fridge, with that warm Biscoff drizzle creating the most amazing temperature contrast. Slice it with a sharp knife dipped in hot water for clean edges, and serve it on chilled plates if you’re feeling fancy.
Store any leftovers (if you actually have leftovers, which I doubt) covered tightly with plastic wrap in the fridge for up to 4 days. The texture gets even better on day two and three as the flavors continue to meld.
You can freeze this cake for up to 2 months — wrap it tightly in plastic wrap, then aluminum foil. Thaw it overnight in the fridge before serving, and add the warm Biscoff drizzle and cookie crumbles right before you plate it.
No-Waste Kitchen Magic
Got extra Biscoff cookies? Crush them up and store them in an airtight container — they make an amazing ice cream topping, yogurt parfait layer, or crust for cheesecake.
Leftover mascarpone can be mixed with honey and spread on toast, stirred into scrambled eggs for extra creaminess (trust me), or folded into mashed potatoes for the fanciest side dish ever.
If your cream starts to look like it’s separating after a few days in the fridge, don’t toss it — whip it again briefly to bring it back together, or fold it into pancake batter for the fluffiest pancakes of your life.
Day-old slices of this cake that have dried out slightly? Cut them into cubes and layer them in a trifle with fresh whipped cream and berries. You’ve just invented a new dessert, congratulations.
No-Bake Cookie Butter Icebox Cake FAQs
Can I freeze No-Bake Cookie Butter Icebox Cake?
Absolutely! Wrap the assembled cake tightly in plastic wrap, then aluminum foil, and freeze for up to 2 months. Thaw it overnight in the fridge before serving — the texture holds up surprisingly well, and some people even prefer eating it slightly frozen on hot summer days.
What’s the best way to store Biscoff Icebox Cake?
Keep it covered tightly with plastic wrap in the fridge for up to 4 days. The cake actually gets better as it sits because the flavors continue developing and the cookies soften even more into perfect cake-like layers.
How do I know when the No-Bake Cookie Butter Icebox Cake is done chilling?
After 24 hours, press gently on the top cookie layer — it should give slightly and feel soft rather than crispy. If it still feels crunchy, give it another 6-12 hours in the fridge.
Why should I use mascarpone in this Speculoos Cookie Butter Cake?
Mascarpone adds a subtle tanginess and rich, creamy texture that keeps the dessert from tasting one-note sweet. It’s less dense than cream cheese and incorporates more smoothly into whipped cream without deflating it.
Could I make this with regular cream cheese instead of mascarpone?
You can, but soften it completely first and use only ¼ cup instead of ⅓ cup — cream cheese is denser and tangier than mascarpone. The texture will be slightly less airy, but it’ll still taste delicious.
Can I make this ahead for a party?
This is actually the perfect make-ahead dessert! Assemble it 24-48 hours before you need it — it sits beautifully in the fridge and gets better with time. Just add the warm Biscoff drizzle and crushed cookie topping right before serving.
Cozy Closing
So there you have it — your new favorite lazy-genius dessert that’ll make you look like you’ve got your life together even when you absolutely don’t. This No-Bake Cookie Butter Icebox Cake is proof that sometimes the best recipes are the ones that barely qualify as recipes at all.
I’d love to see your spin on this No-Bake Cookie Butter Icebox Cake! Drop a comment below with your photos — I’d love to see how you made it your own. Did you add berries? Go wild with the chocolate?
Use it as an excuse to eat cookie butter straight from the jar while “assembling”? This No-Bake Cookie Butter Icebox Cake is so versatile; I bet you’ve got amazing variations already in mind!
If you loved this easy no-bake magic, you’ll definitely want to check out my Oreo Balls Recipe for another crowd-pleasing no-bake treat, or my New Year’s Eve Cake Ball Drops for festive bite-sized desserts.
And if you’re in the mood for something savory to balance out all this sweetness, my Ricotta Dip with Hot Honey and Strawberry Crunch Cheesecake Tacos are both total showstoppers.
I’m Claire Whitmore — a dessert daydreamer from Asheville, NC. For me, baking isn’t about perfect pastries — it’s about the joy of sharing something sweet (and maybe sneaking an extra scoop of icing while no one’s looking).