Crispy Potato Wedges
Crispy potato wedges are one of those recipes that sounds simple — and they are — but only when you know the right tricks. Made with humble Russet potatoes, olive oil, garlic powder, and onion powder, these wedges come out deeply golden with shatteringly crisp edges and fluffy, tender centers.
This recipe takes about 65 minutes total, serves 4, and is completely beginner-friendly. No peeling required, no deep fryer, and no fancy ingredients — just real, honest food that everyone at the table will reach for first.
Hey there, I’m Claire Whitmore — a pastry whisperer in Asheville, NC, where butter totally counts as self-care. These crispy potato wedges have become my go-to side dish on busy weeknights, and once you taste them, you’ll understand why.
I’ll be honest — I used to make sad, soggy wedges that never quite hit the mark. Then I discovered the hot water soak trick, and everything changed. Now I make these at least twice a week, and my family practically appears in the kitchen the second that garlic smell hits the air.
Table of Contents
What This Recipe Delivers
These oven-baked crispy potato wedges are made with just 7 pantry-friendly ingredients and come together in about 65 minutes. A quick hot water soak removes excess starch for a crispy exterior, while high-heat baking locks in a soft, fluffy interior. They’re the perfect easy side dish or snack — no deep fryer needed.
Why You’ll Love This Recipe
- These crispy potato wedges take less active effort than answering a single work email — the oven does the heavy lifting for you.
- You only need one bowl, one pan, and ingredients you probably already have. Minimal cleanup, maximum satisfaction.
- They’re endlessly customizable — swap in your favorite spices, add a sprinkle of parmesan, or pair them with any dipping sauce your heart desires.
- According to Serious Eats in their deep-dive guide to perfectly baked fries, starch removal is the single biggest factor in achieving a crispy crust — and this recipe nails that step every time.
Quick Facts
Here’s the quick scoop on these crispy potato wedges.
- CourseSide Dish / Snack
- Prep Time15 minutes
- Cook Time55–60 minutes
- Total TimeAbout 65 minutes
- Servings4 servings
- DifficultyEasy
Nutritional Peek
Here’s a rough breakdown per serving of these potato wedges. Values are estimates based on the listed ingredients.
| Nutrient | Amount Per Serving |
|---|---|
| Calories | ~280 kcal |
| Carbohydrates | ~43 g |
| Protein | ~5 g |
| Total Fat | ~10 g |
| Fiber | ~3 g |
| Sugar | ~2 g |
Ingredients
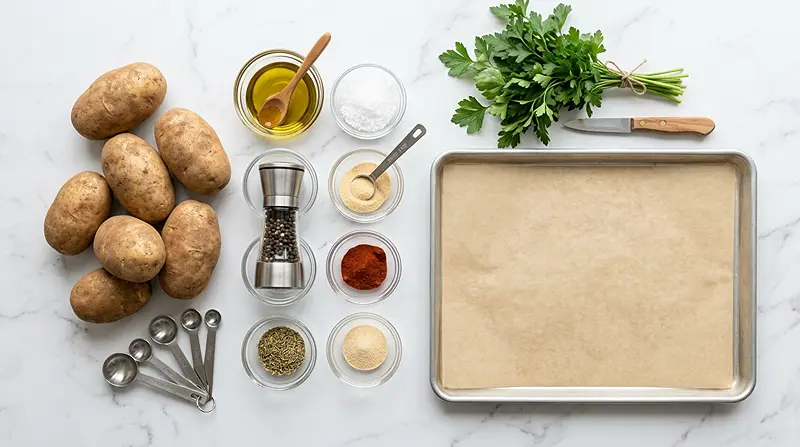
All you need for these golden potato wedges is a handful of simple pantry staples. For the seasoning blend — garlic powder, onion powder, salt, and pepper — you’ll want to be generous; potatoes love bold flavors.
For the base, grab your Russet potatoes and good olive oil. Fresh parsley is optional but adds a beautiful pop of color and freshness right before serving.
| Amount | Ingredient |
|---|---|
| 2 pounds | Russet potatoes (about 6 small or 4 medium), scrubbed clean — no peeling needed! |
| 3 tablespoons | Olive oil (yes, the good stuff — it matters here) |
| 2 teaspoons | Garlic powder |
| 2 teaspoons | Onion powder |
| 1 teaspoon | Fine sea salt |
| To taste | Freshly ground black pepper — be generous! |
| 2 tablespoons | Finely chopped fresh parsley (optional, but highly recommended) |
Tools You’ll Actually Use
- Large rimmed baking sheet (half-sheet size is ideal)
- Parchment paper
- Large mixing bowl
- Sharp chef’s knife and cutting board
- Spatula (for flipping)
- Lint-free kitchen towel or paper towels (for drying the wedges)
Step-by-Step Instructions for Crispy Potato Wedges
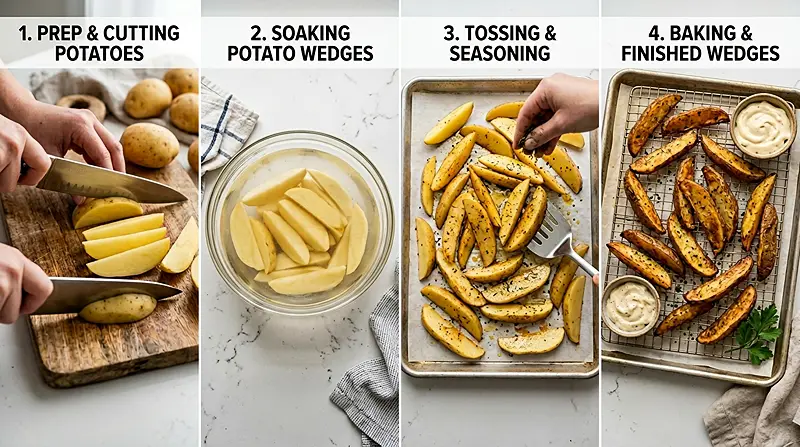
Follow these steps closely and your crispy potato wedges will come out golden and crunchy every single time. The soaking step is the real secret — don’t skip it!
Step 1: Preheat and Prep Your Pan
Preheat your oven to 400 degrees Fahrenheit. Line a large, rimmed baking sheet with parchment paper. This prevents sticking and makes cleanup a total breeze.
Step 2: Cut the Potatoes Into Wedges
Cut each scrubbed Russet potato in half lengthwise, then in half again lengthwise to make quarters. Cut each quarter diagonally to yield 2 wedges — you’ll end up with 8 wedges per potato. Try to keep them similar in size so they cook evenly.
Step 3: Soak in Hot Water
Place all the potato wedges into a large bowl and cover with hot water (heated on the stove is ideal; avoid straight hot tap water as pipes can leach impurities). Let them soak for 10 minutes. You’ll see the water turn cloudy — that’s the starch coming out, and that’s exactly what you want.
Step 4: Drain and Dry Thoroughly
Drain the potatoes and lightly pat them dry with a clean, lint-free kitchen towel. Don’t skip the drying — wet wedges steam instead of crisp, and nobody wants a soggy wedge.
Step 5: Season Generously
Transfer the dried potato wedges to the prepared baking sheet. Drizzle them with the 3 tablespoons of olive oil, then sprinkle over the garlic powder, onion powder, salt, and a really generous amount of freshly ground black pepper. Toss everything together right on the pan until every wedge is evenly coated in oil and spices.
Step 6: Arrange for Maximum Crispiness
Arrange the seasoned wedges in even columns so each one has a cut side flat against the pan. If they don’t all fit in a single layer, divide them between two pans — overcrowding causes steaming, which ruins that crispy exterior you’re after.
Step 7: First Bake
Slide the pan into the preheated 400-degree oven and bake for 30 minutes. Don’t open the oven door and peek too much — let them do their thing and start building that crust.
Step 8: Flip and Bake Again
After 30 minutes, use a spatula to flip the wedges over — you can do several at a time. Rearrange them in an even layer, return the pan to the oven, and bake for another 25 to 30 minutes. The wedges near the edges of the pan may finish a few minutes early, so check those first and pull them out if needed. You’re looking for deeply golden color and a fork that slides in easily.
Step 9: Finish and Serve
Sprinkle with freshly chopped parsley if using, then serve immediately while hot. These are best eaten straight from the oven — that crunch fades fast once they cool!

Can’t get enough of these flavors? You’re going to love what’s waiting in the Vegetable & Potato Soups lineup. Every single recipe is made to impress without the stress. Happy cooking, friend!
Claire’s Pro Tips for Perfect Potato Wedges
Getting these air fryer wedges — or oven-baked ones — just right comes down to a few small but mighty details. I’ve made every mistake so you don’t have to.
The soaking step is non-negotiable if you want that signature crunch. Even a 10-minute soak makes a dramatic difference in the final texture.
Dry your wedges really well. After soaking, take your time patting them dry. Moisture left on the potato surface turns to steam in the oven, which leads to soft rather than crispy wedges. A clean kitchen towel works better than paper towels here.
Don’t crowd the pan. Give each wedge its own little slice of real estate on that baking sheet. If they’re overlapping, they’ll steam and soften instead of roasting to golden perfection.
Use a light-colored baking sheet. Dark pans absorb more heat and can cause the bottoms to burn before the tops are done. A light or silver pan reflects heat more evenly.
Season generously. Potatoes are starchy and mild — they can handle more seasoning than you think. Don’t be shy with the garlic powder, onion powder, and especially the black pepper.
Quick Fixes for Crispy Potato Wedges
Even the best recipes have off days. Here’s how to troubleshoot the most common potato wedge problems.
My wedges are soggy. This almost always comes down to one of three things: not drying the potatoes well enough after soaking, overcrowding the pan, or using a waxy potato variety like red potatoes instead of starchy Russets. Fix the drying step and give them more space.
My wedges are sticking to the pan. Make sure you’re using parchment paper or that your baking sheet is well-greased before adding the potatoes. A properly lined pan releases the wedges cleanly every time.
The edges are burning but the centers aren’t cooked. Your oven may run hot, or the wedges were cut too thick. Try reducing the temperature to 375 degrees F and adding a few more minutes of cooking time. Also check that wedges are cut to similar sizes.
The seasoning isn’t evenly distributed. Try mixing the olive oil and dried spices together in a small bowl first to form a loose paste, then toss the potato wedges in that mixture. It coats more evenly than sprinkling directly.
My wedges don’t have much flavor. Be bolder with seasoning! Russets need generous amounts of salt, garlic, and pepper to shine. Taste a wedge right out of the oven — if it tastes flat, a quick pinch of flaky salt on top fixes everything.
Variations and Fun Twists
Once you’ve got the basic crispy potato wedges recipe down, the flavor possibilities are wide open.
Parmesan and Herb: Add 2 tablespoons of finely grated Parmesan and a teaspoon of dried Italian herbs to the seasoning mix. Sprinkle extra Parmesan on top right when they come out of the oven.
Smoky Paprika: Swap half the garlic powder for smoked paprika and add a pinch of cayenne for a subtle kick. These are incredible with sour cream dip.
Ranch Style: Use a packet of dry ranch seasoning in place of the individual spices. Simple, crowd-pleasing, and great for kids.
Air Fryer Version: These work beautifully in the air fryer. Preheat to 400 degrees F and cook in batches for about 20 minutes, flipping halfway. They’ll be done faster and just as crispy — great option if you’re in a hurry.
Vegan and Gluten-Free: Great news — this recipe is naturally both vegan and gluten-free as written. No swaps needed.
Serving, Storage, and Reheating

These potato wedges are at their absolute best served hot and straight from the oven. Pair them with your favorite homemade dipping sauces like this vibrant peanut sauce — it’s a surprisingly delicious combination! They’re also wonderful alongside burgers, grilled chicken, or a big green salad.
If you actually have leftovers (I’m always skeptical), store them in an airtight container in the refrigerator for up to 3 days. Let them cool completely before sealing — trapping steam makes them go soft.
To reheat, skip the microwave — it makes them rubbery. Instead, spread them on a baking sheet and bake at 400 degrees F for 10 to 15 minutes until hot and re-crisped. The air fryer at 375 degrees F for 5 minutes also works brilliantly.
No-Waste Kitchen Magic
Don’t toss leftover wedges — repurpose them! Roughly chop day-old wedges and fry them up in a skillet with a little butter for a quick hash-style breakfast side.
Leftover wedges also make a fantastic base for a loaded potato bowl. Top with shredded cheese, a dollop of Greek yogurt, and whatever veggies you have on hand for a fast and filling lunch.
Potato scraps and ends can go into a vegetable broth bag in the freezer. Collect them over a few weeks and use them to make a simple, flavorful broth from scratch — nothing wasted, everything used.
FAQs About Crispy Potato Wedges
Can I make these crispy potato wedges ahead of time?
You can prep them ahead by cutting and soaking the wedges up to a day in advance — just store them in cold water in a sealed container in the fridge. Drain and pat dry thoroughly before seasoning and baking. The actual baking is best done fresh for maximum crispiness.
What is the best way to store potato wedges?
Let them cool completely, then transfer to an airtight container. They’ll keep in the refrigerator for up to 3 days. Avoid storing them while still hot, as the trapped steam will make them soggy overnight.
How do I know when potato wedges are done baking?
Look for a deeply golden, almost mahogany color on the cut sides. A fork should slide through the thickest part easily without resistance. If the outside looks golden but the inside still feels firm, give them another 5 minutes.
Why should I soak potato wedges in water before baking?
Soaking pulls excess surface starch out of the potato. That starch is what causes wedges to go gummy or sticky in the oven instead of crisping up. Even a quick 10-minute soak in hot water makes a noticeable difference in the final texture.
Can I use a different type of potato for this recipe?
Russet potatoes are the best choice because they’re high in starch, which gives you that fluffy interior and crispy exterior combination. Yukon Golds work in a pinch and deliver a creamier texture. Avoid waxy varieties like red potatoes — they don’t crisp up the same way.
Let’s Make Some Crispy Potato Wedges Together
I hope these crispy potato wedges become a regular in your weekly rotation — because once you make them this way, the frozen bag version honestly just doesn’t cut it anymore. They’re golden, garlicky, perfectly seasoned, and somehow deeply satisfying in the way only really simple food can be.
I’d love to see your spin on this recipe! Drop a comment below with your potato wedge photos or your favorite dipping sauce combos. These wedges are so versatile — I bet you’ve already got some amazing variations in mind.
I’m Claire Whitmore — a dessert daydreamer (and occasional savory snack enthusiast) from Asheville, NC. For me, cooking isn’t about perfection — it’s about the joy of making something delicious and sharing it with people you love. These crispy potato wedges are proof that the simplest recipes are often the most magical.

Crispy Potato Wedges
Equipment
- Large rimmed baking sheet
- Parchment paper
- Large mixing bowl
- Chef’s knife
- Cutting board
- Spatula
- Kitchen towel or paper towels
Ingredients
- 2 pounds Russet potatoes scrubbed clean, skin-on
- 3 tablespoons Olive oil
- 2 teaspoons Garlic powder
- 2 teaspoons Onion powder
- 1 teaspoon Fine sea salt
- to taste Black pepper freshly ground
- 2 tablespoons Fresh parsley finely chopped, optional
Instructions
- Preheat oven to 400°F (200°C). Line a large baking sheet with parchment paper.
- Cut each potato into wedges by halving lengthwise, then quartering, and slicing each quarter diagonally.
- Place wedges in a large bowl and cover with hot water. Soak for 10 minutes to remove excess starch.
- Drain and thoroughly dry the wedges using a clean kitchen towel or paper towels.
- Transfer wedges to the baking sheet. Drizzle with olive oil and sprinkle with garlic powder, onion powder, salt, and pepper.
- Toss to coat evenly and arrange wedges in a single layer with cut sides facing down.
- Bake for 30 minutes without disturbing.
- Flip wedges and continue baking for another 25–30 minutes until golden and crisp.
- Remove from oven, garnish with fresh parsley if using, and serve immediately.