Bento Cake
This bento cake recipe is your go-to guide for making adorable, single-serving Korean lunchbox cakes with fluffy vanilla buttercream — easy enough for beginners, cute enough to go viral.
Hey there, I’m Claire Whitmore — a pastry whisperer in Asheville, NC, where butter totally counts as self-care. This bento cake recipe is everything: it’s a mini, single-serving Korean lunchbox cake made with a sheet pan, a round biscuit cutter, and the silkiest vanilla buttercream you’ve ever tasted.
It comes together in about an hour, uses easy pantry staples, and is hands-down one of the most crowd-pleasing (yet totally personal) desserts I’ve ever made.
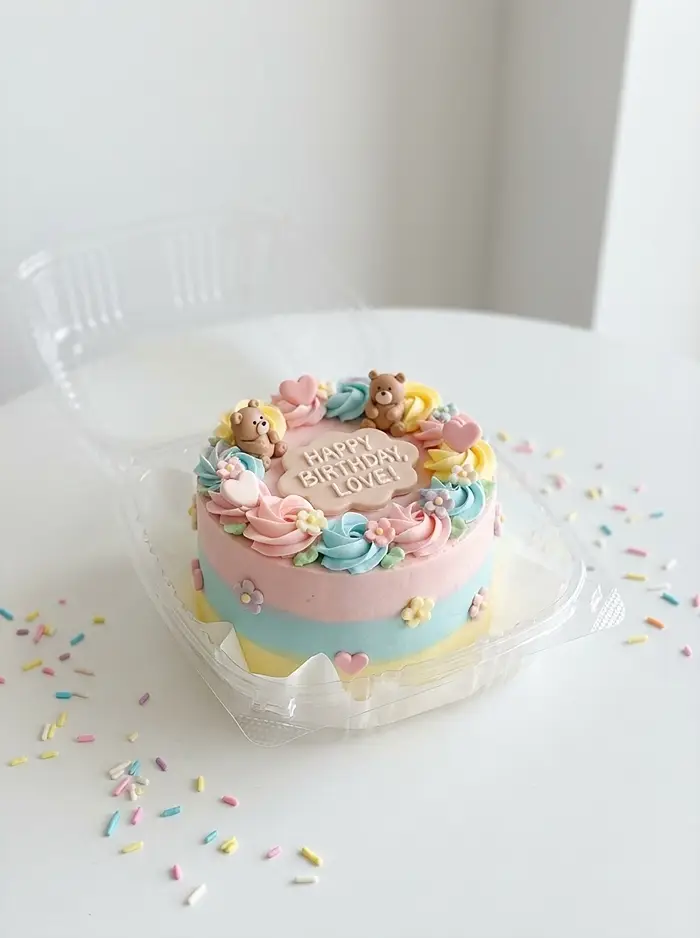
Bento cakes — also called Korean lunchbox cakes or mini bento cakes — are small stacked cakes, typically 4–6 inches wide, that sit inside a cute takeout container. They’re known for their minimalist aesthetic, pastel buttercream, and sweet handwritten-style messages piped on top.
Table of Contents
Little Snapshot: What This Recipe Delivers
This bento cake recipe uses a boxed cake mix baked in a half sheet pan, cut into circles, layered with simple syrup, and frosted with a creamy homemade vanilla buttercream. It makes 6 mini 6-inch bento cakes in about 45 minutes total — easy enough for beginner bakers, impressive enough to gift. It’s the cutest way to say “I made this just for you.”
Why You’ll Love This Recipe 🌸
- This bento cake recipe takes less time than folding laundry — and it’s a whole lot more satisfying.
- You get 6 adorable mini cakes from one sheet pan, which means you can customize each one differently (hello, best gifter in the room).
- No cake decorating skills required — the minimalist Korean aesthetic means simple and stunning are literally the same thing here.
- According to King Arthur Baking’s complete cake guide, the best cakes are built on fundamentals — great crumb, balanced moisture, and buttercream done right — and this mini bento cake nails all three.
Quick Facts ⚡
Here’s the quick scoop on this bento cake.
- CourseDessert
- Prep Time20 minutes
- Cook Time24 minutes
- Total Time~45 minutes (plus chilling)
- Servings6 mini bento cakes
- DifficultyEasy–Medium
Nutritional Peek
Per serving (1 bento cake, approximate)
| Nutrient | Amount Per Serving |
|---|---|
| Calories | ~520 kcal |
| Protein | 4g |
| Carbohydrates | 68g |
| Fat | 26g |
| Saturated Fat | 14g |
| Fiber | 0.5g |
| Sugar | 52g |
Values are estimates based on a standard boxed cake mix and the vanilla buttercream recipe below. Actual values may vary by brand.
Ingredients

For this bento cake recipe, you only need a few simple groups of ingredients — and yes, I mean the good stuff.
For the cake base, you’ll use a boxed cake mix (any flavor you love — vanilla is classic, but chocolate works beautifully too) along with simple syrup to keep the layers moist and tender after assembly. For the vanilla buttercream frosting, you’ll need room-temperature butter and heavy cream so everything blends silky-smooth without lumps.
Cake
| Amount | Ingredient |
|---|---|
| 1 (15–22 oz) box | Prepared cake mix of your choosing |
| 2 tsp | Simple syrup |
Vanilla Buttercream Frosting
| Amount | Ingredient |
|---|---|
| 1 cup | Unsalted butter, room temperature (Kerrygold is chef’s kiss) |
| 1 tsp | Vanilla extract |
| 2⅔ cups | Powdered sugar |
| ½ cup | Heavy whipping cream, room temperature |
Cake Decorations
| Amount | Ingredient |
|---|---|
| To taste | Sprinkles (optional but encouraged) |
| To taste | Gel frosting (optional, for piped messages or details) |
Tools You’ll Actually Use
- Half sheet pan (12×17 inch) or jelly roll pan
- Parchment paper
- 6-inch round biscuit or circle cutter
- Stand mixer or hand mixer with paddle attachment
- Offset spatula or bench scraper
- Wire cooling rack
- Piping bags + assorted tips
- 4 sheets of 9-inch parchment paper squares
- Bento boxes or clamshell takeout containers (6 of them!)
Step-by-Step Instructions
Making this bento cake is way easier than it looks — promise. Here’s exactly how to do it.
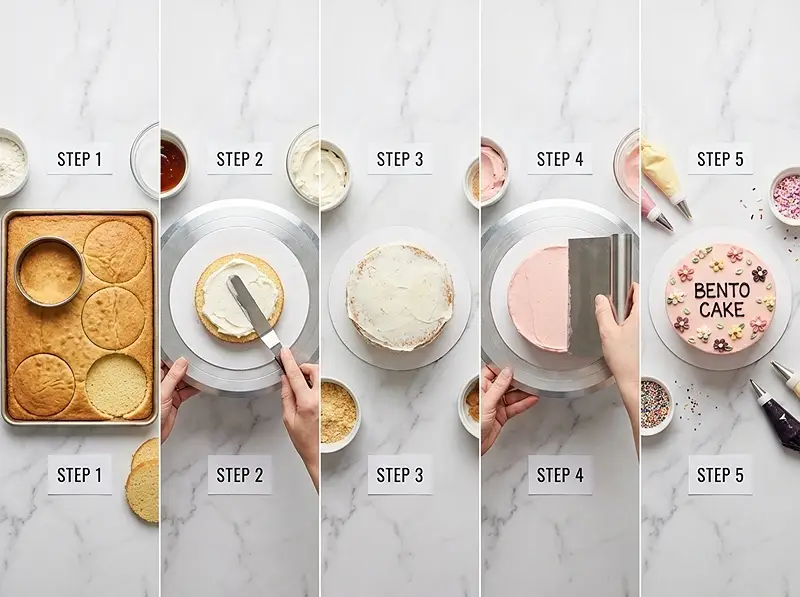
Step 1: Prep your pan. Spray a 12×17 inch half sheet (or jelly roll) pan with cooking spray, then press a sheet of parchment paper into it — cover the bottom fully and press it into the corners and up the sides so nothing sticks.
Step 2: Bake the cake. Spread your prepared cake batter into the pan as evenly as possible — use a spatula to smooth it out flat. Bake at 350°F for 20–24 minutes, until the top is golden brown and a toothpick inserted in the center comes out clean. Let the cake cool completely before moving on.
Step 3: Release the cake. Once cool, use a butter knife to loosen all the edges around the entire pan. Cover the cake with a fresh sheet of parchment paper, place a wire cooling rack on top, and flip the whole pan upside down to release the cake onto the rack. Easy!
Step 4: Make the buttercream. Beat room-temperature unsalted butter on medium speed using the paddle attachment for about 30 seconds until smooth and fluffy. Add the vanilla extract and mix on low until fully combined.
Slowly add the powdered sugar, ½ cup at a time — stop after 1½ cups to pour in the room-temperature heavy cream, then add the remaining powdered sugar. Continue mixing on low until everything is silky, smooth, and dreamy.
Step 5: Cut your cake circles. Using your 6-inch round biscuit or circle cutter, cut 12 circles out of the cooled cake sheet. Set them aside on your wire rack. Also cut four 9-inch squares of parchment paper — these become your little frosting stations.
Step 6: Start assembling. Place one parchment square on your work surface and add a small touch of buttercream to anchor the cake. Set your first cake circle on top, then drizzle it with 1 teaspoon of simple syrup. Spread an even layer of vanilla buttercream on top of that cake layer and smooth it out.
Step 7: Stack and crumb coat. Add the second cake circle on top of the frosted layer and drizzle with another teaspoon of simple syrup. Now frost the entire outside of the stacked cake with a thin layer (crumb coat) of buttercream — this traps all the crumbs so your final coat looks flawless. Smooth with your offset spatula or bench scraper. Repeat this for all 6 mini bento cakes.
Step 8: First chill. Pop all the crumb-coated cakes in the freezer for 10 minutes until the frosting is firm to the touch.
Step 9: Final coat and second chill. Remove the cakes from the freezer and apply a thicker, more generous layer of vanilla buttercream. Smooth it out as much (or as little) as you like — some people love a super clean finish, others love a more textured, organic look. Chill for another 10 minutes.
Step 10: Decorate and box! Carefully lift each cake off the parchment using the paper underneath and gently place each one inside its bento container. Divide the remaining buttercream into separate portions and tint each with gel food coloring.
Transfer to piping bags with your favorite tips and decorate however your heart desires — flowers, swirls, a little message, or just some sprinkles. Gel frosting also works great for writing messages.
Claire’s Pro Tips & Gentle Guidance
When it comes to this korean bento cake, a few small things make a big difference in the final result. I’ve made plenty of batches — including some that were a little lopsided and one that I may have dropped on my kitchen floor — so let me save you the stress.
Room temperature is your best friend here. Cold butter will not whip into that luscious, fluffy buttercream you’re dreaming of — it’ll just be grainy and dense. Same goes for the heavy cream. Pull everything out of the fridge at least 30–45 minutes before you start the frosting.
Don’t skip the simple syrup. This is the secret that keeps mini bento cakes from tasting dry, especially since the layers are thinner than a traditional cake. A gentle drizzle keeps every bite moist and tender — and it’s literally just water and sugar.
Work quickly during decorating. Once the buttercream is at room temperature, it softens fast. If you’re adding color and piping details, work in small batches and pop your piping bags in the fridge between cakes if needed.
The crumb coat is non-negotiable. I know it feels like extra work, but that thin first layer seals in every little crumb so your final coat looks clean and professional. Even if you’re going for a rustic look, the crumb coat gives you a better base.
Gel food coloring only. Liquid food coloring will thin out your buttercream and mess with the consistency. Gel colors give you vibrant, beautiful shades without changing the texture at all.
For more expert guidance on frosting technique and achieving the smoothest buttercream possible, I love this breakdown of cake frostings from King Arthur Baking — their tips on temperature and technique are genuinely next-level.
Quick Fixes for Bento Cake (Troubleshooting Guide)
My buttercream is grainy or lumpy. This almost always means your butter or cream was too cold. Remove the frosting from the mixer, let the whole bowl sit at room temperature for 10–15 minutes, then beat again on medium speed. The warmth will smooth everything right out.
My cake circles are falling apart when I cut them. The cake wasn’t fully cooled before cutting — even a slightly warm cake will crumble under a cutter. Give it at least 45 minutes to cool completely (or 15 minutes in the fridge if you’re in a hurry), and make sure your cutter is sharp and pressed down firmly in one motion.
My frosted cake looks bumpy and uneven. Your buttercream was too stiff. Add one more tablespoon of heavy cream and beat it in on low speed, then smooth the frosting again with a warm offset spatula (run it under hot water and dry it) — the warmth helps glide over the surface beautifully.
My bento cake is sliding around inside the box. You need a little frosting anchor! Place a small smear of buttercream in the center of the parchment before setting the cake down — that tiny bit of stickiness keeps the whole thing stable in the box.
The piped message looks messy. Honestly? Practice on a piece of parchment paper first. Piping letters is a skill, and a minute of warm-up makes a huge difference. Also, make sure your piping bag isn’t too full — it gives you more control.
I have a feeling you’ll love what’s next. The Cakes & Cupcakes favorites are packed with recipes that disappear fast at every gathering. Go check them out before someone else snags them!
Variations & Fun Twists
One of my favorite things about this mini bento cake recipe is how wildly customizable it is.
Flavor swaps: Use a chocolate, red velvet, lemon, or funfetti cake mix as your base. You can also swap the vanilla buttercream for a strawberry buttercream (add 2 tablespoons freeze-dried strawberry powder), cream cheese frosting, or even a light whipped ganache.
Seasonal themes: For fall, add a pinch of cinnamon and cardamom to the buttercream and decorate with tiny leaf sprinkles. For Valentine’s Day, go pastel pink with heart piping tips. For birthdays, go bold with rainbow gel colors and confetti sprinkles.
Gluten-free version: Use a 1:1 gluten-free boxed cake mix. Most work perfectly with this method — just check that it’s meant as a direct swap.
Vegan option: Swap the butter for a high-quality vegan butter (Miyoko’s works beautifully), use full-fat coconut cream in place of heavy cream, and choose a plant-based cake mix. The results are surprisingly dreamy.
Fancy plating: Skip the takeout box and serve the bento cakes on individual small boards or slate tiles for a bakery-style presentation — gorgeous for parties or dessert tables.
Serving, Storage & Reheating
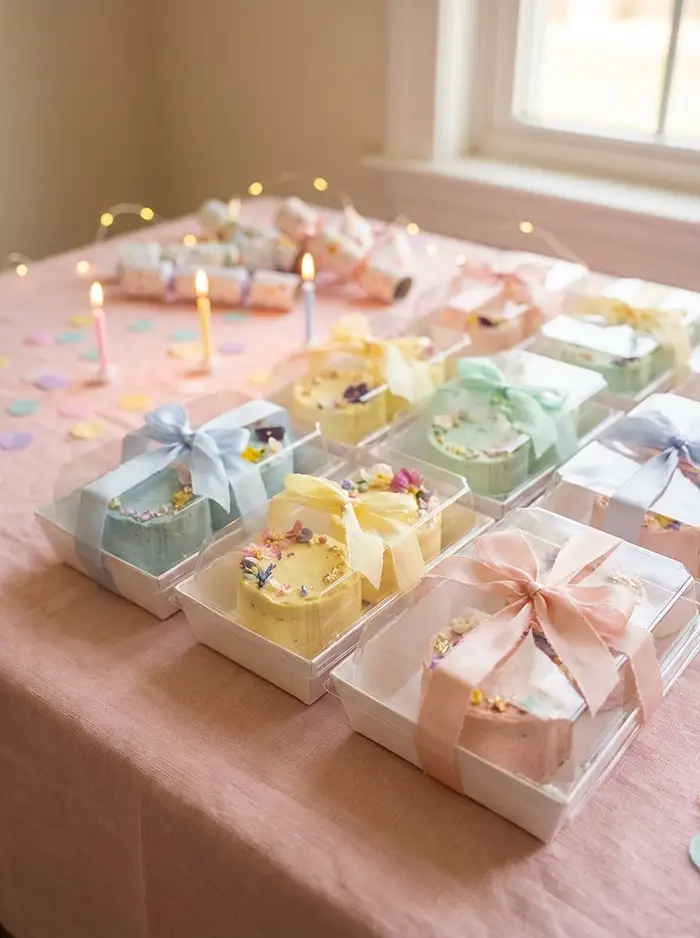
These mini bento cakes are meant to feel like a gift — even if you’re gifting one to yourself.
Serving: Place each finished cake in its bento container with a small candle and a little wooden spoon or fork tucked inside. They look so sweet presented this way! Serve at room temperature for the best flavor and texture — cold buttercream can taste a little dense.
Storage: Bento cakes keep beautifully at room temperature for up to 2 days if your kitchen isn’t too warm. For longer storage, place them in their closed containers in the refrigerator for up to 5 days. Let them sit at room temperature for 20–30 minutes before enjoying — cold cake is never as good.
Reheating: You won’t need to “reheat” these per se, but if your buttercream has firmed up in the fridge, just let the cake sit at room temperature for 20–30 minutes and it’ll be perfectly soft and creamy again. Do not microwave frosted bento cakes — the buttercream melts instantly and you’ll end up with a puddle.
No-Waste Kitchen Magic
The best part about making bento cakes the sheet pan way? The cake scraps are basically an invitation to get creative.
Cake pops: Crumble the leftover cake pieces, mix with a few spoonfuls of buttercream, roll into balls, chill, and dip in melted chocolate. Done.
Trifle cups: Layer cake scraps with whipped cream and fresh berries in clear cups for an effortless layered dessert. No one needs to know it was leftover.
Cake crumble topping: Dry out the scraps in a low oven (300°F for 10–12 minutes), then sprinkle over ice cream or yogurt like a fancy crumble.
Freeze for later: Scraps freeze beautifully in a zip bag for up to a month. Defrost and use for truffles, trifles, or late-night snacking (no judgment here).
Bento Cake FAQs
Can I make bento cake ahead of time?
Yes! You can bake the sheet cake up to 2 days ahead and store it tightly wrapped at room temperature. Make the buttercream up to 3 days ahead and keep it in the fridge — just rewhip it before using. Fully assembled bento cakes are best made the day before or day of serving.
What’s the best way to store bento cake?
Store bento cakes in their closed containers in the refrigerator for up to 5 days. If you’re gifting them, keep them chilled until about 30 minutes before they’ll be eaten. The buttercream holds up well in the fridge but needs a little time to soften before serving.
How do I know when my bento cake is done baking?
The surface will look set and lightly golden, and a toothpick inserted in the center will come out clean with no wet batter attached. Start checking around the 20-minute mark — thin sheet cakes bake faster than you think, and overbaking makes the layers dry.
Can I use homemade cake batter instead of a box mix?
Absolutely! Any standard cake recipe that makes enough for a 9×13 pan will work perfectly for this method. Just adjust your baking time since a half sheet pan is thinner — start checking around 18–20 minutes.
Cozy Closing
I’d love to see your spin on this bento cake! Drop a comment below with your bento cake photos — I’d love to see how you made it your own.
This bento cake recipe is so wonderfully versatile; I bet you’ve already got amazing flavor combos and decoration ideas swirling around in your head. Whether you’re making them as birthday gifts, party favors, or just a little “thinking of you” treat, bento cakes make every occasion feel sweeter.
And if you loved this recipe, you might also adore my rosewater macarons for the next time you want to get a little fancy — or check out my viral Dubai chocolate strawberry cup when you need something that absolutely will stop the scroll.
I’m Claire Whitmore — a dessert daydreamer from Asheville, NC. For me, baking isn’t about perfect pastries — it’s about the joy of sharing something sweet (and maybe sneaking an extra scoop of icing).
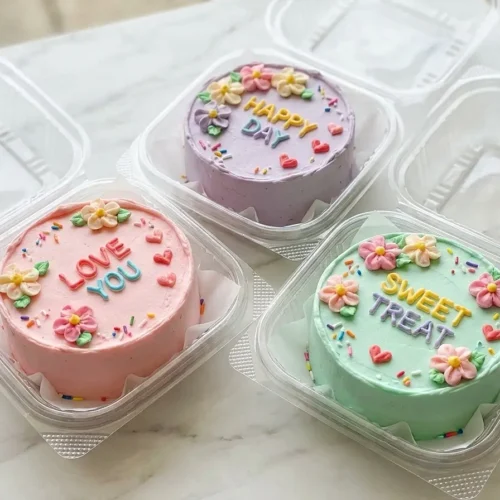
Bento Cake
Equipment
- Half sheet pan (12×17 inch) or jelly roll pan
- Parchment paper
- 6-inch round biscuit or circle cutter
- Stand mixer or hand mixer with paddle attachment
- Offset spatula or bench scraper
- Wire cooling rack
- Piping bags and assorted tips
- Bento boxes or clamshell takeout containers
Ingredients
Cake
- 1 box Prepared cake mix 15–22 oz; any flavor — vanilla is classic, chocolate works beautifully too
- 2 tsp Simple syrup Keeps the thin cake layers moist and tender
Vanilla Buttercream Frosting
- 1 cup Unsalted butter Room temperature; Kerrygold recommended
- 1 tsp Vanilla extract
- 2⅔ cups Powdered sugar
- ½ cup Heavy whipping cream Room temperature
Cake Decorations
- Sprinkles Optional but encouraged
- Gel frosting Optional; for piped messages or decorative details
Instructions
- Spray a 12×17 inch half sheet (or jelly roll) pan with cooking spray, then press a sheet of parchment paper into it — cover the bottom fully and press it into the corners and up the sides so nothing sticks.
- Spread your prepared cake batter into the pan as evenly as possible — use a spatula to smooth it out flat. Bake at 350°F for 20–24 minutes, until the top is golden brown and a toothpick inserted in the center comes out clean. Let the cake cool completely before moving on.
- Once cool, use a butter knife to loosen all the edges around the entire pan. Cover the cake with a fresh sheet of parchment paper, place a wire cooling rack on top, and flip the whole pan upside down to release the cake onto the rack.
- Beat room-temperature unsalted butter on medium speed using the paddle attachment for about 30 seconds until smooth and fluffy. Add the vanilla extract and mix on low until fully combined. Slowly add the powdered sugar ½ cup at a time — stop after 1½ cups to pour in the room-temperature heavy cream, then add the remaining powdered sugar. Continue mixing on low until everything is silky and smooth.
- Using your 6-inch round biscuit or circle cutter, cut 12 circles out of the cooled cake sheet and set them aside on your wire rack. Also cut four 9-inch squares of parchment paper to use as frosting stations.
- Place one parchment square on your work surface and add a small touch of buttercream to anchor the cake. Set your first cake circle on top, then drizzle it with 1 teaspoon of simple syrup. Spread an even layer of vanilla buttercream on top and smooth it out.
- Add the second cake circle on top of the frosted layer and drizzle with another teaspoon of simple syrup. Frost the entire outside of the stacked cake with a thin layer (crumb coat) of buttercream and smooth with your offset spatula or bench scraper. Repeat for all 6 mini bento cakes.
- Place all crumb-coated cakes in the freezer for 10 minutes until the frosting is firm to the touch.
- Remove the cakes from the freezer and apply a thicker, more generous layer of vanilla buttercream. Smooth it out as much or as little as you like. Chill for another 10 minutes in the freezer.
- Carefully lift each cake off the parchment using the paper underneath and gently place each one inside its bento container. Divide the remaining buttercream into portions, tint with gel food coloring, and transfer to piping bags with your favorite tips. Decorate with flowers, swirls, messages, or sprinkles as desired.