Quick Yeast Cinnamon Rolls
You know those mornings when you crave warm, Quick Yeast Cinnamon Rolls but don’t have three hours to spare? I’m Linda Sandra — a Charleston home cook who’s mastered the art of cozy comfort food — and these Quick Yeast Cinnamon Rolls are about to become your new weekend ritual.
These aren’t your average cinnamon rolls that require endless kneading and rising times. We’re talking soft, pillowy rolls with a cinnamon-sugar swirl and cream cheese frosting that tastes like it took all day, but secretly comes together in about 90 minutes from start to finish.
I developed this recipe during those chaotic school-morning rushes when my kids wanted something special but the clock was ticking. Now it’s our Saturday tradition — and honestly, the smell of these baking is better than any alarm clock.
Little Snapshot: What This Recipe Delivers
This Quick Yeast Cinnamon Rolls recipe delivers soft, bakery-style rolls with instant yeast for faster rising, a brown sugar cinnamon filling, and tangy cream cheese frosting — all ready in about 90 minutes with options to prep the night before for stress-free mornings.
Why You’ll Love This Recipe 🌸
- These Quick Yeast Cinnamon Rolls take less time than waiting in the bakery line — and taste way better.
- You can prep them the night before and wake up to fresh-baked magic without the morning chaos.
- The dough is ridiculously forgiving, so even if you’ve never made rolls before, you’ll nail these on the first try.
- According to King Arthur Baking in their guide to creating better cinnamon rolls, using instant yeast and proper resting time creates lighter texture — and this recipe proves exactly why.
Quick Facts ⚡
Here’s the quick scoop on this Quick Yeast Cinnamon Rolls recipe.
- CourseDessert/Breakfast
- Prep Time30 minutes
- Cook Time28 minutes
- Total Time1 hour 30 minutes
- Servings9 rolls
- DifficultyEasy
Table of Contents

Quick Yeast Cinnamon Rolls
Equipment
- Stand mixer with dough hook
- Large mixing bowl
- Dough whisk or wooden spoon
- Microwave-safe bowl
- Medium mixing bowl
- Rolling Pin
- offset spatula
- Rubber spatula
- Pastry cutter or pizza cutter
- 8×8-inch baking pan
- Parchment paper
- Plastic wrap
- Aluminum foil
Ingredients
Main Ingredients
- 3 ½ cups All-purpose flour plus extra for dusting (440g)
- 2 ¼ tsp Instant dry yeast 1 packet (7g)
- 1 tsp Fine salt 6g
- 1 cup Whole milk 240g
- ½ cup Granulated sugar 100g
- ¼ cup Unsalted butter room temperature (56g)
- 1 large Egg room temperature (56g)
For the Filling
- 4 Tbsp Unsalted butter very soft (56g)
- ½ cup Light brown sugar packed (100g)
- 1 Tbsp Ground cinnamon
- ½ tsp Fine salt
For the Frosting
- ¼ cup Cream cheese full-fat, room temperature (56g)
- ¼ cup Unsalted butter room temperature (56g)
- 2 tsp Vanilla extract or vanilla bean paste 8g
- ¼ tsp Fine salt
- 1 ½ cups Powdered sugar 190g
- 2 Tbsp Heavy whipping cream room temperature (30g)
Instructions
- Mix the flour, yeast, and salt in a mixing bowl.
- Warm the milk, sugar, and butter until warm but not hot.
- Combine wet and dry ingredients, add the egg, and knead until elastic.
- Add flour as needed until dough is tacky but not sticky.
- Cover and rest the dough for 10–20 minutes.
- Mix softened butter, brown sugar, cinnamon, and salt to make the filling.
- Roll dough into an 18×12 inch rectangle.
- Spread the cinnamon filling evenly over the dough.
- Roll the dough and cut into 9 pieces, or slice strips and roll individually.
- Proof rolls for 30 minutes in a warm oven (or refrigerate overnight).
- Bake at 350°F (175°C) for 26–30 minutes until golden.
- Prepare frosting by mixing cream cheese, butter, vanilla, powdered sugar, and cream.
- Frost warm rolls and serve.
Notes
Nutritional Peek
Here’s what you’re getting in each heavenly roll — because knowing the numbers helps you enjoy them guilt-free (or at least guilt-reduced).
| Nutrient | Amount per serving |
|---|---|
| Calories | 385 kcal |
| Protein | 6g |
| Carbohydrates | 58g |
| Fat | 15g |
| Fiber | 2g |
| Sugar | 32g |
Quick Yeast Cinnamon Rolls Ingredients
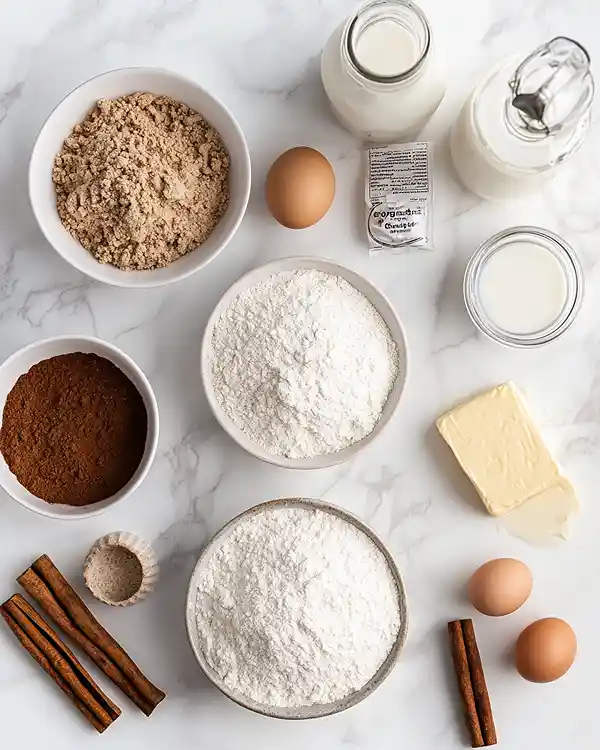
When it comes to home-baked cinnamon rolls, your ingredients make all the difference between “meh” and “can I have three more?”
For the wet ingredients — whole milk, butter, and egg — you’ll want everything at room temperature so the yeast stays happy and the dough comes together smoothly. For the dry mix — all-purpose flour, instant yeast, and salt — using instant yeast (not active dry) means you skip the blooming step and get to the good stuff faster.
| Amount | Ingredient |
|---|---|
| 3 1/2 cups (440g) | All-purpose flour, plus extra for dusting |
| 2 1/4 tsp (1 packet) | Instant dry yeast (7g) |
| 1 tsp | Fine salt (6g) |
| 1 cup (240g) | Whole milk |
| 1/2 cup (100g) | Granulated sugar |
| 1/4 cup (56g) | Unsalted butter, room temperature |
| 1 large | Egg, room temperature (56g) |
| For the Filling: | |
| 4 Tbsp (56g) | Unsalted butter, very soft |
| 1/2 cup (100g) | Light brown sugar, packed |
| 1 Tbsp | Ground cinnamon |
| 1/2 tsp | Fine salt |
| For the Frosting: | |
| 1/4 cup (56g) | Full-fat cream cheese, room temperature |
| 1/4 cup (56g) | Unsalted butter, room temperature |
| 2 tsp (8g) | Vanilla extract or vanilla bean paste |
| 1/4 tsp | Fine salt |
| 1 1/2 cups (190g) | Powdered sugar |
| 2 Tbsp (30g) | Heavy whipping cream, room temperature |
So glad you tried this one! The Classic Comfort Foods collection has even more recipes that are just as comforting and crowd-pleasing. Go ahead, take a look — your next favorite dish is right there.
Tools You’ll Actually Use
You probably have most of these already hiding in your cabinets:
- Stand mixer with dough hook or large mixing bowl
- Dough whisk or wooden spoon
- Medium mixing bowl for filling
- Microwave-safe bowl
- Rolling pin
- Offset spatula or rubber spatula
- Pastry cutter or pizza cutter
- 8×8-inch baking pan (metal preferred, or glass)
- Parchment paper
- Plastic wrap
- Aluminum foil
Step-by-Step Instructions
Let’s make these Quick Yeast Cinnamon Rolls happen! Trust me, this is way easier than it sounds.
Step 1: Mix the Dough Base Preheat your oven to 200°F (95°C) — unless you’re prepping these the night before, then skip this for now. In your stand mixer bowl or a large mixing bowl, combine 3 1/2 cups all-purpose flour, 2 1/4 teaspoons instant dry yeast, and 1 teaspoon fine salt. Whisk them together so the yeast gets evenly distributed.
Step 2: Warm the Wet Ingredients In a separate microwave-safe bowl, combine 1 cup whole milk, 1/2 cup granulated sugar, and 1/4 cup room-temperature butter. Microwave for 1 minute, then stir everything together.
The butter should be mostly melted, and the mixture should feel warm but not hot — like bathwater, not tea. If it’s too hot, wait a minute. Hot liquid kills yeast, and we definitely don’t want that.
Step 3: Combine and Knead Slowly pour the warm milk mixture into your flour bowl and mix on medium speed with a dough hook (or by hand with a dough whisk or wooden spoon).
Add 1 large room-temperature egg and mix on low speed until a sticky dough ball forms. Keep mixing on medium-low for a couple of minutes until the dough becomes stretchy and elastic.
Step 4: Adjust the Texture As the dough mixes, add additional flour 1 tablespoon at a time until the dough starts pulling away from the sides of the bowl. You’ll probably add 1-3 extra tablespoons. Here’s my secret test: poke the dough with your finger. It should feel tacky but not sticky, and when you pull your finger away, there shouldn’t be any dough stuck to it.
Step 5: Let It Rest Cover your bowl with plastic wrap and set it aside for 10-20 minutes. This resting period relaxes the gluten and makes rolling out the dough so much easier. Think of it as a little nap for your dough.
Step 6: Make the Cinnamon Filling While the dough rests, let’s make that gorgeous filling. Your butter needs to be really soft here — softer than room temperature but not melted. I usually microwave room-temp butter in 5-second bursts until it’s super spreadable.
In a medium bowl, mix together 4 tablespoons very soft butter, 1/2 cup packed light brown sugar, 1 tablespoon ground cinnamon, and 1/2 teaspoon fine salt until you have a thick, paste-like consistency.
Step 7: Roll Out the Dough Line an 8×8-inch pan with parchment paper and set it aside. Place your rested dough on a lightly floured surface and roll it into a large rectangle about 18×12 inches and roughly 1/2 cm thick. Don’t stress about perfect measurements — close enough is perfect enough.
Step 8: Spread the Magic Using an offset spatula or rubber spatula, spread the cinnamon filling in a thin, even layer across the entire dough rectangle. It might look like there’s not enough filling at first, but trust me, there is! Just take your time working it into a thin layer.
Step 9: Roll and Cut Here’s where you have options! Traditional method: Roll the dough up horizontally into a log, then use dental floss (yes, really!) to cut 9 equal pieces. My preferred method:
Use a pastry cutter or pizza cutter to slice the dough into 9 equal strips about 2 inches wide, then roll each strip up individually. This gives you more control and prettier spirals. Place your rolls in the prepared pan.
Step 10: Proof the Rolls If making these the night before: Cover the pan tightly with plastic wrap and refrigerate overnight. The next morning, take them out, preheat the oven to 200°F, turn it off, cover the rolls with foil, and place them in the warm oven for about 30 minutes until they’ve puffed up.
If making these same-day: Turn off your preheated 200°F oven, cover the rolls with foil, and let them rise in the warm oven for about 30 minutes. Make sure the oven is OFF — we want a cozy environment, not a baking one yet. They should look puffier and about twice their original size.
Step 11: Bake Until Golden Remove the rolls from the oven, take off the foil, and preheat the oven to 350°F (175°C). Don’t worry if some butter has melted out around the base — that’s totally normal. Bake for 26-30 minutes, rotating the pan halfway through, until the rolls are just starting to turn golden brown on top.
Step 12: Make the Cream Cheese Frosting While those beauties bake and your kitchen smells like absolute heaven, make the frosting. Mix together 1/4 cup cream cheese, 1/4 cup room-temperature butter, 2 teaspoons vanilla extract, and 1/4 teaspoon salt with a spoon or electric mixer until smooth.
Add 1 1/2 cups powdered sugar and 2 tablespoons heavy cream, mixing on low speed until everything’s combined. Scrape down the sides and bottom with a rubber spatula to make sure everything’s incorporated.
Step 13: Frost and Serve Let the cinnamon rolls cool for about 10 minutes (if you can wait that long), then spoon generous amounts of cream cheese frosting over each warm roll. Serve immediately and watch them disappear.
Pro Tips & Gentle Guidance
These tips will take your almost homemade cinnamon rolls from great to “can you make these every weekend?”
The room temperature thing isn’t just fancy baker talk — it actually matters. When your butter, eggs, milk, and cream cheese are all at room temperature, they blend together smoothly without lumps. I usually set mine out about an hour before I start baking.
If you’re eyeballing whether your milk mixture is the right temperature, aim for about 110°F if you have a thermometer. No thermometer? Stick your finger in — it should feel warm and comfortable, not hot enough to make you pull away.
The “cut then roll” method is a game-changer, especially if you’re new to cinnamon rolls. Rolling each strip individually gives you better control, prettier spirals, and more even-sized rolls. Plus, you can fix any mistakes as you go instead of discovering them after you’ve cut the whole log.
If you’re new to working with yeast dough, King Arthur Baking‘s detailed cinnamon roll guide has excellent visuals that helped me understand what “tacky but not sticky” actually looks like.
Don’t skip the resting period after mixing the dough. Those 10-20 minutes let the gluten relax, which means you won’t be wrestling with shrinking dough when you try to roll it out. It’s like the difference between stretching cold rubber bands versus warm ones.
For the most even baking, use a light-colored metal pan instead of glass. Glass holds heat differently and can make your bottoms too dark. If glass is all you have, just lower your oven temp by 25°F and add a few extra minutes to the baking time.
Quick Fixes for Quick Yeast Cinnamon Rolls
Problem: My dough is too sticky and won’t stop sticking to everything. Solution: Add flour one tablespoon at a time while mixing until the dough pulls away from the bowl sides and passes the finger test (tacky but not sticky). Don’t add too much though, or your rolls will be dense.
Problem: The filling is sliding out everywhere when I roll the dough. Solution: Your butter was probably too melted. The filling should be paste-like, not liquid. Also, try the “cut then roll” method instead of rolling the whole thing — it keeps the filling contained better.
Problem: My rolls didn’t rise much in the oven. Solution: Your liquid was probably too hot and killed the yeast, or your oven wasn’t warm enough during proofing. Make sure your milk mixture is just warm (not hot), and that your proofing spot is cozy but not baking-hot.
Problem: The bottoms of my rolls burned but the tops are pale. Solution: Your oven might run hot, or you used a dark pan. Lower the temperature by 25°F next time, and consider switching to a light-colored metal pan. Also, make sure your oven rack is in the center position.
Problem: My cream cheese frosting is lumpy. Solution: Your cream cheese or butter was too cold. Let everything come to room temperature, then mix slowly. If it’s already lumpy, you can microwave it for 5-10 seconds and re-whip it smooth.
Variations & Adaptations
These home-baked cinnamon rolls are incredibly versatile! Here are some fun twists:
Blueberry Cinnamon Rolls: Add 1 cup of fresh or frozen blueberries on top of the filling before rolling. The berries create jammy pockets that taste like summer. Check out my blueberry cinnamon rolls for the full technique.
Holiday Spice Version: Add 1/4 teaspoon cardamom, 1/4 teaspoon nutmeg, and a pinch of ground ginger to your cinnamon filling for a festive twist that pairs beautifully with my gingerbread house icing.
Maple Pecan Variation: Replace half the brown sugar in the filling with maple syrup and sprinkle 1/2 cup chopped pecans over the filling before rolling. Swap the vanilla in the frosting for maple extract.
Gluten-Free Option: Use a 1:1 gluten-free flour blend (one with xanthan gum included) in place of all-purpose flour. The texture will be slightly different but still delicious.
Dairy-Free Adaptation: Use oat milk or almond milk instead of dairy milk, coconut oil instead of butter in the dough, and make a simple powdered sugar glaze instead of cream cheese frosting.
Serving, Storage & Reheating
These quick yeast cinnamon rolls are best served warm with that frosting getting all melty, but here’s how to keep them delicious for days.
Serve these within 30 minutes of baking for the ultimate gooey experience. They’re perfect for weekend brunch, holiday mornings, or anytime you want to feel like you’re eating at a fancy bakery. Pair them with coffee or hot chocolate for the full cozy experience.
Store leftover rolls in an airtight container at room temperature for up to 2 days, or refrigerate for up to 5 days. The frosting will firm up in the fridge, but that’s totally fine.
To reheat, wrap individual rolls in a damp paper towel and microwave for 20-30 seconds, or warm the whole pan covered with foil in a 300°F oven for about 10 minutes. They’ll taste almost as good as fresh-baked.
No-Waste Kitchen Magic
If you somehow manage not to eat all nine rolls immediately (impressive!), here are creative ways to use them:
Day-Old Roll French Toast: Slice leftover rolls in half horizontally and dip them in an egg-cinnamon mixture, then pan-fry until golden. The cinnamon filling caramelizes and creates the most incredible breakfast.
Cinnamon Roll Bread Pudding: Cube day-old rolls, soak them in a custard mixture, and bake for a decadent dessert that’s even better than the original rolls.
Cinnamon Roll Ice Cream Topping: Chop up leftover rolls and use them as an ice cream topping. The combination of cold ice cream and cinnamon roll chunks is ridiculously good.
Repurpose Extra Frosting: If you have leftover cream cheese frosting, spread it on graham crackers, use it to fill sandwich cookies, or stir it into your morning coffee for a special treat.
Quick Yeast Cinnamon Rolls FAQs
Can I freeze Quick Yeast Cinnamon Rolls before baking?
Absolutely! Prepare the rolls through the cutting and arranging step, then freeze them in the pan wrapped tightly in plastic wrap and foil for up to 3 months.
What’s the best way to store baked cinnamon rolls?
Store baked rolls in an airtight container at room temperature for 2 days or refrigerated for up to 5 days. You can also freeze baked rolls for up to 3 months — just reheat in the oven or microwave when you’re ready to enjoy them.
How do I know when my Quick Yeast Cinnamon Rolls are done baking?
They’re ready when they’re just starting to turn golden brown on top and spring back slightly when touched, usually 26-30 minutes at 350°F. The internal temperature should be around 190°F if you have a thermometer, but honestly, the visual cue works great.
What’s the difference between these and par-baked cinnamon rolls?
These are fully baked fresh rolls, while par-baked cinnamon rolls (partially baked then frozen) are a convenience option.
Could I add chocolate chips to these cinnamon rolls?
Oh yes! Sprinkle 1/2 cup mini chocolate chips over the filling before rolling for chocolate-cinnamon magic. Dark chocolate pairs especially well with the cinnamon and brown sugar.
Wrapping It Up
So there you go — Quick Yeast Cinnamon Rolls that feel fancy but are secretly easy enough for any morning you want to treat yourself (or impress your family).
The best part? You can make these tonight, stick them in the fridge, and wake up tomorrow to warm, fresh rolls without the morning chaos. Or throw them together on a Saturday morning when you have a bit more time to enjoy the process.
I’d love to see your spin on this Quick Yeast Cinnamon Rolls recipe! Drop a comment below with your photos or any fun variations you tried — I’m always looking for new twists to test in my kitchen. Did you go for the blueberry version? Add chocolate chips? Make them dairy-free? Tell me everything!
These rolls have become our Saturday tradition, and I have a feeling they’ll become yours too. There’s just something about pulling apart warm, frosted cinnamon rolls that makes the whole day feel special.
Happy baking, friend! 🌸
I’m Linda Sandra — a Charleston home chef and comfort-food daydreamer. Around here, cooking’s not about perfection — it’s about cozy vibes, creative twists, and food that feels like love.