Pumpkin Patch Deviled Eggs
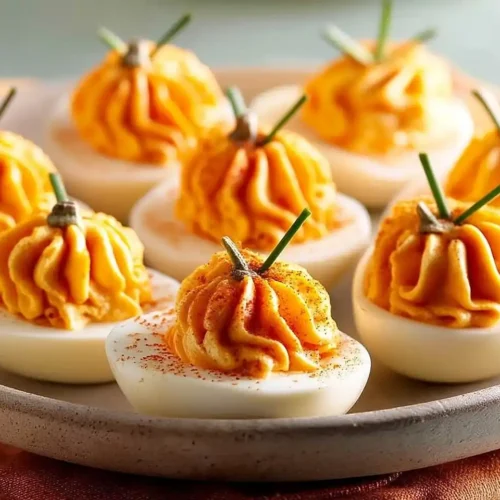
These adorable Pumpkin Patch Deviled Eggs transform a classic appetizer into festive fall fun! With creamy filling, vibrant orange hue, and chive “stems,” they’re perfect for Thanksgiving gatherings and autumn celebrations.
Hey there, I’m Claire Whitmore — a pastry whisperer in Asheville, NC, where butter totally counts as self-care. This Pumpkin Patch Deviled Eggs recipe is one of those magical little party tricks that makes everyone think you spent hours in the kitchen, when really, you just got creative with a piping bag and some chives.
I’ll be honest: I stumbled onto this idea last October when I was frantically trying to make my Thanksgiving spread look more “Pinterest-worthy” without actually having Pinterest-level skills.
Turns out, a few simple tweaks to classic deviled eggs can create the cutest little pumpkin patch you’ve ever seen on a serving platter. My niece literally squealed when she saw them, and I’ve been making them every fall since.
Little Snapshot: What This Recipe Delivers
These Orange Deviled Eggs are your secret weapon for fall entertaining. With a foolproof hard-boiling method that guarantees easy-to-peel eggs, a creamy paprika-spiced filling, and adorable pumpkin styling using piped swirls and fresh chive stems, you’ll have a show-stopping appetizer ready in under an hour.
They’re festive, flavorful, and way easier than they look.
Why You’ll Love This Recipe 🌸
- These Pumpkin Patch Deviled Eggs look like you hired a professional food stylist, but they’re honestly easier than remembering where you put your car keys.
- The foolproof boiling method means no more wrestling with stubborn eggshells or ending up with crater-pocked whites that look like the moon’s surface.
- They’re the perfect conversation starter at any fall gathering — because who doesn’t want to Instagram their appetizer before eating it?
- According to Serious Eats, the ice bath technique is key to perfectly peelable eggs — and this recipe proves exactly why.
Quick Facts ⚡
Here’s the quick scoop on this Pumpkin Patch Deviled Eggs recipe.
- CourseAppetizer
- Prep Time20 minutes
- Cook Time10 minutes
- Total Time30 minutes (plus chilling time)
- Servings12 deviled egg halves
- DifficultyEasy
Table of Contents
Nutritional Peek
Here’s what you’re working with per deviled egg half — because sometimes it’s nice to know, even if we’re totally indulging anyway:
| Nutrient | Amount per Serving |
|---|---|
| Calories | 65 kcal |
| Protein | 3.5g |
| Carbohydrates | 0.5g |
| Total Fat | 5.5g |
| Saturated Fat | 1.5g |
| Fiber | 0g |
| Sugar | 0.3g |
| Cholesterol | 95mg |
| Sodium | 95mg |
Ingredients
When it comes to making perfect Snacks For Holidays, the ingredient list is refreshingly short. You probably have most of this already hanging out in your fridge:
| Amount | Ingredient |
|---|---|
| 6 | large eggs |
| 1/4 cup | mayonnaise (the real stuff — trust me on this) |
| 1 tsp | yellow mustard |
| 1/4 tsp | salt |
| 1/8 tsp | black pepper |
| 1/2 tsp | paprika, plus extra for dusting |
| tiny dash | orange food coloring (optional, but it really makes them pop!) |
| 2 tbsp | fresh chives, finely chopped (these become your adorable little “stems”) |
A quick note: Yes, real mayonnaise makes a difference here. I’ve tried the light versions, and they just don’t give you that luxuriously creamy texture we’re going for. And those chives? They’re not just pretty — they add a lovely mild onion flavor that balances the richness.
Tools You’ll Actually Use
- Medium saucepan with lid
- Large bowl for ice bath
- Slotted spoon
- Small mixing bowl
- Fork or potato masher
- Piping bag with star tip (Wilton 1M works beautifully)
- Serving platter
- Butter knife or toothpick (for creating pumpkin ridges)
- Optional: Fine-mesh sieve for extra-smooth filling
Step-by-Step Instructions
Getting Those Eggs Just Right
Step 1: Let’s talk about the Pumpkin Patch Deviled Eggs game-changer: the foolproof boiling method. Place your eggs in a single layer in your saucepan — don’t overcrowd them or they’ll crack.
Cover with cold water by about an inch. Crank the heat to high and bring everything to a full, rolling boil. The second you see those big bubbles happening, kill the heat completely, slap that lid on, and set a timer for exactly 10 minutes. Not 9, not 11 — 10 is the magic number.
Step 2: While your eggs are hanging out in their hot tub, prep your ice bath. Fill a big bowl with ice and cold water — be generous with the ice. When that 10-minute timer goes off, use your slotted spoon to transfer those hot eggs straight into the ice bath. Let them chill for at least 5 minutes. This is where the peeling magic happens, I promise.
Step 3: Here’s where you’ll feel like a kitchen wizard. Tap each cooled egg gently on your counter to crack the shell all over (I like to give it a little roll to really break things up). Then peel under cool running water.
The shells should practically slip off like they’re late for an appointment. If you’ve been battling stubborn eggshells your whole life, prepare to be amazed.
Building Your Little Pumpkin Patch
Step 4: Slice each peeled egg lengthwise — nice and careful so you don’t tear the whites. Gently pop out those yolks into your small bowl, and arrange the whites on your prettiest serving platter. This is going to look so cute in about five minutes.
Step 5: Time to make the filling! Add your mayo, mustard, salt, pepper, and paprika to those yolks. If you’re going for that vibrant pumpkin orange (and honestly, why wouldn’t you?), add just the tiniest drop of orange food coloring.
Mash everything together with a fork until it’s completely smooth and creamy. I’m talking no lumps whatsoever. For the silkiest texture, you can press it through a fine-mesh sieve, but that’s totally optional.
Step 6: Spoon your creamy mixture into a piping bag fitted with a star tip. Now here’s the fun part: pipe the filling into each egg white half in a circular swirling motion, building it up into a nice plump mound.
Think of it like you’re creating soft-serve ice cream — that rounded top is what’ll make these look like actual pumpkins.
Step 7: To create those classic pumpkin ridges, take the dull side of a butter knife or a toothpick and gently press lines from the top center down the sides. Don’t go crazy — just 4 or 5 subtle indentations around each “pumpkin” does the trick.
Step 8: For the stems, bundle 2-3 pieces of chive together (each about 1/2 to 3/4 inch long) and gently poke them into the very top center of each piped pumpkin. They should stand up nice and proud, like little green stems.
Step 9: Give everything a light dusting of extra paprika for that warm, autumnal glow. Sprinkle any leftover chopped chives around your platter as garnish — it makes the whole presentation look intentional and fancy.
Step 10: Pop these beauties in the fridge for at least 30 minutes before serving. This gives the flavors time to get cozy together and firms up the filling so everything stays photo-ready.
Claire’s Pro Tips & Gentle Guidance
These Deviled Eggs For Thanksgiving are pretty forgiving, but here are a few things I’ve learned the hard way so you don’t have to:
On egg freshness: Here’s a weird tip — slightly older eggs (like a week or two old) actually peel better than farm-fresh ones. The pH changes over time make the membrane separate more easily. So if you bought eggs specifically for this, let them hang out in your fridge for a few days first.
Piping bag panic? No piping bag, no problem! You can use a zip-top bag with a corner snipped off, or even just spoon the filling in and use a fork to create texture. It won’t be quite as sculptural, but it’ll still be adorable and taste exactly the same.
The food coloring debate: That tiny dash of orange food coloring really does make these pop visually, but if you’re avoiding artificial colors, the paprika alone gives a nice peachy-orange hue.
You could also try adding a pinch of turmeric for natural color, though it’ll add a subtle earthy flavor.
One thing I’ve learned from trial and error (emphasis on error): don’t skip the chilling time at the end. I know you’re excited to serve them, but warm deviled eggs with soft filling just don’t hit the same.
The folks at Bon Appétit recommend chilling deviled eggs for optimal texture and food safety — and after serving lukewarm ones once at a potluck (embarrassing!), I couldn’t agree more.
Quick Fixes for Pumpkin Patch Deviled Eggs
Problem: Your filling is too runny and won’t hold its piped shape.
Fix: Mix in a tablespoon of sour cream or Greek yogurt — it’ll thicken things up and add a nice tang. You can also chill the filling for 15 minutes before piping.
Problem: The egg whites tore during peeling and look raggedy.
Fix: Use those imperfect whites for the bottom layer on your platter (no one will notice), and save your prettiest ones for the top. Or embrace the rustic look — they’ll still taste amazing!
Problem: Your piped pumpkins deflated or fell over.
Fix: Your filling might be too warm. Pop everything back in the fridge for 10 minutes to firm up, then re-pipe if needed.
Problem: The chive stems won’t stay upright.
Fix: Cut them a bit shorter and insert them at a slight angle rather than straight down. Or bundle more pieces together for extra stability.
Problem: The filling tastes bland.
Fix: Deviled eggs should be punchy! Add an extra pinch of salt, a dash more mustard, or even a tiny splash of pickle juice for that classic tangy kick.
This recipe is just the start of something delicious. Browse the entire Delicious Desserts collection and discover all the ways you can bring more flavor to your table. Your family will thank you.
Variations & Fun Twists
Once you’ve mastered the basic Pumpkin Patch Deviled Eggs, the world is your oyster (or, well, your egg):
Spicy Pumpkin Patch: Add a pinch of cayenne pepper or a few drops of hot sauce to the filling for a little heat. Autumn doesn’t always have to be all cozy and mild, you know?
Bacon Lover’s Version: Crumble crispy bacon into the filling and use a small piece of bacon instead of chives for the “stem.” It’s less authentic to the pumpkin theme, but who’s complaining about bacon?
Herb Garden: Mix in fresh dill, parsley, or tarragon along with the chives for a more herbaceous flavor profile. You can even use different herbs as “stems” for variety.
Extra Fancy: Add a tiny dollop of caviar or smoked salmon on top of each pumpkin for an upscale twist. Suddenly you’ve got appetizers worthy of a fancy dinner party.
Make-Ahead Hack: You can boil and peel the eggs up to 3 days in advance. Store them whole in an airtight container covered with a damp paper towel. Mix the filling and pipe/decorate the day you’re serving for best results.
Need more fall inspiration? These pair beautifully with my Pumpkin Shaped Sliders for a full pumpkin patch spread, or serve them alongside Roasted Tomato Basil Soup for a cozy autumn lunch.
Serving, Storage & Reheating
These Orange Deviled Eggs are best served cold, straight from the fridge. Arrange them on a platter with some fresh herbs or fall leaves around them for extra visual impact — though honestly, they’re so cute they don’t need much help.
Storage: If you actually have leftovers (which I doubt, because these disappear fast), store them in an airtight container in the fridge for up to 2 days.
The chive stems might wilt a bit, so you may want to remove and replace them before serving again.
Transporting: If you’re bringing these to a potluck or Thanksgiving dinner, transport the decorated eggs in a container with a lid, and keep them in a cooler if you’re traveling more than 30 minutes. Food safety is real, folks!
Not for freezing: Unfortunately, hard-boiled eggs and mayonnaise-based fillings don’t freeze well. They get weirdly rubbery and watery when thawed. These are definitely a make-and-eat-within-a-couple-days situation.
Party timing: Aim to serve these within 2 hours of taking them out of the fridge, or keep them on ice if your party’s running long.
Nobody wants to be that person who gives their guests food poisoning at Thanksgiving.
Looking for more crowd-pleasing sides? Check out my Easy Cranberry Sauce or go all-in with comfort food like Mississippi Pot Roast.

No-Waste Kitchen Magic
Leftover egg whites: If you end up with any torn or extra egg whites that didn’t make the cut for your pumpkin patch, chop them up and add them to salads, or make egg salad sandwiches for lunch the next day.
Extra yolk filling: Any leftover filling can be spread on toast, used as a dip for veggies, or stirred into pasta salad. It keeps for about 3 days in the fridge.
Day-old deviled eggs: If your pumpkin patch has seen better days and the chives are wilting, remove the decoration, chop everything up, and mix it with a bit more mayo and some diced celery for a quick egg salad. Waste not, want not!
Egg cooking water: That water you boiled the eggs in? Let it cool completely and use it to water your plants. The minerals from the shells are actually good for them.
Chive stems: Save any leftover chives in a damp paper towel in the fridge, or chop them up and freeze them in ice cube trays with a little water or butter for future cooking adventures.
Pumpkin Patch Deviled Eggs FAQs
What is the secret ingredient in deviled eggs?
Honestly? There’s no single “secret” ingredient, but my personal twist is using just enough paprika to add both color and a subtle smoky-sweet depth.
Some people swear by a splash of pickle juice for tang, while others add a tiny bit of Dijon mustard for extra complexity.
For these pumpkin patch versions, that optional drop of food coloring is what really makes them special — it transforms them from “cute” to “absolutely Instagram-worthy.”
What are the five golden rules of deviled eggs?
Here’s my version of the golden rules:
1) Use the ice bath method for easy-peeling eggs — game changer.
2) Don’t skip the mustard; it provides essential tang and cuts through the richness.
3) Mash that filling until it’s completely smooth with zero lumps.
4) Season generously — deviled eggs should taste punchy, not bland.
5) Always chill before serving so the filling firms up and the flavors can meld. Follow these, and you’ll have perfect deviled eggs every single time.
What’s the trick for deviled eggs?
The biggest trick is nailing the hard-boiled eggs so they peel perfectly — that boil-then-sit-for-10-minutes-then-ice-bath method I shared is pure gold.
Beyond that, the “trick” is really just balancing your mayo-to-mustard ratio so you get creamy without being heavy, and tangy without being sharp. And here’s a pro tip: slightly overfill each egg white half with the yolk mixture.
It looks more generous and impressive, plus who doesn’t want more of that creamy filling?
What ingredients are in deviled eggs?
Classic deviled eggs keep it simple: hard-boiled eggs, mayonnaise, mustard, salt, and pepper. That’s your foundation. From there, you can customize endlessly.
These pumpkin patch versions add paprika for color and a hint of smokiness, optional orange food coloring for that festive pumpkin hue, and fresh chives for both flavor and decoration.
Some folks add relish, hot sauce, Worcestershire sauce, or fresh herbs, but I like keeping the base traditional and adding flair through presentation
Cozy Closing
And there you have it — your very own adorable Pumpkin Patch Deviled Eggs that’ll steal the show at any fall gathering! These little guys prove that sometimes the simplest recipes with the cutest presentation make the biggest impact.
Plus, you get to tell everyone they’re way easier than they look (we love a humble brag).
I’d love to see your spin on these festive eggs! Did you make them extra spicy? Try a different herb for the stems? Leave a note below or tag me on Instagram so we can share a sweet moment together.
And if you’re building out your holiday menu, definitely check out my Delicious Pumpkin Cupcakes for dessert — because a pumpkin-themed feast is never complete without actual pumpkin treats!
Need a cozy drink to sip while you’re prepping? My Creamy Almond Latte with Citrus White Chocolate is the perfect kitchen companion.
I’m Claire Whitmore — a dessert daydreamer from Asheville, NC. For me, baking isn’t about perfect pastries — it’s about the joy of sharing something sweet (and maybe sneaking an extra scoop of icing). Though deviled eggs aren’t technically dessert, they’ve earned a special place in my heart as the appetizer that always makes people smile.
Pumpkin Patch Deviled Eggs
Equipment
- Medium saucepan with lid
- Large bowl for ice bath
- Slotted spoon
- Small mixing bowl
- Fork or potato masher
- Piping bag with star tip
- Serving platter
- Butter knife or toothpick
- Fine mesh sieve
Ingredients
Main
- 6 large eggs
- ¼ cup mayonnaise use real mayonnaise for best texture
- 1 tsp yellow mustard
- ¼ tsp salt
- ⅛ tsp black pepper
- ½ tsp paprika plus extra for dusting
- tiny dash orange food coloring optional
- 2 tbsp fresh chives finely chopped for stems
Instructions
- Place eggs in a single layer in a saucepan and cover with cold water by about an inch. Bring to a rolling boil, then remove from heat, cover, and let sit for 10 minutes.
- Transfer eggs to an ice bath and chill for at least 5 minutes to make peeling easier.
- Gently crack and peel eggs under cool running water, then slice each egg lengthwise and remove yolks to a mixing bowl.
- Add mayonnaise, mustard, salt, pepper, and paprika to yolks. Mix until smooth. Add a drop of orange food coloring if desired and mix well.
- Spoon filling into a piping bag fitted with a star tip and pipe into each egg white half in a swirl to create a pumpkin shape.
- Use the back of a butter knife or toothpick to press gentle ridges into the filling to resemble pumpkins.
- Insert small bundles of chives into the top of each egg to form stems. Dust lightly with extra paprika.
- Chill eggs for at least 30 minutes before serving to firm the filling and develop flavor.