Homemade Sourdough Discard Focaccia
This Homemade Sourdough Discard Focaccia turns tangy discard into pillowy, olive oil-kissed bread with a golden crust. Ready in under 2 hours with simple pantry staples!
Hey there, I’m Claire Whitmore — a pastry whisperer in Asheville, NC, where butter totally counts as self-care. This Homemade Sourdough Discard Focaccia recipe is my go-to way to rescue that jar of discard from the back of your fridge and transform it into something absolutely crave-worthy.
We’re talking pillowy bread with crispy edges, dimpled with olive oil and flaky salt, ready to soak up all your favorite toppings — from rosemary and garlic to sliced tomatoes and olives.
Table of Contents
Little Snapshot: What This Recipe Delivers
This Homemade Sourdough Discard Focaccia combines 170 grams of tangy sourdough discard with bread flour, whole wheat flour, and instant yeast to create two sheet pans of golden, dimpled Italian flatbread in about 90 minutes.
It’s beginner-friendly, endlessly customizable with your favorite toppings, and uses simple stretch-and-fold techniques instead of heavy kneading — so you get bakery-quality results without the arm workout.
Why You’ll Love This Recipe 🌸
- This sourdough focaccia recipe with discard takes less time than binge-watching two episodes of your favorite show — and tastes about a thousand times better.
- It’s practically impossible to mess up (trust me, I’ve tested this with distracted toddlers underfoot), and the stretch-and-fold method means zero intimidating kneading.
- You can top it with literally anything — from classic rosemary to fancy grapes and pistachios — so it works for fancy dinner parties or casual Tuesday sandwiches.
- According to King Arthur Baking’s guide to sourdough discard recipes, using discard adds incredible depth of flavor without the long fermentation times — and this focaccia discard recipe proves exactly why.
Quick Facts ⚡
Here’s the quick scoop on this Homemade Sourdough Discard Focaccia.
- CourseBread / Side Dish
- Prep Time20 minutes
- Cook Time25-30 minutes
- Total Time1 hour 30 minutes
- Servings12 servings (2 sheet pans)
- DifficultyEasy
Nutritional Peek
Here’s a friendly breakdown of what you’re getting per slice (because we believe in treating ourselves and knowing what’s in our food).
| Nutrient | Amount per Serving |
|---|---|
| Calories | 215 kcal |
| Protein | 6g |
| Carbohydrates | 34g |
| Fat | 6g |
| Fiber | 2g |
| Sugar | 4g |
| Sodium | 580mg |
Note: Nutritional values are approximate and will vary based on toppings and serving size.
Homemade Sourdough Discard Focaccia Ingredients
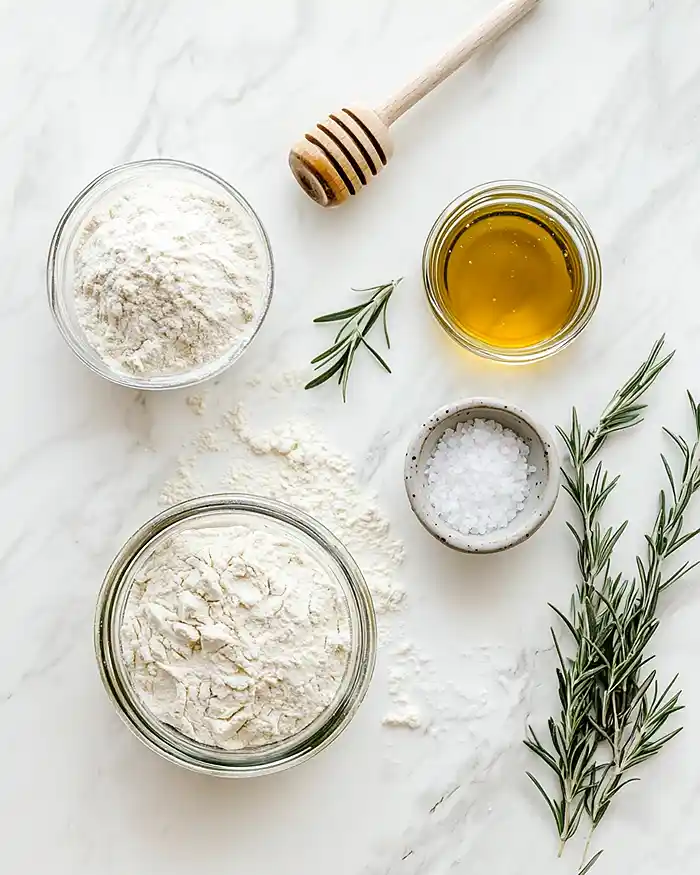
This sourdough focaccia recipe discard comes together with ingredients you probably already have in your pantry — no fancy specialty items required.
Before we jump into the list, let’s talk about the dough components. For the wet ingredients — water, instant yeast, honey, and sourdough discard — you’ll want everything at room temperature so the yeast activates properly and the discard blends in smoothly.
For the dry mix — bread flour, whole wheat flour, and salt — we’re using a combination of flours to get that perfect chewy-tender texture, plus the whole wheat adds a subtle nutty depth.
| Amount | Ingredient |
|---|---|
| For the Dough | |
| 452 grams (about 2 cups) | Water, room temperature |
| 7 grams (1 packet) | Instant yeast |
| 42 grams (2 tablespoons) | Honey or cane sugar |
| 170 grams (about ¾ cup) | Sourdough discard, unfed |
| 540 grams (about 4 cups) | Bread flour |
| 90 grams (about ¾ cup) | Whole wheat flour |
| 12 grams (2 teaspoons) | Salt (yes, it seems like a lot, but it’s essential for flavor!) |
| 56 grams (¼ cup) | Olive oil, plus extra for greasing |
| For Topping | |
| 56 grams (¼ cup) | Olive oil (the good stuff — it’s worth it) |
| 7 grams (about 1 teaspoon) | Flaky sea salt |
| Suggested Toppings (Go Wild!) | |
| As desired | Sliced tomatoes |
| As desired | Fresh rosemary sprigs |
| As desired | Thinly sliced onions |
| As desired | Ground pistachios |
| As desired | Thinly sliced lemons |
| As desired | Olives (kalamata or green) |
| As desired | Freshly ground black pepper |
| As desired | Minced or thinly sliced garlic |
| As desired | Halved grapes (trust me on this one!) |
Tools You’ll Actually Use
Here’s what you’ll need to pull this off without digging through your entire kitchen:
- Large mixing bowl (big enough to let the dough double)
- Wooden spoon or your hands (I prefer hands — it’s therapeutic)
- Plastic wrap or clean kitchen towel (for covering the dough)
- Two 9×13-inch baking sheets (or one if you’re making a single giant focaccia)
- Aluminum foil or parchment paper (for easy cleanup)
- Measuring cups and kitchen scale (grams are your friend for bread baking!)
- Cooling rack (so the bottom doesn’t get soggy)
Step-by-Step Instructions
Let’s make this Homemade Sourdough Discard Focaccia happen. The beauty of this recipe is that it’s mostly hands-off waiting time, so you can fold laundry, answer emails, or just stare out the window with a cup of coffee.
Step 1: Make the dough
In a large mixing bowl, combine 452 grams of room-temperature water, 7 grams of instant yeast, 42 grams of honey (or cane sugar), and 170 grams of unfed sourdough discard.
Whisk everything together with a fork or your hands until the discard completely dissolves into the water — no lumps allowed. This step is important because you want that tangy sourdough flavor evenly distributed throughout the dough.
Step 2: Add the flour and salt
Dump in 540 grams of bread flour, 90 grams of whole wheat flour, and 12 grams of salt. Use a wooden spoon or your hands to mix until all the flour is hydrated and you have a shaggy, sticky dough. Don’t worry if it looks messy — that’s exactly what we want at this stage.
Step 3: Knead in the olive oil
Pour 56 grams of olive oil over the dough and start working it in with your hands. It’ll feel greasy and slippery at first, but keep kneading gently for about 2-3 minutes until the oil is completely absorbed and the dough feels smooth and elastic. Cover the bowl with plastic wrap and let it rest in a warm spot for 15 minutes.
Step 4: First stretch and fold
After the 15-minute rest, it’s time for your first stretch and fold. With the dough still in the bowl, use your fingertips to grab the edge of the dough closest to you. Stretch it up as far as it’ll go without tearing (you’ll feel resistance — that’s the gluten developing), then fold it over itself toward the center.
Rotate the bowl 90 degrees and repeat this process three more times until you’ve gone around the whole bowl. Cover with plastic wrap, let it rest for another 15 minutes, then repeat the stretch-and-fold process one more time. This builds structure without aggressive kneading.
Step 5: First rise
Cover the bowl with plastic wrap and let the dough rise at room temperature until it’s doubled in size and looks bubbly on top — this usually takes 30 to 45 minutes depending on how warm your kitchen is. You’ll know it’s ready when you poke it gently and the indentation slowly springs back.
Step 6: Prep your pans
Line two 9×13-inch baking sheets with aluminum foil or parchment paper. Drizzle about 1 tablespoon (14 grams) of olive oil onto the bottom of each pan and spread it around with your hands to coat evenly. Preheat your oven to 425°F so it’s nice and hot when the dough is ready.
Step 7: Second rise and stretch
Divide the risen dough into two equal portions (a kitchen scale helps here, but eyeballing works too). Transfer each portion onto one of your prepared pans. Cover both pans with plastic wrap and let the dough relax for 15 minutes — this makes it way easier to stretch.
After the rest, gently stretch each portion of dough toward the edges of the pan using your fingertips. Don’t force it; if it resists, let it rest another 5 minutes and try again. Cover the pans once more and let the dough rise for another 20 minutes or until it looks puffy and bubbly.
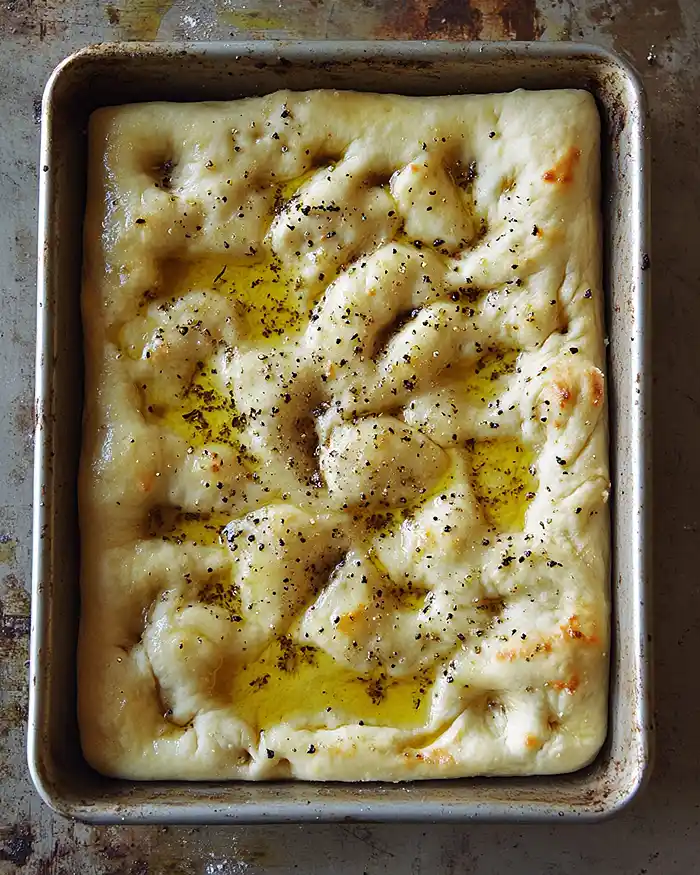
Step 8: Dimple and top
This is the fun part. Working with one pan at a time, drizzle about 1 tablespoon (14 grams) of olive oil over the surface of the dough. Use the palm of your hand to spread it around, then use your fingertips to press straight down into the dough all over, creating those signature focaccia dimples.
Press firmly enough to flatten the dough but not so hard you punch through to the pan. Sprinkle with flaky sea salt and arrange your chosen toppings — rosemary, sliced tomatoes, garlic, grapes, whatever makes your heart happy. Repeat with the second pan.
Step 9: Bake
Slide both baking sheets into your preheated 425°F oven and bake for 25 to 30 minutes, or until the focaccia is golden brown on top and the edges are crispy. Your kitchen should smell like an Italian bakery at this point — it’s intoxicating.
Step 10: Cool and enjoy
Transfer the focaccia to a cooling rack and let it cool for at least 10 minutes before slicing (I know, the wait is brutal). If you’re using the focaccia for sandwiches, let it cool a bit longer so it doesn’t get soggy. Slice into squares or rectangles and serve warm.
Claire’s Pro Tips & Gentle Guidance
Here’s where I share the little secrets I’ve picked up from making this sourdough focaccia recipe discard approximately 47 times (yes, really).
Use unfed discard straight from the fridge. Don’t stress about whether your discard is “active” or “fed” — this recipe works beautifully with unfed, cold discard that’s been sitting in your fridge for up to two weeks. The instant yeast does the heavy lifting for rise, and the discard just adds that gorgeous tangy flavor.
Room temperature water is your friend. If your water is too hot, it’ll kill the yeast; too cold, and the yeast won’t activate properly. Aim for lukewarm — about 95-100°F, or roughly the temperature of a warm bath. I usually just mix cold tap water with a splash of hot water from the kettle.
Don’t skip the stretch and folds. I know it seems fussy, but those two sets of stretch and folds are what give your focaccia that amazing chewy-tender texture. They build gluten structure without the arm workout of traditional kneading.
According to Serious Eats‘ detailed guide to bread dough techniques, this method is gentler on the dough and produces better texture in high-hydration breads like focaccia.
The dimples aren’t just for looks. When you dimple the dough with your fingertips, you’re creating little pools for the olive oil to settle into, which gives you those crispy, golden spots after baking. Press firmly enough that your fingers touch the bottom of the pan — you want the dough completely flat before it goes into the oven.
Toppings are where you can get creative. I’ve topped this focaccia with everything from classic rosemary and garlic to unexpected combos like sliced grapes with pistachios (sounds weird, tastes incredible). Just make sure wet toppings like tomatoes are sliced thin so they don’t make the bread soggy.
Quick Fixes for Homemade Sourdough Discard Focaccia
Even the best bakers run into hiccups. Here’s how to troubleshoot the most common focaccia frustrations.
Problem: My dough isn’t rising.
Your yeast might be expired, or your kitchen might be too cold. Check the expiration date on your yeast packet, and if your kitchen is chilly, try letting the dough rise in a slightly warm oven (turn it on for 1 minute, then turn it off before putting the dough in). You can also set the bowl near a sunny window or on top of the fridge where it’s warmer.
Problem: The focaccia turned out dense instead of airy.
This usually means the dough didn’t rise long enough, or you didn’t complete the stretch and folds properly.
Make sure you’re giving the dough the full rise time — it should literally double in size and look bubbly. Also, don’t rush the stretch and folds; they’re essential for building that light, open crumb.
Problem: The bottom is soggy.
You might not have used enough olive oil on the pan, or the focaccia didn’t cool on a rack. Make sure you’re coating the bottom of each pan generously with oil (don’t skimp!), and always transfer the baked focaccia to a cooling rack so air can circulate underneath.
Problem: My toppings burned.
Some toppings (like garlic and rosemary) can burn at 425°F. If you’re using delicate toppings, try adding them halfway through baking, or tent the focaccia with foil for the last 5-10 minutes to protect the top while the inside finishes cooking.
Variations & Fun Twists
This focaccia discard recipe is basically a blank canvas — here’s how to make it your own.
Seasonal herb garden focaccia: In the summer, I top mine with fresh basil leaves, cherry tomato halves, and a drizzle of balsamic glaze after baking. In the fall, try caramelized onions with fresh thyme and a sprinkle of parmesan.
Gluten-free version: Swap the bread flour and whole wheat flour for a gluten-free bread flour blend (like Bob’s Red Mill 1-to-1), and add 1 teaspoon of xanthan gum to help with structure. The texture won’t be quite as chewy, but it’ll still be delicious.
Vegan option: Replace the honey with maple syrup or agave, and you’re good to go — this recipe is naturally dairy-free and egg-free!
Rustic vs. fancy plating: For casual dinners, I cut the focaccia into big rustic squares and serve it in a basket lined with a kitchen towel. For dinner parties, I slice it into smaller rectangles, arrange them on a wooden board, and serve with olive oil and balsamic vinegar for dipping.
Sweet focaccia twist: This might sound wild, but try a dessert version with sliced figs, honey drizzle, and a sprinkle of fresh thyme. Reduce the salt in the dough to 1 teaspoon and skip the savory toppings. It’s incredible with a cheese board.
Serving, Storage & Reheating
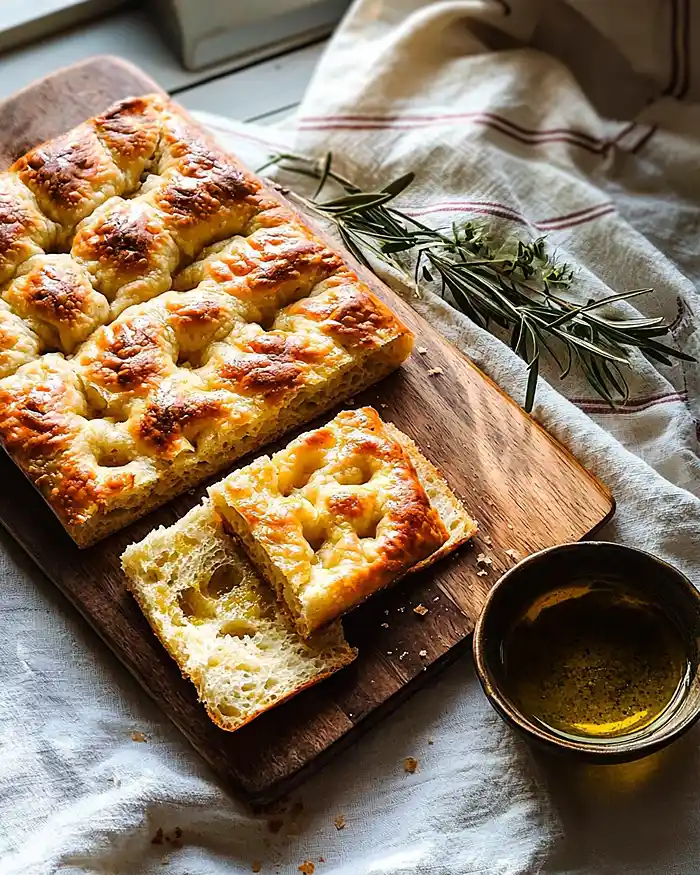
This sourdough focaccia recipe with discard is best enjoyed fresh, but here’s how to keep it delicious for days (if it lasts that long).
Serving suggestions: Serve the focaccia warm as a side for soups and salads, slice it horizontally for sandwiches (it makes incredible paninis), or cut it into strips for dipping into marinara sauce or olive oil with balsamic. I also love using leftover focaccia for breakfast — toast a slice and top it with mashed avocado and a fried egg.
Storage: This bread tastes absolutely best the day it’s baked — the crust is crispy and the inside is pillowy soft. But if you actually have leftovers (which I doubt), store them in an airtight container at room temperature for up to 3 days. If you used fresh toppings like tomatoes or herbs, refrigerate the leftovers to prevent spoilage.
Reheating: To bring back that fresh-baked magic, reheat slices in a 350°F oven for 5-7 minutes until warmed through and the crust crisps up again. You can also toast individual slices in a toaster or toaster oven. Avoid the microwave if you can — it makes the bread chewy instead of crispy.
Can’t get enough of these flavors? You’re going to love what’s waiting in the Sourdough Recipes lineup. Every single recipe is made to impress without the stress. Happy cooking, friend!
No-Waste Kitchen Magic
Because we’re all about using every last bit and keeping things sustainable around here.
Use that day-old focaccia: If your focaccia is getting stale, cube it up and turn it into the most amazing croutons for salads or soups. Toss the cubes with olive oil, garlic powder, and Italian seasoning, then bake at 375°F for 10-12 minutes until golden and crispy.
Freeze for later: This focaccia freezes beautifully! Let it cool completely, then wrap individual slices or the whole sheet tightly in plastic wrap and aluminum foil. Freeze for up to 3 months. Thaw at room temperature and reheat in the oven to refresh.
Repurpose the olive oil: If you have leftover herb-infused olive oil from the top of the focaccia, don’t toss it! Drizzle it over pasta, use it as a dipping oil for bread, or brush it onto chicken before roasting.
Sourdough discard swap: If you’re making my sourdough discard cheddar biscuits or sourdough discard chocolate chip cookies, you can use the same unfed discard you’d use for this focaccia — it’s all about minimizing waste and maximizing flavor.
FAQs
Can I freeze this Homemade Sourdough Discard Focaccia?
Absolutely! Let the focaccia cool completely, then wrap it tightly in plastic wrap and aluminum foil before freezing for up to 3 months. When you’re ready to eat it, thaw at room temperature and reheat in a 350°F oven for 5-7 minutes to crisp up the crust.
How do I know when my focaccia discard recipe is done baking?
Your focaccia is done when the top is deeply golden brown, the edges are crispy, and the internal temperature reaches about 200°F if you want to be precise. The bread should sound hollow when you tap the bottom, and your kitchen should smell absolutely incredible.
Will this recipe work if my sourdough discard is really old?
As long as your discard doesn’t have any mold or off-putting smells, it’ll work! I’ve used discard that’s been in the fridge for two weeks with great results. The tangy flavor actually gets more pronounced with older discard, which I personally love.
Should I use a stand mixer for this sourdough focaccia recipe with discard?
Nope — this dough comes together easily by hand and the stretch-and-fold method replaces traditional kneading. A stand mixer is totally unnecessary and honestly just creates more dishes to wash. Save yourself the cleanup and use your hands!
Cozy Closing
There you have it — your new favorite way to put that sourdough discard to delicious use! This Homemade Sourdough Discard Focaccia is forgiving, flexible, and so worth the (mostly hands-off) time it takes to make.
Whether you’re serving it alongside soup, turning it into sandwiches, or just tearing off warm pieces straight from the pan, it’s the kind of bread that makes everyone at the table pause and say, “Wait, you made this?”
I’d love to see your spin on this Homemade Sourdough Discard Focaccia! Drop a comment below with your focaccia photos or tell me what toppings you tried — I bet you’ve got amazing variations already in mind. And if you’re looking for more ways to use that sourdough discard, you’re in the right place.
I’m Claire Whitmore — a dessert daydreamer from Asheville, NC. For me, baking isn’t about perfect pastries — it’s about the joy of sharing something homemade (and maybe sneaking an extra drizzle of olive oil when no one’s looking).

Homemade Sourdough Discard Focaccia
Equipment
- Large mixing bowl
- Wooden spoon
- Plastic wrap or kitchen towel
- Two 9×13-inch baking sheets
- Aluminum foil or parchment paper
- Measuring cups
- Kitchen scale
- cooling rack
Ingredients
For the Dough
- 452 grams water room temperature, about 2 cups
- 7 grams instant yeast 1 packet
- 42 grams honey or cane sugar 2 tablespoons
- 170 grams sourdough discard unfed, about ¾ cup
- 540 grams bread flour about 4 cups
- 90 grams whole wheat flour about ¾ cup
- 12 grams salt 2 teaspoons
- 56 grams olive oil ¼ cup, plus extra for greasing
For Topping
- 56 grams olive oil ¼ cup
- 7 grams flaky sea salt about 1 teaspoon
Suggested Toppings (Optional)
- tomatoes sliced
- fresh rosemary
- onions sliced
- ground pistachios
- lemons sliced
- olives
- ground pepper
- garlic
- grapes
Instructions
- In a large mixing bowl, combine 452 grams of room-temperature water, 7 grams of instant yeast, 42 grams of honey (or cane sugar), and 170 grams of unfed sourdough discard. Whisk everything together with a fork or your hands until the discard completely dissolves into the water — no lumps allowed. This step is important because you want that tangy sourdough flavor evenly distributed throughout the dough.
- Dump in 540 grams of bread flour, 90 grams of whole wheat flour, and 12 grams of salt. Use a wooden spoon or your hands to mix until all the flour is hydrated and you have a shaggy, sticky dough. Don’t worry if it looks messy — that’s exactly what we want at this stage.
- Pour 56 grams of olive oil over the dough and start working it in with your hands. It’ll feel greasy and slippery at first, but keep kneading gently for about 2-3 minutes until the oil is completely absorbed and the dough feels smooth and elastic. Cover the bowl with plastic wrap and let it rest in a warm spot for 15 minutes.
- After the 15-minute rest, it’s time for your first stretch and fold. With the dough still in the bowl, use your fingertips to grab the edge of the dough closest to you. Stretch it up as far as it’ll go without tearing (you’ll feel resistance — that’s the gluten developing), then fold it over itself toward the center. Rotate the bowl 90 degrees and repeat this process three more times until you’ve gone around the whole bowl. Cover with plastic wrap, let it rest for another 15 minutes, then repeat the stretch-and-fold process one more time. This builds structure without aggressive kneading.
- Cover the bowl with plastic wrap and let the dough rise at room temperature until it’s doubled in size and looks bubbly on top — this usually takes 30 to 45 minutes depending on how warm your kitchen is. You’ll know it’s ready when you poke it gently and the indentation slowly springs back.
- Line two 9×13-inch baking sheets with aluminum foil or parchment paper. Drizzle about 1 tablespoon (14 grams) of olive oil onto the bottom of each pan and spread it around with your hands to coat evenly. Preheat your oven to 425°F so it’s nice and hot when the dough is ready.
- Divide the risen dough into two equal portions (a kitchen scale helps here, but eyeballing works too). Transfer each portion onto one of your prepared pans. Cover both pans with plastic wrap and let the dough relax for 15 minutes — this makes it way easier to stretch. After the rest, gently stretch each portion of dough toward the edges of the pan using your fingertips. Don’t force it; if it resists, let it rest another 5 minutes and try again. Cover the pans once more and let the dough rise for another 20 minutes or until it looks puffy and bubbly.
- This is the fun part. Working with one pan at a time, drizzle about 1 tablespoon (14 grams) of olive oil over the surface of the dough. Use the palm of your hand to spread it around, then use your fingertips to press straight down into the dough all over, creating those signature focaccia dimples. Press firmly enough to flatten the dough but not so hard you punch through to the pan. Sprinkle with flaky sea salt and arrange your chosen toppings — rosemary, sliced tomatoes, garlic, grapes, whatever makes your heart happy. Repeat with the second pan.
- Slide both baking sheets into your preheated 425°F oven and bake for 25 to 30 minutes, or until the focaccia is golden brown on top and the edges are crispy. Your kitchen should smell like an Italian bakery at this point — it’s intoxicating.
- Transfer the focaccia to a cooling rack and let it cool for at least 10 minutes before slicing (I know, the wait is brutal). If you’re using the focaccia for sandwiches, let it cool a bit longer so it doesn’t get soggy. Slice into squares or rectangles and serve warm.