Gut-Brain Axis Kimchi Fried Rice
This Gut-Brain Axis Kimchi Fried Rice is the kind of dinner that works for you while you eat it. I’m Linda Sandra — a home cook who’s obsessed with food that tastes amazing and supports how you actually feel day to day.
This kimchi fried rice recipe is built around the gut-brain connection — that very real, science-backed relationship between your gut microbiome and your mood, focus, and overall wellbeing.
I started making this after a season of feeling foggy and off. I wanted something warm, satisfying, and packed with ingredients that truly support my body. One skillet of this and I was hooked. It’s become a weekly staple in my kitchen.
Table of Contents
Little Snapshot: What This Recipe Delivers
Craving more satisfying, wholesome meals that are as vibrant as they are nourishing? This Gut-Brain Axis Kimchi Fried Rice is just a taste of the incredible possibilities awaiting you in our collection of nourishing grain and Buddha bowls – perfect for any day of the week!
This Gut-Brain Axis Kimchi Fried Rice is a quick, one-pan probiotic dinner that combines fermented kimchi, crispy day-old rice, bacon fat, and a gut-brain umami sauce ready in under 30 minutes.
It’s a medium-difficulty kimchi fried rice recipe that serves 2–3 and delivers layers of flavor alongside brain-supporting add-ins like turmeric, walnuts, and sesame seeds.
Why You’ll Love This Recipe
- This Gut-Brain Axis Kimchi Fried Rice comes together in one pan in under 30 minutes — faster than scrolling for delivery options.
- It’s a probiotic dinner idea that actually tastes indulgent, thanks to crispy bacon, umami sauce, and that perfectly crunchy soccarat layer on the bottom.
- Every single ingredient pulls double duty — flavor and function. Kimchi feeds your gut, turmeric soothes inflammation, and walnuts support brain health.
- According to Healthline’s breakdown of the gut-brain connection, fermented foods like kimchi have been shown to positively alter brain activity — and this recipe proves exactly why eating with intention can feel this good.
Quick Facts
Here’s the quick scoop on this Gut-Brain Axis Kimchi Fried Rice.
- Course: Main Dish
- Prep Time: 10 minutes
- Cook Time: 20 minutes
- Total Time: 30 minutes
- Servings: 2–3 servings
- Difficulty: Medium
Nutritional Peek
Here’s a general per-serving estimate based on 3 servings. Numbers will vary slightly depending on your bacon choice and exact rice amount.
| Nutrient | Amount Per Serving |
|---|---|
| Calories | ~420 kcal |
| Protein | ~14g |
| Carbohydrates | ~48g |
| Fat | ~19g |
| Fiber | ~3g |
| Sugar | ~4g |
Ingredients
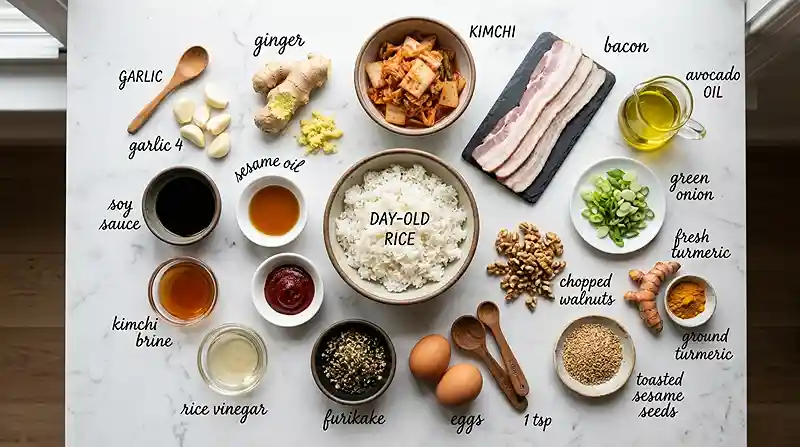
This kimchi fried rice recipe is built around three simple groups of ingredients that work beautifully together.
For the aromatics and base — garlic, ginger, kimchi, and day-old rice — these are the heart of the dish. For the gut-brain boost add-ins — turmeric, sesame seeds, and walnuts — you’re layering in function alongside flavor. And for the umami sauce — soy sauce, gochujang, sesame oil, kimchi brine, and rice vinegar — this is the part that makes people ask for seconds.
Aromatics and Base
| Amount | Ingredient |
|---|---|
| 4 cloves | Garlic, minced |
| 1 tbsp | Fresh ginger, minced (about 1 inch) |
| 1/2 cup | Kimchi, chopped |
| 2 cups | Cooked day-old rice — cold from the fridge works best for crisping |
| 2–3 strips | Bacon, diced (or turkey bacon or mushrooms for a lighter version) |
| 2 tbsp | Avocado oil or vegetable oil |
| 2–3 | Green onions, sliced |
| To taste | Salt |
| Optional | Furikake, for topping |
Gut-Brain Boost Add-Ins
| Amount | Ingredient |
|---|---|
| 1 tsp | Grated fresh turmeric, or 1/2 tsp turmeric powder |
| 1 tsp | Sesame seeds (prebiotic support) |
| 1 tbsp | Chopped walnuts, optional — great for brain-supporting healthy fats |
Sauce (Gut-Brain Umami Blend)
| Amount | Ingredient |
|---|---|
| 3 tbsp | Low-sodium soy sauce |
| 1 tbsp | Gochujang |
| 2 tbsp | Sesame oil |
| 1/4 cup | Kimchi brine — don’t toss this, it’s liquid gold |
| 1 tsp | Rice vinegar (for balance) |
| 1 pinch | Salt |
Tools You’ll Actually Use
- Cast iron skillet (essential for that crispy rice crust)
- Small mixing bowl (for the sauce)
- Chef’s knife and cutting board
- Wooden spoon or silicone spatula
- Small nonstick pan (for frying the eggs separately)
- Measuring spoons
Step-by-Step Instructions for Gut-Brain Axis Kimchi Fried Rice
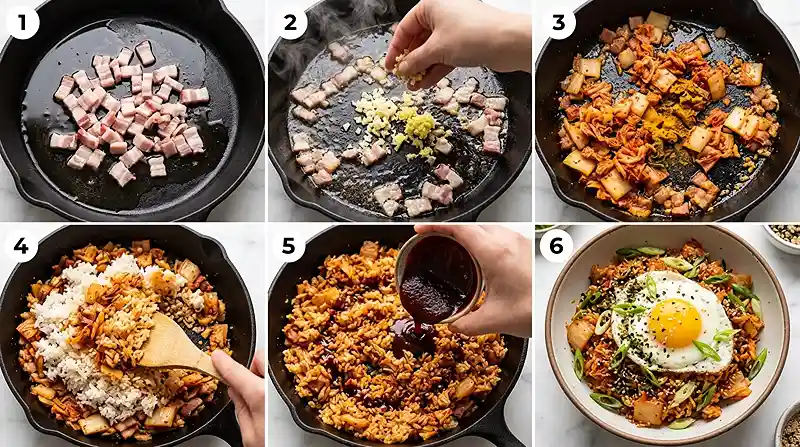
Step 1: Prep Everything First
Mince the garlic and ginger, chop the kimchi into small bite-sized pieces, and slice the green onions. In a small bowl, whisk together all the sauce ingredients — soy sauce, gochujang, sesame oil, kimchi brine, rice vinegar, and salt — until well combined. Set the sauce aside so it’s ready to go.
Step 2: Render the Bacon and Build Flavor
Place your cast iron skillet over medium heat while it’s still cold. Add the diced bacon and let it cook slowly so the fat fully renders out and the pieces get beautifully crispy. Once the bacon is done, add the minced garlic and ginger directly into the bacon fat and sauté for 1–2 minutes until fragrant and slightly golden.
Step 3: Stir-Fry the Base
Add the chopped kimchi and turmeric to the skillet, stirring everything together for 1–2 minutes. The kimchi will begin to caramelize slightly, deepening in color and flavor. Add the cold day-old rice and break up any clumps, mixing well so every grain gets coated in that gorgeous bacon fat and aromatic base.
Step 4: Add the Sauce and Crisp It Up
Pour the umami sauce over the rice mixture and toss until everything is evenly coated and glowing. Press the rice firmly into the pan and resist all urges to stir. Let it sit undisturbed for 4–5 minutes so the bottom develops those irresistible crispy, slightly charred edges. Give it a stir, then press and repeat briefly if you want even more texture.
Step 5: Finish and Serve
Scatter green onions, sesame seeds, and optional walnuts over the top. In a separate small nonstick pan, fry your eggs to your liking — a runny yolk here is everything. Place the egg on top of the rice, sprinkle with furikake if you’re using it, and serve immediately while it’s hot and crispy.
Pro Tips for the Best Kimchi Fried Rice Recipe
This gut brain axis meal has a few little secrets that take it from good to why-is-this-so-good. Here are the things that make the biggest difference.
Day-old rice is non-negotiable. Freshly cooked rice has too much steam and moisture — it’ll turn mushy in the pan instead of crisping up. Spread leftover rice on a sheet pan uncovered in the fridge overnight if you’re planning ahead.
Let the rice sit. The biggest mistake people make is stirring too often. Press the rice, walk away, and trust the process. That’s how you build the golden crust at the bottom.
Don’t skip the kimchi brine. That liquid at the bottom of your kimchi jar is packed with probiotics and bold flavor. It’s a core part of the sauce — don’t toss it.
Cold cast iron, then heat. Starting the bacon in a cold pan lets the fat render gradually for maximum crispiness without burning. It’s a small step that makes a big difference.
If you’re new to cooking with fermented ingredients, Healthline’s detailed guide to kimchi’s health benefits and uses is a wonderful starting point that I come back to often.
Quick Fixes for Gut-Brain Axis Kimchi Fried Rice
My rice turned mushy instead of crispy.
This almost always comes down to the rice being too fresh or too wet. Always use cold, day-old rice straight from the fridge. If your rice looks wet after adding the sauce, turn up the heat slightly and leave it undisturbed longer before stirring.
It tastes too salty.
Kimchi and soy sauce both carry saltiness, so taste before adding extra salt. Use low-sodium soy sauce from the start, and remember that the kimchi brine also contributes salt to the dish.
The rice isn’t getting any color or crust.
Your heat might be too low, or you’re stirring too often. Use a cast iron skillet for the best heat retention, press the rice firmly into the pan, and don’t touch it for at least 4–5 minutes. Patience is the secret ingredient here.
It’s not spicy enough for me.
Add extra gochujang to the sauce, or serve with a drizzle of chili oil on top. You can also use a more aged, fermented kimchi — older kimchi tends to be tangier and more pungent, which adds a natural kick.
Variations and Adaptations
This kimchi fried rice recipe is wonderfully flexible. Here are a few easy ways to make it your own.
Vegetarian version: Swap the bacon for diced shiitake mushrooms. They’ll still render beautifully in oil and add that savory, umami depth. Use a plant-based oyster sauce or extra sesame oil in the sauce.
Gluten-free: Swap regular soy sauce for tamari or coconut aminos. Double-check your gochujang brand — some contain wheat, so look for a certified gluten-free version.
Extra protein: Stir in shredded rotisserie chicken, cooked shrimp, or crumbled tofu after adding the rice. You can also add two eggs directly into the pan scrambled-style if you prefer not to fry them separately.
Seasonal twist: In the fall, stir in roasted butternut squash cubes for a cozy, slightly sweet balance to the spicy kimchi. In summer, top with sliced avocado for cooling creaminess.
Serving, Storage, and Reheating
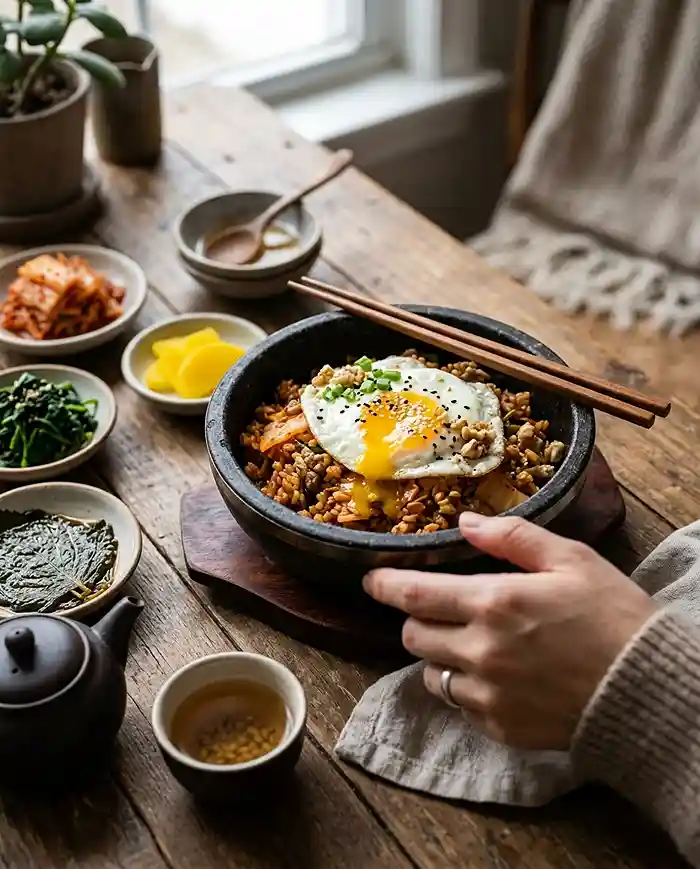
This kimchi fried rice recipe is best served immediately straight from the skillet, while the rice is still warm and the bottom crust is at its crispiest. A runny fried egg on top is almost required — the yolk creates a rich, silky sauce as it breaks over the rice.
Store any leftovers in an airtight container in the refrigerator for up to 3 days. The flavors actually deepen overnight, making the next-day version somehow even more delicious.
To reheat, use a hot skillet with a tiny drizzle of sesame oil rather than the microwave. Press the rice into the pan and let it re-crisp for 3–4 minutes. The microwave works in a pinch but you’ll lose that gorgeous texture.
No-Waste Kitchen Magic
This dish was practically designed to use up what’s already in your fridge. Got leftover rice? This is its moment. Wilting green onions? Perfect. A jar of kimchi that’s been sitting in the back of the fridge getting more fermented and tangy? Even better — older kimchi makes more flavorful fried rice.
The kimchi brine is often thrown away, but here it’s a star ingredient in the sauce. Same goes for bacon drippings — every drop goes into building flavor, so nothing gets wasted.
Leftover fried rice makes an excellent filling for lettuce wraps the next day, or a base for a quick grain bowl topped with whatever fresh vegetables you have on hand.
You might also love this cooling cucumber mint probiotic gazpacho as a refreshing side that complements the bold, warm flavors of this dish beautifully.
Frequently Asked Questions
Can I make this gut-brain axis kimchi fried rice ahead of time?
You can prep the components ahead of time — mix the sauce, chop the kimchi, and mince the garlic and ginger up to 24 hours in advance. Store them separately in the fridge, and when you’re ready, the dish comes together in under 20 minutes.
Can I freeze this kimchi fried rice recipe?
Fried rice freezes okay but the texture can get slightly mushy after thawing. Store in a freezer-safe bag for up to one month and reheat in a hot skillet with a drizzle of sesame oil to revive the texture.
What is the best rice for crispy kimchi fried rice?
Day-old jasmine or short-grain white rice works best. The time in the fridge removes excess moisture, which allows the rice to crisp instead of steam. Spread fresh rice on a sheet pan and refrigerate uncovered for 2 hours if you need a shortcut.
Why should I use kimchi brine in this gut-brain axis meal?
Kimchi brine is rich in the same beneficial probiotics as the kimchi itself, plus it adds deep fermented flavor that coats every grain of rice in the sauce. It is one of the best low-waste, high-impact ingredients in this recipe.
Is this a good probiotic dinner idea if I am sensitive to spice?
Yes — use mild kimchi and reduce gochujang to 1 teaspoon, or swap it for white miso paste for gentle umami without the heat. The soy sauce, sesame oil, and rice vinegar still deliver incredible depth of flavor.
Let’s Talk Gut-Brain Axis Kimchi Fried Rice
I’d love to see your version of this Gut-Brain Axis Kimchi Fried Rice! Drop a comment below with your photos or tell me what add-ins you tried.
Did you go the veggie route? Add extra gochujang? Top it with avocado? This kimchi fried rice recipe is so versatile — I bet you’ve already got a delicious variation in mind.
And if you’re on a gut-health kick lately, you might also want to check out this anti-inflammatory BBQ marinade — another recipe that’s all about flavor with intention.
So there you go — a Gut-Brain Axis Kimchi Fried Rice that feels like a treat but is secretly doing something wonderful for your body. One skillet, 30 minutes, and a whole lot of cozy.
I’m Linda Sandra — a Charleston home chef and comfort-food daydreamer. Around here, cooking’s not about perfection — it’s about cozy vibes, creative twists, and food that feels like love.
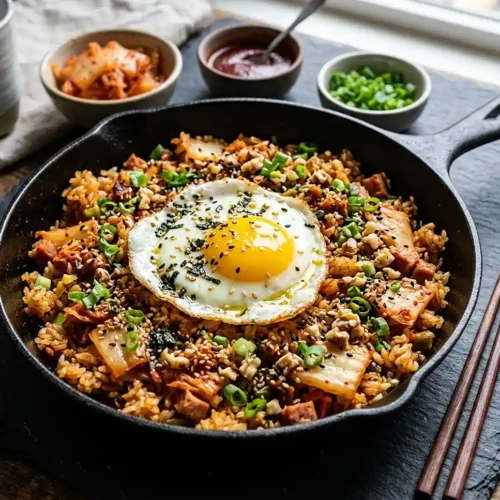
Gut-Brain Axis Kimchi Fried Rice
Equipment
- Cast iron skillet
- Small mixing bowl
- Chef’s knife and cutting board
- Wooden spoon or silicone spatula
- Small nonstick pan
- Measuring spoons
Ingredients
Aromatics and Base
- 4 garlic cloves, minced
- 1 tbsp fresh ginger, minced (about 1 inch)
- 0.5 cup kimchi, chopped
- 2 cup cooked day-old rice best for crisping, cold from fridge
- 2 strips bacon, diced or turkey bacon or mushrooms
- 2 tbsp avocado oil or vegetable oil
- 2 green onions, sliced
- 1 pinch salt, to taste
- 1 tbsp furikake optional topping
Gut-Brain Boost Add-Ins
- 1 tsp grated fresh turmeric or 0.5 tsp turmeric powder
- 1 tsp sesame seeds prebiotic support
- 1 tbsp chopped walnuts optional, brain-support fats
Sauce (Gut-Brain Umami Blend)
- 3 tbsp low-sodium soy sauce
- 1 tbsp gochujang
- 2 tbsp sesame oil
- 0.25 cup kimchi brine
- 1 tsp rice vinegar for balance
- 1 pinch salt
Instructions
- Mince garlic and ginger, chop kimchi into small pieces, and slice green onions. Whisk all sauce ingredients together in a small bowl and set aside.
- Place a cast iron skillet over medium heat while still cold. Add diced bacon and cook slowly until fat renders and pieces are crispy. Add garlic and ginger to the bacon fat and saute for 1-2 minutes until fragrant.
- Add chopped kimchi and turmeric to the skillet and stir for 1-2 minutes. Add cold day-old rice and break up any clumps, mixing well to coat with bacon fat and aromatics.
- Pour in the sauce mixture and toss until evenly coated. Press rice firmly into the pan and let sit undisturbed for 4-5 minutes to develop crispy edges. Stir and repeat briefly for extra texture if desired.
- Top with green onions, sesame seeds, and optional walnuts. Fry eggs in a separate pan and place on top. Finish with furikake if using. Serve immediately.