Graduation Nacho Bar Board
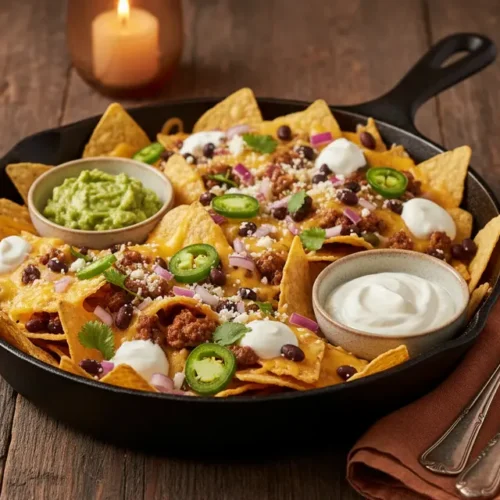
Elevate your graduation party spread with a show-stopping Graduation Nacho Bar Board that’s as easy to assemble as it is delightful to devour!
Hey there, sweet friends! I’m Linda Sandra, and around my Charleston kitchen, every single meal is about sharing joy and creating memories. Today, we’re diving into a fun, festive, and utterly delicious Graduation Nacho Bar Board that’s perfect for celebrating those hard-earned achievements.
Charcuterie-style boards have truly revolutionized party food, offering a creative, customizable, and visually stunning way to serve everything from brunch delights to savory snacks. This nacho bar concept brings that same effortless elegance to your celebration, making it an instant crowd-pleaser for all ages.
Table of Contents
Little Snapshot: What This Recipe Delivers
This Graduation Nacho Bar Board offers a vibrant, interactive, and fully customizable spread of delicious nacho toppings, perfect for celebrating graduates. It’s designed for easy setup and allows guests to build their ideal cheesy, savory creation, making party food fun and stress-free.
Why You’ll Love This Recipe 🌸
- This Graduation Nacho Bar Board takes less time than folding laundry.
- It’s a wonderfully engaging way to feed a crowd, letting everyone craft their perfect bite, taking the pressure off you, sweet momma.
- Simple to scale up or down, making it perfect for any party size.
- According to Statista, snackification and customizable food experiences are booming—and this recipe proves exactly why.
Quick Facts ⚡
Here’s the quick scoop on this Graduation Nacho Bar Board.
- CourseAppetizer
- Prep Time20 minutes
- Cook Time25 minutes
- Total Time45 minutes
- Servings8-10 servings
- DifficultyEasy
Nutritional Peek
| Nutrient | Amount per serving (estimated) |
|---|---|
| Calories | 450-600 kcal |
| Protein | 20-30 g |
| Carbs | 35-45 g |
| Fat | 25-35 g |
| Fiber | 5-8 g |
| Sugar | 3-6 g |
What You’ll Need
- Large charcuterie board or serving platter
- Small serving bowls or ramekins
- Skillet for warming proteins
- Saucepan for cheese sauce
- Cutting board and knife
- Serving spoons and tongs
Ingredients
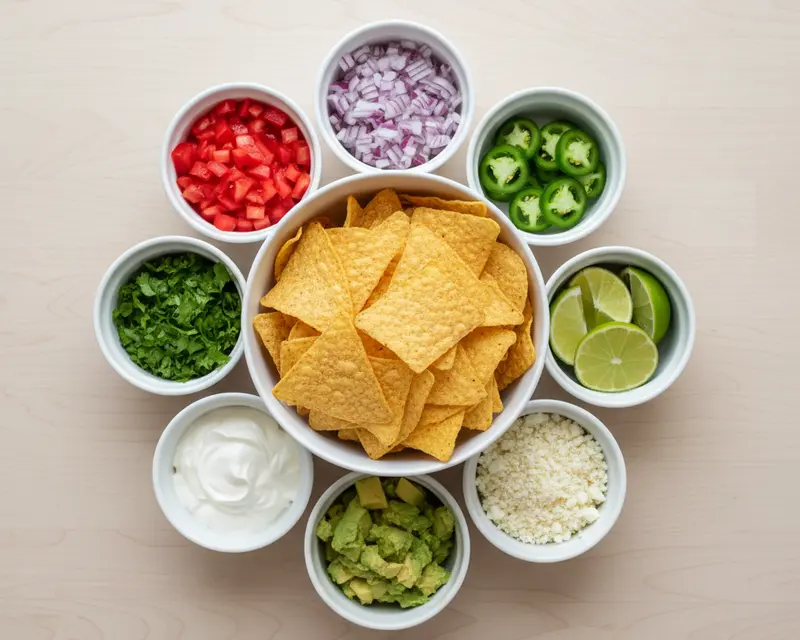
For the ultimate nacho bar setup, you’ll want a delightful array of fresh, flavorful components. Think crispy chips, savory seasoned proteins, creamy cheeses, and plenty of vibrant, zesty toppings. This combination ensures every bite is a little explosion of happiness!
| Group | Ingredient | Amount | Notes |
|---|---|---|---|
| Foundation | Tortilla Chips | 1 large bag (15-20 oz) | Your favorite sturdy chips, perfect for scooping! |
| Proteins | Ground Beef or Shredded Chicken | 1-1.5 lbs | Seasoned with taco seasoning for that classic flavor. |
| Warm Refried Beans | 1 (16 oz) can | Creamy and satisfying. | |
| Cheeses | Warm Nacho Cheese Sauce | 1 (15 oz) jar or homemade | The gooey star of the show. |
| Shredded Cheese Blend | 2 cups | Monterey Jack, Cheddar, or a Mexican blend. | |
| Fresh & Tangy Toppings | Salsas (mild, medium, hot) | 3 small bowls | Variety is the spice of life, honey! |
| Pico de Gallo | 1.5 cups | Freshly made adds so much zing. | |
| Guacamole | 1.5 cups | Creamy goodness. | |
| Sour Cream | 1 cup | For a lovely cool contrast. | |
| Jalapeños | 1/2 cup sliced | Fresh or pickled, for that kick! | |
| Black Olives | 1/2 cup sliced | A classic addition. | |
| Corn | 1 cup | Canned, roasted, or grilled for sweetness. | |
| Diced Red or White Onions | 1/4 cup | For a little bite. | |
| Fresh Cilantro | 1/4 cup chopped | Bright and herbaceous. | |
| Lime Wedges | 2-3 limes | A squeeze of fresh lime makes all the difference! | |
| Optional Extras | Hot Sauce, Pickled Red Onions, Cotija Cheese, Green Chilies | To taste | For those who love extra flair! |
Step-by-Step Instructions
Let’s make this happen. Crafting your Graduation Nacho Bar Board is a breeze, promising a feast for the eyes and the stomach!
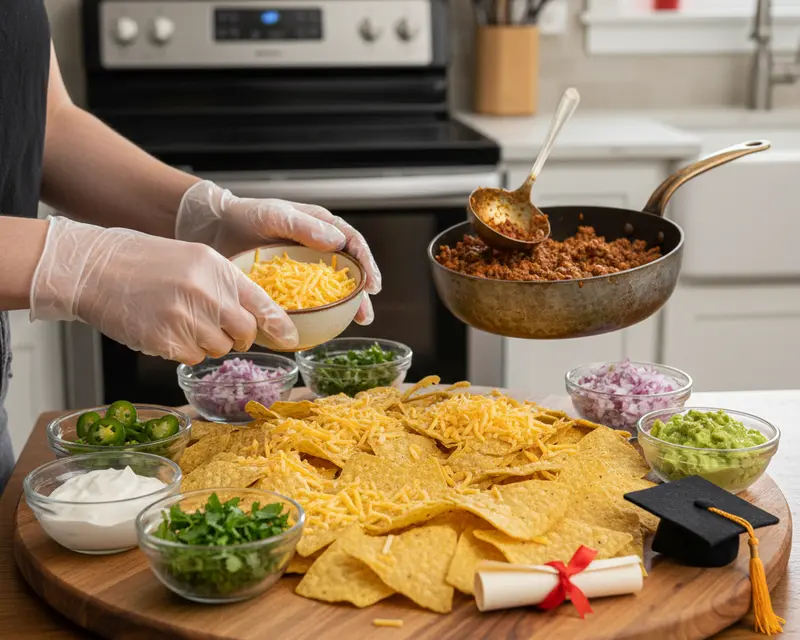
- Prepare Your Board/Platter: Choose a large charcuterie board, a festive platter, or even a baking sheet as your base. For super easy cleanup, consider lining it with parchment paper before you start building.
- Arrange the Chips: Artfully spread the tortilla chips across the board, creating a sturdy and appealing base for all your wonderful toppings. You can create a few separate mounds for different textures or opt for a continuous layer.
- Add Warm Toppings: In separate small bowls or directly onto sections of the chips (especially if serving immediately), carefully place your warm nacho cheese sauce, savory seasoned ground beef or shredded chicken, and comforting warm refried beans.
- Place Cold Toppings: Arrange delicious salsas, fresh pico de gallo, creamy guacamole, and cool sour cream in their own small serving bowls around the chips. Fill any remaining gaps with shredded cheese, vibrant sliced jalapeños, classic black olives, sweet corn, crisp diced onions, and a sprinkle of fresh cilantro.
- Garnish & Serve: Garnish the entire board with bright lime wedges. Encourage your guests to dive in and build their very own custom nachos, just the way they like them! Replenish any popular toppings as needed to keep the party going strong.
- Keep Warm (Optional): If you’re expecting guests to graze over a longer period, consider keeping your warm toppings in small slow cookers or on a warming tray. Assemble a fresh section of the board periodically to ensure everything stays fresh, hot, and appealing.
Pro Tips & Gentle Guidance
Creating a fabulous graduation party food display, like this DIY nacho board, is all about smart prep and thoughtful touches. These little secrets will help ensure your celebration is smooth, delicious, and memorable for everyone.
A great host knows that convenience and customization make all the difference. By having everything ready and accessible, you’re not just serving food; you’re creating an experience. For more inspiration on crafting delightful spreads, check out these superb appetizer recipes.
- Prep Ahead is Your Best Friend: Slice, dice, and warm everything possible before guests arrive. Prepare your meats, chop veggies, and make your guacamole a few hours in advance (add a lime twist to keep it fresh!). This makes assembly a breeze right before serving.
- Offer Variety in Spice: Not everyone loves a kick, and some adore the heat! Provide mild, medium, and hot salsa options, and keep the jalapeños separate so guests can customize their spice level.
- Keep “Warm” Warm: Invest in a few small warming trays or mini slow cookers for your cheese sauce, refried beans, and protein. This ensures those crucial warm elements stay deliciously hot throughout the party.
- Label Everything: If you have any dietary restrictions or just want to be extra helpful, use small labels for your toppings. This is especially good if you offer a vegetarian protein option!
- Consider Individual Bowls: For sauces like guacamole, salsa, or sour cream, using several smaller bowls around the board rather than one large one can help with flow and avoid a crowd around a single spot.
Variations & Adaptations
Get creative with your DIY nacho board! You can easily tailor it to different tastes or dietary needs. It’s all about making it uniquely yours, honey.
- Vegetarian Delight: Swap ground beef for seasoned black beans or a plant-based crumble. Add extra corn, bell peppers, and grilled onions for more texture and flavor.
- Spicy Fiesta: Amp up the heat with habanero salsa, pickled red onions, extra sliced jalapeños, and a drizzle of ghost pepper hot sauce.
- Breakfast Nachos: Yes, really! Use crispy breakfast potatoes as the base, topped with scrambled eggs, crumbled sausage or bacon, shredded cheddar, and a drizzle of hollandaise or hot sauce.
- Dessert Nachos: For a sweet treat, use cinnamon sugar pita chips or waffle cone pieces. Top with melted chocolate, caramel drizzle, fresh fruit, whipped cream, and sprinkles. Oh, my stars!
Quick Fixes for Graduation Nacho Bar Board
Don’t you worry if something doesn’t go quite as planned with your Graduation Nacho Bar Board. We’ve got easy solutions for common little kitchen mishaps.
Problem: Guacamole Turning Brown
Solution: Press plastic wrap directly onto the surface of the guacamole to prevent air exposure. Squeeze a little extra lime juice over the top before storing. A pit left in the guacamole can also help keep it green, a lovely old trick!
Problem: Cheese Sauce Gets Too Thick
Solution: Gently reheat the cheese sauce over low heat, stirring constantly. Add a tablespoon or two of milk or broth at a time until it reaches your desired creamy consistency. This gentle coaxing will bring it right back.
Problem: Chips Become Soggy on the Board
Solution: To prevent soggy chips, keep very wet toppings (like salsas and pico de gallo) in separate bowls. Guests can add these fresh toppings to their individual servings as they build their nachos, keeping the main board crispy and inviting.
Problem: Not Enough Protein for a Crowd
Solution: If you realize you’re short on protein, quickly sauté some extra black beans with taco seasoning. You can also scramble an extra batch of ground beef or chicken if you have it on hand. It’s a quick and hearty fix!
Storage & Reheating
Caring for your Graduation Nacho Bar Board remnants, though unlikely, is quite simple! Enjoy those leftover bits in new, delightful ways. You wouldn’t want a single delicious morsel to go to waste.
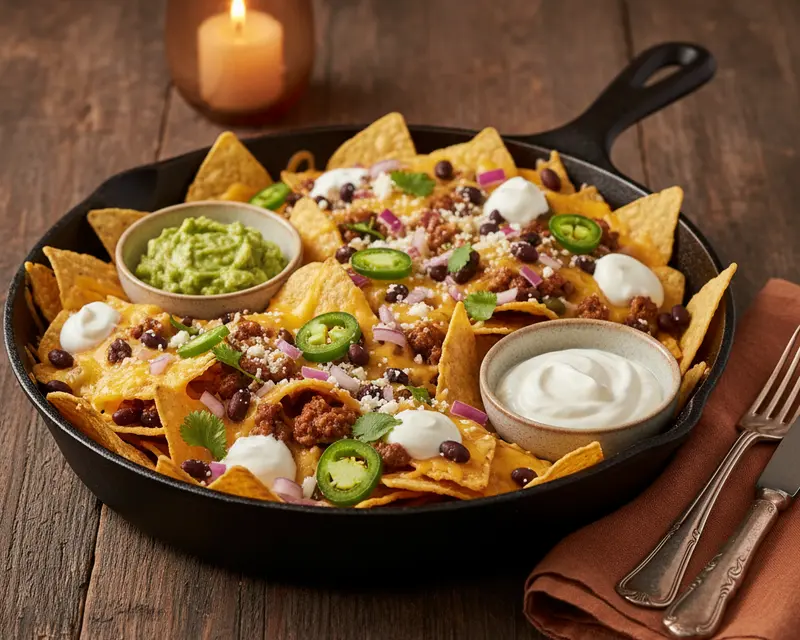
While a nacho board is best enjoyed fresh, any individual components can be stored separately. Repurpose leftover seasoned meat for tacos or quesadillas. Leftover salsas and guacamole are perfect for chips or as a topping for eggs.
To store, transfer any remaining toppings (meats, beans, cheeses, salsas) into separate airtight containers and refrigerate promptly. Keep chips in their original bag or a sealed container to maintain crispness.
Reheat warm components like meat or beans gently in the microwave or on the stovetop until heated through. The cheese sauce can be gently rewarmed with a splash of milk. Assemble new mini nacho plates with fresh chips for a delightful second round.
| Component | Storage Method | Shelf Life (Refrigerated) | Reheating Notes |
|---|---|---|---|
| Seasoned Meat | Airtight container | 3-4 days | Microwave or stovetop until hot. |
| Refried Beans | Airtight container | 3-4 days | Gently warm on stovetop or microwave. |
| Nacho Cheese Sauce | Airtight container | up to 5 days | Low heat on stovetop with a splash of milk. |
| Salsas/Pico de Gallo | Airtight container | 3-5 days | Serve cold. |
| Guacamole | Airtight container (plastic wrap pressed onto surface) | 1-2 days | Serve cold. |
| Shredded Cheese | Sealed bag or container | Up to 7 days | No reheating needed. |
No-Waste Kitchen Magic
Embrace the joy of a no-waste kitchen, even with your Graduation Nacho Bar Board. Every little bit can be transformed into something new and delicious, stretching your ingredients and saving money. It’s about being smart and creative, sweetpea!
- Leftover Meat Magic: Transform any remaining seasoned ground beef or shredded chicken into quick taco salads, a hearty quesadilla filling, or even mix it into scrambled eggs for a savory breakfast scramble the next morning.
- Salsa and Guacamole Boost: Don’t let extra salsa or guacamole go to waste! Use them as a vibrant topping for baked potatoes, grilled chicken or fish, or stir salsa into soups and stews for an extra layer of flavor.
- Chips Repurposed: If you have extra tortilla chips that are getting a little stale, crush them up! They make a fantastic crunchy topping for casseroles, or you can use them as a breading for chicken or fish.
- Veggie Scraps Broth: Any onion ends, pepper tops, or other veggie trimmings can be saved in a freezer bag. Once full, boil them down with some water and herbs for a homemade vegetable broth.
Frequently Asked Questions
Here are some common thoughts and questions about creating a festive and delicious Graduation Nacho Bar Board.
What is a Graduation Nacho Bar Board?
A Graduation Nacho Bar Board is a specially curated platter or setup resembling a charcuterie board, but instead of cheeses and meats, it features all the components for building personalized nacho creations, themed for a graduation celebration.
What kind of ingredients are typically included on a Graduation Nacho Bar Board?
Common ingredients include tortilla chips, seasoned ground beef or shredded chicken, various cheeses (shredded cheddar, Monterey Jack, nacho cheese sauce), salsas, guacamole, sour cream, jalapeños, olives, onions, and often a custom graduation-themed topper or decoration.
How do I set up a Graduation Nacho Bar Board for a party?
Arrange individual bowls or sections for each ingredient on a large platter or cutting board. Keep warm ingredients in small slow cookers or chafing dishes. Provide serving spoons for each item and place the chips strategically for easy access. Decorate with graduation-themed accents.
Can a Graduation Nacho Bar Board accommodate different dietary preferences?
Yes, it’s highly customizable! Offer vegetarian protein options like black beans or lentils, gluten-free chips, and dairy-free cheese alternatives. Labeling each item clearly helps guests make informed choices.
What are some creative ways to personalize a Graduation Nacho Bar Board?
Beyond the food, you can use graduation-themed cookie cutters for cheese shapes, edible graduation cap decorations, or signage featuring the graduate’s name, school colors, or a congratulatory message. You can also include different themed sauces or specialty toppings.
Final Dish
And there you have it, darlin’—a Graduation Nacho Bar Board ready to make your celebration truly special! It’s more than just food; it’s an experience, a memory in the making. I just know your guests will adore customizing their own plates, filling them with all their favorite toppings. Don’t forget to share your beautiful board photos with me—I’d just love to see them!
I’m Linda Sandra — a Charleston home chef and comfort-food daydreamer. Around here, cooking’s not about perfection — it’s about cozy vibes, creative twists, and food that feels like love.
Graduation Nacho Bar Board: Celebrate with Flavor!
Ingredients
Ingredients
- Tortilla Chips: A generous amount of your favorite tortilla chips.
- Protein Options: Ground beef or shredded chicken seasoned with taco seasoning.
- Cheese Sauce: Warm creamy nacho cheese sauce.
- Shredded Cheese: Monterey Jack cheddar, or a Mexican blend.
- Salsas: Mild medium, and hot salsa.
- Pico de Gallo: Freshly made with diced tomatoes onions, cilantro, and jalapeños.
- Guacamole: Creamy avocado lime juice, cilantro, and onion.
- Sour Cream: For cooling and creaminess.
- Jalapeños: Sliced fresh or pickled.
- Black Olives: Sliced.
- Refried Beans: Warm.
- Corn: Canned or roasted.
- Onions: Diced red or white onions.
- Cilantro: Freshly chopped.
- Lime Wedges: For serving.
- Optional Toppings: Hot sauce pickled red onions, crumbled cojita cheese, green chilies.
Instructions
Prepare Your Board/Platter
- Choose a large charcuterie board, platter, or baking sheet as your base. Consider lining it with parchment paper for easy cleanup.
Arrange the Chips
- Artfully spread the tortilla chips across the board, creating a sturdy base for your toppings. You can make a few separate mounds or a continuous layer.
Add Warm Toppings
- In separate small bowls or directly on the chips (if serving immediately), place the warm nacho cheese sauce, seasoned ground beef or shredded chicken, and warm refried beans.
Place Cold Toppings
- Arrange the salsas, pico de gallo, guacamole, and sour cream in small serving bowls around the chips. Fill in the gaps with shredded cheese, sliced jalapeños, black olives, corn, diced onions, and fresh cilantro.
Garnish & Serve
- Garnish the board with lime wedges. Encourage guests to build their own custom nachos. Replenish toppings as needed.
Keep Warm (Optional)
- If you anticipate guests grazing over a period, consider keeping warm toppings in small slow cookers or on a warming tray. Assemble a fresh board periodically to keep everything appealing.