Crispy Chilli Paneer
Chilli Paneer is one of those dishes that makes everyone at the table lean in and ask for seconds. I’m Linda Sandra — a Charleston home cook who believes every meal should feel like a hug, and this Indo-Chinese fusion recipe absolutely delivers that cozy, restaurant-quality magic right in your own kitchen.
We’re talking crispy, golden paneer cubes tossed in a glossy, tangy-spicy sauce with vibrant bell peppers, spring onions, and just the right amount of heat. It’s the kind of dish that looks impressive but secretly comes together faster than folding a load of laundry.
I first fell in love with Chilli Paneer at a little Indo-Chinese spot near my neighborhood. After one bite, I knew I had to figure out how to make it at home — and after a few kitchen experiments (and some very happy taste-testers), here we are.
What This Recipe Delivers
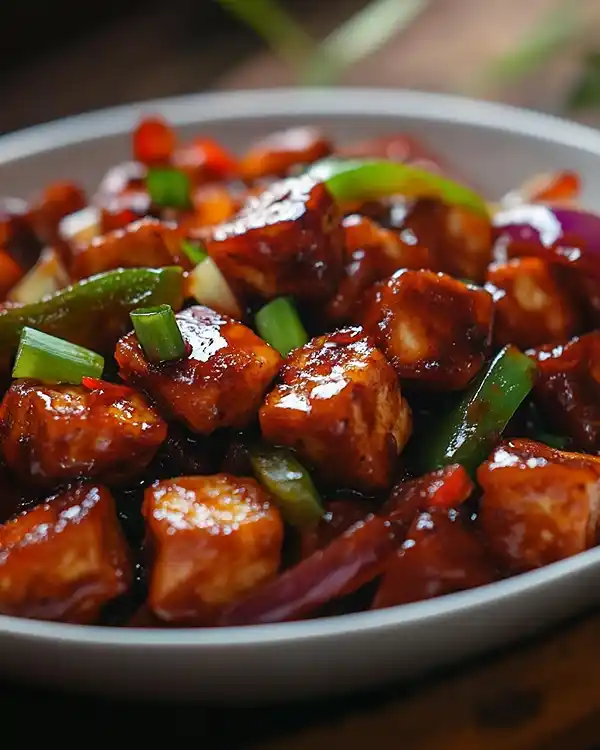
This Chilli Paneer recipe gives you crispy batter-fried paneer cubes smothered in a sweet, tangy, and spicy sauce with crunchy vegetables. It takes about 30 minutes from start to finish, uses simple pantry ingredients like cornstarch, soya sauce, and chilli sauce, and works beautifully as either an appetizer or a main dish served over rice or noodles.
Why You’ll Love This Recipe 🌸
- This Chilli Paneer tastes like it came from your favorite Indo-Chinese restaurant — but it’s way easier (and cheaper) to make at home.
- You can adjust the heat level to match your family’s taste — mild for the kids, fiery for the brave souls.
- It’s ready in about 30 minutes, which is less time than it takes to wait for takeout.
- According to Serious Eats’ guide to Indo-Chinese cuisine, the best fusion dishes balance bold flavors with simple techniques — and this recipe proves exactly why.
Quick Facts ⚡
Here’s the quick scoop on this Chilli Paneer.
- CourseAppetizer/Main Dish
- Prep Time15 minutes
- Cook Time15 minutes
- Total Time30 minutes
- Servings4 servings
- DifficultyEasy
Table of Contents

Chilli Paneer
Equipment
- Frying pan or wok
- Mixing bowls
- Whisk
- Slotted spoon
- Knife
- Cutting board
- Measuring spoons
Ingredients
Main
- 200 grams Paneer (cubed)
For the Batter
- ¼ tsp Red chilli powder
- 3 tbsp Cornstarch
- 3 tbsp All-purpose flour
- ⅛ tsp Black pepper
- ⅛ tsp Salt
- 6 tbsp Water as needed
- 3-4 tbsp Oil for shallow frying
For the Sauce
- 1 tbsp Soya sauce
- 2 tbsp Red chilli sauce
- 2 tbsp Tomato ketchup
- ½ tsp Vinegar
- ½ tsp Red chilli powder
- 1 tsp Sugar
For the Chilli Paneer Gravy
- 1 tbsp Garlic (finely chopped)
- 2 tbsp Spring onion greens (chopped)
- 2 tbsp Spring onion whites (chopped)
- ½ cup Bell pepper (cubed)
- 1 medium Onion (cubed)
- 1 Green chili (slit)
- ¼ tsp Black pepper
- 1 tsp Cornstarch
- ½ cup Water
Instructions
- Whisk cornstarch, flour, spices, salt, and water into a smooth thick batter.
- Coat paneer cubes in the batter and shallow fry until golden and crisp; drain.
- Mix the sauce ingredients in a bowl and separately whisk cornstarch slurry.
- Sauté garlic, onions, and peppers on high heat for 2 minutes.
- Add sauce and slurry; cook until thick and glossy.
- Toss in fried paneer and spring onion greens; serve hot.
Notes
Nutritional Peek
Here’s a quick nutritional breakdown per serving (based on 4 servings):
| Nutrient | Amount per Serving |
|---|---|
| Calories | 285 kcal |
| Protein | 12g |
| Carbohydrates | 22g |
| Fat | 16g |
| Fiber | 2g |
| Sugar | 6g |
Ingredients
This Chilli Paneer recipe brings together three simple ingredient groups that create magic together. For the crispy coating — cornstarch, all-purpose flour, and a hint of red chilli powder — you’ll whisk these into a smooth batter that clings perfectly to the paneer. For the sauce — soya sauce, chilli sauce, ketchup, vinegar, and a touch of sugar — these combine into that signature glossy, tangy-spicy glaze. And for the vegetables and aromatics — garlic, spring onions, bell peppers, and onions — you’ll get that fresh crunch and aromatic depth that makes this dish so irresistible.
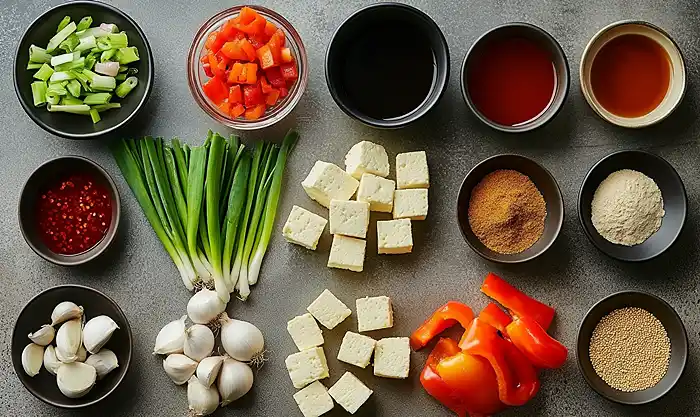
| Amount | Ingredient |
|---|---|
| 200 grams | Paneer (cubed to ¾ by ¾ inch pieces) |
| For the Batter | |
| ¼ teaspoon | Red chilli powder (Kashmiri or less spicy, optional) |
| 3 tablespoons | Cornstarch (white corn flour) |
| 3 tablespoons | All-purpose flour (maida, optional) |
| ⅛ teaspoon | Black pepper (crushed or ground) |
| ⅛ teaspoon | Salt (adjust to taste) |
| 6 tablespoons | Water (as needed) |
| 3-4 tablespoons | Oil (for shallow frying) |
| For the Sauce | |
| 1 tablespoon | Soya sauce (naturally brewed or organic) |
| 2 tablespoons | Red chilli sauce (or 1 tbsp hot sauce/green chilli sauce) |
| 2 tablespoons | Tomato ketchup |
| ½ teaspoon | Vinegar (apple cider works great) |
| ½ teaspoon | Red chili powder (or red chilli paste, optional) |
| 1 teaspoon | Sugar (adjust to taste) |
| For the Chilli Paneer Gravy | |
| 1 tablespoon | Garlic (finely chopped) |
| 2 tablespoons | Spring onions greens (chopped) |
| 2 tablespoons | Spring onion whites (chopped) |
| ½ cup | Capsicum/bell pepper (cubed) |
| 1 medium | Onion (cubed, layers separated) |
| 1 | Green chili (slit and deseeded) |
| ¼ teaspoon | Black pepper (crushed) |
| 1 teaspoon | Cornstarch (2 tsp for more gravy) |
| ½ cup | Water (1 cup for more gravy) |
Tools You’ll Actually Use
- Deep frying pan or wok
- Mixing bowls (2-3 medium-sized)
- Whisk or fork
- Slotted spoon or spider strainer
- Kitchen tissues or steel colander
- Sharp knife and cutting board
- Measuring spoons and cups
How to Make Chilli Paneer
Let’s make this Chilli Paneer magic happen, step by delicious step.
Make the Batter
Add the cornstarch, all-purpose flour, red chilli powder, crushed black pepper, and salt to a mixing bowl. Pour in about 6 tablespoons of water and whisk until you’ve got a smooth batter — it should be thick enough to coat the back of a spoon but not so thick it clumps. Add 1-2 more tablespoons of water if needed, and make sure there are no lumps hiding in there.
Fry the Paneer
Heat 3-4 tablespoons of oil in a deep pan over medium flame for shallow frying. While the oil heats up, add your cubed paneer (200-250 grams) to the batter and gently coat each piece. Test the oil by dropping a tiny bit of batter in — it should sizzle up to the surface without browning immediately. That’s your green light.
Pick up each batter-coated paneer cube with a spoon and gently slide them into the hot oil. Space them out so they’re not crowding each other, and resist the urge to poke them for at least a minute — let that batter firm up first. Then stir and fry on medium heat until all sides are golden and crispy. Drain them on kitchen tissues or a steel colander.
Prepare Your Sauce
For dry Chilli Paneer: Stir 1 teaspoon cornstarch into half a cup of water until smooth, then set aside. In a separate small bowl, mix together 2 tablespoons chilli sauce, 1 tablespoon soya sauce, 2 tablespoons ketchup, 1 teaspoon sugar, half a teaspoon vinegar, and half a teaspoon red chilli powder (if you like it spicy). Set this aside too.
For gravy-style Chilli Paneer: Mix 2 teaspoons cornstarch with 1 cup water to make a lump-free slurry. In another bowl, combine 2 tablespoons soya sauce, 4 tablespoons chilli sauce, 1 teaspoon vinegar, 3 tablespoons tomato ketchup, plus extra salt, sugar, and ¾ teaspoon red chilli powder for that gorgeous color. Stir well and set aside.
Bring It All Together
Remove most of the oil from your fry pan, leaving just about 1 tablespoon. Toss in your finely chopped garlic and fry until it smells absolutely amazing. Add 2 tablespoons of spring onion whites and your cubed onion (layers separated so they cook evenly). Throw in the slit green chili and diced capsicum, then crank the heat to high and sauté everything for about 2 minutes — you want those veggies to stay crisp.
Stir your prepared sauce, then pour it into the pan. Give your cornstarch slurry a quick stir (it settles) and pour that in too. Mix everything together and cook on medium heat until the sauce thickens into that beautiful glossy coating. Taste it — this is your moment to adjust with more sauce, salt, or a splash of hot water if you want it thinner.
Turn off the heat and let things cool down for just a minute. Add your fried paneer cubes and crushed black pepper, then gently toss everything together so each piece gets coated in that gorgeous sauce. Sprinkle those spring onion greens on top, and you’re done.
Serve your Chilli Paneer hot as an appetizer with toothpicks, or as a main dish over fluffy rice or delicious Korean noodles.
Pro Tips & Gentle Guidance
These little tricks will take your Chilli Paneer recipe from good to “wait, you actually made this?” territory.
Room Temperature Paneer is Your Friend Take your paneer out of the fridge about 15 minutes before you start cooking. Room temperature paneer absorbs the batter better and fries more evenly without getting too hard or rubbery.
Don’t Skip the Batter Test That little trick where you drop batter into the oil? It’s not just for show. If the oil’s too hot, your paneer will brown too fast and stay raw inside. Too cool, and it’ll absorb oil like a sponge and turn soggy.
High Heat for the Veggies When you’re sautéing those bell peppers and onions, keep the heat high and move fast. You want them to stay crisp and vibrant, not soft and sad. Two minutes is really all you need.
Adjust the Sauce to Your Family’s Taste If you’ve got spice-sensitive eaters, cut the chilli sauce in half and skip the red chilli powder. You can always serve extra hot sauce on the side for the brave souls at your table.
If you’re new to Indo-Chinese cooking techniques, The Spruce Eats has a helpful guide to stir-frying vegetables that really breaks down the timing and temperature tricks I love using.
Quick Fixes for Chilli Paneer
Problem: My paneer turned out rubbery or hard This usually means the oil was too hot or you fried them too long. Next time, keep the heat at medium (not high) and fry just until golden — about 3-4 minutes total. Overcooked paneer loses its soft, creamy center.
Problem: The batter fell off during frying Your batter was probably too thin, or you didn’t let the battered paneer sit for a minute before frying. The batter needs a few seconds to “grip” the paneer. Also, make sure your paneer cubes are completely dry before you coat them.
Problem: The sauce is too watery You either added too much water or didn’t let the cornstarch slurry thicken enough. Let it simmer for another minute or two on medium heat, stirring constantly. The cornstarch needs time to work its magic.
Problem: It’s way too spicy Balance it out by adding more ketchup (for sweetness) and a squeeze of fresh lemon juice. You can also double the sauce base and add more water to dilute the heat without losing flavor.
Variations & Adaptations
This Chilli Paneer is endlessly adaptable — here’s how to make it work for different diets and tastes.
Gluten-Free Version Skip the all-purpose flour entirely and use just cornstarch for the batter. It’ll still get beautifully crispy. Also double-check that your soya sauce is gluten-free (tamari works great).
Extra-Crispy Paneer Add a tablespoon of rice flour to your batter. It creates an extra-crunchy coating that stays crisp even after tossing in the sauce.
Different Vegetables Swap in mushrooms, baby corn, broccoli florets, or even cubed zucchini. Just keep the cooking time short so they stay crisp-tender.
Make it a Full Meal Double the sauce, add more vegetables, and serve it over cavatappi noodles or steamed rice. Suddenly it’s dinner, not just an appetizer.
Air Fryer Option Coat your paneer in the batter, spray lightly with oil, and air fry at 375°F for 12-15 minutes, flipping halfway. It’s not quite as crispy as shallow frying, but it’s a lighter option that still tastes great.
Serving, Storage & Reheating
Serve your Chilli Paneer immediately while it’s hot and the paneer is still crispy. It’s perfect as a party appetizer with toothpicks, or pile it over rice or noodles for a complete meal. A side of cheesy garlic pizza bread makes an indulgent companion.
If you somehow manage not to eat this all at once, store leftovers in an airtight container in the fridge for up to 3 days. Just know that the paneer will soften as it sits in the sauce — it’s still delicious, just not crispy anymore.
Reheat gently in a pan over medium heat, adding a splash of water if the sauce has thickened too much. The microwave works too, but a quick pan reheat brings back more of that fresh-cooked flavor.
I have a feeling you’ll love what’s next. The Classic Comfort Foods favorites are packed with recipes that disappear fast at every gathering. Go check them out before someone else snags them!
No-Waste Kitchen Magic
Leftover Batter Don’t toss that extra batter — slice up some onions, dip them in, and fry them into crispy onion pakoras. They’re amazing with tea or as a snack.
Day-Old Chilli Paneer Turn it into a wrap filling. Warm up the Chilli Paneer, stuff it into a tortilla with some lettuce and a drizzle of mayo or yogurt sauce, and you’ve got lunch sorted.
Extra Vegetables If you’ve got leftover bell peppers or onions, chop them up and add them to scrambled eggs tomorrow morning, or toss them into a tartiflette for added texture.
Sauce Goes a Long Way Made too much sauce? Save it in the fridge for up to a week and use it as a quick stir-fry base for chicken, shrimp, or tofu. It’s basically a flavor shortcut in a jar.
Chilli Paneer FAQs
What is chilli paneer made of?
Chilli Paneer is made of cubed paneer cheese coated in a spiced batter and shallow fried until crispy, then tossed in a tangy-spicy sauce with bell peppers, onions, garlic, and spring onions. The sauce is a mix of soya sauce, chilli sauce, ketchup, vinegar, and sugar with cornstarch for thickness.
Which country invented chilli paneer? C
hilli Paneer was invented in India as part of Indo-Chinese cuisine — a fusion style that started when Chinese immigrants adapted their cooking techniques to Indian tastes and ingredients. It’s basically an Indian take on Chinese stir-fry, and it’s wildly popular across India.
What to eat with chilli paneer?
Serve Chilli Paneer with steamed rice, fried rice, noodles, or even as an appetizer on its own with toothpicks. It pairs beautifully with roasted garlic and parmesan carrots or a simple cucumber salad to balance the spice.
Is paneer healthy or unhealthy?
Paneer itself is quite nutritious — it’s high in protein, calcium, and healthy fats, making it great for vegetarians. However, it’s also calorie-dense, so portion control matters. When it’s fried like in this recipe, it becomes richer, but it’s still a better protein option than many fried appetizers.
Can I freeze this Chilli Paneer?
You can freeze the fried paneer cubes before adding the sauce — spread them on a baking sheet, freeze until solid, then transfer to a freezer bag for up to 2 months. Thaw and toss in freshly made sauce when you’re ready to eat. I don’t recommend freezing the finished dish since the sauce and vegetables don’t freeze well.
Closing
So there you go — Chilli Paneer that tastes like it came from your favorite restaurant but costs a fraction of the price and takes less time than scrolling through takeout apps. The crispy paneer, that glossy sauce, the crunch of fresh vegetables — it all comes together into something really special.
I’d love to see your spin on this Chilli Paneer recipe! Drop a comment below with your photos or any fun variations you tried — did you make it extra spicy? Add different veggies? Serve it over noodles or rice? I’m always looking for new ideas, and honestly, your creativity inspires me to keep experimenting in my own kitchen.
Thanks for cooking with me today. Now go make this Chilli Paneer and watch it disappear faster than you can say “seconds, please!”
I’m Linda Sandra — a Charleston home chef and comfort-food daydreamer. Around here, cooking’s not about perfection — it’s about cozy vibes, creative twists, and food that feels like love.