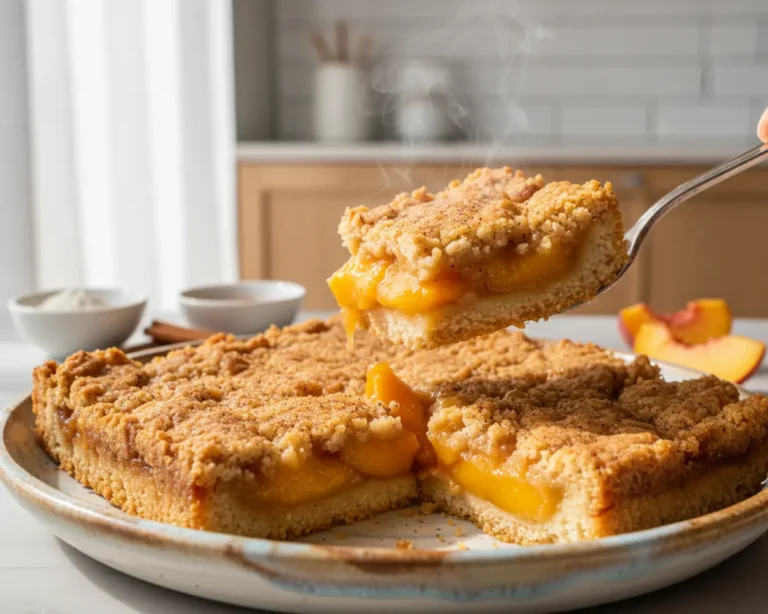
Sweet Cherry Crumble Bars
Sweet Cherry Crumble Bars are the kind of fresh cherry recipe that makes your whole kitchen smell incredible — and your friends think you spent way more time than you did.
Hey there, I’m Claire Whitmore — a pastry whisperer in Asheville, NC, where butter totally counts as self-care. These bars are made with fresh pitted cherries, a buttery shortbread-style crumble base, and a simple cornstarch-thickened filling that holds together perfectly when you slice them.
This is the kind of easy cherry dessert that fits into real life: just a handful of pantry staples, one bowl, and about 40 minutes of hands-on time. Whether you’re making them for a summer potluck or sneaking one straight from the fridge — no judgment — these bars are your new warm-weather go-to.
Table of Contents
Little Snapshot: What This Recipe Delivers
These Sweet Cherry Crumble Bars feature a buttery, press-in crumble crust and topping with a jammy fresh cherry filling sweetened with sugar and thickened with cornstarch. Ready in under an hour with just 10 simple ingredients, they yield 9 generous bars — easy enough for a weeknight, impressive enough for company.
Why You’ll Love This Recipe
- This sweet cherry crumble bar recipe takes less time to prep than it does to pit all the cherries — and that part goes fast too.
- One bowl, no mixer, no chilling the dough — just mix, press, layer, and bake. Weeknight-friendly for real.
- The same buttery crumble does double duty as both the crust and topping, which means fewer dishes and a very happy sink situation.
- According to King Arthur Baking in their guide to simple berry bar desserts, the best fruit bars lean on fresh seasonal ingredients and a reliable crumble base — and this recipe proves exactly why that formula works so well.
Quick Facts
Here’s the quick scoop on this Sweet Cherry Crumble Bar recipe.
- CourseDessert / Snack Bar
- Prep Time15 minutes
- Cook Time32–36 minutes
- Total TimeAbout 50 minutes (plus cooling)
- Servings9 bars
- DifficultyEasy
Nutritional Peek
Here’s an approximate nutritional breakdown per bar, based on 9 servings. These are estimates and can vary depending on your exact ingredients.
| Nutrient | Amount Per Serving |
|---|---|
| Calories | ~270 kcal |
| Carbohydrates | ~40 g |
| Protein | ~3 g |
| Fat | ~11 g |
| Saturated Fat | ~6.5 g |
| Fiber | ~1 g |
| Sugar | ~23 g |
Ingredients for Sweet Cherry Crumble Bars
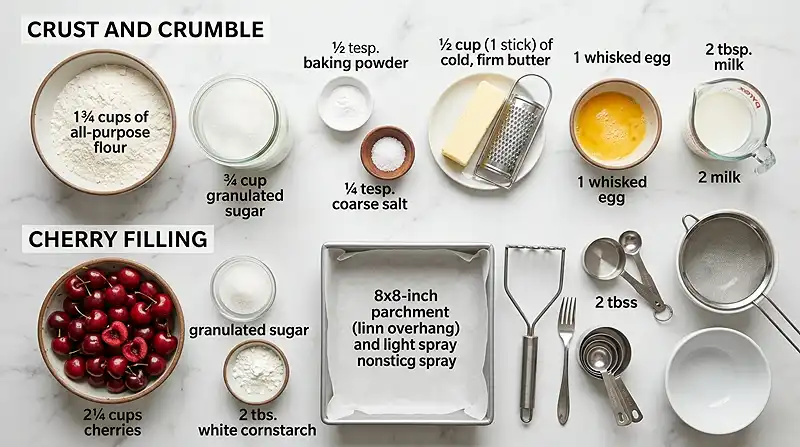
Fresh cherry recipes shine brightest when the ingredients stay simple — and this one is no exception. For the crumble base and topping, you’ll use dry pantry staples like flour, sugar, baking powder, and salt alongside cold butter, an egg, and a splash of milk to bind it all together.
For the cherry filling, all you need are fresh pitted cherries, a little sugar, and cornstarch to thicken up those gorgeous juices. Room-temperature egg and any milk you have on hand both work beautifully here.
| Amount | Ingredient |
|---|---|
| 1 3/4 cups | All-purpose flour |
| 3/4 cup | Sugar |
| 1/2 tsp | Baking powder |
| 1/4 tsp | Salt |
| 1/2 cup | Butter, cold (yes, real butter — margarine just doesn’t cut it here) |
| 1 | Egg, whisked |
| 2 tbsp | Milk, any kind |
| 2 1/4 cups | Fresh cherries, pitted (the star of the show) |
| 3 tbsp | Sugar |
| 2 tbsp | Cornstarch |
Tools You’ll Actually Use
- 8×8 or 9×9 square baking dish
- Parchment paper
- Nonstick spray
- Large mixing bowl
- Medium mixing bowl
- Box grater (for grating the cold butter — game changer)
- Fine mesh strainer
- Potato masher or fork
- Spatula or wooden spoon
- Wire cooling rack
- Cherry pitter (optional but deeply satisfying)
How to Make Sweet Cherry Crumble Bars Step by Step
This Sweet Cherry Crumble Bar recipe comes together in a handful of easy steps — no special skills required, just a little patience while they cool.
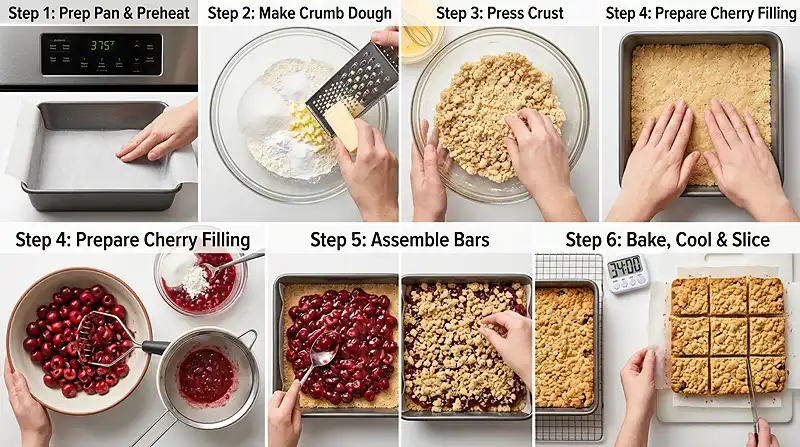
Step 1: Prep Your Pan
Preheat your oven to 375°F. Line an 8×8 or 9×9 baking dish with parchment paper, leaving about a 1-inch overhang on each side so you can lift the bars out easily later. Spray the exposed sides of the pan with nonstick spray and set aside.
Step 2: Make the Crumble Dough
In a large bowl, stir together 1 3/4 cups all-purpose flour, 3/4 cup sugar, 1/2 tsp baking powder, and 1/4 tsp salt. Grate the cold 1/2 cup butter directly into the bowl using a box grater — this is the secret to easy, even crumbles without a pastry cutter. Use your hands to work the grated butter into the flour mixture until it resembles small pebbles.
Pour in the whisked egg and 2 tbsp milk, then stir until the dough just comes together. It should hold when you pinch a bit between your fingers — that’s your green light.
Step 3: Press the Base Layer
Transfer about two-thirds of the crumble mixture into your prepared pan. Use your hands to press it into an even, compact layer across the bottom. Don’t worry about it being perfect — a slightly rustic base is part of the charm.
Step 4: Prep the Cherry Filling
Add 2 1/4 cups fresh pitted cherries to a medium bowl and use a potato masher or fork to roughly mash them. You want them broken down but still a little chunky — no whole cherries sneaking through.
Pour the mashed cherries through a fine mesh strainer to drain off the excess liquid (this keeps your bars from going soggy). Return the drained cherries to the bowl and stir in 3 tbsp sugar and 2 tbsp cornstarch until everything is well coated.
Step 5: Layer and Top
Scoop the cherry filling evenly over the pressed crust layer. Then crumble the remaining one-third of the dough mixture over the top of the cherries. Don’t pack it down — a loose, crumbly topping bakes up with the best texture.
Step 6: Bake Until Golden
Slide the pan into your preheated 375°F oven and bake for 32 to 36 minutes, until the edges are set and the top is lightly golden brown. Your kitchen will smell absolutely dreamy at this point — like a summer afternoon in a bakery.
Step 7: Cool Completely, Then Slice
This is the hardest part: let the bars cool completely in the pan before cutting. You can do this at room temperature or speed things up in the refrigerator. Once fully cooled, lift them out using the parchment overhang, slice into 9 bars, and enjoy.
Claire’s Pro Tips for the Best Cherry Crumble
When it comes to fresh cherry recipes, a few small tricks make a big difference. These tips come from my own trial and error — including the time I skipped straining the cherries and ended up with a very pretty, very soggy situation.
Don’t skip the draining step. After mashing your cherries, straining out the excess juice is what prevents a wet, sunken filling. A minute at the strainer saves you from a mess at the cutting board.
Cold butter is non-negotiable. Grating it straight from the fridge means it stays in small, even pieces throughout the dough — which is exactly what gives you that crumbly, shortbread-like texture. Softened butter will give you a denser result.
The pinch test is your best friend. After mixing the dough, pinch a small amount between your fingers. If it holds together, you’re good. If it crumbles apart and won’t stick, add milk half a teaspoon at a time until it does.
Let them cool all the way. I know it’s tempting, but cutting into warm bars means they’ll fall apart. Pop them in the fridge if you’re impatient — 30 minutes in there beats 2 hours on the counter.
Quick Fixes for Sweet Cherry Crumble Bars
My bars are falling apart when I cut them.
This almost always means they weren’t cooled completely. The filling needs time to set up as it cools. Give them at least an hour at room temperature, or 30 minutes in the fridge before slicing.
The filling is watery or runny.
You likely didn’t drain enough liquid from the mashed cherries, or the cornstarch wasn’t fully mixed through. Make sure you strain the cherries well and stir the cornstarch in thoroughly before layering.
The topping isn’t browning.
Your oven may run a little cool. Check the internal temperature with an oven thermometer, and don’t be afraid to leave the bars in for the full 36 minutes. The golden color on top is your best visual cue.
The crust is too crumbly to press down.
Add a small splash more milk — just half a teaspoon at a time — and stir again. The dough should hold together when you pinch it. A slightly stickier dough is much easier to press into the pan than one that’s too dry.
My bars are dense and cakey instead of crumbly.
This usually happens if the butter was too warm when you added it. Always start with cold butter straight from the fridge, and grate it in rather than cutting or softening it. Cold fat is what creates that crumbly, light texture.
Variations and Fun Twists
Cherry crumble bars are wonderfully flexible — once you have the base recipe down, the variations are endless.
Mixed berry version: Swap half the cherries for fresh blueberries or raspberries. The cornstarch holds everything together just as well with mixed berries.
Almond twist: Add 1/2 teaspoon of almond extract to the dough. Cherries and almond are a classic pairing that feels fancy with almost zero extra effort.
Gluten-free swap: Use a 1:1 gluten-free all-purpose flour blend in place of regular flour. The texture will be slightly more tender, but still delicious.
Lemon zest addition: Stir a teaspoon of fresh lemon zest into the cherry filling before layering. It brightens everything up and balances the sweetness beautifully.
Frozen cherries: No fresh cherries? Frozen pitted cherries work just fine — thaw and drain them well before mashing. You may need a touch more cornstarch if they’re extra juicy.
Rustic vs. pretty plating: Serve straight from the pan for casual gatherings, or dust with powdered sugar and serve alongside a scoop of vanilla ice cream for an effortlessly elegant dessert plate.
Craving more delightful treats to bake? If you love the comforting sweetness of these cherry bars, you’ll adore exploring our entire collection of irresistible sweet baking and muffin recipes, perfect for any occasion!
Serving, Storage, and Reheating
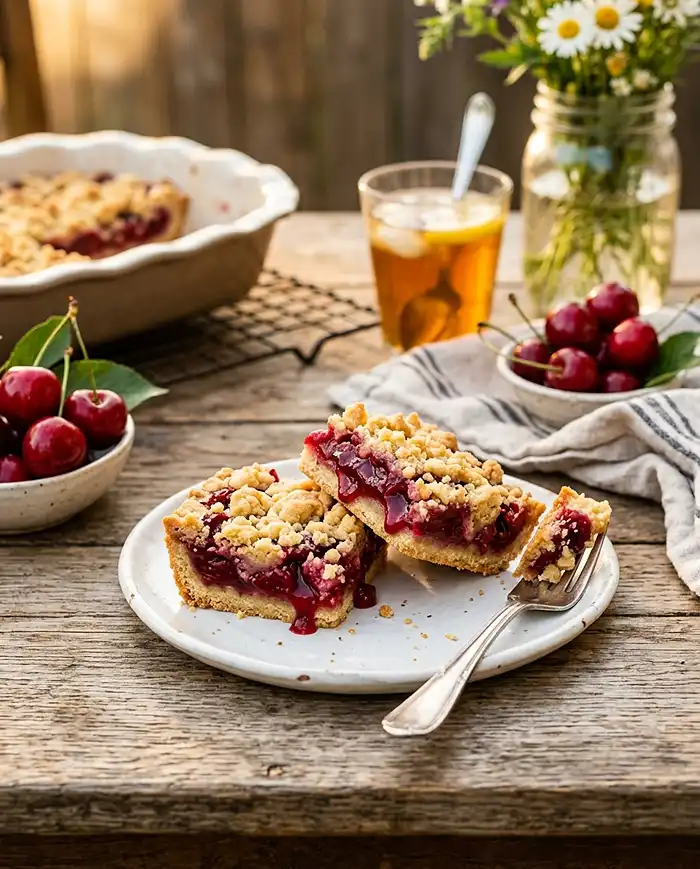
These cherry crumble bars are equally good warm (barely) or straight from the fridge. They pair beautifully with a scoop of vanilla ice cream or a dollop of fresh whipped cream for a simple but impressive dessert. For a casual summer spread, they slot right in alongside something light like a fresh and creamy ranch pea salad for a complete warm-weather meal.
Store leftover bars in an airtight container at room temperature for up to 2 days, or in the refrigerator for up to 5 days. The fridge version has the best texture for clean slicing — the filling firms up nicely overnight.
To reheat, pop a bar in the microwave for about 15 to 20 seconds, just enough to take the chill off. Avoid overheating or the filling can get too runny. Served slightly warm with a cold scoop of ice cream melting over the top? Absolutely perfect.
No-Waste Kitchen Magic
If you drained a lot of liquid from the mashed cherries, don’t toss it. That cherry juice is gorgeous stirred into lemonade, drizzled over yogurt, or mixed into a simple syrup for cocktails.
Day-old bars that have softened can be crumbled over vanilla ice cream as a quick cherry crisp-style sundae topping. Honestly, it might be even better the second day.
If you have extra pitted cherries, freeze them flat on a baking sheet, then transfer to a zip-top bag. Frozen cherries are perfect for smoothies, overnight oats, or the next batch of these bars come fall.
More Recipes You’ll Love
If these Sweet Cherry Crumble Bars hit the spot, you might also love these strawberry shortcake cheesecake cups for another fruity, no-fuss summer dessert that disappears fast.
Wrapping Up
There’s something so satisfying about a dessert that looks impressive but comes together with a single bowl and a handful of real ingredients. These Sweet Cherry Crumble Bars are exactly that — a celebration of fresh cherries in their simplest, most delicious form.
I’d love to see your spin on this Sweet Cherry Crumble Bar recipe! Drop a comment below with your photos — I’d love to see how you made it your own. Did you add almond extract? Go the mixed berry route? These Cherry Crumble Bars are so versatile; I bet you’ve already got amazing variations in mind.
I’m Claire Whitmore — a dessert daydreamer from Asheville, NC. For me, baking isn’t about perfect pastries — it’s about the joy of sharing something sweet (and maybe sneaking an extra crumble straight from the bowl before the pan even hits the oven).
Can I use frozen cherries in this Sweet Cherry Crumble Bar recipe?
Yes, frozen pitted cherries work well here. Thaw them completely and drain off as much liquid as possible before mashing. You may want to add an extra teaspoon of cornstarch to the filling since frozen cherries tend to release more juice than fresh.
How do I know when the cherry crumble bars are done baking?
The bars are ready when the edges are set and the top crumble is lightly golden brown, usually around the 32 to 36 minute mark at 375 degrees F. The filling may still look a little soft in the center, but it firms up beautifully as the bars cool completely.
What is the best way to store these cherry crumble bars?
Store the bars in an airtight container in the refrigerator for up to 5 days. They also keep at room temperature for up to 2 days, but refrigerating gives you cleaner slices and a firmer filling. Let them come to room temperature or microwave briefly before serving if preferred.
Can I make Sweet Cherry Crumble Bars ahead of time?
Absolutely. These bars actually taste even better the next day once the filling has fully set. Bake them the evening before, let them cool completely, cover the pan, and refrigerate overnight. Slice and serve the next day for the cleanest, neatest bars.
Why do I need to strain the mashed cherries before adding them to the bars?
Straining removes excess cherry juice that would otherwise make the filling too wet and prevent it from setting properly. This one step is what keeps your bars sliceable and sturdy rather than soggy. The drained juice can be saved and used in drinks or drizzled over yogurt.
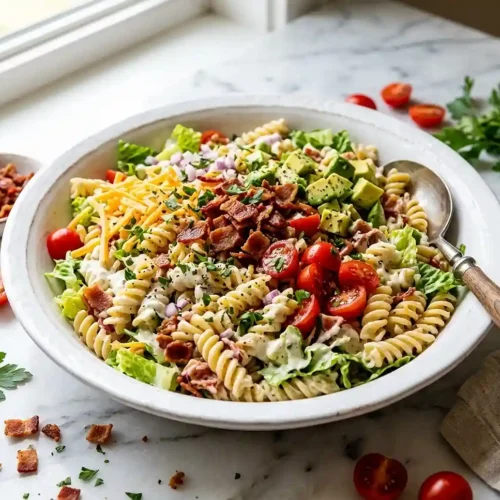
BLT Pasta Salad
Equipment
- Large pot
- Skillet
- Large mixing bowl
- Small bowl
- Whisk
- Cutting board and knife
- Colander
Ingredients
For the Salad
- 10 slices bacon cooked, crumbled, grease reserved
- 12 oz rotini or penne pasta cooked and cooled
- 1 ½ cups fresh tomatoes diced
- ½ avocado diced
- 1 cup shredded cheddar cheese
- ⅓ cup red onion diced
- 1 cup romaine lettuce chopped
- fresh parsley chopped, optional garnish
For the Dressing
- ½ cup mayonnaise
- ¾ cup ranch dressing
- 1 tbsp reserved bacon grease optional
Instructions
- In a small bowl, whisk together 1/2 cup mayonnaise, 3/4 cup ranch dressing, and 1 tablespoon reserved bacon grease if using. Set aside.
- In a large mixing bowl, combine the cooked and cooled rotini, diced tomatoes, diced avocado, shredded cheddar, diced red onion, chopped romaine, and crumbled bacon.
- Pour the ranch-mayo dressing over the salad and toss gently until everything is evenly coated. Be gentle with the avocado and romaine.
- Garnish with fresh chopped parsley if desired. Serve immediately or refrigerate covered for up to 1 hour before serving.