Oven-Baked Salmon Sushi Bites Recipe
I’m Linda Sandra — a home chef who believes the best recipes are the ones that look great but don’t stress you out, and Oven-Baked Salmon Sushi Bites are exactly that. They’re like sushi and a cozy casserole had the cutest baby, and now you can make them in your muffin tin.
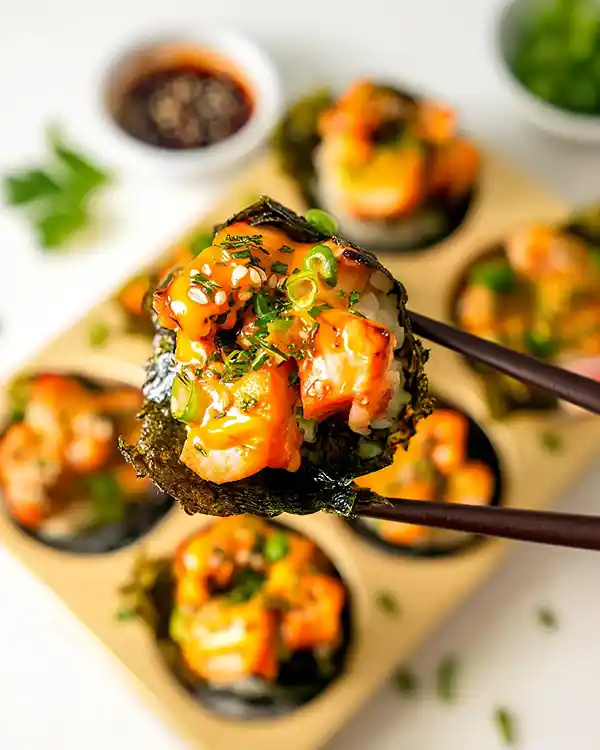
These little bites pack all the flavors of your favorite spicy salmon roll — tender seasoned salmon, perfectly seasoned sushi rice, crispy nori sheets, and that addictive Kewpie mayo-sriracha combo. Plus, they’re baked, not rolled, which means no special skills required.
I came up with this salmon sushi meal on a Tuesday night when I was craving sushi but really didn’t want to deal with the whole rolling situation. Turns out, muffin tins are basically magic for making individual portions that everyone can grab and go.
Table of Contents
Little Snapshot: What This Recipe Delivers
These Oven-Baked Salmon Sushi Bites deliver all the flavors of spicy salmon sushi in cute, poppable muffin-tin cups. Ready in about 35 minutes with seasoned sushi rice, spicy salmon, and crispy nori, they’re perfect for weeknight dinners, meal prep, or parties where you want to look fancy without the fuss.
Why You’ll Love This Recipe 🌸
- These Oven-Baked Salmon Sushi Bites give you all the sushi vibes without any rolling, folding, or YouTube tutorial panic.
- They’re totally customizable — spice level, toppings, even the fish (hello, tuna lovers).
- You can prep the components ahead and assemble right before baking, which is perfect for busy weeknights or when guests are coming over.
- According to Serious Eats in their complete guide to perfect sushi rice, properly seasoned rice is the foundation of any great sushi dish — and this recipe proves exactly why.
Quick Facts ⚡
Here’s the quick scoop on this Oven-Baked Salmon Sushi Bites recipe.
- CourseAppetizer / Main Dish
- Prep Time15 minutes
- Cook Time20 minutes
- Total Time35 minutes
- Servings12 sushi bites
- DifficultyEasy

Oven-Baked Salmon Sushi Bites
Equipment
- Standard 12-cup muffin tin
- Medium mixing bowls
- Microwave-safe bowl
- Kitchen scissors or sharp knife
- Spoon or rice paddle
- Measuring cups and spoons
Ingredients
For the Salmon Mixture
- 1 lb salmon cubed into ½-inch pieces
- 1 tbsp light soy sauce
- 1 tbsp Kewpie mayo or regular mayo
- 1 tbsp sriracha adjust to taste
- 1 tsp sesame oil
For the Sushi Rice
- 1½ cups uncooked sushi rice
- 1 tbsp rice vinegar
- 2 tsp white sugar
For Assembly
- 3 large nori sheets
- 2 tbsp furikake for garnish
- 1 green onion sliced thin, for garnish
- cooking spray as needed
Instructions
- Cook your 1½ cups uncooked sushi rice according to the package instructions. While that’s happening, you can prep everything else.
- In a microwave-safe bowl, combine 1 tablespoon rice vinegar and 2 teaspoons white sugar. Microwave for about 30 seconds, or until the sugar dissolves completely. Pour this vinegar mixture over your cooked rice and gently fold it in until every grain is coated. Set the seasoned rice aside while you work on the salmon.
- Preheat your oven to 400°F. Make sure your muffin tin is clean and ready to go.
- In a medium bowl, combine your cubed salmon (about 1 lb), 1 tablespoon light soy sauce, 1 tablespoon Kewpie mayo, 1 tablespoon sriracha, and 1 teaspoon sesame oil. Mix everything together until the salmon is evenly coated. Taste and adjust the sriracha if you want more heat.
- Take your 3 large nori sheets and cut each one into 4 rectangles or squares — you want pieces large enough to line the bottom and come up the sides of each muffin cup slightly.
- Lightly grease your muffin tin with cooking spray. Press one nori square into each muffin cup, letting it come up the sides a bit. Add a generous spoonful of seasoned sushi rice (about 2-3 tablespoons) onto each nori square, then press it down gently to create a compact base. Top each rice layer with a spoonful of your spicy salmon mixture, making sure each cup gets an equal amount.
- Slide the muffin tin into your preheated 400°F oven and bake for 15 minutes, or until the salmon is cooked through and the tops are slightly golden brown.
- Remove the sushi cups from the oven and let them cool for 3-5 minutes. Drizzle with extra sriracha or spicy mayo, sprinkle with furikake and sliced green onions, then serve immediately while they’re still warm.
Notes
Nutritional Peek
Here’s what you’re working with per sushi bite (because knowing helps):
| Nutrient | Amount per Serving |
|---|---|
| Calories | 145 kcal |
| Protein | 9g |
| Carbohydrates | 18g |
| Fat | 4g |
| Fiber | 1g |
| Sugar | 2g |
These little bites pack protein from the salmon and give you that satisfying carb hug from the rice. Not too heavy, not too light — just right for a snack or light meal.
Oven-Baked Salmon Sushi Bites Ingredients
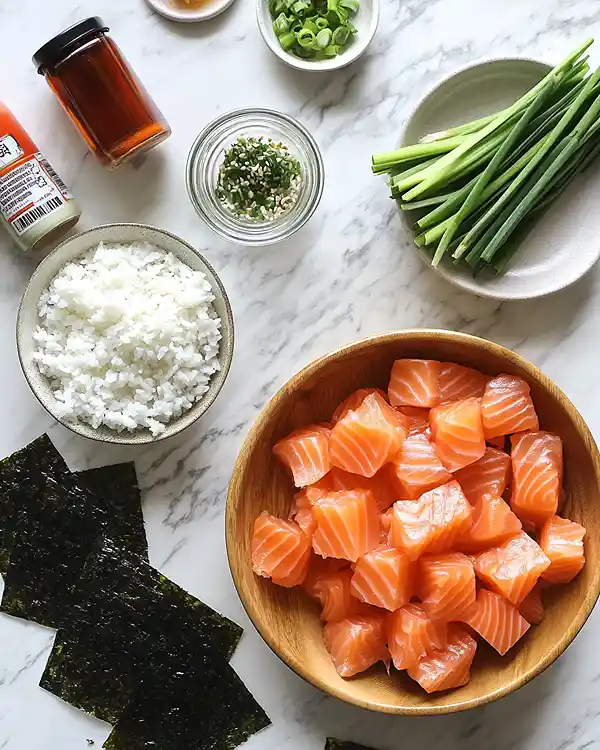
This salmon sushi meal comes together with ingredients you can find at any grocery store — no specialty shop required, though an Asian market will have the best Kewpie mayo if you’re feeling fancy.
For the salmon mixture — fresh salmon cubes, soy sauce, Kewpie mayo, and sriracha — you’ll want everything at room temperature so the flavors blend beautifully. For the sushi rice base — uncooked sushi rice, rice vinegar, and sugar — the vinegar-sugar combo is what gives that classic tangy-sweet sushi rice flavor we all love.
| Amount | Ingredient |
|---|---|
| 1 lb | salmon, cubed into ½-inch pieces |
| 1 tbsp | light soy sauce |
| 1 tbsp | Kewpie mayo (or regular mayo in a pinch) |
| 1 tbsp | sriracha (adjust to your spice comfort zone) |
| 1 tsp | sesame oil |
| 1½ cups | uncooked sushi rice |
| 1 tbsp | rice vinegar |
| 2 tsp | white sugar |
| 3 large | nori sheets |
| 2 tbsp | furikake, for garnish |
| 1 | green onion, sliced thin, for garnish |
| as needed | cooking spray |
Tools You’ll Actually Use
- Standard 12-cup muffin tin
- Medium mixing bowls (2)
- Microwave-safe bowl
- Kitchen scissors or sharp knife (for cutting nori)
- Spoon or rice paddle
- Measuring cups and spoons
Step-by-Step Instructions
Making these Oven-Baked Salmon Sushi Bites is easier than you think — promise. Just follow along and you’ll have restaurant-worthy bites in no time.
Step 1: Cook the sushi rice. Cook your 1½ cups uncooked sushi rice according to the package instructions. While that’s happening, you can prep everything else — multitasking for the win.
Step 2: Season the rice. In a microwave-safe bowl, combine 1 tablespoon rice vinegar and 2 teaspoons white sugar. Microwave for about 30 seconds, or until the sugar dissolves completely.
Pour this vinegar mixture over your cooked rice and gently fold it in until every grain is coated. This is what gives sushi rice that signature tangy-sweet flavor, so don’t skip it. Set the seasoned rice aside while you work on the salmon.
Step 3: Preheat and prep. Preheat your oven to 400°F. Now’s a good time to make sure your muffin tin is clean and ready to go.
Step 4: Make the spicy salmon mixture. In a medium bowl, combine your cubed salmon (about 1 lb), 1 tablespoon light soy sauce, 1 tablespoon Kewpie mayo, 1 tablespoon sriracha, and 1 teaspoon sesame oil.
Mix everything together until the salmon is evenly coated in that gorgeous spicy-creamy mixture. Taste a tiny bit (yes, it’s safe with fresh salmon) and adjust the sriracha if you want more heat.
Step 5: Cut the nori sheets. Take your 3 large nori sheets and cut each one into 4 rectangles or squares — you want pieces large enough to line the bottom and come up the sides of each muffin cup slightly. Kitchen scissors work better than a knife here, trust me.
Step 6: Assemble the sushi cups. Lightly grease your muffin tin with cooking spray — this helps the nori release cleanly after baking. Press one nori square into each muffin cup, letting it come up the sides a bit.
Add a generous spoonful of seasoned sushi rice (about 2-3 tablespoons) onto each nori square, then press it down gently to create a compact base. Top each rice layer with a spoonful of your spicy salmon mixture, making sure each cup gets an equal amount.
Step 7: Bake until golden. Slide the muffin tin into your preheated 400°F oven and bake for 15 minutes, or until the salmon is cooked through and the tops are slightly golden brown. Your kitchen should smell absolutely amazing right about now.
Step 8: Garnish and serve. Remove the sushi cups from the oven and let them cool for 3-5 minutes — they’ll firm up slightly and be easier to remove. Drizzle with extra sriracha or spicy mayo, sprinkle with furikake and sliced green onions, then serve immediately while they’re still warm and slightly crispy on the edges.
Pro Tips & Gentle Guidance
These sushi bake ideas are pretty forgiving, but a few little tricks will take them from good to “can I have the recipe?” status.
Use sushi-grade salmon if you can find it, especially if you like your salmon on the rare side. Regular grocery store salmon works great too — just make sure it’s fresh and bake it fully.
Don’t overmix the rice when adding the vinegar mixture. You want to fold it in gently so the grains stay intact and fluffy, not mushy. Think of it like you’re tucking the rice in for a nap, not wrestling it.
If your nori gets a little soft during baking, that’s totally normal. Some people love it that way, but if you want it crispier, you can toast the nori sheets lightly over a gas flame or in a dry pan before cutting them.
Can’t find Kewpie mayo? Regular mayo works, but add a tiny squeeze of lemon juice to mimic that tangy flavor. If you’re looking for more tips on working with Japanese ingredients, Just One Cookbook‘s detailed sushi rice guide is super helpful and breaks down all the little details.
Let the cups cool for a few minutes before trying to remove them from the tin. They’ll hold together better and won’t fall apart on you.
Quick Fixes for Oven-Baked Salmon Sushi Bites
Problem: The rice is too sticky or mushy. You might’ve used too much water when cooking the rice. Next time, use slightly less water than the package suggests, or let the rice cool for 5 minutes before adding the vinegar mixture so it’s not absorbing extra moisture.
Problem: The salmon is dry or overcooked. Fifteen minutes at 400°F should be perfect, but every oven is different. Start checking at the 12-minute mark, and pull them out as soon as the salmon looks opaque and just cooked through.
Problem: The nori is too chewy or tough. This usually means the nori absorbed too much moisture from the rice. Try using less rice per cup, or lightly toast your nori sheets before assembling to create a barrier.
Problem: The cups are falling apart when I remove them. Let them cool for a full 5 minutes before trying to lift them out. You can also run a butter knife gently around the edges to loosen them first.
Variations & Adaptations
This fish sushi recipe is basically a blank canvas for whatever you’re craving. Swap the salmon for diced tuna, cooked shrimp, or even imitation crab if that’s what you have on hand.
Want it spicy? Double the sriracha or add a dash of chili oil to the salmon mixture. Want it mild? Skip the sriracha entirely and just use Kewpie mayo with a squeeze of lime.
Make it vegetarian by replacing the salmon with diced avocado, cucumber, and cream cheese — like a veggie sushi roll in cup form. Add some pickled veggies for extra zing.
Try a California roll version with imitation crab, avocado, and cucumber, then top with sesame seeds instead of furikake.
Serving, Storage & Reheating
These Oven-Baked Salmon Sushi Bites are best served warm right out of the oven, with extra sriracha, soy sauce, or spicy mayo on the side for dipping. I love putting out little bowls of pickled ginger and wasabi for people who want the full sushi experience.
If you somehow manage not to eat all twelve in one sitting, store leftovers in an airtight container in the fridge for up to 2 days. The nori will soften quite a bit, but they’re still delicious.
To reheat, pop them in a 350°F oven for 8-10 minutes, or use an air fryer at 350°F for about 5 minutes to crisp them back up. Microwaving works in a pinch but won’t give you that nice texture contrast.
No-Waste Kitchen Magic
Got leftover sushi rice? Use it for fried rice the next day, or make onigiri (rice balls) for lunch — just shape it into triangles and wrap with nori.
Extra salmon mixture can be served over a salad, stuffed into avocado halves, or spread on cucumber slices for a quick low-carb snack.
If your nori sheets are getting stale, toast them and crumble them over ramen, rice bowls, or even popcorn for a savory umami boost.
Leftover green onions? Chop them up and freeze in ice cube trays with a little water or oil. Pop them out whenever you need a quick garnish.
This is just one of the many gems in our Salmon & Fresh Catch Recipes series. Every recipe there has been tested and loved in real kitchens, and I promise there’s something for every craving. Go see for yourself.
Oven-Baked Salmon Sushi Bites FAQs
Can I freeze Oven-Baked Salmon Sushi Bites?
I wouldn’t recommend freezing these fully assembled since the rice and nori don’t thaw well together. But you can definitely freeze the raw seasoned salmon mixture for up to 2 months, then thaw and assemble fresh when you’re ready to bake.
What’s the best way to store leftover salmon sushi bites?
Keep them in an airtight container in the fridge for up to 2 days. The texture changes a bit (the nori gets softer), but the flavor is still great.
Is there a substitute for sushi rice?
Sushi rice (short-grain Japanese rice) is best because it’s sticky enough to hold together in the muffin cups. In a pinch, you could try short-grain white rice or even Arborio rice, but it won’t have quite the same texture or flavor.
What if I don’t have furikake?
No problem! Top with sesame seeds, nori strips, or even everything bagel seasoning for a fun twist. Furikake adds that classic umami flavor, but these bites are delicious without it too.
Can I use frozen salmon for this recipe?
Yep! Just make sure to thaw it completely in the fridge overnight, then pat it really dry before cubing and mixing with the seasonings. Excess moisture can make the mixture too runny.
Closing
So there you go — Oven-Baked Salmon Sushi Bites that look fancy but are secretly so easy. I love how versatile these are, and honestly, they’ve become my go-to when I want something special without spending hours in the kitchen.
I’d love to see your spin on these Oven-Baked Salmon Sushi Bites! Drop a comment below with your photos or tell me what toppings you tried — I bet you’ve already got amazing variations brewing. Did you make them spicier? Add avocado? I’m here for all of it.
These little bites have saved me on busy weeknights and impressed guests at potlucks, and I know they’ll do the same for you. Happy cooking!
If you loved these, you might also enjoy my Perfect Lemon Brownies for dessert, or these refreshing Strawberry Lemonade Popsicles on a hot day. And if you’re in a baking mood, these Blueberry Cream Cheese Bars are absolute magic.
I’m Linda Sandra — a Charleston home chef and comfort-food daydreamer. Around here, cooking’s not about perfection — it’s about cozy vibes, creative twists, and food that feels like love.