No-Bake Banana Pudding Cheesecake
No-Bake Banana Pudding Cheesecake is the kind of southern dessert that gets people hovering around the fridge asking “is it ready yet?” It’s a dreamy layered no-bake dessert built on a buttery vanilla wafer crust, filled with a banana pudding cream cheese mixture, and topped with fluffy whipped cream and fresh banana slices.
This recipe comes together with no oven required, just a handful of simple ingredients, and about 15 minutes of hands-on prep time. It’s the kind of banana pudding dessert that looks like it took all day — but honestly, your afternoon nap can stay on the schedule.
Hey there, I’m Claire Whitmore — a pastry whisperer in Asheville, NC, where butter totally counts as self-care. This No-Bake Banana Pudding Cheesecake recipe is one of those desserts I keep coming back to every single summer. It started as a “what do I do with these bananas” moment and turned into the most-requested recipe at every potluck I attend.
Table of Contents
Little Snapshot: What This Recipe Delivers
This No-Bake Banana Pudding Cheesecake combines a crunchy vanilla wafer crust with a silky cream cheese and banana pudding filling, all chilled to perfection in a springform pan. It serves 10 generous slices, comes together in about 20 minutes of prep time, and requires zero baking — just chill for 2–4 hours and you’re ready to wow the crowd.
Why You’ll Love This Recipe
- This No-Bake Banana Pudding Cheesecake comes together in under 20 minutes of prep — your oven gets the night off and you still get all the praise.
- It’s the ultimate make-ahead dessert for busy moms and hostesses — pop it in the fridge and forget about it until the party starts.
- The layered no-bake dessert vibe means it looks absolutely stunning on a dessert table with zero fancy plating skills required.
- According to King Arthur Baking in their roundup of favorite no-bake summer recipes, desserts that rely on the fridge to set develop flavors that magically marry together overnight — and this recipe proves exactly why.
Quick Facts
Here’s the quick scoop on this No-Bake Banana Pudding Cheesecake.
- CourseDessert
- Prep Time20 minutes
- Cook Time0 minutes (no bake!)
- Total Time2 hours 20 minutes (including chill time)
- Servings10 slices
- DifficultyEasy
Nutritional Peek
Here’s a general nutritional breakdown per slice of this No-Bake Banana Pudding Cheesecake (based on 10 servings). Numbers are estimates and may vary based on specific brands used.
| Nutrient | Amount Per Serving |
|---|---|
| Calories | ~380 kcal |
| Protein | ~4 g |
| Carbohydrates | ~40 g |
| Fat | ~23 g |
| Fiber | ~1 g |
| Sugar | ~26 g |
Ingredients
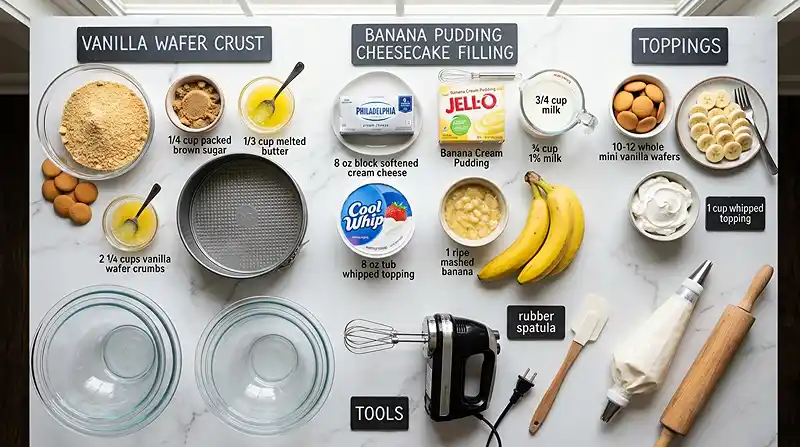
This layered no-bake dessert uses three simple groups of ingredients that you can likely grab in a single grocery run. For the vanilla wafer crust — wafer crumbs, brown sugar, and butter — you want everything at room temperature and that butter fully melted.
For the banana pudding cheesecake filling — cream cheese, banana pudding mix, milk, whipped topping, and a ripe banana — softened cream cheese is non-negotiable for a lump-free finish. And for the toppings, keep things simple and pretty with mini wafers, fresh banana slices, and a piped cloud of whipped cream.
Vanilla Wafer Crust
| Amount | Ingredient |
|---|---|
| 2 1/4 cups | Vanilla wafer crumbs |
| 1/4 cup (packed) | Brown sugar |
| 1/3 cup | Butter, melted (yes, real butter — margarine just doesn’t cut it here) |
Banana Pudding Cheesecake Filling
| Amount | Ingredient |
|---|---|
| 8 oz | Cream cheese, softened (full-fat is the way to go) |
| 1 box (3.4 oz) | Instant banana pudding mix |
| 3/4 cup | Milk (1% works great, whole milk makes it extra rich) |
| 8 oz | Whipped topping, thawed |
| 1 | Ripe banana, mashed (the riper, the sweeter) |
Toppings
| Amount | Ingredient |
|---|---|
| 10–12 | Mini vanilla wafers |
| 1 | Banana, cut into slices |
| 1 cup | Whipped topping (for piping) |
There’s a whole world of delicious desserts waiting for you over at the Delicious Desserts collection. Each one is made with the same love and attention, and they’re all absolutely worth trying. Happy cooking!
Tools You’ll Actually Use
- 9-inch springform pan (lightly greased)
- Food processor or blender (or a zip bag + rolling pin for the crust crumbs)
- Two mixing bowls
- Hand mixer or stand mixer
- Rubber spatula
- Piping bag with a star tip (or a zip-top bag with the corner snipped)
- Plastic wrap (for covering while chilling)
Step-by-Step Instructions for No-Bake Banana Pudding Cheesecake
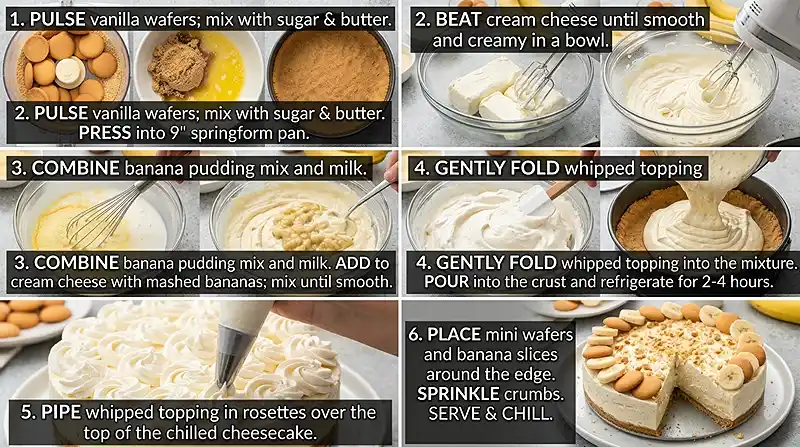
Make the Vanilla Wafer Crust
Step 1 — Crush the vanilla wafers. Pulse the vanilla wafers in a food processor or blender until you get fine, even crumbs. No food processor? No problem — toss the wafers into a sealed zip bag and crush them with a rolling pin until crumbly.
Step 2 — Mix the crust. In a mixing bowl, combine 2 1/4 cups vanilla wafer crumbs, 1/4 cup packed brown sugar, and 1/3 cup melted butter. Stir until every crumb is coated and the mixture looks like damp sand that holds together when pinched.
Step 3 — Press and chill. Pour the crumb mixture into a lightly greased 9-inch springform pan. Press the crumbs firmly into the bottom and partially up the sides using your fingers or the bottom of a measuring cup. Pop the crust into the fridge while you make the filling — this helps it firm up nicely.
Make the Banana Pudding Cheesecake Filling
Step 4 — Beat the cream cheese. In a large mixing bowl, beat the 8 oz of softened cream cheese with a hand mixer until completely smooth and fluffy, with no lumps. This step is the secret to a silky, dreamy filling — cold cream cheese will make this harder, so let it sit out first.
Step 5 — Mix the pudding. In a separate bowl, whisk together the 3.4 oz box of instant banana pudding mix and 3/4 cup milk. Stir for about 2 minutes until the mixture thickens up and is fully combined.
Step 6 — Combine the fillings. Add the banana pudding mixture to the beaten cream cheese, along with 1 mashed ripe banana. Mix everything together until smooth and creamy — it should smell absolutely amazing at this point.
Step 7 — Fold in the whipped topping. Add the 8 oz of thawed whipped topping to the mixture and gently fold it in with a spatula. Use a light hand here — you want to keep things fluffy, not deflate all that lovely airiness.
Step 8 — Fill and chill. Pour the banana pudding cheesecake filling into the chilled vanilla wafer crust and smooth the top with your spatula. Cover tightly with plastic wrap and refrigerate for 2–4 hours, or until the cheesecake is set and firm enough to slice.
Decorate and Serve
Step 9 — Pipe the whipped topping. Once the cheesecake is set, spoon 1 cup of whipped topping into a piping bag fitted with a star tip (or a zip bag with the corner snipped). Pipe swirls all over the top of the cheesecake in whatever pattern your heart desires.
Step 10 — Add the garnishes. Place the mini vanilla wafers and fresh banana slices around the edge of the cheesecake in a pretty pattern. Sprinkle any leftover vanilla wafer crumbs over the top for a little extra crunch and visual charm.
Claire’s Pro Tips for the Perfect Banana Pudding Dessert
This banana pudding dessert is wonderfully forgiving, but a few small habits will take it from good to absolutely unforgettable. These are the things I wish I’d known the first time I made it — consider this your shortcut to cheesecake success.
Always use softened cream cheese. Cold cream cheese is the enemy of a smooth filling. Pull it out of the fridge at least 30 minutes before you start. If you accidentally skip this step and end up with lumps, beat the cream cheese alone for an extra 2–3 minutes before adding anything else.
Don’t skip the chill time. I know it’s tempting to dig in early, but the cheesecake needs a minimum of 2 hours in the fridge — ideally 4 — to set properly. If you try to slice it too soon, it’ll just slump into a pile (still delicious, but not exactly pretty).
Use a very ripe banana in the filling. Those spotty, almost-too-ripe bananas on your counter? That’s exactly what you want here. The riper the banana, the sweeter and more intense the banana flavor in every bite.
Press the crust firmly and evenly. A well-packed crust holds its shape when you slice. Use the bottom of a flat measuring cup to really press everything in — loose crumbs make crumbly slices.
Add banana slices just before serving. Fresh banana starts to brown pretty quickly, so save the banana garnish for right before you put the cheesecake on the table. It’ll look fresher and more beautiful that way.
Quick Fixes for No-Bake Banana Pudding Cheesecake
The filling is lumpy. This almost always means the cream cheese was too cold. Next time, let it soften fully at room temperature. For now, keep mixing — beating it a little longer usually smooths things out.
The cheesecake isn’t setting up. Give it more time in the fridge. Two hours is the minimum, but 4 hours is safer, especially if your kitchen is warm. If it’s still soft after 4 hours, it may need to chill overnight.
The crust is crumbling when I slice it. The crust wasn’t pressed firmly enough, or it didn’t have enough chill time before adding the filling. Next time, chill the crust for at least 15–20 minutes and really pack those crumbs in tight.
The banana flavor isn’t strong enough. Make sure you used a very ripe banana in the filling. You can also add a tiny drop of banana extract to boost the flavor, but go easy — a little goes a long way.
The top looks messy after slicing. Run your knife under hot water and dry it between each cut. Clean, warm cuts make picture-perfect slices every time.
Variations and Fun Twists
One of the best things about this southern dessert is how easily it adapts. Here are a few ways to spin it:
- Chocolate-Banana Twist: Swap the vanilla wafer crust for crushed chocolate wafers or Oreos. The chocolate-banana combo is absolutely stunning.
- Strawberry-Banana Version: Add a layer of sliced fresh strawberries between the crust and the filling for a fruity, colorful variation.
- Gluten-Free Option: Use gluten-free vanilla wafers or gluten-free graham crackers for the crust — everything else in this recipe is naturally GF-friendly.
- Mini Cheesecakes: Press the crust into a lined muffin tin and fill with the cheesecake mixture. Individual portions are great for parties and kids absolutely love them.
- Tropical Twist: Mix a few tablespoons of crushed pineapple (well-drained) into the filling for a banana-pineapple tropical vibe.
Serving, Storage, and Reheating
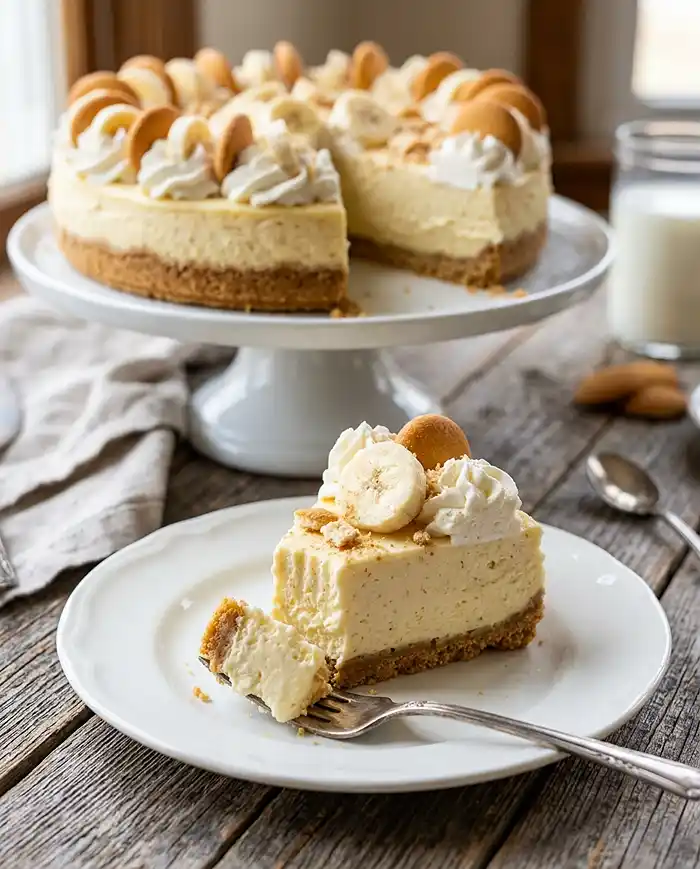
This no-bake banana pudding cheesecake is best served cold, straight from the fridge. Slice it with a warm, clean knife for the prettiest pieces, and add the banana and wafer garnishes right before you bring it to the table.
If you actually have leftovers — which, honestly, I doubt — store the cheesecake covered tightly in the refrigerator for up to 3–4 days. The crust softens slightly over time, which some people actually prefer. Keep in mind that the fresh banana slices on top will brown, so you may want to add fresh garnishes each day.
This is a no-reheat dessert — it’s meant to be enjoyed cold and creamy. If it’s been sitting out for more than 30 minutes, pop it back in the fridge for 15–20 minutes before serving the next slice. And if you need to make it ahead, this cheesecake is absolutely ideal for preparing the day before a party.
No-Waste Kitchen Magic
Got leftover vanilla wafer crumbs? Toss them into a jar and use as a topping for yogurt parfaits, ice cream, or even sprinkle over oatmeal for a fun crunch.
Leftover mashed banana that didn’t make it into the filling? Freeze it in a zip bag for your next batch of banana bread or smoothies. Frozen mashed banana is also a fantastic add-in for overnight oats.
Extra whipped topping can be dolloped onto hot cocoa, stirred into coffee, or layered into a quick trifle using any leftover cake scraps and fruit you have on hand.
If the cheesecake is getting close to the end of its fridge life, cut it into cubes and fold them into a bowl of fresh fruit for an easy banana pudding trifle that looks intentional and delicious.
FAQs
Can I make this No-Bake Banana Pudding Cheesecake the night before?
Absolutely — and it’s actually better that way! Making it the night before gives the flavors extra time to meld together and the filling sets more firmly overnight. Just hold off on adding the banana slices and fresh garnishes until right before serving.
Will this cheesecake freeze well?
It can be frozen, but the texture changes a bit once thawed — the filling can become slightly grainy and the crust loses some of its crunch. If you do freeze it, wrap it tightly in plastic wrap and freeze for up to 1 month. Thaw overnight in the fridge before serving.
How do I know when the cheesecake is ready to slice?
The cheesecake is set when it feels firm to the touch in the center, not jiggly or soft. After at least 2–4 hours in the fridge, press the center gently — if it bounces back and feels solid, it’s ready. When in doubt, give it another hour.
What’s the best way to store leftover banana pudding cheesecake?
Cover it tightly with plastic wrap or store individual slices in an airtight container in the refrigerator. It keeps well for 3–4 days. For the freshest look, add new banana slice garnishes daily since cut bananas brown over time.
Why should I use softened cream cheese in this recipe?
Softened cream cheese blends much more smoothly into the filling, preventing lumps that are nearly impossible to fix once the other ingredients are added. It also creates a lighter, creamier texture in the finished cheesecake. Cold cream cheese means clumpy cheesecake — and nobody wants that.
Can I pair this dessert with other light dishes?
Absolutely — a rich southern dessert like this cheesecake pairs beautifully after something fresh and light. Try serving it after these ground chicken teriyaki lettuce wraps for a meal that balances light and indulgent perfectly. And if you’re building out a full spread, a refreshing side like this creamy cucumber dill salad keeps things bright before dessert hits the table.
A Sweet Closing Thought
I’d love to see your spin on this No-Bake Banana Pudding Cheesecake! Drop a comment below with your photos — I’d genuinely love to see how you made it your own. Whether you swapped the crust, added a fruity layer, or went full-on fancy with the piping, this layered no-bake dessert is so versatile that I know you’ve already got amazing ideas brewing.
This No-Bake Banana Pudding Cheesecake has become one of those recipes in my kitchen that feels like home every single time. I hope it becomes one of yours too.
I’m Claire Whitmore — a dessert daydreamer from Asheville, NC. For me, baking (and not-baking!) isn’t about perfect pastries — it’s about the joy of sharing something sweet with the people you love. And maybe sneaking an extra spoonful of that banana pudding filling before the cheesecake even makes it to the fridge.
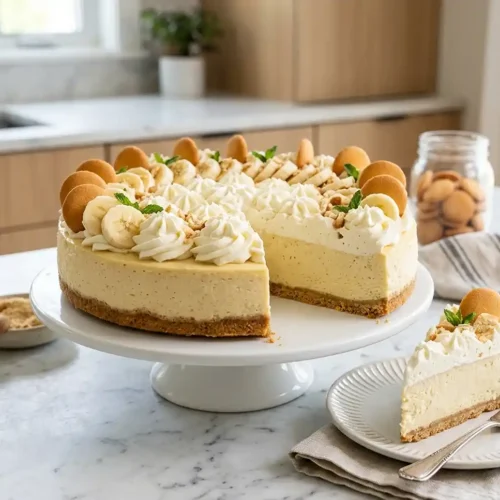
No-Bake Banana Pudding Cheesecake
Equipment
- 9-inch springform pan
- Food processor or blender
- Zip bag + rolling pin
- Mixing bowls
- Hand mixer or stand mixer
- Rubber spatula
- Piping bag with star tip
- Plastic wrap
Ingredients
Vanilla Wafer Crust
- 2 ¼ cups Vanilla wafer crumbs
- ¼ cup Brown sugar packed
- ⅓ cup Butter melted
Banana Pudding Cheesecake Filling
- 8 oz Cream cheese softened
- 1 box (3.4 oz) Instant banana pudding mix
- ¾ cup Milk 1% or whole milk
- 8 oz Whipped topping thawed
- 1 Ripe banana mashed
Toppings
- 10–12 Mini vanilla wafers
- 1 Banana cut into slices
- 1 cup Whipped topping for piping
Instructions
- Crush the vanilla wafers in a food processor or blender until fine crumbs form. Alternatively, place wafers in a sealed zip bag and crush with a rolling pin.
- In a mixing bowl, combine vanilla wafer crumbs, brown sugar, and melted butter. Stir until evenly coated and the mixture resembles damp sand.
- Press the crumb mixture firmly into the bottom and partially up the sides of a lightly greased 9-inch springform pan. Refrigerate while preparing the filling.
- Beat softened cream cheese in a large bowl with a hand mixer until smooth and fluffy with no lumps.
- In a separate bowl, whisk together instant banana pudding mix and milk for about 2 minutes until thickened.
- Add the banana pudding mixture and mashed banana to the cream cheese. Mix until smooth and creamy.
- Gently fold in the thawed whipped topping with a spatula until light and fluffy.
- Pour the filling into the chilled crust and smooth the top. Cover with plastic wrap and refrigerate for 2–4 hours until firm.
- Pipe whipped topping onto the chilled cheesecake using a piping bag fitted with a star tip or a zip bag with the corner snipped.
- Decorate with mini vanilla wafers and banana slices. Sprinkle extra wafer crumbs over the top if desired and serve chilled.