Honey Lime Chicken Meal Prep
Honey Lime Chicken Meal Prep is the kind of recipe that quietly becomes your weekly ritual. I’m Linda Sandra — a Charleston home cook who believes weekday lunches should feel exciting, not sad — and this one genuinely delivers.
This recipe brings together zesty lime, golden honey, and perfectly cooked chicken in a marinade that does most of the heavy lifting for you. It’s the kind of dish that hits multiple goals at once: high-protein, naturally gluten-free, and packed with bright, bold flavor.
I started making these honey lime chicken bowls during a particularly chaotic stretch of work deadlines. One Sunday of prep saved me five days of scrambling — and honestly, I’ve never looked back.
Table of Contents
Little Snapshot: What This Recipe Delivers
Loving the ease of this Honey Lime Chicken? If you’re all about comforting, one-dish wonders that make weeknights a breeze, you absolutely have to explore our delicious collection of hearty chicken casseroles next!
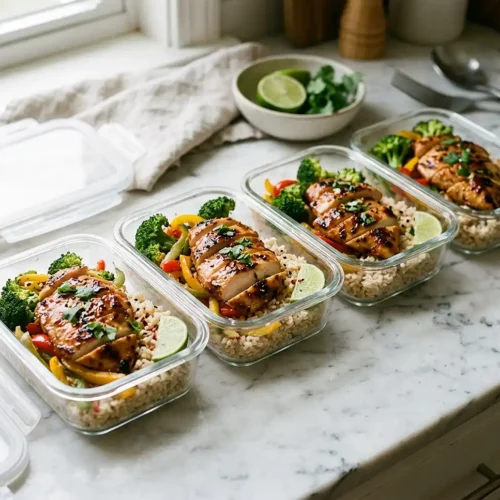
This Honey Lime Chicken Meal Prep features tender marinated chicken — infused with fresh lime zest, honey, garlic, and chili powder — cooked in about 15 minutes and portioned into four ready-to-go servings.
It’s an easy, healthy lunch prep option that works in a pan, air fryer, or on the grill. Total time from marinade to plate is under an hour, with a difficulty level that suits total beginners.
Why You’ll Love This Recipe
- This honey lime chicken meal prep takes less active effort than deciding what to order for lunch — just marinate, cook, and you’re set for days.
- It’s naturally gluten-free and works beautifully for clean eating goals, without tasting like diet food. Warm, citrusy, and just a little sweet — your taste buds will absolutely not feel deprived.
- One batch covers four full servings, which means four fewer “what am I eating today?” panic moments every single week.
- According to Serious Eats’ complete guide to pan-seared chicken, the key to juicy chicken every time is resting it after cooking — and this recipe builds that step right in.
Quick Facts
Here’s the quick scoop on this Honey Lime Chicken Meal Prep.
- CourseMain Dish / Meal Prep
- Prep Time10 minutes
- Marinate Time20 minutes – 24 hours
- Cook Time12–15 minutes
- Total Time35–45 minutes (active)
- Servings4 servings
- DifficultyEasy
Nutritional Peek
Here’s a per-serving breakdown for this honey lime chicken. Numbers are estimates based on chicken breast and standard ingredient amounts.
| Nutrient | Amount Per Serving |
|---|---|
| Calories | ~230 kcal |
| Protein | ~28 g |
| Carbohydrates | ~14 g |
| Fat | ~6 g |
| Fiber | ~0.2 g |
| Sugar | ~12 g |
Ingredients
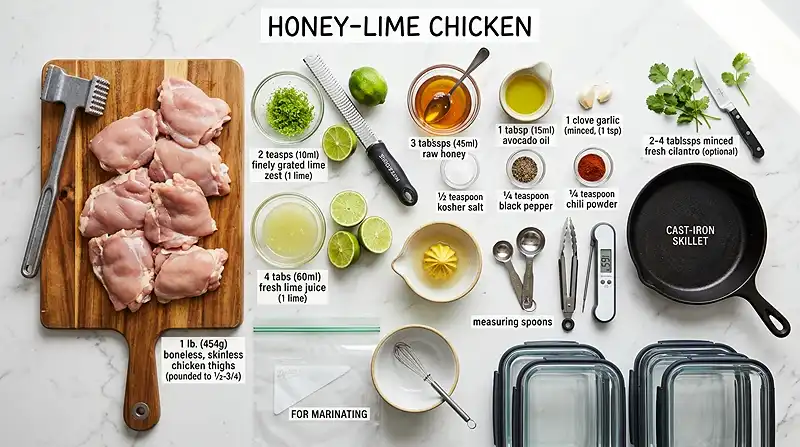
These honey lime chicken bowls use simple, honest pantry staples. For the marinade — lime zest, lime juice, honey, and garlic — fresh is always best. For the protein, boneless skinless chicken breast or thighs both work beautifully here.
Room-temperature chicken cooks more evenly, so pull it from the fridge while you prep everything else.
| Amount | Ingredient |
|---|---|
| 1 pound | Boneless skinless chicken breast or thighs, pounded to 1/2–3/4 inch thickness |
| 2 teaspoons | Fresh lime zest (zest of 1 lime) |
| 4 tablespoons | Fresh lime juice (juice of 1 lime) |
| 3 tablespoons | Honey or agave |
| 1 tablespoon | Avocado oil or olive oil |
| 1 clove | Garlic, finely minced |
| 1/2 teaspoon | Salt |
| 1/4 teaspoon | Black pepper |
| 1/4 teaspoon | Chili powder |
| 2–4 tablespoons | Fresh cilantro, minced (optional) |
| A small drizzle | Oil for the pan or grill |
Tools You’ll Actually Use
- Zip-top bag or lidded food storage container (for marinating)
- Small mixing bowl and whisk
- Meat mallet or rolling pin (for pounding chicken)
- Skillet or grill pan — OR air fryer (preferred)
- Instant-read meat thermometer
- Cutting board and sharp knife
- Meal prep containers (4 servings)
Step-by-Step Instructions
Ready to make this Honey Lime Chicken Meal Prep? Here’s exactly how it comes together, step by step.
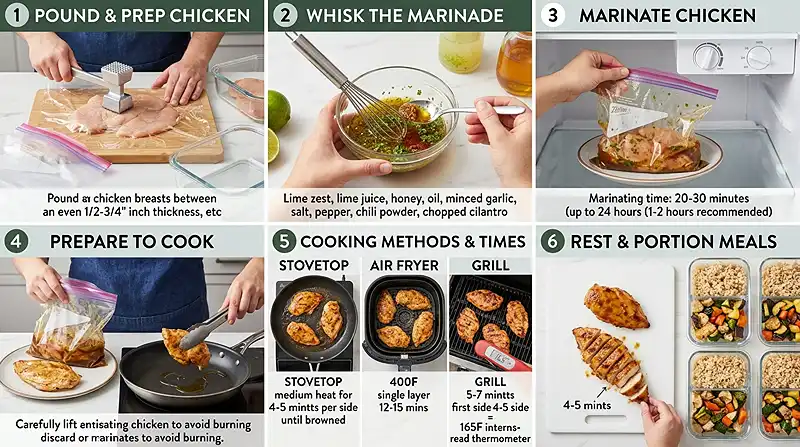
Step 1: Prep the Chicken
Place your boneless skinless chicken breast (or thighs) in a zip-top bag or lidded container. Using a meat mallet or rolling pin, pound it to an even 1/2–3/4 inch thickness. Even thickness means even cooking — no dry edges and raw middles here.
Step 2: Make the Marinade
In a small bowl, whisk together the lime zest, fresh lime juice, honey, oil, minced garlic, salt, black pepper, chili powder, and cilantro if using. Give it a quick taste — now’s the time to add a little extra honey for sweetness or more chili powder for heat.
Step 3: Marinate the Chicken
Pour the marinade over the chicken in the bag or container and seal it up. Pop it on a plate (to catch any drips) and slide it into the fridge. Marinate for at least 20–30 minutes. For the best flavor, aim for 1–2 hours. You can go up to 24 hours, but the lime will start to slightly change the texture of the chicken if left too long.
Step 4: Bring to Room Temperature
When you’re ready to cook, pull the chicken from the fridge and let it sit at room temperature while your pan, air fryer, or grill heats up. This small step makes a real difference in how evenly the chicken cooks through.
Step 5A: Stovetop Method
Remove chicken from the marinade and discard any remaining liquid — extra marinade on the chicken will burn, not caramelize. Heat a drizzle of oil in a skillet over medium heat. Cook the chicken 4–5 minutes per side until nicely browned and the internal temperature reaches 165°F. Watch the heat closely — honey can char quickly. Lower the heat if needed.
Step 5B: Air Fryer Method (Preferred)
Preheat your air fryer to 400°F. Remove the chicken from the marinade, discard the liquid, and arrange pieces in a single layer — not touching — so the hot air can circulate freely. Air fry for 12–15 minutes, until the internal temperature reads 165°F. Cook in batches if needed.
Step 5C: Grill Method
Preheat the grill and oil the grates lightly. Remove chicken from the marinade and discard the liquid. Grill 5–7 minutes on the first side, flip, then cook another 4–5 minutes on the second side, until the interior hits 165°F.
Step 6: Rest, Then Slice
Once cooked, set the chicken on a clean cutting board and let it rest for 4–5 minutes before slicing. This lets the juices redistribute through the meat instead of running out the second you cut into it. Slice, portion into your meal prep containers, and you’re done.
Pro Tips and Gentle Guidance
These honey lime chicken bowls are pretty forgiving, but a few small moves make a big difference. Here’s what I’ve learned from making this on repeat.
Pound the chicken evenly. This isn’t just a fussy chef thing — it genuinely prevents dry, overcooked edges. A few taps with a mallet takes under a minute and the payoff is juicy chicken every time.
Don’t skip discarding the marinade. I know it feels wasteful, but raw chicken has been sitting in that liquid. The extra moisture also prevents proper browning. Always start with dry-ish chicken going into the pan.
The air fryer is genuinely the best method here. The circulating heat creates a slightly caramelized exterior without any char risk. If you have one, use it.
Marinate in the morning. If you’re doing Sunday meal prep, mix the marinade the night before or first thing in the morning. By the time you’re ready to cook, you’ll get that deeper, richer flavor without any extra effort.
Quick Fixes for Honey Lime Chicken Meal Prep
The chicken turned out dry. This usually means it was overcooked or not pounded to even thickness. Use a meat thermometer and pull the chicken at exactly 165°F — not higher. Let it rest fully before slicing.
The honey is burning in the pan. That’s the sugar in the honey responding to high heat. Lower the burner to medium or medium-low, and don’t walk away. The stovetop method needs a little more attention than the air fryer.
The flavor feels weak. The marinade time makes a huge difference here. If you only had 20 minutes, that’s fine for a weeknight, but for meal prep you’ll notice a much bigger flavor payoff at 1–2 hours or overnight.
The chicken isn’t browning properly. Make sure you’re discarding the marinade before cooking and that the pan or grill is fully preheated. A wet or cold surface steams the chicken instead of searing it.
Variations and Adaptations
These summer meal prep bowls are endlessly adaptable. Here are some easy twists to keep things interesting week after week.
- Spicy version: Double the chili powder or add a pinch of cayenne to the marinade.
- Citrus swap: Try orange juice and zest instead of lime for a sweeter, mellower flavor.
- Dairy-free and gluten-free: This recipe already fits both — no swaps needed.
- Thighs over breasts: Chicken thighs are more forgiving if you accidentally cook them a minute too long. Great beginner swap.
- Sheet pan version: Roast at 400°F for 20–25 minutes alongside sliced peppers and onions for a complete one-pan meal.
- Bowl style: Serve over cilantro lime rice with black beans, avocado, and a drizzle of extra honey. Or try pairing with this meal prep southwest chicken salad jar formula for a full week of variety.
Serving, Storage, and Reheating
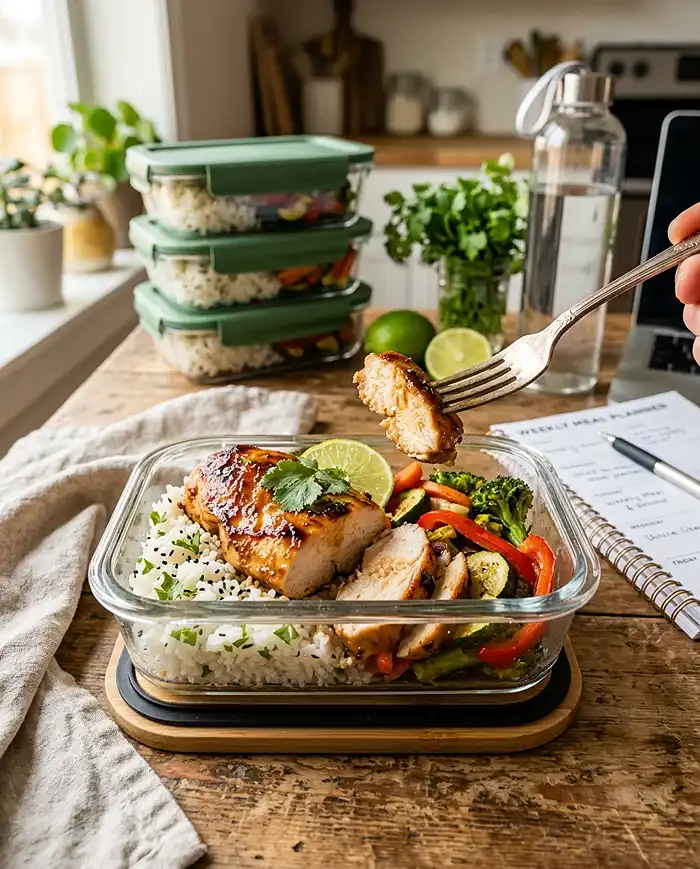
These honey lime chicken bowls are delicious served over cilantro rice, in lettuce wraps, or sliced into salads. They also work great as a protein addition to grain bowls — pair with roasted sweet potato, black beans, and a simple avocado crema.
Store sliced chicken in airtight meal prep containers in the refrigerator for up to 4 days. Keep the chicken separate from wet toppings like salsa or dressing until you’re ready to eat — this keeps everything fresher and the chicken from getting soggy.
To reheat, microwave for 60–90 seconds with a damp paper towel draped over the container. This traps steam and keeps the chicken from drying out. You can also reheat quickly in a skillet over medium heat for about 2 minutes per side.
No-Waste Kitchen Magic
Got leftover chicken from your meal prep? Here are a few smart ways to use it up before it turns into a forgotten container in the back of the fridge.
- Quesadillas: Chop leftover chicken and stuff into a tortilla with shredded cheese. Two minutes in a pan and dinner is done.
- Grain bowls: Throw sliced chicken over leftover rice or farro with whatever vegetables you have on hand.
- Wraps and sandwiches: Thinly sliced honey lime chicken with a smear of avocado and some greens makes a seriously good lunch wrap.
- Chicken tacos: Warm the chicken, slice thin, and tuck into corn tortillas with shredded cabbage, lime, and cilantro. Done in minutes.
- Soup booster: Stir diced leftover chicken into a simple broth-based soup during the last few minutes of cooking for a protein-packed, flavor-forward addition.
Let’s Wrap It Up
This Honey Lime Chicken Meal Prep is one of those recipes that earns a permanent spot in your rotation. It’s bright, protein-packed, endlessly versatile, and it genuinely makes weekday eating feel like a treat instead of a chore.
If you’re already a fan of batch cooking, you might also love this Memorial Day deviled egg board for your next gathering — easy, crowd-pleasing, and just as stress-free to put together.
I’d love to see your spin on this Honey Lime Chicken Meal Prep! Drop a comment below with how you served yours — over rice, in wraps, as tacos? Tag me and show me your bowls. This honey lime chicken is so versatile, I know you’ve already got delicious ideas brewing.
So there you go — Honey Lime Chicken Meal Prep that tastes like a restaurant order but costs a fraction and takes one Sunday afternoon. Happy prepping!
I’m Linda Sandra — a Charleston home chef and comfort-food daydreamer. Around here, cooking’s not about perfection — it’s about cozy vibes, creative twists, and food that feels like love.
FAQs
Here are the questions I get most often about this healthy lunch prep recipe — answered honestly and without the fluff.
Can I freeze honey lime chicken meal prep?
Yes, you can freeze it before or after cooking. To freeze before cooking, place the chicken in the marinade in a freezer bag and freeze for up to 3 months — it will marinate as it thaws overnight in the fridge. To freeze cooked chicken, cool it completely first, then store in a freezer-safe container for up to 2 months.
How long should I marinate the chicken?
At minimum, 20–30 minutes will work in a pinch. For the best flavor, 1–2 hours is the sweet spot. You can marinate up to 24 hours, but beyond that the lime juice can begin to break down the protein and affect the texture.
What is the best way to store honey lime chicken meal prep?
Store in airtight containers in the refrigerator for up to 4 days. Let the chicken cool completely before sealing — trapping steam leads to soggy chicken. Keep any sauces or dressings in separate small containers until ready to serve.
How do I know when honey lime chicken is done?
Use an instant-read thermometer inserted into the thickest part of the chicken — you’re looking for 165°F. Visually, the outside should be nicely browned and the center should no longer be pink when you cut into it.
Should I use chicken breast or chicken thighs for this recipe?
Both work well. Breasts are leaner and slice up cleanly for bowls. Thighs are juicier and more forgiving if cooked slightly past 165°F. For meal prep beginners, thighs are the safer and more flavorful choice.
Honey Lime Chicken Meal Prep
Equipment
- Zip-top bag or lidded food storage container
- Small mixing bowl and whisk
- Meat mallet or rolling pin
- Skillet, grill pan, or air fryer
- Instant-read meat thermometer
- Cutting board and sharp knife
- Meal prep containers
Ingredients
For the Honey-Lime Chicken
- 1 pound boneless skinless chicken breast or thighs pounded to 1/2–3/4 inch thickness
- 2 tsp fresh lime zest zest of 1 lime
- 4 tbsp fresh lime juice juice of 1 lime
- 3 tbsp honey or agave
- 1 tbsp avocado oil or olive oil
- 1 clove garlic finely minced
- ½ tsp salt
- ¼ tsp black pepper
- ¼ tsp chili powder
- 2-4 tbsp fresh cilantro minced, optional
- small drizzle of oil for cooking for the pan or grill
Instructions
- Prep Chicken. Place the boneless skinless chicken breast or thighs in a zip-top bag or lidded container. Pound to an even 1/2–3/4 inch thickness using a meat mallet or rolling pin.
- Make the Marinade. In a small bowl, whisk together the lime zest, fresh lime juice, honey, oil, minced garlic, salt, black pepper, chili powder, and cilantro (if using). Taste and adjust — add more honey for sweetness or more chili powder for heat.
- Marinate. Pour the marinade over the chicken in the bag or container and seal. Place on a plate to catch any drips and refrigerate for at least 20–30 minutes, up to 24 hours. For best flavor, aim for 1–2 hours.
- Bring to Room Temperature. When ready to cook, remove the marinating chicken from the refrigerator and allow it to come to room temperature while you preheat your pan, air fryer, or grill.
- Discard Marinade. Remove the chicken from the marinade and discard the remaining liquid. Extra marinade left on the chicken will burn during cooking.
- Stovetop Method. Heat a drizzle of oil in a skillet over medium heat. Cook chicken 4–5 minutes per side until browned on the outside, no longer pink inside, and the internal temperature reaches 165°F. Watch closely — the honey can start to char. Reduce heat as needed.
- Air Fryer Method (Preferred). Preheat the air fryer to 400°F. Arrange chicken in a single layer, not touching, so air can circulate freely. Air fry 12–15 minutes, or until the internal temperature reaches 165°F. Cook in batches if needed.
- Grill Method. Preheat the grill and oil the grates. Grill 5–7 minutes on the first side, then flip and cook 4–5 minutes on the second side, or until chicken reaches 165°F internally.
- Rest. Set the cooked chicken on a clean cutting board and let it rest 4–5 minutes before slicing. This lets the juices redistribute so the chicken stays juicy when cut. Slice, portion into meal prep containers, and store.