Easy Red Velvet Blossom Cookies
Easy Red Velvet Blossom Cookies are soft, chocolatey, and crowned with a Hershey’s Kiss — perfect for holidays, Valentine’s Day, or any time you need a festive treat that’s ready in under 30 minutes.
Easy Red Velvet Blossom Cookies are one of those festive little treats that look way fancier than the effort you put in — and honestly, that’s my favorite kind of baking. Hey there, I’m Claire Whitmore — a pastry whisperer in Asheville, NC, where butter totally counts as self-care.
These soft, cocoa-kissed cookies feature a vibrant red hue, a sparkly sugar coating, and a Hershey’s Kiss centerpiece that makes them perfect for Valentine’s Day, Christmas cookie trays, or just because you deserve something pretty on a Tuesday.
They’re quick to mix, simple to shape, and they bake up in just 10 minutes — so you can go from craving to cookie in less time than it takes to fold a load of laundry. The soft, buttery texture pairs beautifully with the slight chocolate flavor, and that glossy Hershey’s Kiss on top? It’s basically edible jewelry.
Table of Contents
Little Snapshot: What This Recipe Delivers
These Easy Red Velvet Blossom Cookies deliver soft, cocoa-infused sweetness with a buttery crumb and a glossy chocolate Kiss on top. They take just 10 minutes to bake, use simple pantry ingredients, and look absolutely gorgeous on any dessert table — no fancy skills required.
Why You’ll Love This Recipe 🌸
- This Easy Red Velvet Blossom Cookies recipe takes less time than folding laundry — and tastes way better.
- They’re soft, buttery, and just chocolatey enough without being too rich — perfect for people who want a little indulgence without the sugar coma.
- The red sanding sugar coating makes them sparkle like edible confetti, so they’re Instagram-ready without any extra effort.
- According to Sally’s Baking Addiction in their detailed baking guide, the secret to tender cookies is avoiding overmixing — and this recipe proves exactly why.
Quick Facts ⚡
Here’s the quick scoop on this Easy Red Velvet Blossom Cookies recipe.
- CourseDessert
- Prep Time15 minutes
- Cook Time10 minutes
- Total Time25 minutes
- Servings18 cookies
- DifficultyEasy


Easy Red Velvet Blossom Cookies
Equipment
- Stand mixer or handheld electric mixer
- Large baking sheet
- Parchment paper
- Tablespoon or cookie scoop
- Small bowl
- cooling rack
Ingredients
Cookie Dough
- 7 tbsp Butter salted or unsalted, softened
- ½ cup Brown sugar
- 2 tbsp Granulated sugar
- 1 tsp Vanilla extract
- 1 large Egg yolk
- ¼ tsp Red food coloring gel
- 1 cup All-purpose flour
- 1 tbsp Cocoa powder unsweetened
- ½ tsp Baking powder
- ¼ tsp Salt
For Rolling and Topping
- ¼ cup Red sanding sugar
- 18 Hershey’s Chocolate Kisses unwrapped
Instructions
- Preheat your oven to 350°F, then line a large baking sheet with parchment paper and set it aside. Unwrap all 18 Hershey’s Kisses now so you’re not frantically peeling foil while your cookies cool.
- In a stand mixer (or with a handheld mixer), cream together the softened butter, brown sugar, and granulated sugar until the mixture is smooth, fluffy, and pale — about 2 minutes.
- Add the egg yolk, vanilla extract, and red food coloring gel to the butter-sugar mixture and mix until everything is fully combined and you’ve got that gorgeous red hue.
- Add the all-purpose flour, cocoa powder, baking powder, and salt to the bowl, then mix just until the flour mixture disappears and the dough comes together. Don’t overmix here — once you can’t see any dry flour, stop.
- Using a tablespoon or cookie scoop, portion out 18 equally sized cookie dough balls. Roll each one between the palms of your hands to smooth it out, then roll it in the red sanding sugar until it’s fully coated and sparkling.
- Place the cookie dough balls on your prepared baking sheet — give them a little space, about 2 inches apart — and bake for exactly 10 minutes. They’ll look slightly underdone when you pull them out, and that’s perfect.
- As soon as you pull the cookies out of the oven, gently press a Hershey’s Kiss into the center of each one. Press down just enough so it sticks but not so much that the cookie cracks. Let the cookies cool on the baking sheet for 10 minutes, then transfer them to a cooling rack.
Notes
Nutritional Peek
Here’s a quick nutritional snapshot for these red velvet blossom cookies — because sometimes it’s nice to know what you’re indulging in (no judgment here).
| Nutrient | Amount per serving |
|---|---|
| Calories | 120 kcal |
| Protein | 1g |
| Carbohydrates | 16g |
| Fat | 6g |
| Fiber | 0.5g |
| Sugar | 10g |
Easy Red Velvet Blossom Cookies Ingredients
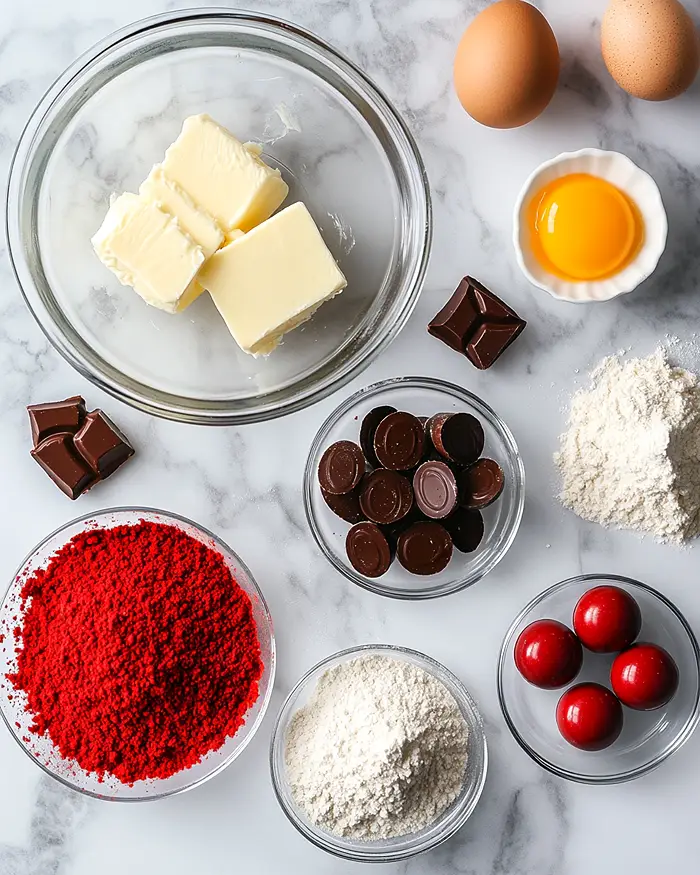
These red velvet hershey kiss cookies come together with simple pantry staples — nothing fancy, nothing weird, just good old-fashioned baking ingredients that you probably already have.
For the wet ingredients — butter, brown sugar, granulated sugar, egg yolk, vanilla, and red food coloring — you’ll want everything at room temperature so it creams together smoothly. For the dry mix — flour, cocoa powder, baking powder, and salt — a quick whisk ensures no lumps sneak in.
| Amount | Ingredient |
|---|---|
| 7 tbsp | Butter (salted or unsalted, softened — yes, real butter, margarine just doesn’t cut it here) |
| 1/2 cup | Brown sugar |
| 2 tbsp | Granulated sugar |
| 1 tsp | Vanilla extract |
| 1 large | Egg yolk (save the white for an omelet tomorrow) |
| 1/4 tsp | Red food coloring gel (the gel kind gives you that gorgeous color without making the dough soggy) |
| 1 cup | All-purpose flour |
| 1 tbsp | Cocoa powder (unsweetened) |
| 1/2 tsp | Baking powder |
| 1/4 tsp | Salt |
| 1/4 cup | Red sanding sugar (for rolling — this is what makes them sparkle) |
| 18 | Hershey’s Chocolate Kisses (unwrap them before you start baking, trust me) |
Tools You’ll Actually Use
- Stand mixer or handheld electric mixer
- Large baking sheet
- Parchment paper
- Tablespoon or cookie scoop
- Small bowl (for the sanding sugar)
- Cooling rack
Step-by-Step Instructions
Making Easy Red Velvet Blossom Cookies is the kind of baking project that feels rewarding without being stressful — just the way I like it. Here’s how to bring these beauties to life.
Step 1: Preheat and Prep
Preheat your oven to 350°F, then line a large baking sheet with parchment paper and set it aside. Unwrap all 18 Hershey’s Kisses now so you’re not frantically peeling foil while your cookies cool — learned that one the hard way.
Step 2: Cream the Butter and Sugars
In a stand mixer (or with a handheld mixer), cream together the softened butter, brown sugar, and granulated sugar until the mixture is smooth, fluffy, and pale — about 2 minutes. This is where the magic starts, so don’t rush it.
Step 3: Add the Wet Ingredients
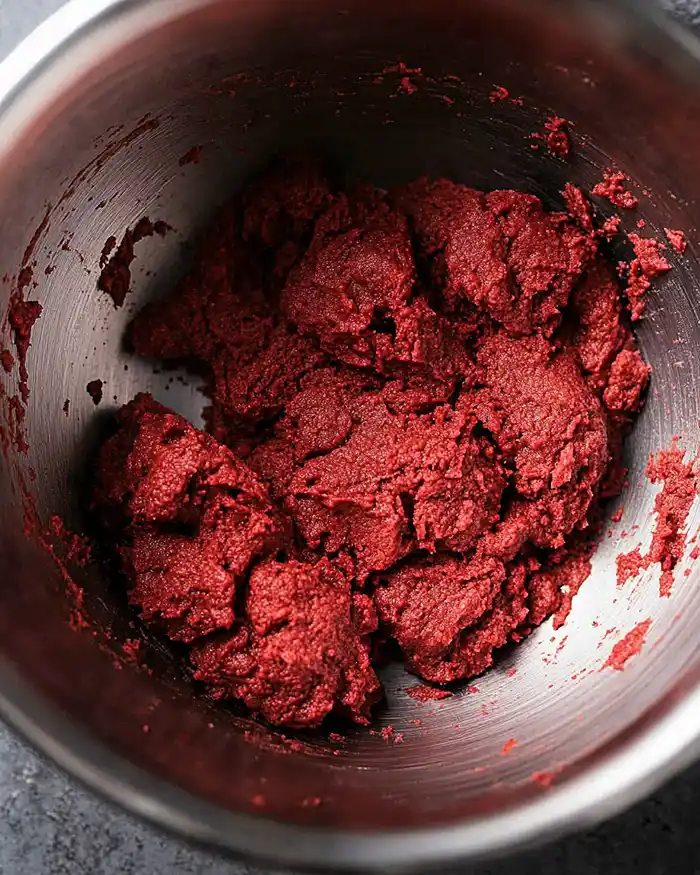
Add the egg yolk, vanilla extract, and red food coloring gel to the butter-sugar mixture and mix until everything is fully combined and you’ve got that gorgeous red hue. The color should be vibrant but not neon — think velvet, not traffic cone.
Step 4: Mix in the Dry Ingredients
Add the all-purpose flour, cocoa powder, baking powder, and salt to the bowl, then mix just until the flour mixture disappears and the dough comes together. Don’t overmix here — once you can’t see any dry flour, stop. Overmixing leads to tough cookies, and nobody wants that.
Step 5: Shape and Roll the Dough
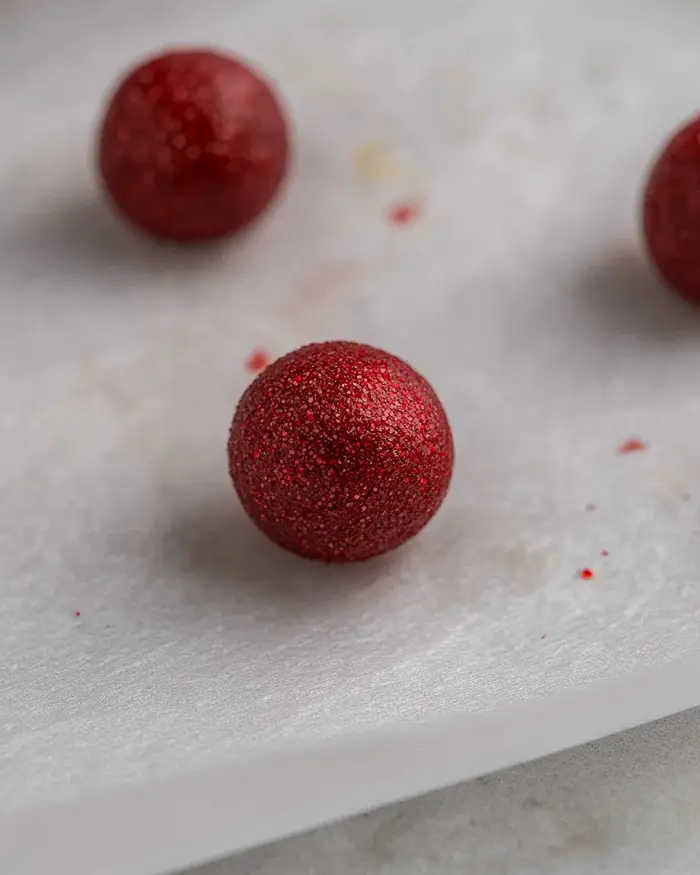
Using a tablespoon or cookie scoop, portion out 18 equally sized cookie dough balls. Roll each one between the palms of your hands to smooth it out, then roll it in the red sanding sugar until it’s fully coated and sparkling like a tiny disco ball.
Step 6: Bake
Place the cookie dough balls on your prepared baking sheet — give them a little space, about 2 inches apart — and bake for exactly 10 minutes. They’ll look slightly underdone when you pull them out, and that’s perfect. They’ll firm up as they cool, and you’ll end up with soft, chewy centers.
Step 7: Add the Kisses
As soon as you pull the cookies out of the oven, gently press a Hershey’s Kiss into the center of each one. Press down just enough so it sticks but not so much that the cookie cracks. Let the cookies cool on the baking sheet for 10 minutes — this helps them set without falling apart — then transfer them to a cooling rack.
Claire’s Pro Tips & Gentle Guidance
Here’s where I share the little secrets that make these red velvet kiss cookies go from good to “wait, can I have another one?” For the butter, make sure it’s truly softened — not melted, not cold, but room temperature and slightly squishy when you press it. This helps it cream properly with the sugar and gives you that soft, tender texture.
Use gel food coloring instead of liquid if you can. The gel version gives you a richer, more vibrant color without adding extra moisture to the dough, which can throw off the texture.
Don’t skip the sanding sugar coating — it’s not just for looks. That sparkly outer layer adds a little crunch and makes the cookies feel extra special, like you put in way more effort than you actually did.
If your Kisses start to melt or lean to one side, pop the whole baking sheet in the fridge for 5 minutes. The chocolate will firm back up, and they’ll stay perfectly perched on top.
According to King Arthur Baking‘s expert cookie troubleshooting resource, letting cookies cool on the baking sheet before moving them is key to preventing breakage — and these delicate beauties need that little rest.
Quick Fixes for Easy Red Velvet Blossom Cookies
Problem: My cookies spread too much and lost their shape.
Your butter was probably too warm or even melted. Make sure it’s softened but still holds its shape when you press it. If your kitchen is really warm, chill the dough balls for 10 minutes before baking.
Problem: The Hershey’s Kisses melted into the cookies.
You pressed them in too hard or left the cookies on the hot pan too long. Press gently — just enough to nestle them in — and let the cookies cool on the pan for 10 minutes before moving them. If it’s a hot day, chill the baking sheet briefly before adding the Kisses.
Problem: My cookies turned out dry and crumbly.
You either overbaked them or overmixed the dough. These cookies bake fast — 10 minutes is all they need, and they’ll look slightly underdone when you pull them out. Also, mix the dough just until the flour disappears, no more.
Problem: The red color looks patchy or streaky.
The food coloring wasn’t fully incorporated. Mix the wet ingredients (butter, sugar, egg yolk, vanilla, and food coloring) for an extra 30 seconds to make sure the color is evenly distributed before you add the dry ingredients.
Variations & Fun Twists
Want to switch things up? These red velvet blossom cookies are super versatile. Swap the red sanding sugar for white or pink for a softer, more romantic vibe — perfect for bridal showers or baby showers.
For a richer chocolate flavor, use dark cocoa powder instead of regular unsweetened cocoa. You’ll get a deeper color and a slightly more intense chocolate taste that pairs beautifully with the Hershey’s Kiss.
If you’re not a fan of Hershey’s Kisses, try using Dove Promises, Rolo candies, or even a white chocolate truffle. Each one gives you a different flavor profile, and they all look adorable.
Want to make them gluten-free? Swap the all-purpose flour for a 1:1 gluten-free baking blend. I’ve done this with great success — just make sure your blend includes xanthan gum for the best texture.
Serving, Storage & Reheating
Serve these red velvet hershey kiss cookies while they’re still slightly warm — the Kiss will be a little melty and the cookie will be at peak softness. They’re perfect alongside a glass of cold milk, a cup of coffee, or tucked into a holiday cookie tin with other favorites like my Coffee Frosted Brownies or Decadent Blackberry Velvet Gothic Cake.
Store them in an airtight container at room temperature for up to 5 days. Layer them with parchment paper so the Kisses don’t stick to each other, and they’ll stay soft and chewy.
If you want to freeze them, place the cooled cookies in a single layer on a baking sheet and freeze until solid, then transfer to a freezer-safe bag or container. They’ll keep for up to 3 months. Thaw at room temperature for about 20 minutes before serving — they’ll taste just as good as the day you baked them.
No-Waste Kitchen Magic
Got leftover egg whites from this recipe? Whip them into a simple meringue, add them to your morning scramble, or save them in the fridge for up to 4 days to use in my Cinnamon Roll Overnight Oats with Protein or a frittata.
If you have extra red sanding sugar, sprinkle it on top of vanilla cupcakes, sugar cookies, or even rim a festive cocktail glass. It keeps forever in the pantry and adds instant sparkle to anything you’re baking.
Day-old cookies (if you somehow have any left) make a fantastic crumbled topping for ice cream or yogurt. Just pulse them in a food processor for a few seconds and sprinkle them over your favorite frozen treat.
Easy Red Velvet Blossom Cookies FAQs
Can I freeze the cookie dough before baking?
Absolutely! Roll the dough balls in the sanding sugar, then freeze them on a baking sheet until solid. Transfer to a freezer bag and store for up to 3 months. Bake straight from frozen — just add an extra minute or two to the baking time.
What’s the best way to store red velvet blossom cookies?
Keep them in an airtight container at room temperature, layered with parchment paper so the Kisses don’t stick. They’ll stay soft and fresh for up to 5 days, though I doubt they’ll last that long.
How do I know when these cookies are done?
They’ll look slightly underdone when you pull them out — the edges will be set but the centers will still look soft. That’s exactly what you want. They firm up as they cool, giving you that perfect chewy texture.
Why should I use gel food coloring instead of liquid in red velvet kiss cookies?
Gel food coloring is more concentrated, so you get a vibrant red hue without adding extra liquid to your dough. Liquid food coloring can make the dough too wet, which affects the texture and can cause the cookies to spread too much.
Can I make these cookies without a stand mixer?
Yes! A handheld electric mixer works just as well. You can even do it by hand with a wooden spoon and a little elbow grease, though it’ll take a bit longer to cream the butter and sugar properly.
So glad you tried this one! The Cookies & Brownies collection has even more recipes that are just as comforting and crowd-pleasing. Go ahead, take a look — your next favorite dish is right there.
Cozy Closing
I’d love to see your spin on these Easy Red Velvet Blossom Cookies! Drop a comment below with your red velvet blossom cookies photos — I’d love to see how you made them your own.
These cookies are so versatile; I bet you’ve got amazing variations already in mind. Whether you’re baking them for a holiday party, a Valentine’s Day surprise, or just because you need something pretty and delicious on a random Wednesday, I hope they bring a little sparkle to your day.
If you’re looking for more festive treats, check out my Smoked Salmon Nibbles for something savory, or keep it sweet with another batch of cookies. Happy baking, friend — and remember, butter totally counts as self-care.
I’m Claire Whitmore — a dessert daydreamer from Asheville, NC. For me, baking isn’t about perfect pastries — it’s about the joy of sharing something sweet (and maybe sneaking an extra scoop of icing).