Dairy-Free Pumpkin Pie Bars Recipe
Hey there, I’m Claire Whitmore — a pastry whisperer in Asheville, NC, where butter totally counts as self-care. This Dairy-Free Pumpkin Pie Bars Recipe is proof that dessert doesn’t have to be complicated to feel special.
You know that cozy feeling when fall rolls around and everything smells like cinnamon and nutmeg? That’s what I was chasing when I first made these bars.
I wanted all the pumpkin pie vibes without the fuss of rolling out dough or worrying about a soggy bottom. Plus, my sister went dairy-free last year, and I wasn’t about to let that stop us from having our favorite autumn dessert together.
Little Snapshot: What This Recipe Delivers
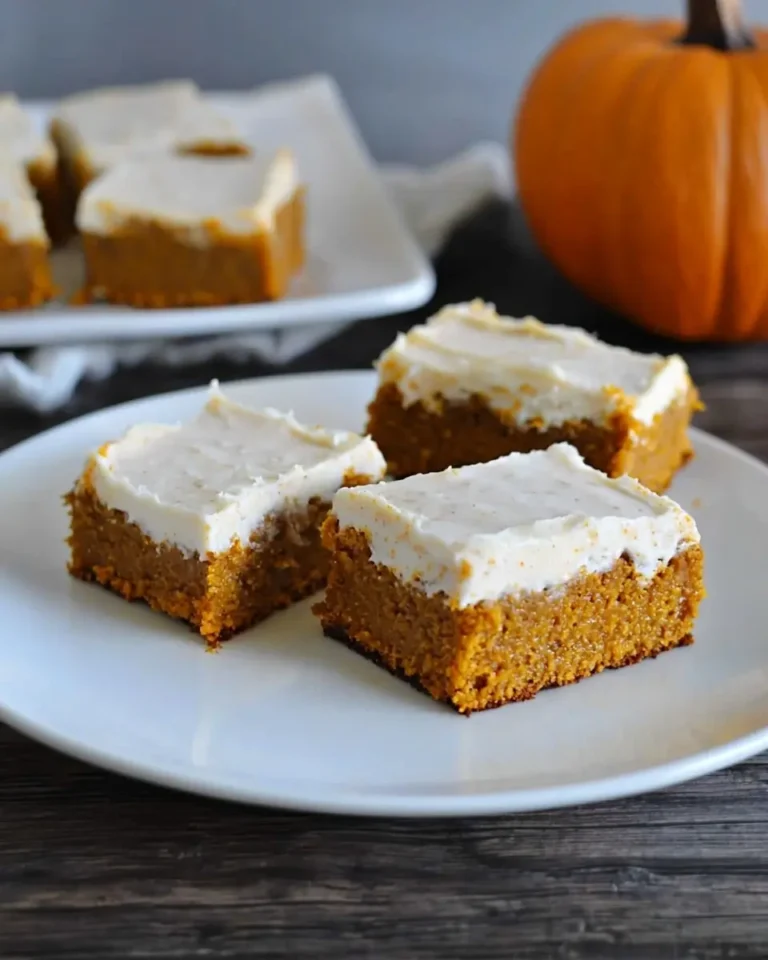
This Dairy-Free Pumpkin Pie Bars Recipe gives you all the creamy, spiced goodness of classic pumpkin pie in an easy-to-slice bar form.
With a buttery graham cracker crust and silky pumpkin filling made with dairy-free condensed milk, these bars are perfect for anyone avoiding dairy but refusing to skip dessert.
They’re make-ahead friendly, feed a crowd, and honestly taste just as indulgent as the traditional version.
Why You’ll Love This Recipe 🌸
- These Dairy Free Pumpkin Bars take less time than arguing about whether pumpkin is technically a vegetable.
- You get all the cozy fall flavors without any dairy — perfect for anyone with allergies, intolerances, or just a preference for plant-based treats.
- They’re way easier to serve than traditional pie (no stress about perfect slices or runny filling), which means more time actually enjoying dessert with your people.
- According to King Arthur Baking, dairy-free baking can be just as rich and delicious when you use the right substitutes — and this recipe proves exactly why.
Quick Facts ⚡
Here’s the quick scoop on this Dairy-Free Pumpkin Pie Bars Recipe.
- CourseDessert
- Prep Time15 minutes
- Cook Time1 hour 10 minutes
- Total Time1 hour 25 minutes (plus cooling time)
- Servings9 bars
- DifficultyEasy
Nutritional Peek
Here’s what you’re working with per bar — because knowing what’s in your dessert doesn’t make it any less delicious:
| Nutrient | Amount per Serving |
|---|---|
| Calories | 285 kcal |
| Protein | 6g |
| Carbohydrates | 38g |
| Total Fat | 12g |
| Saturated Fat | 7g |
| Fiber | 2g |
| Sugar | 24g |
Note: Nutritional values are approximate and will vary based on specific brands and ingredients used.
Dairy-Free Pumpkin Pie Bars Recipe Ingredients
Let’s talk about what goes into these Dairy Free Pumpkin Bars — nothing fancy, just good stuff you can probably grab at your regular grocery store.
| Amount | Ingredient |
|---|---|
| 1 1/4 cup | Graham crackers, crushed (regular or gluten-free) |
| 1/2 cup | Butter, melted (vegan or regular butter) |
| 4 | Eggs |
| 1 (15oz) can | Pumpkin puree (or about 2 cups homemade) |
| 1 (11.25oz) can | Dairy-free sweetened condensed milk (regular works too if you’re not dairy-free) |
| 2 teaspoons | Vanilla extract |
| 1 tablespoon | Pumpkin pie spice |
| 2 tablespoons | Real maple syrup (optional, for extra sweetness) |
A little note on the butter — yes, I know “dairy-free” is in the title, but if you’re using vegan butter for the crust, you’re golden. If dairy isn’t an issue for you, regular butter works beautifully too.
Just don’t skip it entirely or you’ll end up with sad, crumbly crust that falls apart like my New Year’s resolutions.
Tools You’ll Actually Use
Here’s what you’ll need to pull this off:
- 9×9 inch baking pan
- Parchment paper
- Small mixing bowl (for the crust)
- Medium mixing bowl (for the filling)
- Whisk
- Measuring cups and spoons
- Nonstick cooking spray
Optional but helpful:
- Food processor (for crushing graham crackers quickly)
- Cooling rack
Step-by-Step Instructions
Alright, let’s make these Dairy-Free Pumpkin Pie Bars happen. I promise it’s easier than parallel parking.
1. Get Your Oven Ready
Preheat your oven to 350°F. While it’s warming up, line your 9×9 pan with parchment paper, making sure you’ve got flaps hanging over two sides — trust me, future you will thank present you when it’s time to lift these babies out. Give the parchment a good spray with nonstick cooking spray.
2. Make That Graham Cracker Magic
In a small bowl, combine your crushed graham crackers and melted butter. Mix it until it looks like wet sand at the beach (the good kind, not the gritty-in-your-teeth kind). Pour this into your prepared pan and spread it out evenly.
Now press it down firmly with your hands — channel any stress from the day into making that crust nice and flat. Pop it in the oven on the middle rack for 10 minutes, then take it out and let it cool while you work on the filling.
3. Whip Up the Filling
While your crust is chilling out, grab your medium mixing bowl. Crack in those eggs, then add the pumpkin puree, dairy-free sweetened condensed milk, vanilla, pumpkin pie spice, and maple syrup if you’re using it.
Whisk everything together until it’s smooth and dreamy. The filling should be silky and smell like fall decided to move into your kitchen.
4. Bake It Beautiful
Pour that gorgeous filling right over your pre-baked crust. Slide the pan back into the oven (middle rack again) and let it bake for a full hour. You’ll know it’s done when the edges look set but the center still has a tiny bit of jiggle — kind of like a perfectly set custard.
5. The Hardest Part: Waiting
Let the bars cool completely at room temperature. I know, I know — this is torture. But if you cut into them too soon, they’ll be a gooey mess instead of clean slices. For best results, stick them in the fridge overnight.
This gives the filling time to really set up and makes slicing so much easier.
6. Slice and Serve
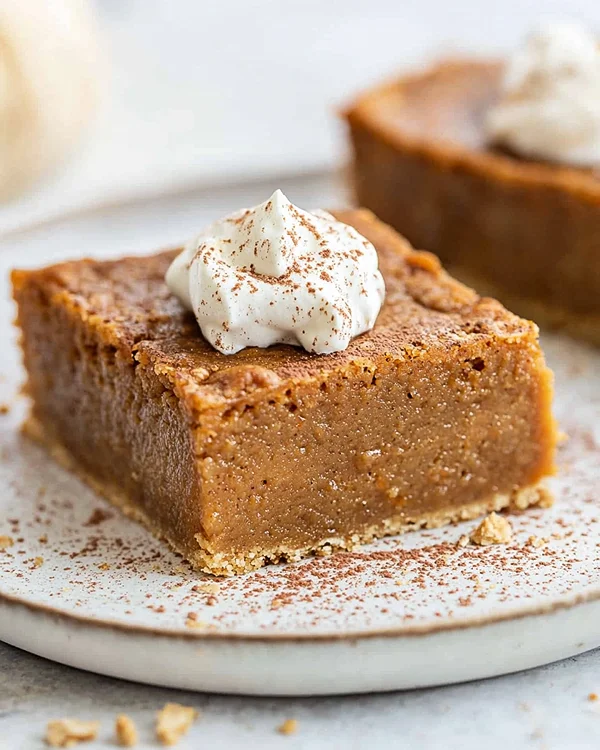
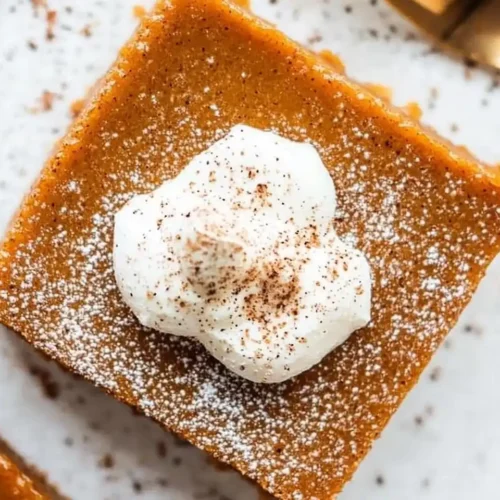
Use those parchment flaps to lift the whole thing out of the pan, then slice into 9 squares. Top with whipped cream (dairy-free or regular — your call) and maybe a sprinkle of extra pumpkin pie spice if you’re feeling fancy.
This is the kind of recipe that makes you want to cook everything in sight. Lucky for you, the Cookies & Brownies collection is full of exactly that. Go explore and find your new go-to dish.
Claire’s Pro Tips & Gentle Guidance
Here’s where I share the little secrets that took me a few (okay, several) batches to figure out with these Gluten Free Vegan Pumpkin Bars:
Crust Confidence: Press that graham cracker crust down like you mean it. The first time I made these, I was too gentle and ended up with a crust that fell apart when I tried to cut the bars. Really pack it in there.
The Cooling Game: I cannot stress this enough — let these cool completely and ideally chill overnight. I once got impatient and tried to serve them after just an hour of cooling.
The filling was still too soft, and instead of neat bars, I served something that looked more like rustic pumpkin pudding. Still delicious, but not exactly Instagram-worthy.
Dairy-Free Milk Matters: Not all dairy-free condensed milks are created equal. I’ve had the best luck with coconut-based versions, but almond and oat work great too.
According to the folks at Epicurious , choosing quality dairy-free substitutes makes all the difference in baking — and they’re absolutely right.
Pumpkin Puree vs. Pie Filling: Make sure you’re using pure pumpkin puree, not pumpkin pie filling (which already has spices and sugar added).
I learned this the hard way when I accidentally grabbed the wrong can and ended up with bars that were way too sweet and oddly spiced.
Quick Fixes for Dairy-Free Pumpkin Pie Bars Recipe
Even the best-laid plans sometimes need a little troubleshooting. Here’s what to do when things go sideways:
Problem: The crust is falling apart
Fix: You probably didn’t press it down firmly enough or didn’t use enough melted butter. Next time, really pack it in there like you’re making a sandcastle, and make sure every bit of graham cracker is coated in butter.
Problem: The filling is too liquidy even after baking
Fix: This usually means it needed more time in the oven or wasn’t fully cooled. Pop it back in for another 10-15 minutes if it’s still warm, or give it a good long chill in the fridge (at least 4 hours, ideally overnight).
Problem: The bars are cracking on top
Fix: This happens sometimes with egg-based custards and doesn’t affect the taste at all. To minimize cracking, avoid opening the oven door during baking and let them cool gradually at room temperature before refrigerating.
Problem: They’re sticking to the pan
Fix: This is why we use parchment paper with flaps! If you forgot the parchment, run a knife around the edges while the bars are still slightly warm, then chill completely before trying to remove them.
Variations & Fun Twists
These Gf Df Pumpkin Bars are pretty perfect as-is, but here are some ways to make them your own:
Go Fully Gluten-Free: Just swap regular graham crackers for gluten-free ones. Kinnikinnick and Mi-Del make great GF graham crackers that taste just like the original.
Spice It Up: If you’re a spice lover like me, add a pinch of cayenne pepper to the filling for a subtle kick. Or bump up the pumpkin pie spice to 1 1/2 tablespoons for extra cozy vibes.
Gingersnap Twist: Replace the graham crackers with crushed gingersnap cookies for a spicier, more robust crust. It’s like pumpkin pie’s sassier cousin.
Chocolate Drizzle: Once the bars are fully set and sliced, drizzle melted dark chocolate over the top. Because pumpkin and chocolate are actually best friends and nobody talks about it enough.
Pecan Praline Topping: Mix 1/4 cup chopped pecans with 2 tablespoons melted vegan butter and 2 tablespoons brown sugar. Sprinkle over the bars for the last 15 minutes of baking for a crunchy, nutty topping.
Mini Bar Version: Use a muffin tin lined with parchment squares to make individual portions. Bake for about 25-30 minutes instead of a full hour.
Serving, Storage & Reheating
Let’s talk about what to do with these Dairy Free Pumpkin Bars once they’re made (if you actually have leftovers, which I doubt).
Serving: These are best served chilled, straight from the fridge. Top each bar with a dollop of dairy-free whipped cream — the canned coconut kind works great, or you can whip up some aquafaba cream if you’re feeling ambitious. A light dusting of cinnamon or pumpkin pie spice on top makes them look bakery-fancy with zero effort.
Storage: Keep them covered in the fridge for up to 5 days. I like to cut them all at once and store them in an airtight container with parchment paper between the layers so they don’t stick together.
Freezing: These freeze beautifully! Wrap individual bars in plastic wrap, then store them all in a freezer bag for up to 3 months. Thaw in the fridge overnight before serving.
Reheating: Honestly? I love these cold. But if you want them slightly warm, let a bar sit at room temperature for about 20 minutes. Don’t microwave them — the filling gets weird and watery.
No-Waste Kitchen Magic
Because wasting food makes my heart hurt, here are some clever ways to use up any extras:
Leftover Pumpkin Puree: If you’ve got pumpkin left from the can, stir it into your morning oatmeal, blend it into a smoothie, or use it in my Easy Potato Leek Soup for a fun fall twist.
Extra Graham Crackers: Crush them up and use as a topping for yogurt, ice cream, or even mix into cookie dough for added texture.
Day-Old Bars: If your bars have been hanging out for a few days and lost some of their oomph, crumble them up and layer with dairy-free yogurt and granola for a pumpkin pie parfait situation.
Those Parchment Flaps: Wipe them off and reuse them for your next baking project. Parchment paper can usually handle a second round, especially if it wasn’t too messy the first time.
Dairy-Free Pumpkin Pie Bars Recipe FAQs
Can I freeze this Dairy-Free Pumpkin Pie Bars Recipe?
Absolutely! These freeze like a dream. Just wrap individual bars tightly in plastic wrap and store in a freezer bag for up to 3 months. Thaw overnight in the fridge before serving.
Do I have to use dairy-free condensed milk?
Nope! If dairy isn’t an issue for you, regular sweetened condensed milk works perfectly. The recipe is flexible that way.
Can I make these gluten-free?
Totally. Just use gluten-free graham crackers for the crust and you’re all set. The filling is naturally gluten-free, so that’s the only swap you need to make.
Can I use homemade pumpkin puree?
Yes! Just make sure it’s thick and not too watery. Homemade puree tends to be more liquidy than canned, so you might want to drain it through a cheesecloth for a bit to remove excess moisture.
What can I serve these with?
Dairy-free whipped cream is the classic choice, but they’re also amazing with a scoop of dairy-free vanilla ice cream. Or try them alongside The Best Cranberry Sauce for a fun Thanksgiving dessert board.
Can I cut the sugar?
The sweetened condensed milk is already doing most of the sweetening work here. You can definitely skip the maple syrup if you want them less sweet, but I wouldn’t recommend reducing the condensed milk since it affects the texture.
Cozy Closing
And there you have it — a Dairy-Free Pumpkin Pie Bars Recipe that’s easier than traditional pie, feeds more people, and tastes every bit as cozy and delicious.
These bars have become my go-to for fall gatherings because they travel well, cut cleanly, and make everyone happy (including my dairy-free sister, who tears up a little every time she can actually eat the dessert).
Whether you’re making them for Thanksgiving, a cozy weekend treat, or just because it’s Tuesday and you deserve something sweet, I think you’re going to love how simple and satisfying these are.
I’d love to see your spin on this Dairy-Free Pumpkin Pie Bars Recipe! Leave a note below or tag me on Instagram so we can share a sweet moment together. And if you’re in a fall baking mood, don’t miss my Apple Cider Donuts — they’re the perfect companion to these bars for an autumn dessert spread.
I’m Claire Whitmore — a dessert daydreamer from Asheville, NC. For me, baking isn’t about perfect pastries — it’s about the joy of sharing something sweet (and maybe sneaking an extra scoop of icing).
Dairy-Free Pumpkin Pie Bars
Equipment
- 9×9-inch baking pan
- Parchment paper
- Small mixing bowl
- Medium mixing bowl
- Whisk
- Measuring cups and spoons
- Nonstick cooking spray
- Food processor
- cooling rack
Ingredients
Crust
- 1 ¼ cup graham crackers crushed, regular or gluten-free
- ½ cup butter melted, vegan or regular
Filling
- 4 eggs
- 1 15oz can pumpkin puree or about 2 cups homemade
- 1 11.25oz can dairy-free sweetened condensed milk regular works too
- 2 teaspoons vanilla extract
- 1 tablespoon pumpkin pie spice
- 2 tablespoons real maple syrup optional, for extra sweetness
Instructions
- Preheat your oven to 350°F. While it’s warming up, line your 9×9 pan with parchment paper, making sure you’ve got flaps hanging over two sides. Give the parchment a good spray with nonstick cooking spray.
- In a small bowl, combine your crushed graham crackers and melted butter. Mix it until it looks like wet sand. Pour this into your prepared pan and spread it out evenly. Press it down firmly with your hands. Pop it in the oven on the middle rack for 10 minutes, then take it out and let it cool while you work on the filling.
- While your crust is chilling out, grab your medium mixing bowl. Crack in those eggs, then add the pumpkin puree, dairy-free sweetened condensed milk, vanilla, pumpkin pie spice, and maple syrup if you’re using it. Whisk everything together until it’s smooth and silky.
- Pour that filling right over your pre-baked crust. Slide the pan back into the oven (middle rack again) and let it bake for a full hour. You’ll know it’s done when the edges look set but the center still has a tiny bit of jiggle.
- Let the bars cool completely at room temperature. For best results, stick them in the fridge overnight. This gives the filling time to really set up and makes slicing so much easier.
- Use those parchment flaps to lift the whole thing out of the pan, then slice into 9 squares. Top with whipped cream (dairy-free or regular) and maybe a sprinkle of extra pumpkin pie spice if you’re feeling fancy.