Crispy Honey Chicken Recipe
This Crispy Honey Chicken recipe delivers restaurant-quality results at home with an ultra-crispy double-fried coating and sticky-sweet honey glaze. Perfect for weeknight dinners or party appetizers!
Hey there, I’m Claire Whitmore — a pastry whisperer in Asheville, NC, where butter totally counts as self-care. This Crispy Honey Chicken recipe is one of those dishes that makes you feel like a total kitchen rockstar, even if you’re just winging it on a Tuesday night.
I’ll be honest — the first time I tried making honey chicken at home, I ended up with soggy, sad little nuggets that tasted like regret.
But after a few trial runs (and way too many taste tests), I cracked the code: double frying and ice-cold batter. Now? This recipe’s a total game-changer, and I’m sharing all my secrets with you.
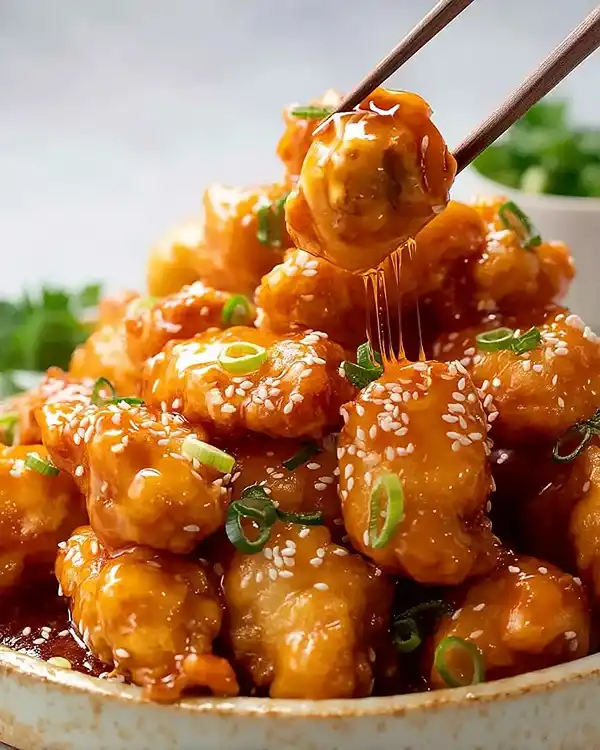
What This Honey Chicken Recipe Delivers
This Crispy Honey Chicken features tender chicken pieces wrapped in an ultra-crispy, stay-crunchy coating that’s double-fried to golden perfection, then tossed in a sticky-sweet honey glaze. It’s the kind of dish that rivals your favorite Chinese takeout — except you made it yourself, and yes, you should absolutely brag about it.
Why You’ll Love This Recipe 🌸
- This Honey Chicken stays crispy for way longer than you’d expect — seriously, the double-fry method is magic.
- It looks fancy enough for company but comes together faster than scrolling through delivery apps trying to decide what to order.
- The honey glaze hits that perfect sweet-savory balance without being cloying or sticky-in-a-bad-way.
- According to Serious Eats, double frying is the secret to extra-crispy textures — and this recipe proves exactly why.
Quick Facts ⚡
Here’s the quick scoop on this Crispy Honey Chicken.
- CourseMain Dish / Appetizer
- Prep Time40 minutes (includes marinating)
- Cook Time20 minutes
- Total Time1 hour
- Servings4 servings
- DifficultyMedium
Table of Contents
Nutritional Peek
Here’s what you’re working with per serving (because knowledge is power, friend):
| Nutrient | Amount per Serving |
|---|---|
| Calories | 485 kcal |
| Protein | 22g |
| Carbohydrates | 58g |
| Fat | 18g |
| Fiber | 1g |
| Sugar | 25g |
Note: Nutritional values are approximate and will vary based on specific ingredients used.
Ingredients
Let’s talk about what goes into making the best Party Snacks Recipes you’ll serve this season. The ingredient list might look a little long, but trust me — everything here has a job to do, and you probably have most of it already.
| Amount | Ingredient |
|---|---|
| Chicken & Marinade: | |
| 300g (10oz) | Chicken thighs, skinless boneless, cut into 2.5cm/1″ pieces (Yes, thighs — they stay juicier than breasts!) |
| 1 tbsp | Light soy sauce (NOT dark soy — it’ll make things too salty) |
| 2 tsp | Chinese cooking wine (or sub with more soy sauce) |
| 2 tsp | Cornflour/cornstarch |
| Dredging: | |
| 1/2 cup | Cornflour/cornstarch |
| Stay-Crispy Puffy Batter: | |
| 6 tbsp | Cornflour/cornstarch |
| 4 tbsp | Plain/all-purpose flour |
| 7-8 tbsp | COLD soda water, club soda, or seltzer (the colder, the crispier!) |
| 1/4 tsp | Baking powder (NOT baking soda — they’re different!) |
| 1/4 tsp | Kosher/cooking salt (halve if using table salt) |
| Oil for Frying: | |
| 2-3 cups | Vegetable or canola oil |
| Honey Sauce: | |
| 1/3 cup (100g) | Honey (the good stuff makes a difference) |
| 1.5 tbsp (25g) | Glucose or light corn syrup |
| 1 tbsp | Light soy sauce |
| 2 tsp | Chinese cooking wine (or more soy sauce) |
| Garnish/Serving: | |
| 25g (2oz) | Vermicelli rice noodles (optional but SO fun) |
| To taste | Sesame seeds and finely sliced green onions |
Tools You’ll Actually Use
Nothing fancy required — just your regular kitchen setup:
- Medium mixing bowls (at least 2)
- Shallow plate for dredging
- Small pot or large saucepan for frying
- Cooking thermometer (super helpful but not mandatory)
- Wire rack and baking tray
- Large saucepan for the honey sauce
- Whisk
- Tongs or slotted spoon
- Rubber spatula
Step-by-Step Instructions
Alright, let’s make some Crispy Honey Chicken that’ll have everyone asking for seconds (and the recipe).
Get Your Batter Ready (Beginner Tip): Pop your mixing bowl in the fridge with the flour, baking powder, and salt already measured out. Keeping everything cold is the secret to that ultra-crispy coating — learned that one the hard way!
Marinate & Dust the Chicken:
- Mix your chicken pieces with the soy sauce, Chinese cooking wine, and 2 teaspoons of cornflour in a bowl. Cover and let it hang out in the fridge for 30 minutes. This is when I usually catch up on emails or pretend to fold laundry.
- Spread that 1/2 cup of cornflour on a shallow plate. Working in small batches (about 8-10 pieces at a time), toss the chicken to coat, shake off any excess like you’re dusting flour off your hands, and set aside on a clean plate.
Make That Cold Batter & First Fry:
- Set up a wire rack on a baking tray — this is where your crispy chicken will drain, and it’s way better than soggy paper towels.
- Pour about 4cm (roughly 1.7 inches) of oil into your pot and heat it to 180°C/350°F over medium-high heat. No thermometer? Drop a tiny bit of batter in — if it sizzles immediately, you’re good to go.
- Now for the magic batter: Whisk together your flour, cornflour, baking powder, and salt from the fridge. Pour in 7 tablespoons of that ice-cold soda water and whisk just until combined — like, maybe 10 whisks total. A few lumps are totally fine! Over-mixing makes the coating weird and heavy, so resist the urge to perfect it.
- The batter should coat the chicken easily without being see-through, but it shouldn’t look like pancake batter either. Add extra water a teaspoon at a time if it’s too thick.
- Drop about 8 chicken pieces into the batter, turn them to coat, then carefully lower them into the hot oil one by one. Fry for 3 minutes until they’re light golden and you can hear that satisfying crispy crunch when you lift one out.
- Transfer to your wire rack and repeat with the remaining chicken. I usually do 4 batches total — don’t crowd the pot or your oil temperature will drop and you’ll end up with sad, greasy chicken.
- Let the chicken cool for 20 minutes. I know, it’s torture, but this rest period is crucial for the second fry to work its magic.
Make the Honey Sauce:
- While the chicken’s cooling, combine all your sauce ingredients in a large saucepan over medium heat. Bring it to a gentle simmer and let it bubble away for 3 minutes. It should look like maple syrup — thick enough to coat a spoon but still pourable. Turn off the heat and cover it to keep warm. (If it cools down too much, it gets thick and stubborn.)
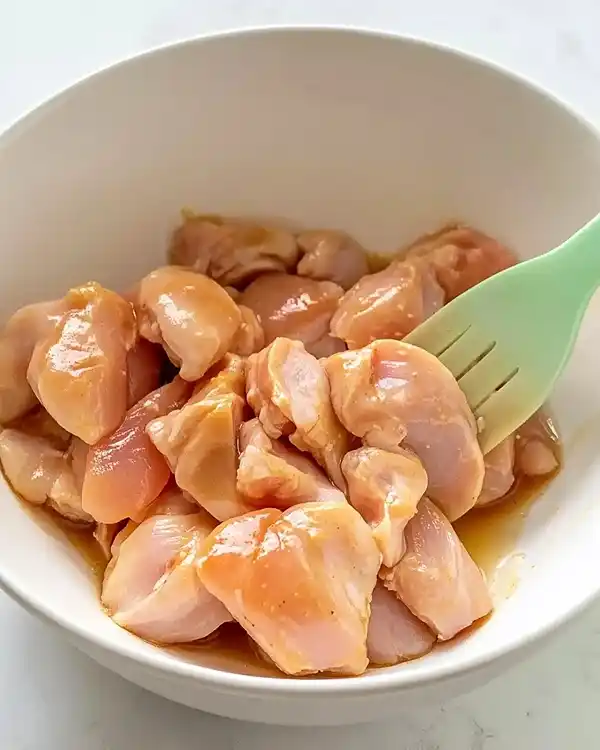
The Second Fry (Where the Magic Happens):
- Crank that oil heat up to 200°C/390°F. This time, you can crowd the pot a little — I do half the chicken at once.
- Fry for 90 seconds until the color shifts from pale gold to gorgeous, deep golden. Don’t go darker than that or the chicken will overcook. When you pull them out, you’ll actually feel how insanely crispy they are.
- Repeat with the second batch. At this point, your kitchen smells absolutely incredible and you’ll understand why this recipe’s worth every minute.
Toss in Sauce & Serve:
- Working quickly (the sauce thickens fast!), tumble all that crispy chicken into the saucepan with your honey sauce. Use a rubber spatula to toss everything together until every piece is gloriously coated.
- Pile it high on a serving plate. If you made those crispy rice noodles (instructions below), put them down first, then stack the chicken on top. Shower everything with sesame seeds and sliced green onions, and try not to eat it all before it hits the table.
Bonus: Puffy Crispy Noodles (Optional but Impressive):
While your oil’s hot at any point, grab a small handful of vermicelli rice noodles and drop them in. They’ll puff up dramatically in about 3 seconds — it’s honestly so satisfying to watch.
Pull them out with tongs, drain on paper towels, and use them as a crunchy base for your chicken. Total restaurant move right there.
Claire’s Pro Tips & Gentle Guidance
After making this Honey Chicken more times than I can count (for science, obviously), here’s what I’ve learned:
- The cold batter is non-negotiable. Room-temperature batter = less crispy coating. I actually keep my soda water in the fridge door specifically for this recipe.
- Chicken thighs over breasts, always. They’re more forgiving and stay juicier even after double frying. I used breasts once and they came out a little dry — still good, but not as amazing.
- Don’t skip the 20-minute rest between fries. I know it seems fussy, but this is when the coating firms up and the chicken relaxes. Skipping this makes the second fry less effective.
- The sauce thickens FAST once it’s off the heat. If it gets too thick to toss the chicken in, just pop it back on low heat for 30 seconds with a splash of water.
- According to Bon Appétit, letting fried chicken rest between frying sessions helps redistribute moisture and creates an even crispier final texture — and honestly, they’re not wrong. It’s the difference between good and holy wow good.
- Glucose or corn syrup isn’t optional in the sauce. I tried making this without it once (because who just has glucose lying around?), and the sauce crystallized into a weird, grainy mess. The glucose keeps it smooth and glossy.
Quick Fixes for Crispy Honey Chicken
We’ve all been there — things don’t always go perfectly, and that’s totally okay. Here’s how to rescue your honey chicken if things go sideways:
Problem: The coating’s falling off
- Your oil probably wasn’t hot enough for the first fry. The batter needs to set immediately when it hits the oil, or it’ll just slide right off. Make sure you’re at 180°C/350°F before adding chicken.
- Also, don’t skip the cornflour dusting step — it helps the batter actually stick to the chicken.
Problem: The chicken’s soggy, not crispy
- This usually means the batter was too thick or too warm. Remember: cold and thin-ish is what we’re after.
- Or you crowded the pot and the oil temperature dropped. Fry in smaller batches, even if it takes longer.
Problem: The coating’s too thick and doughy
- You over-whisked the batter. I know it feels wrong to leave lumps, but trust me — minimal mixing = lighter coating.
Problem: The honey sauce is way too thick
- It cooled down too much. Just reheat it gently over low heat with a tiny splash of water until it loosens up.
Problem: Everything’s too sweet
- Next time, dial back the honey by a tablespoon or two. You can always add more, but you can’t take it out once it’s in there.
Variations & Fun Twists
This Christmas recipe base is super adaptable once you nail the technique:
Spicy Honey Chicken: Add 1-2 teaspoons of chili flakes or a drizzle of sriracha to the honey sauce. I like to serve extra chili oil on the side for the spice lovers at the table.
Orange Honey Chicken: Add the zest of one orange and 2 tablespoons of fresh orange juice to the honey sauce. It’s like those orange chicken vibes but fancier.
Sesame Honey Chicken: Stir a tablespoon of toasted sesame oil into the finished sauce and go heavy on the sesame seed garnish. So nutty and delicious.
Gluten-Free Version: Swap the all-purpose flour for a gluten-free flour blend. The coating won’t be quite as delicate, but it’ll still be crispy and tasty.
Make It a Bowl: Serve this over jasmine rice or fried rice with some steamed broccoli and boom — you’ve got a complete meal that’s way better than takeout.
Party-Style: Make smaller chicken pieces (bite-sized) and serve them on toothpicks as an appetizer. Perfect for game day or holiday parties, and people will lose their minds over them.
Serving, Storage & Reheating
Let’s talk about keeping this Honey Chicken at its best (if you actually have leftovers, which I doubt).
Serving: This is best served immediately while the coating’s still at peak crispiness. I like to pile it on a big platter family-style with those crispy noodles underneath and lots of green onions on top. Serve it alongside some Perfect Autumn Chopped Salad for a lighter contrast, or go full comfort with some Italian Sausage and Potato Soup on the side.
Storage: Store any leftovers in an airtight container in the fridge for up to 3 days. I won’t lie — the coating won’t be as crispy after storage, but it’s still really tasty.
Reheating: Your oven is your best friend here. Spread the chicken on a wire rack over a baking sheet and reheat at 180°C/350°F for about 10 minutes until heated through and the coating crisps up again. The microwave will make everything soggy and sad, so just don’t.
Freezing: I don’t recommend freezing this once it’s coated and sauced — the texture gets weird. But you CAN freeze the marinated, un-fried chicken for up to 3 months. Thaw it in the fridge overnight, then proceed with the dusting and frying when you’re ready.
No-Waste Kitchen Magic
Because we’re all about making the most of what we’ve got around here:
Leftover Honey Sauce: If you have extra sauce (rare, but it happens), store it in a jar in the fridge for up to a week. It’s incredible as a glaze for roasted vegetables, drizzled over grilled salmon, or mixed into a stir-fry sauce.
Day-Old Crispy Honey Chicken: Chop it up and toss it into fried rice or noodles. The sauce adds amazing flavor and the chicken bits add texture, even if they’re not super crispy anymore.
Those Crispy Noodles: If they lose their crunch, you can re-crisp them in a 180°C/350°F oven for a few minutes. Use them as a topping for salads or soups — they add such a fun textural element.
Extra Marinade: Don’t have enough for a full batch of chicken? Use the marinade technique on tofu, shrimp, or pork instead. The soy-wine-cornflour combo is magic on pretty much any protein.
Crispy Honey Chicken FAQs
What is Honey Chicken sauce made of?
The honey chicken sauce is a beautiful blend of honey (obviously!), glucose or corn syrup for smoothness, light soy sauce for saltiness and umami, and a splash of Chinese cooking wine for depth. It’s sweet, a little savory, and glossy enough to make everything look restaurant-fancy. The glucose is what keeps it from crystallizing and getting grainy, which is why you really shouldn’t skip it.
What goes in Honey Chicken?
Honey chicken starts with tender chicken pieces (I use thighs for maximum juiciness) that are marinated, double-coated, double-fried until insanely crispy, then tossed in a sticky honey glaze. The coating involves cornflour, flour, baking powder, and ice-cold soda water — that combo is what creates that signature light, crispy texture that actually lasts. It’s all about technique and temperature control!
What does Chinese Honey Chicken taste like?
Think crispy, juicy chicken with a glossy coating that’s sweet from the honey but balanced with savory notes from the soy sauce. It’s not cloying or one-dimensional — there’s depth from the cooking wine and just enough saltiness to keep you reaching for another piece. The texture is where it really shines: super crunchy outside, tender and juicy inside. If you’ve ever had orange chicken but wished it was sweeter and simpler, this is your jam.
How to honey garlic chicken?
While this recipe focuses on honey (without the garlic), you can absolutely make it honey garlic by adding 3-4 minced garlic cloves to the sauce when you’re simmering it. Let the garlic cook in the sauce for those 3 minutes so it mellows out and becomes sweet instead of sharp. Some people also like to fry some extra garlic separately and scatter it on top as a garnish for double garlic power. Just don’t add raw garlic to the finished dish — it’ll be too harsh and overwhelm that beautiful honey flavor.
Cozy Closing
So there you have it — Crispy Honey Chicken that’s legitimately better than anything you’d order in. The double-fry method might seem extra, but I promise it’s the difference between “pretty good” and “I need this recipe RIGHT NOW.”
I’d love to see your spin on this Crispy Honey Chicken! Leave a note below so we can share a sweet moment together. And if you’re looking for more cozy comfort food, check out my Honey Bourbon Cranberry Sauce or those dreamy Apple Cider Donuts — because there’s always room for a little something sweet.
I’m Claire Whitmore — a dessert daydreamer from Asheville, NC. For me, baking isn’t about perfect pastries — it’s about the joy of sharing something sweet (and maybe sneaking an extra scoop of icing).
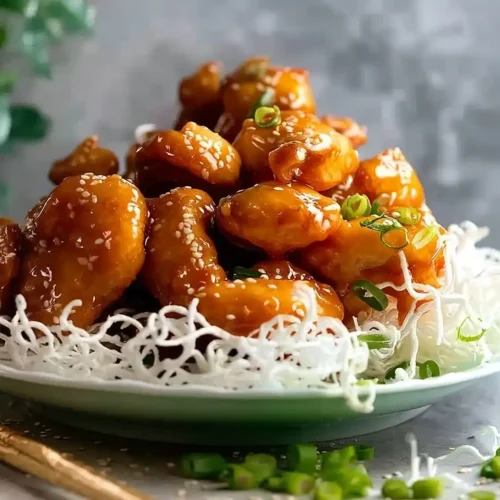
Crispy Honey Chicken
Equipment
- Mixing bowls
- Shallow plate
- saucepan
- Cooking thermometer
- Wire rack
- Baking tray
- Whisk
- Tongs
- Rubber spatula
Ingredients
Chicken & Marinade
- 300 g Chicken thighs skinless boneless, cut into 2.5cm/1″ pieces
- 1 tbsp Light soy sauce NOT dark soy
- 2 tsp Chinese cooking wine or sub with more soy sauce
- 2 tsp Cornflour/cornstarch
Dredging
- ½ cup Cornflour/cornstarch
Stay-Crispy Puffy Batter
- 6 tbsp Cornflour/cornstarch
- 4 tbsp All-purpose flour
- 7-8 tbsp Cold soda water club soda or seltzer
- ¼ tsp Baking powder NOT baking soda
- ¼ tsp Kosher/cooking salt halve if using table salt
Oil for Frying
- 2-3 cups Vegetable or canola oil
Honey Sauce
- ⅓ cup Honey about 100g
- 1.5 tbsp Glucose or light corn syrup
- 1 tbsp Light soy sauce
- 2 tsp Chinese cooking wine or more soy sauce
Garnish/Serving
- 25 g Vermicelli rice noodles optional
- Sesame seeds and sliced green onions to taste
Instructions
- Marinate chicken with soy sauce, Chinese cooking wine, and cornflour for 30 minutes.
- Coat chicken pieces in cornflour and shake off excess.
- Prepare cold batter by whisking together flours, baking powder, salt, and soda water until just combined.
- Heat oil to 180°C/350°F. Fry chicken for 3 minutes until light golden. Drain and repeat in batches.
- Let chicken rest for 20 minutes.
- In a saucepan, combine honey, glucose syrup, soy sauce, and cooking wine. Simmer for 3 minutes until thickened.
- Reheat oil to 200°C/390°F and fry chicken again for 90 seconds until deep golden and crispy.
- Toss fried chicken in honey sauce until coated evenly.
- Garnish with sesame seeds and green onions. Serve immediately.
- Optional: Fry vermicelli noodles until puffed for garnish.