Crispy Buffalo Cauliflower Wings
These Crispy Buffalo Cauliflower Wings are about to become your new favorite party snack — and honestly, they might just steal the spotlight from regular wings.
I’m Linda Sandra, a Charleston home cook who’s always chasing that perfect balance of cozy and creative, and this recipe checks every single box. Whether you’re feeding a crowd or just treating yourself to something delicious, these cauliflower wings deliver all the spicy, tangy, crispy goodness you’re craving.
Here’s what makes this recipe special: we’re using superfine almond flour for an extra-crispy coating that stays put, buffalo sauce that brings the heat without overwhelming, and a simple baking method that keeps things light.
The cauliflower florets get tender on the inside while developing that satisfying crunch on the outside — it’s the kind of texture contrast that makes you reach for just one more piece (and then another, and another).
Table of Contents
Little Snapshot: What This Recipe Delivers
These Crispy Buffalo Cauliflower Wings give you restaurant-quality appetizers in about 35 minutes with just a handful of wholesome ingredients. They’re naturally gluten-free, dairy-free friendly, and pack all the spicy buffalo flavor and satisfying crunch you want — perfect for game day, parties, or whenever that wing craving hits.
Why You’ll Love This Recipe 🌸
- These Crispy Buffalo Cauliflower Wings take less time than debating what to order for takeout — and they’re way more satisfying.
- They’re naturally gluten-free and can easily go dairy-free, so everyone at the table gets to dig in without worry.
- The almond flour batter creates an irresistibly crispy coating that actually stays put (no sad, soggy wings here).
- According to Serious Eats’ guide to achieving perfect crispy wings, high heat and proper coating are the secret — and this cauliflower wing recipe proves exactly why.
Quick Facts ⚡
Here’s the quick scoop on this Crispy Buffalo Cauliflower Wings recipe.
- CourseAppetizer
- Prep Time10 minutes
- Cook Time35 minutes
- Total Time45 minutes
- Servings6 servings
- DifficultyEasy
Nutritional Peek
Here’s a quick look at what you’re getting in each serving — because sometimes it’s nice to know, even when we’re indulging a little.
| Nutrient | Amount per Serving |
|---|---|
| Calories | 145 kcal |
| Protein | 5g |
| Carbohydrates | 9g |
| Fat | 10g |
| Fiber | 4g |
| Sugar | 2g |
Ingredients
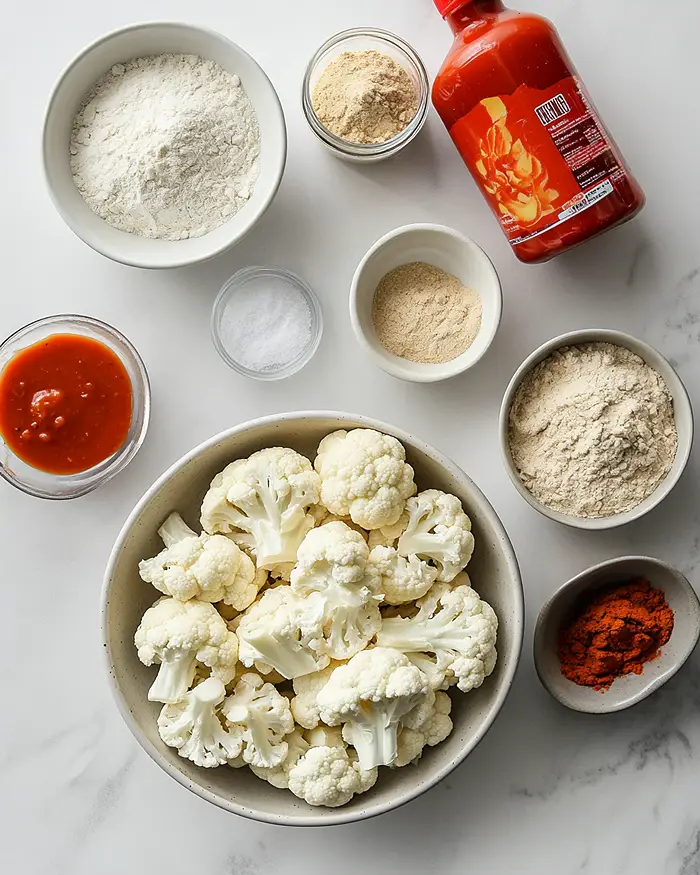
These gluten-free cauliflower wings start with simple, wholesome ingredients that come together into something truly crave-worthy.
For the crispy coating — superfine almond flour, unsweetened almond milk, and a blend of onion salt, paprika, and garlic powder — you’re building flavor and texture from the ground up.
For the star ingredient, you’ll need fresh cauliflower florets that’ll soak up all that deliciousness, plus buffalo sauce and vegan butter to create that classic tangy, spicy finish.
| Amount | Ingredient |
|---|---|
| 1 cup | Superfine almond flour |
| 1/2 cup | Unsweetened almond milk (any milk works) |
| 1 tsp | Onion salt |
| 1 tsp | Paprika |
| 1/2 tsp | Garlic powder |
| 4 cups | Cauliflower florets (about 1 medium cauliflower) |
| 1/2 cup | Buffalo sauce (Tessamae’s or Frank’s) |
| 2 Tbs | Vegan butter (or ghee if not dairy-free) |
Tools You’ll Actually Use
You won’t need anything fancy for these cauliflower wing recipes — just the basics:
- Large mixing bowl
- Baking sheet
- Parchment paper
- Medium bowl (for buffalo sauce)
- Sharp knife and cutting board
- Measuring cups and spoons
- Spatula or tongs for flipping
Step-by-Step Instructions
Making these Crispy Buffalo Cauliflower Wings is honestly easier than you’d think — and way more fun than ordering delivery.
Step 1: Prep the cauliflower. Remove most of the stem from your medium cauliflower and chop it into bite-sized florets, keeping them relatively uniform so they cook evenly. You want pieces that are big enough to feel substantial but small enough to get crispy all over.
Step 2: Heat things up. Preheat your oven to 450 degrees F and line a baking sheet with parchment paper. This high heat is what gives you that restaurant-quality crispiness.
Step 3: Mix the magic batter. In a large bowl, whisk together the superfine almond flour, unsweetened almond milk, onion salt, garlic powder, and paprika until you have a smooth, lump-free batter. It should be thick enough to coat the cauliflower but still pourable.
Step 4: Coat the cauliflower. Add your cauliflower florets to the batter and toss gently until every piece is completely coated. Don’t be shy here — you want that batter covering all the nooks and crannies.
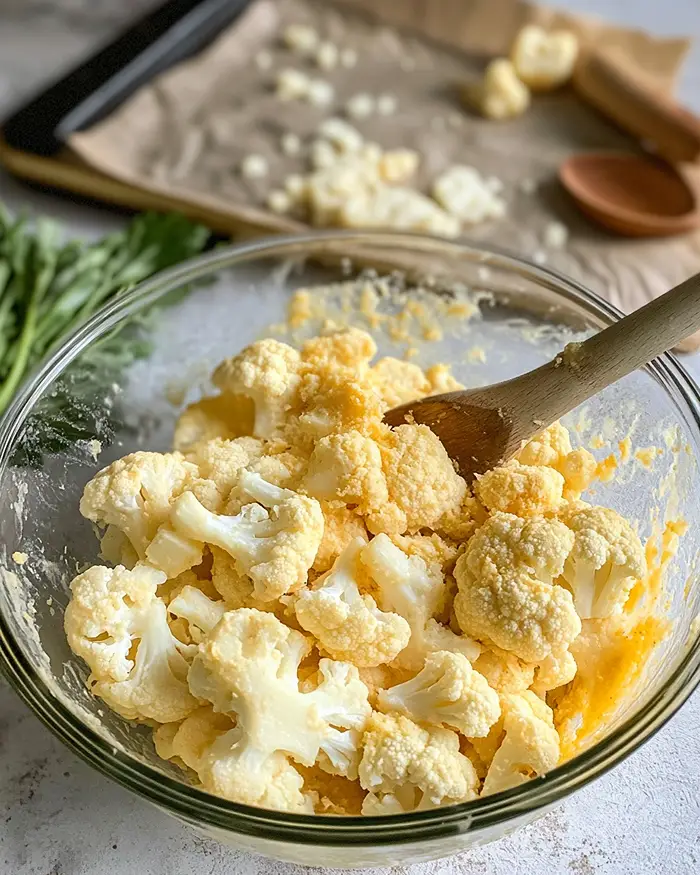
Step 5: First bake. Arrange the battered florets in a single layer on your prepared baking sheet, making sure they’re not touching (this helps them crisp up instead of steaming). Bake for 20-25 minutes, flipping them halfway through, until they’re golden brown and starting to get crispy.
Step 6: Make the buffalo sauce. While the cauliflower bakes, mix your buffalo sauce with the melted vegan butter or ghee in a medium bowl. This little bit of fat helps the sauce cling and adds richness.
Step 7: Sauce ’em up. Once the cauliflower comes out of the oven, pour the buffalo sauce mixture over the hot florets and toss until everything’s evenly coated. They’ll look glossy and gorgeous.
Step 8: Final crisp. Pop them back in the oven for another 10 minutes until they’re extra crispy and just starting to brown at the edges. Your kitchen’s going to smell incredible right about now.
Step 9: Serve and enjoy. Garnish with fresh chopped herbs if you’re feeling fancy, and serve immediately with your favorite dipping sauce — ranch, blue cheese, or even extra buffalo sauce for the heat seekers.
Pro Tips & Gentle Guidance
These gf cauliflower wings are pretty forgiving, but a few little tricks can take them from good to absolutely stellar.
Use superfine almond flour for best results. Regular almond flour works in a pinch, but superfine gives you that extra-smooth coating that crisps up beautifully. It’s worth seeking out if you can find it.
Don’t overcrowd the pan. Give those florets some breathing room on the baking sheet. If they’re touching, they’ll steam instead of crisp, and nobody wants soggy wings.
Flip them halfway through. I know it’s tempting to just let them be, but flipping ensures even browning and crispiness on all sides. Use tongs or a spatula and be gentle so the coating stays put.
Adjust the buffalo heat to your taste. If you’re feeding kids or spice-sensitive folks, use less buffalo sauce or mix it with a bit of honey to mellow the heat. For the brave souls who love fire, add a dash of cayenne to the batter.
If you’re looking for more ways to nail that perfect crispy texture, King Arthur Baking’s expert guidance on crispy roasted vegetables has some fantastic tips that work beautifully for these wings too.
Quick Fixes for Crispy Buffalo Cauliflower Wings
Problem: Wings came out soggy instead of crispy. This usually means the oven wasn’t hot enough or the florets were too crowded. Next time, make sure your oven’s fully preheated to 450°F and give each piece plenty of space on the pan.
Problem: The coating fell off during baking. The batter might’ve been too thin, or the florets were too wet before coating. Pat the cauliflower dry before battering, and make sure your batter’s thick enough to really cling — it should coat the back of a spoon.
Problem: They’re burning on the outside but raw inside. Your florets might be too large. Cut them smaller next time, and check at the 15-minute mark to see if you need to lower the heat to 425°F for more even cooking.
Problem: Not enough buffalo flavor. Don’t be shy with that sauce! Toss the florets thoroughly after the first bake, and if you want even more punch, reserve a little extra buffalo sauce for drizzling right before serving.
Variations & Adaptations
These cauliflower wing recipes are endlessly adaptable to whatever you’re craving or whatever dietary needs you’re working with.
Go BBQ instead. Swap the buffalo sauce for your favorite BBQ sauce and add a pinch of smoked paprika to the batter. Sweet and smoky is always a crowd-pleaser.
Try different spice profiles. Mix things up with teriyaki sauce and sesame seeds, or go Mediterranean with za’atar seasoning and a lemon-tahini drizzle.
Make them keto-friendly. This recipe’s already pretty low-carb, but if you’re counting strictly, just make sure your buffalo sauce doesn’t have added sugar.
Add extra veggies. Toss in some broccoli florets alongside the cauliflower for variety. They work beautifully with the same batter and timing.
Amp up the crunch. For extra-crispy wings, add 2 tablespoons of nutritional yeast to the batter. It adds a savory, almost cheesy flavor too.
Serving, Storage & Reheating

These gluten-free cauliflower wings are best enjoyed fresh from the oven while they’re at peak crispiness. Serve them up with celery sticks, carrot rounds, and your choice of ranch or blue cheese dressing for the full wing experience. They’re perfect alongside buffalo chicken sliders for game day.
Store any leftovers in an airtight container in the fridge for up to 3 days. I’ll be honest — they won’t be quite as crispy, but they’re still delicious.
To reheat, spread them on a baking sheet and pop them in a 400°F oven for 8-10 minutes until heated through and crisping up again. The microwave works in a pinch but won’t give you that satisfying crunch back.
No-Waste Kitchen Magic
Got leftover cauliflower wings that have lost their crisp? Don’t toss them — they’re perfect for creative repurposing.
Chop them up and toss them into a grain bowl with quinoa, greens, and ranch dressing for a buffalo cauliflower power bowl. Or stuff them into pitas with shredded lettuce and extra sauce for quick buffalo cauliflower pockets.
Those stems you trimmed off? Dice them up and add them to vegetable stock, or roast them with olive oil and salt for a simple snack. Even the smaller floret bits that didn’t make the cut can go into soup or get mashed into cauliflower rice.
If you’ve got extra buffalo sauce hanging around, it’s incredible drizzled over roasted chickpeas or tossed with shredded rotisserie chicken for easy meal prep.
Crispy Buffalo Cauliflower Wings FAQs
Can I freeze these Crispy Buffalo Cauliflower Wings?
Yep, but freeze them before the second bake for best results. After coating and the first baking session, let them cool completely, then freeze in a single layer on a baking sheet. Once frozen, transfer to a freezer bag for up to 2 months.
What’s the best way to make these extra crispy?
The secret’s in the spacing and the heat. Make sure your oven’s fully preheated to 450°F, don’t crowd the pan, and flip halfway through the first bake. You can also try broiling for the last 1-2 minutes, but watch them closely so they don’t burn.
How do I know when the cauliflower wings are done?
They’re ready when they’re golden brown, the edges are starting to get crispy and slightly darker, and a fork easily pierces the cauliflower. The total baking time is usually 30-35 minutes split between the two baking sessions.
Why should I use superfine almond flour in these cauliflower wings?
Superfine almond flour creates a smoother, more even coating that crisps up beautifully without any gritty texture. Regular almond flour works but won’t give you quite the same restaurant-quality finish — the finer grind makes a real difference.
One recipe down, and so many more to explore! Head over to our complete Classic Comfort Foods lineup for more delicious ideas that’ll keep your kitchen buzzing. Bookmark this one — you’ll thank yourself later.
Closing
So there you go — Crispy Buffalo Cauliflower Wings that bring all the flavor and none of the fuss. They’re the kind of recipe that makes you feel like a kitchen genius even though they’re secretly super simple.
I’d love to see your spin on these buffalo cauliflower wings! Drop a comment below with your photos or let me know if you tried any fun variations — I’d love to see how you made them your own. These crispy buffalo cauliflower wings are so versatile; I bet you’ve got amazing flavor ideas already brewing.
And hey, if you’re looking for more cozy recipe inspiration that feels like a warm hug, grab a strawberry matcha latte and browse around — there’s always something delicious happening here at EdenPlate.
I’m Linda Sandra — a Charleston home chef and comfort-food daydreamer. Around here, cooking’s not about perfection — it’s about cozy vibes, creative twists, and food that feels like love.

Crispy Buffalo Cauliflower Wings
Equipment
- Large mixing bowl
- Baking sheet
- Parchment paper
- Medium bowl
- Sharp knife
- Cutting board
- Measuring cups
- Measuring spoons
- Spatula or tongs
Ingredients
For the Crispy Coating
- 1 cup superfine almond flour
- ½ cup unsweetened almond milk can sub any milk
- 1 tsp onion salt
- 1 tsp paprika
- ½ tsp garlic powder
Main Ingredients
- 4 cups cauliflower florets about 1 medium cauliflower
For the Buffalo Sauce
- ½ cup buffalo sauce Tessamae’s or Frank’s
- 2 Tbs vegan butter can sub with ghee if not dairy-free
Instructions
- Remove most of the stem from your medium cauliflower and chop it into bite-sized florets, keeping them relatively uniform so they cook evenly. You want pieces that are big enough to feel substantial but small enough to get crispy all over.
- Preheat your oven to 450 degrees F and line a baking sheet with parchment paper. This high heat is what gives you that restaurant-quality crispiness.
- In a large bowl, whisk together the superfine almond flour, unsweetened almond milk, onion salt, garlic powder, and paprika until you have a smooth, lump-free batter. It should be thick enough to coat the cauliflower but still pourable.
- Add your cauliflower florets to the batter and toss gently until every piece is completely coated. Don’t be shy here—you want that batter covering all the nooks and crannies.
- Arrange the battered florets in a single layer on your prepared baking sheet, making sure they’re not touching (this helps them crisp up instead of steaming). Bake for 20-25 minutes, flipping them halfway through, until they’re golden brown and starting to get crispy.
- While the cauliflower bakes, mix your buffalo sauce with the melted vegan butter or ghee in a medium bowl. This little bit of fat helps the sauce cling and adds richness.
- Once the cauliflower comes out of the oven, pour the buffalo sauce mixture over the hot florets and toss until everything’s evenly coated. They’ll look glossy and gorgeous.
- Pop them back in the oven for another 10 minutes until they’re extra crispy and just starting to brown at the edges. Your kitchen’s going to smell incredible right about now.
- Garnish with fresh chopped herbs if you’re feeling fancy, and serve immediately with your favorite dipping sauce—ranch, blue cheese, or even extra buffalo sauce for the heat seekers.