Christmas Tree Shaped Charcuterie
Christmas Tree Shaped Charcuterie transforms fresh rosemary, colorful grapes, festive cheese, and seasonal fruit into a show-stopping holiday appetizer that’s ready in under 30 minutes — no cooking required!
Christmas Tree Shaped Charcuterie is hands-down the most fun holiday appetizer you’ll make this season — it’s basically art you get to eat, made with fresh rosemary, vibrant grapes, sharp cheddar, Monterey Jack cheese, cranberries, star fruit, and crispy nuts arranged into an edible evergreen.
Hey there, I’m Claire Whitmore — a pastry whisperer in Asheville, NC, where butter totally counts as self-care. This Christmas tree charcuterie board recipe is perfect for busy moms who want to impress guests without spending hours in the kitchen, featuring simple ingredients like colorful cheese cubes, seasonal fruit clusters, fresh herbs, and crunchy nuts that come together in minutes.
Last Christmas Eve, I made this while my kids decorated cookies (translation: made a flour tornado in my kitchen). The best part? They were so mesmerized by the “tree” that they actually left me alone for twenty whole minutes. That’s basically a Christmas miracle, folks.
Little Snapshot: What This Recipe Delivers
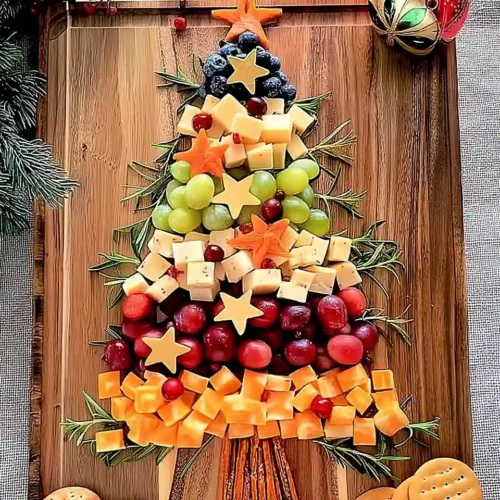
This Christmas Tree Shaped Charcuterie delivers a stunning, no-cook holiday appetizer featuring fresh rosemary branches as the tree outline, colorful cheese cubes, red and green grapes, cranberries, star fruit, and mixed nuts arranged in a festive tree shape with a celery trunk.
It takes about 20-30 minutes to assemble, serves 8-10 people, and requires zero cooking skills — just creativity and a festive spirit.
Why You’ll Love This Recipe 🌸
- This Christmas Tree Charcuterie Board looks absolutely magical but takes less time than wrapping a single present awkwardly with a cat sitting on the paper.
- There’s literally no cooking involved — just creative arranging while you hum along to Mariah Carey.
- It’s completely customizable, so if your kids hate kiwi or your uncle’s allergic to nuts, just swap ’em out with what works for your crew.
- According to Food Network’s essential guide to building charcuterie boards, the best boards require little to no cooking and only take a few minutes to assemble — and this festive Christmas tree proves exactly why.
Quick Facts ⚡
Here’s the quick scoop on this Christmas Tree Shaped Charcuterie.
- CourseAppetizer
- Prep Time20-30 minutes
- Cook Time0 minutes
- Total Time20-30 minutes
- Servings8-10 servings
- DifficultyEasy
Table of Contents
Nutritional Peek
Here’s a nutritional snapshot per serving, though honestly, during the holidays we’re all just vibing and enjoying the festive flavors!
| Nutrient | Amount per Serving |
|---|---|
| Calories | 180-220 kcal |
| Protein | 8-10g |
| Carbohydrates | 12-15g |
| Fat | 11-14g |
| Fiber | 2-3g |
| Sugar | 8-10g |
Note: Nutritional values are approximate and vary based on specific cheeses, portion sizes, and optional ingredients you choose.
Christmas Tree Shaped Charcuterie
Equipment
- Large serving platter or wooden cutting board
- Sharp knife
- Small kitchen scissors
- Small bowls (optional)
Ingredients
Tree Structure
- 10 sprigs fresh rosemary more or less depending on size
- 1 stalk celery
Cheese Selection
- 4 ounces sharp cheddar cheese cut into ¾-inch squares
- 4 ounces Monterey Jack cheese cut into ¾-inch squares
- 4 ounces mild or medium cheddar cheese cut into ¾-inch squares
Fruit & Garnishes
- red, green, and black seedless grapes clipped into small clusters or individual grapes
- ½ cup fresh cranberries
- 1-2 star fruit sliced
- 1 green kiwi fruit sliced
- 1 cup assorted nuts almonds work great for the pot
Instructions
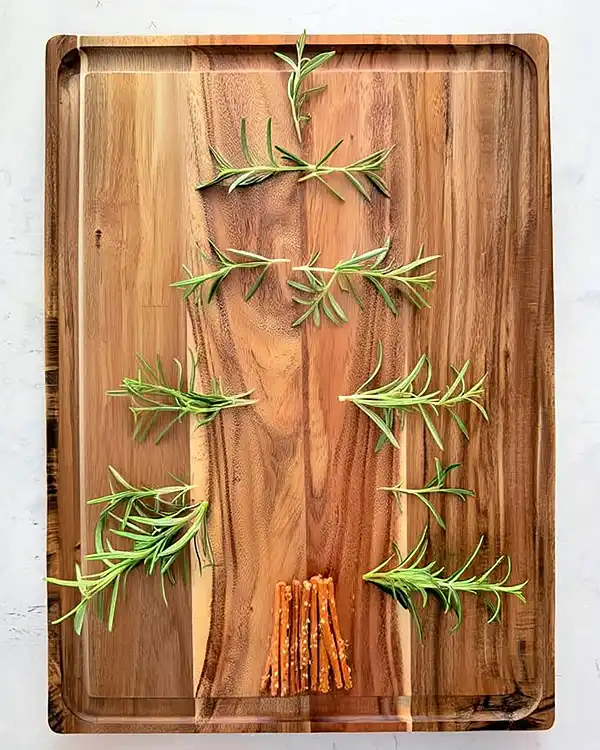
- Start by arranging the fresh rosemary sprigs on your serving platter to form the outline of a Christmas tree. Begin at the top with a single sprig pointing upward, then gradually fan the sprigs outward as you move down the board to create that classic triangular tree shape. Don’t stress about perfection here — you’ll adjust these as you add ingredients, so think of this as your rough draft.
- Place the celery stalk at the bottom center of your tree formation to serve as the trunk. Trim it to whatever length looks balanced to you — about 3-4 inches usually works well. This entire process is totally by sight and what feels right, so trust your creative instincts.
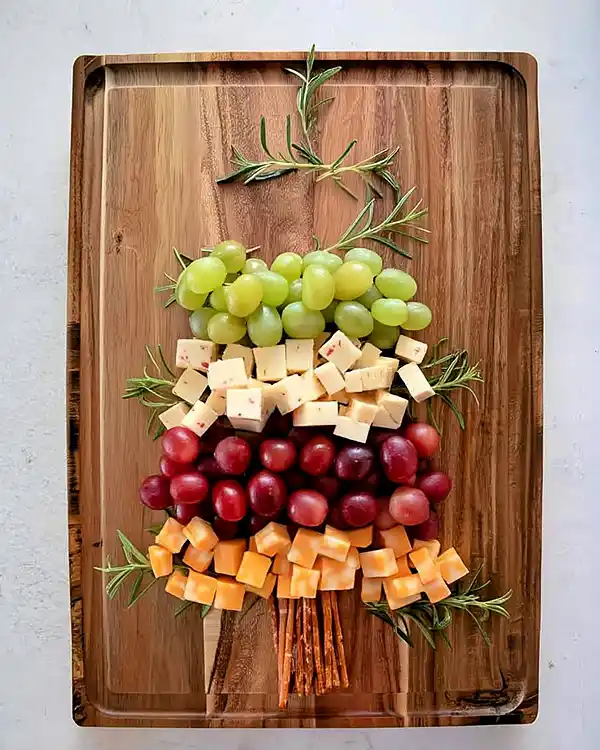
- Starting at the bottom of your tree and working your way up, create horizontal rows that get progressively narrower. Create a row of cheese cubes (mix your sharp cheddar, mild cheddar, and Monterey Jack for variety), followed by a row of red grapes, another row of cheese, then green grapes, another cheese row, and finally black grapes near the top. Each row should have fewer pieces than the one below it to maintain that tree shape.
- Arrange the kiwi slices in a small triangle formation at the very top of your tree to create the green peak. Overlap them slightly so they look lush and full. Then, place one slice of star fruit at the absolute top as your Christmas star. If you can’t find star fruit, cut a star shape from a slice of yellow cheese using a small cookie cutter.
- Scatter the remaining star fruit slices randomly over your tree like ornaments. Sprinkle fresh cranberries throughout the tree for festive red accents. Finally, arrange your mixed nuts at the base of the tree around the celery trunk, creating a pot or ground effect. Almonds work especially well arranged in a square formation at the base, partially covering the bottom of the celery.
- Step back and look at your creation with fresh eyes. Fill in any gaps with extra grapes, cheese cubes, or cranberries where the board looks sparse. Adjust your rosemary sprigs if they’ve shifted during assembly. You can assemble this beauty up to 4 hours ahead — just cover it loosely with plastic wrap and refrigerate until you’re ready to serve.
Notes
I have a feeling you’ll love what’s next. The Christmas & Winter favorites are packed with recipes that disappear fast at every gathering. Go check them out before someone else snags them!
Christmas Tree Shaped Charcuterie Ingredients
This Christmas Cheese Board comes together with fresh, colorful ingredients that are as beautiful as they are delicious. For the tree structure, you’ll use aromatic fresh rosemary sprigs and a crisp celery stalk that forms the trunk.
For the cheese selection — sharp cheddar, mild cheddar, and creamy Monterey Jack — make sure they’re cut into uniform ¾-inch cubes so everything looks polished and professional (even though this is super casual to make).
Your fruit and garnish lineup includes ruby-red cranberries, jewel-toned grape clusters in red, green, and black, tropical star fruit slices for that perfect tree-topper star, and vibrant green kiwi slices. Finish with a generous cup of assorted nuts for texture and crunch.
| Amount | Ingredient |
|---|---|
| 10 sprigs | Fresh rosemary (more or less depending on size) |
| 1 stalk | Celery |
| As needed | Red, green, and black seedless grapes (clipped into small clusters or individual grapes) |
| 4 ounces | Sharp cheddar cheese, cut into ¾-inch squares |
| 4 ounces | Monterey Jack cheese, cut into ¾-inch squares |
| 4 ounces | Mild or medium cheddar cheese, cut into ¾-inch squares |
| ½ cup | Fresh cranberries |
| 1-2 | Star fruit, sliced (or substitute with a small cookie cutter star from cheese) |
| 1 cup | Assorted nuts (almonds work great for the “pot”) |
| 1 | Green kiwi fruit, sliced |
Tools You’ll Actually Use
You don’t need fancy equipment for this Christmas cheese masterpiece — just grab what you’ve probably already got hanging around your kitchen:
- Large serving platter or wooden cutting board (the bigger, the better for this festive display)
- Sharp knife (for slicing cheese, fruit, and trimming rosemary if needed)
- Small kitchen scissors (perfect for snipping grape clusters)
- Small bowls (optional, if you want to serve nuts or cranberries on the side)
Step-by-Step Instructions
Making this Christmas Tree Shaped Charcuterie is honestly more fun than stressful — think of it as edible arts and crafts. Let’s break it down so you can create your own showstopper without second-guessing yourself.
Step 1: Create Your Tree Outline Start by arranging the fresh rosemary sprigs on your serving platter to form the outline of a Christmas tree. Begin at the top with a single sprig pointing upward, then gradually fan the sprigs outward as you move down the board to create that classic triangular tree shape.
Don’t stress about perfection here — you’ll adjust these as you add ingredients, so think of this as your rough draft. The rosemary not only looks festive but also smells incredible, giving your whole spread that cozy holiday vibe.
Step 2: Add the Trunk Place the celery stalk at the bottom center of your tree formation to serve as the trunk. Trim it to whatever length looks balanced to you — mine’s usually about 3-4 inches, but honestly, eyeball it based on your platter size. This entire process is totally by sight and what feels right, so trust your creative instincts.
Step 3: Build Your Tree with Cheese and Grapes Now comes the fun part! Starting at the bottom of your tree and working your way up, create horizontal rows that get progressively narrower.
I like to do a row of cheese cubes (mix your sharp cheddar, mild cheddar, and Monterey Jack for variety), followed by a row of red grapes, another row of cheese, then green grapes, another cheese row, and finally black grapes near the top.
Each row should have fewer pieces than the one below it to maintain that tree shape. Play around with the pattern — there’s no wrong way to do this.
Step 4: Create the Tree Top Arrange the kiwi slices in a small triangle formation at the very top of your tree to create the green “peak.” Overlap them slightly so they look lush and full.
Then, place one slice of star fruit at the absolute top as your Christmas star. If you can’t find star fruit, no worries — just cut a star shape from a slice of yellow cheese using a small cookie cutter, or even use a pretty cherry tomato.
Step 5: Add the Finishing Touches Scatter the remaining star fruit slices randomly over your tree like ornaments — they add gorgeous pops of color and shape. Sprinkle fresh cranberries throughout the tree for those festive red accents.
Finally, arrange your mixed nuts at the base of the tree around the celery trunk, creating a “pot” or “ground” effect. Almonds work especially well for this since their shape looks neat when arranged in a square formation at the base, partially covering the bottom of the celery.
Step 6: Final Adjustments Step back and look at your creation with fresh eyes. Fill in any gaps with extra grapes, cheese cubes, or cranberries where the board looks sparse. Adjust your rosemary sprigs if they’ve shifted during assembly.
Your Christmas tree charcuterie is ready to wow your guests! You can assemble this beauty up to 4 hours ahead — just cover it loosely with plastic wrap and refrigerate until you’re ready to serve.
Claire’s Pro Tips & Gentle Guidance
Let me share some insider secrets I’ve picked up while making this Christmas Tree Charcuterie Board about a million times. These little tips make all the difference between “pretty good” and “wait, did you go to culinary school?!”
Room temperature cheese is your best friend here. Take your cheeses out of the fridge about 20-30 minutes before you start assembling so they’re easier to cut and taste way better. Cold cheese is basically flavorless and also way harder to slice into those nice, uniform cubes.
Don’t overthink the rosemary placement. I used to spend forever trying to make perfect sprigs, but honestly? A little wild and organic looks more charming. If a sprig breaks, just overlap another one — no one will ever know.
Prep your grapes the night before. Wash them, clip them into small clusters or individual grapes, and store them in the fridge in a container lined with paper towels. This saves you SO much time on party day, and they’ll be perfectly dry so they don’t make your cheese soggy.
Keep your cheese cubes uniform (around ¾-inch) so everything looks intentional and professional. I use a ruler the first few times — now I just eyeball it, but that little bit of consistency makes your board look magazine-worthy.
Star fruit too hard to find? I feel you — my grocery store only has it sometimes. Use a small star-shaped cookie cutter to cut stars from yellow bell pepper, pineapple slices, or even a thick slice of yellow cheddar. Works like a charm and honestly looks just as cute.
If you’re looking for more guidance on building show-stopping holiday boards, check out Food Network’s collection of festive entertaining ideas — they’ve got tons of creative inspiration for making your holiday spread absolutely unforgettable.
Worried about it falling apart during transport? If you’re bringing this to a party, assemble it at your destination if possible. Otherwise, pack your ingredients in separate containers and do a quick 10-minute assembly when you arrive. Trust me, it’s way less stressful than watching your beautiful tree slide around in the car.
Quick Fixes for Christmas Tree Shaped Charcuterie
Even the easiest recipes can throw you a curveball, so here’s how to troubleshoot the most common issues without panicking.
Problem: Your tree looks lopsided or uneven. Step back about 6 feet and look at your board from a distance — you’ll see the balance issues way more clearly. Add extra cheese cubes or grape clusters to the sparse side, and don’t be afraid to move things around. This isn’t surgery; it’s art!
Problem: Everything keeps sliding around on your board. Your platter might be too smooth or slightly oily. Wipe it down with a paper towel, and consider using a board with a little texture like wood or slate. You can also create a subtle “bed” at the base using your nuts spread flat first, which gives other ingredients something to nestle into.
Problem: Your rosemary sprigs keep poking out at weird angles. Trim the stem ends at a slight diagonal so they lay flatter against your board. You can also gently bend the sprigs to soften them — just don’t snap them! If some are too unruly, swap them out for better-behaved sprigs.
Problem: Cheese cubes are different sizes and it looks messy. Don’t stress — just eat the wonky ones (quality control is important!). For the remaining cubes, use your sharpest knife and take your time.
Put on a Christmas movie, pour some wine, and turn cheese-cutting into your zen moment. Alternatively, buy pre-cubed cheese from the deli and just adjust sizes as needed.
Problem: Your fruit is browning or looking tired. This happens if you prep too far ahead. Squeeze a tiny bit of lemon juice over cut kiwi and star fruit to prevent oxidation — just a light mist, not enough to make things tangy.
Grapes should be bone-dry before assembly. If cranberries look shriveled, swap them for fresh ones or use dried cranberries rehydrated in warm water for 10 minutes.
Variations & Fun Twists
The beauty of this Christmas Tree Charcuterie Board is that it’s basically a template you can customize however you want. Here are some fun ways to make it your own.
Go Tropical: Swap out traditional grapes for fresh pineapple chunks, mango slices, and papaya cubes. Use coconut flakes instead of nuts at the base. This is perfect if you’re in a warm climate or just want to shake things up.
Make It Gluten-Free and Allergy-Friendly: Skip the nuts entirely (use extra cranberries or pomegranate seeds instead) and serve with gluten-free crackers on the side. All the cheese, fruit, and rosemary are naturally gluten-free, making this an inclusive option for guests with dietary restrictions.
Try a Vegan Christmas Tree: Use dairy-free cheese alternatives (there are some really good ones now!), and load up on colorful veggies like cherry tomatoes, cucumber rounds, bell pepper strips, and marinated artichoke hearts. Add hummus or cashew cheese in small bowls for dipping.
Fancy It Up with Charcuterie: Add rolled salami roses, prosciutto ribbons, or thin slices of soppressata between your cheese rows. This turns your tree into a full-on Christmas charcuterie situation that’s even more impressive.
Go Dessert-Style: Create a sweet version using brownie bites, fudge squares, chocolate-covered strawberries, and candy instead of cheese and grapes. Use pretzel rods for the trunk and crushed Oreos or chocolate chips for the “pot.” Your kids will absolutely lose their minds.
Change Up Your “Star”: If star fruit isn’t available, try a small wheel of brie at the top, a cluster of golden berries, a pretty edible flower, or even a decorative cheese ball rolled in herbs. Get creative!
Serving, Storage & Reheating
Let’s talk about the practical stuff so your Christmas Cheese masterpiece stays fresh and gorgeous from assembly to the last bite.
Serving: This Christmas Tree Charcuterie is best served at room temperature, so take it out of the fridge about 15-20 minutes before your guests arrive. The cheese flavors really open up when they’re not ice-cold, and everything just tastes better.
Set out some small appetizer plates, cocktail napkins, and maybe some toothpicks or small forks so people can easily help themselves. .
Storage: If you actually have leftovers (which I doubt, but just in case), gently transfer everything to airtight containers and refrigerate for up to 2 days. Keep the cheese separate from the fruit if possible, since fruit releases moisture that can make cheese soggy. The rosemary can be composted — it’s done its decorative duty!
Reheating: There’s no reheating needed here since everything’s meant to be served cold or at room temperature. Just pull your stored ingredients from the fridge, let them come to room temp for about 15 minutes, and enjoy. The cheese might have hardened up a bit, so definitely don’t skip that sitting-out time.
No-Waste Kitchen Magic
I’m all about using every bit of what you buy, especially during the holidays when groceries can get pricey. Here’s how to make the most of your Christmas Tree Charcuterie ingredients.
Leftover Cheese Cubes? Toss them into a breakfast scramble, melt them over roasted veggies, or add them to a grilled cheese sandwich. You can also freeze cubed cheddar and Monterey Jack for up to 3 months — just pop them into soups or casseroles straight from frozen.
Extra Grapes? Freeze them for a healthy snack (frozen grapes are like nature’s candy!), or roast them at 425°F for 20 minutes until they’re jammy and concentrated, then serve over brie or fold into a salad. They’re also fantastic in smoothies.
Rosemary Sprigs Looking Tired? Strip the leaves off and dry them for a week on your countertop, then store in a jar to use in roasted potatoes, focaccia bread, or homemade herb butter. The woody stems can go into your fireplace or outdoor fire pit for amazing fragrance.
Cranberries and Nuts You Didn’t Use? Cranberries freeze beautifully for up to a year — I always stock up and use them for muffins and sauces later. Extra nuts can be toasted with a bit of honey and cinnamon to make candied nuts for future cheese boards or salad toppings.
Star Fruit and Kiwi? Slice them up for breakfast smoothie bowls, fruit salads, or freeze them for tropical cocktails later. They’re also gorgeous garnishes for mocktails and party punches.
Christmas Tree Shaped Charcuterie FAQs
Can I make this Christmas Tree Charcuterie Board ahead of time?
Absolutely! Assemble your tree up to 4 hours before your party, then cover it loosely with plastic wrap and refrigerate. Just let it sit at room temperature for 15-20 minutes before serving so the cheese can come up to temp and taste its best.
What’s the best way to store leftover Christmas Cheese Board ingredients?
Transfer cheese, fruit, and nuts to separate airtight containers and refrigerate for up to 2 days. Keep the cheese away from moisture-heavy fruit to prevent it from getting soggy. The rosemary sprigs can be composted or dried for future cooking use.
How do I know how much cheese and fruit to buy per person?
Plan for about 3-4 ounces of cheese total per person and roughly 2-3 ounces of fruit and nuts combined. For a party of 10, you’re looking at around 2-3 pounds of cheese and about 1.5 pounds of fruit and nuts — this recipe fits that perfectly!
Could I use other cheeses instead of cheddar and Monterey Jack?
Definitely! Swap in whatever cheeses your family loves — gouda, Swiss, pepper jack, or even cubed mozzarella all work great. Just aim for a mix of flavors and colors so your tree looks vibrant and interesting.
Cozy Closing
There you have it — your complete guide to creating a Christmas Tree Shaped Charcuterie that’s going to be the absolute star of your holiday table! This recipe is proof that you don’t need to be a chef or spend hours in the kitchen to create something truly special.
Just grab some cheese, fruit, and fresh rosemary, pour yourself something festive, and have fun arranging your edible masterpiece.
The best part? This Christmas Tree Charcuterie Board isn’t just gorgeous — it’s also crazy versatile. Make it exactly as written, or get creative with your own variations. Maybe add some Cheesy Pull-Apart Christmas Bread alongside it, or finish your holiday spread with Little Debbie Christmas Tree Cake Truffles and Christmas Crack Saltine Bark for dessert.
I’d love to see your spin on this Christmas Tree Shaped Charcuterie! Drop a comment below with your photos or tell me what ingredients you used — I bet you’ve already got some amazing variations in mind.
Did you go traditional with cheddar and grapes, or did you create something totally unique? Let’s swap ideas and make this holiday season even more delicious together!
I’m Claire Whitmore — a dessert daydreamer from Asheville, NC. For me, creating holiday recipes isn’t about perfection — it’s about bringing people together over beautiful, delicious food that makes you feel cozy and connected (and maybe sneaking a few extra cheese cubes while you’re arranging everything).