Christmas Peppermint Pie
Hey there, I’m Claire Whitmore — a pastry whisperer in Asheville, NC, where butter totally counts as self-care. This Christmas Peppermint Pie recipe is pure holiday magic wrapped in an Oreo crust, and honestly?
It’s one of those easy baking Christmas miracles that looks like you hired a professional but actually requires zero baking skills. We’re talking creamy peppermint filling, crushed candy cane topping, and a gorgeous pink swirl that screams festive without screaming “I spent all day in the kitchen.”
This no-bake Christmas pie recipe delivers everything you want during the holidays: quick prep time (20 minutes!), crowd-pleasing peppermint flavor, make-ahead convenience, and that gorgeous Instagram-worthy presentation that’ll have your guests asking for the recipe before they’ve even taken a bite.
Plus, it’s one of those Christmas dessert recipes no bake that actually stays perfectly creamy and dreamy in the fridge.
Little Snapshot: What This Recipe Delivers
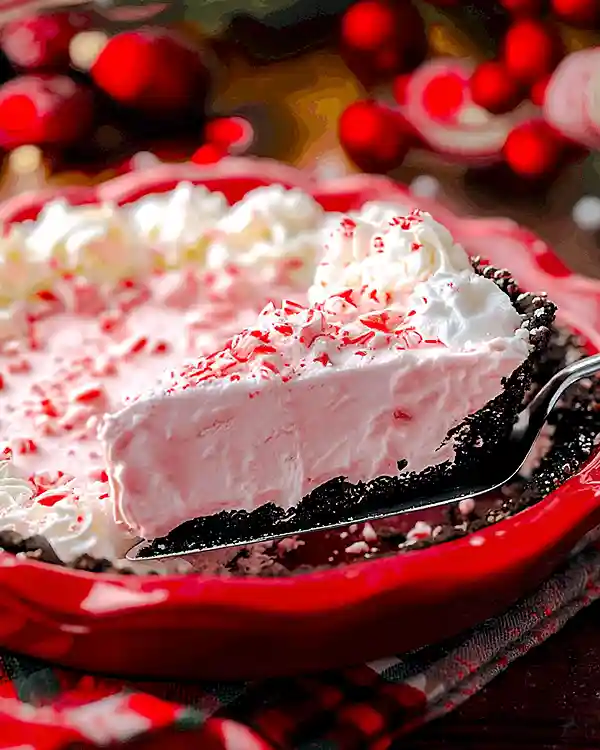
This Christmas Peppermint Pie is a creamy, no-bake dessert featuring a chocolate Oreo crust filled with peppermint-flavored cream cheese, whipped cream, and crushed candy canes.
It takes just 20 minutes of hands-on time, requires no oven, and delivers that festive peppermint flavor everyone craves during the holidays — perfect for busy bakers who want impressive results without the stress.
Why You’ll Love This Recipe 🌸
- This Christmas Peppermint Pie comes together in about 20 minutes — seriously, it takes less time than wrapping presents.
- No oven required, which means you can actually hang out with your family instead of babysitting a timer.
- The creamy peppermint filling tastes like you spent hours on it, but it’s secretly one of the easiest no-bake Christmas desserts you’ll ever make.
- According to King Arthur Baking’s holiday dessert guide, the best festive treats balance ease with wow-factor — and this recipe nails exactly that.
Quick Facts ⚡
Here’s the quick scoop on this Christmas Peppermint Pie.
- CourseDessert
- Prep Time20 minutes
- Cook Time0 minutes
- Total Time2 hours 20 minutes (including chill time)
- Servings8 servings
- DifficultyEasy
Table of Contents

Christmas Peppermint Pie
Equipment
- Large mixing bowl
- Medium mixing bowl
- Electric hand mixer or stand mixer
- Rubber spatula
- Measuring cups and spoons
- Plastic bag and rolling pin
- 9-inch pie dish
Ingredients
For the crust:
- 1 Oreo pie crust store-bought or homemade
For the filling:
- 2 8 oz packages cream cheese softened to room temperature
- 1.5 cups powdered sugar
- 1 cup heavy whipping cream cold from the fridge
- ½ cup crushed peppermint candy about 12-15 candy canes
- 2 tsp vanilla extract McCormick pure vanilla extract recommended
- 1 tsp peppermint flavoring or peppermint extract
- 10 drops red food coloring optional
For the topping and garnish:
- 1 tub (8 oz) whipped topping like Cool Whip, thawed
- 2-3 tbsp crushed peppermint candy for garnish
Instructions
- In a large bowl, whip the heavy whipping cream using an electric mixer on medium-high speed until stiff peaks form. This usually takes about 3-4 minutes — you’ll know it’s ready when you lift the beaters and the cream stands up straight instead of flopping over. The whipped cream should look thick, fluffy, and cloud-like. Set this bowl aside while you work on the filling.
- In a medium bowl, beat together the softened cream cheese and powdered sugar on medium speed until the mixture is completely smooth and fluffy with no lumps. Add the vanilla extract, peppermint extract, and red food coloring (if using). Mix until the pink color is evenly distributed throughout. Finally, gently fold in 1/2 cup of crushed peppermint candy with a spatula.
- Add the pink peppermint cream cheese mixture to the bowl of whipped heavy cream. Using your mixer on LOW speed, gently blend the two mixtures together until thoroughly combined and smooth. Be careful not to over-mix — you want to maintain the light, fluffy texture without deflating all that beautiful air you whipped into the cream.
- Pour the combined peppermint filling into the Oreo pie crust, using a spatula to spread it out evenly from edge to edge. Make sure the filling is smooth on top.
- Spread the whipped topping (Cool Whip) over the top of the pie filling, creating beautiful swirls with the back of your spoon if desired. Sprinkle 2-3 tablespoons of crushed peppermint candy generously over the whipped topping. Refrigerate the pie for at least 1-2 hours (or up to overnight) until set. Let the pie sit at room temperature for about 5 minutes before slicing for easier cutting.
Notes
Nutritional Peek
Here’s a quick nutritional breakdown per slice (because we’re all about balance around here, especially during cookie season):
| Nutrient | Amount per Serving |
|---|---|
| Calories | 420 kcal |
| Protein | 4g |
| Total Carbohydrates | 48g |
| Dietary Fiber | 1g |
| Sugars | 39g |
| Total Fat | 24g |
| Saturated Fat | 14g |
| Cholesterol | 65mg |
| Sodium | 240mg |
Note: These are estimates and can vary based on specific brands and ingredient substitutions.
Christmas Peppermint Pie Ingredients
This no bake Christmas pie recipe starts with ingredients you probably already have hanging around your holiday baking stash. For the creamy filling base — cream cheese, heavy whipping cream, and powdered sugar — you’ll want everything at room temperature so it blends like a dream.
The peppermint magic comes from crushed candy canes and peppermint extract, while the gorgeous pink color happens with just a few drops of red food coloring (totally optional if you’re going for a winter white vibe).
| Amount | Ingredient |
|---|---|
| For the crust: | |
| 1 | Oreo pie crust (store-bought or homemade) |
| For the filling: | |
| 2 (8 oz) packages | cream cheese, softened to room temperature — yes, this matters for a lump-free filling |
| 1.5 cups | powdered sugar (also called confectioners’ sugar) |
| 1 cup | heavy whipping cream, cold from the fridge |
| 1/2 cup | crushed peppermint candy (about 12-15 candy canes) |
| 2 tsp | vanilla extract (I swear by McCormick pure vanilla) |
| 1 tsp | peppermint flavoring or extract |
| 10 drops | red food coloring (optional, but it makes it so festive) |
| For the topping: | |
| 1 tub (8 oz) | whipped topping, thawed (Cool Whip works perfectly) |
| 2-3 tbsp | crushed peppermint candy for garnish |
Tools You’ll Actually Use
You won’t need any fancy equipment for this easy baking Christmas dessert — just the basics:
- Large mixing bowl (for whipping cream)
- Medium mixing bowl (for the cream cheese mixture)
- Electric hand mixer or stand mixer
- Rubber spatula for folding
- Measuring cups and spoons
- Plastic bag and rolling pin (for crushing candy canes — or let your kids do it, they love this part)
- 9-inch pie dish (if making your own crust)
Step-by-Step Instructions
Alright, let’s make this Christmas Peppermint Pie happen! The whole process is honestly easier than untangling Christmas lights, I promise.
Step 1: Whip the Heavy Cream
Grab your large bowl and pour in that cold heavy whipping cream. Using your electric mixer on medium-high speed, whip the cream until you get stiff peaks — this means when you lift the beaters, the cream stands up straight instead of flopping over.
This usually takes about 3-4 minutes, and you’ll know it’s ready when it looks thick, fluffy, and cloud-like. Set this gorgeous bowl of whipped cream aside while you work on the filling — it’s about to become the dreamy base that makes this no-bake Christmas pie recipe so incredibly creamy.
Step 2: Prepare the Cream Cheese Mixture
In your medium bowl, add the softened cream cheese and powdered sugar. Beat them together on medium speed until the mixture is completely smooth and fluffy — no lumps allowed here, which is why room-temperature cream cheese is non-negotiable.
Now here comes the fun part: add your vanilla extract, peppermint extract, and those 10 drops of red food coloring. Mix everything until the pink color is evenly distributed and you can practically smell Christmas happening in your kitchen.
Finally, gently fold in that half cup of crushed peppermint candy with a spatula — those little candy bits add the perfect peppermint crunch to every bite.
Step 3: Combine the Mixtures
This is where the magic happens, friends. Take your pink peppermint cream cheese mixture and add it to the bowl of whipped heavy cream. Here’s the secret: use your mixer on LOW speed to gently blend everything together.
You want to combine them thoroughly until the mixture is smooth and uniform, but you don’t want to deflate all that beautiful air you whipped into the cream. The result should be light, fluffy, and perfectly pink — basically everything a Christmas dessert should be.
Step 4: Fill the Oreo Crust
Pour your gorgeous peppermint filling into that Oreo pie crust, using your spatula to spread it out evenly from edge to edge. The chocolate-peppermint combo here is honestly chef’s kiss — it’s like a grown-up version of those chocolate-covered candy canes. Make sure the filling is smooth on top because you’re about to make it even prettier.
Step 5: Garnish and Chill
Spread that tub of Cool Whip over the top of your pie filling, creating beautiful swirls with the back of your spoon if you’re feeling fancy. Sprinkle crushed peppermint candy generously over the whipped topping — don’t be shy here, this is what makes your pie look like it belongs in a holiday magazine.
Pop the whole thing in the refrigerator for at least 1-2 hours (or up to overnight if you’re prepping ahead). The chilling time lets everything set up perfectly so you get clean slices instead of a delicious mess.
When you’re ready to serve, let the pie sit at room temperature for about 5 minutes before slicing — this makes cutting so much easier. Then watch everyone’s faces light up when they take that first creamy, peppermint-y bite!
Claire’s Pro Tips & Gentle Guidance
These Christmas dessert recipes no bake are pretty forgiving, but I’ve learned a few tricks that’ll make your pie even better.
Room temperature cream cheese is everything. I know I mentioned it already, but seriously — cold cream cheese creates lumps that no amount of mixing will fix. Leave your cream cheese out for about 30-45 minutes before you start, or unwrap it and microwave each block for 10 seconds to take the chill off.
Make your own crushed candy canes the easy way. Put unwrapped candy canes in a ziplock bag, seal it tight, and let your kids go to town with a rolling pin. It’s great for getting their energy out, plus they’ll feel like they helped make dessert. Just make sure the bag is sealed or you’ll be finding peppermint shards until Valentine’s Day.
The pink color is totally optional. If you skip the food coloring, you’ll have a beautiful winter-white pie that’s just as delicious. I’ve done both, and honestly, it depends on your holiday aesthetic. Some years I go full pink and festive, other years I keep it minimal and elegant.
According to Serious Eats‘ comprehensive whipped cream tutorial , cold cream and cold bowls are the secret to perfect whipped cream — so if your kitchen is warm, pop your mixing bowl in the freezer for 10 minutes before whipping. This little trick has saved me from under-whipped cream disasters more times than I can count.
Don’t over-mix after adding the whipped cream. Once you combine the cream cheese mixture with the whipped cream, mix just until blended. Over-mixing deflates the cream and you’ll end up with a denser filling instead of that light, mousse-like texture we’re going for.
Quick Fixes for Christmas Peppermint Pie
Problem: My filling looks grainy instead of smooth. This usually means your cream cheese was too cold when you mixed it. Next time, make sure it’s truly room temperature — it should feel soft when you press it. If it’s already mixed and grainy, you can try warming the bowl slightly (hold it over warm water for 30 seconds while stirring) to help smooth it out.
Problem: The filling is too runny and won’t set. Make sure you whipped your heavy cream to stiff peaks, not just soft peaks. Under-whipped cream won’t hold the structure. If your pie is already in the fridge and still runny after 3-4 hours, it might not set properly — but honestly, it’ll still taste amazing, just serve it in bowls and call it peppermint mousse!
Problem: My pie is too firm or dense. You might’ve over-mixed when combining the whipped cream with the cream cheese mixture, which deflated all that beautiful air. The fix for next time: use the lowest speed on your mixer and stop as soon as everything is combined. For this pie, let it sit at room temperature for 10-15 minutes before serving to soften it up a bit.
Problem: The candy cane pieces sank to the bottom. This happens if the filling was too thin when you folded them in. Next time, make sure your whipped cream is at stiff peaks before combining. The good news? Candy at the bottom just means a delicious crunchy surprise with every bite, so I’d call that a win anyway.
Variations & Fun Twists
This easy baking Christmas pie is super versatile — here are some ways to make it your own:
Chocolate Lover’s Version: Use a chocolate graham cracker crust instead of Oreo, and fold in mini chocolate chips along with the peppermint candy. You could even drizzle melted dark chocolate over the Cool Whip topping for extra decadence.
Make It Boozy: Add 2 tablespoons of peppermint schnapps or crème de menthe to the cream cheese mixture for a grown-ups-only version. Just reduce the heavy cream slightly to keep the consistency right.
Gluten-Free Option: Use a gluten-free chocolate cookie crust (many stores carry them now) or make your own with gluten-free chocolate wafer cookies. The filling is naturally gluten-free already.
Rustic Holiday Presentation: Skip the Cool Whip topping and instead pipe fresh whipped cream rosettes around the edge of the pie. Add fresh mint leaves and whole candy canes for a gorgeous farmhouse vibe.
Peppermint Bark Version: Fold white chocolate chips into the filling along with the candy canes, and top with crushed peppermint bark instead of just candy canes. It’s like eating Christmas crack in pie form.
Serving, Storage & Reheating
This no bake Christmas pie recipe is best served chilled, straight from the fridge. I like to slice it with a sharp knife that I’ve run under hot water and wiped dry — this gives you those perfect, clean slices that make everyone ooh and ahh. Serve each slice with an extra sprinkle of crushed candy canes on top if you’re feeling extra festive.
Store any leftovers (if you actually have leftovers, which I doubt) covered in the refrigerator for up to 3 days. The pie holds up beautifully, though the candy cane pieces might soften slightly over time — which honestly just makes it taste more like peppermint bark, so not a problem in my book.
You can also freeze this pie for up to 2 months if you want to make it way ahead. Wrap it tightly in plastic wrap and then aluminum foil before freezing. Thaw it overnight in the refrigerator before serving — just know that the Cool Whip topping might look slightly less fluffy after freezing, but the taste will still be amazing.
No-Waste Kitchen Magic
Got leftover candy canes taking over your pantry? Crush them up and stir them into your morning hot chocolate, sprinkle them over ice cream, or fold them into sugar cookie dough for a festive twist.
If you have extra Cool Whip after topping your pie, freeze it in small portions in an ice cube tray. Pop out a cube or two whenever you want to add a dollop to hot cocoa or coffee — it’s like a peppermint mocha hack.
Day-old slices of this pie (if they last that long) can be crumbled up and layered in parfait glasses with extra whipped cream and crushed cookies for an easy trifle-style dessert. Kids absolutely love this presentation, and it feels like a whole new treat.
Christmas Peppermint Pie FAQs
Can I freeze this Christmas Peppermint Pie?
Absolutely! This pie freezes beautifully for up to 2 months. Just wrap it tightly in plastic wrap and then aluminum foil before freezing. Thaw it overnight in the fridge before serving, and it’ll taste just as creamy and delicious as the day you made it.
What’s the best way to crush candy canes without making a mess?
Put unwrapped candy canes in a heavy-duty ziplock bag, seal it tight, and crush them with a rolling pin or the bottom of a heavy pan. You can also pulse them in a food processor for about 3-5 seconds. The ziplock method is less cleanup and honestly more fun if you have kids who want to help.
How do I know when my whipped cream is ready?
Whipped cream is at stiff peaks when you lift the beaters and the peaks stand straight up without drooping over. It should look thick and fluffy, almost like white clouds. If it looks glossy and pourable, keep whipping — you’re only at soft peaks.
Why should I use peppermint extract instead of just crushed candy in my Christmas Peppermint Pie?
The extract gives you that deep, consistent peppermint flavor throughout the entire filling, while the crushed candy adds texture and little bursts of peppermint. Using both gives you layers of flavor — the extract provides the base taste, and the candy pieces create those fun crunchy moments in every bite.
Can I make this pie a day ahead?
Actually, this pie is even better when made a day ahead! The flavors meld together beautifully overnight, and everything has time to set perfectly. Just add the whipped topping and candy cane garnish a few hours before serving so they look fresh.
Your Turn to Shine
I’d love to see your spin on this Christmas Peppermint Pie! Drop a comment below with your photos or tag me on Instagram — I’d love to see how you made it your own. Did you try the chocolate lover’s version? Go full pink or keep it winter white? This Christmas Peppermint Pie is so versatile; I bet you’ve got amazing variations already in mind.
And if you’re looking for more festive no-bake magic, check out my Christmas Puppy Chow for an addictive snack, or these Peppermint Red Velvet Blossoms if you want cookies that match your pie. Both are perfect for cookie exchanges and holiday parties where you need something impressive without the stress.
I’m Claire Whitmore — a dessert daydreamer from Asheville, NC. For me, baking isn’t about perfect pastries — it’s about the joy of sharing something sweet (and maybe sneaking an extra scoop of whipped cream when no one’s looking).