Chicken Fajita Meal Prep Boxes
Chicken Fajita Meal Prep Boxes are the weekly lunch hero you did not know you needed. I’m Linda Sandra — a home cook who believes weekday lunches should feel exciting, not like a chore.
These fajita bowls meal prep beautifully with juicy oven-baked chicken breast, sweet caramelized bell peppers, and smoky taco seasoning — all tucked into warm tortillas. They’re colorful, satisfying, and packed with real-food goodness.
I started making these on Sunday evenings when I realized I was spending way too much money on sad desk lunches. One sheet pan later, and my whole week changed.
Table of Contents
Little Snapshot: What This Recipe Delivers
These Chicken Fajita Meal Prep Boxes are a healthy meal prep lunch made with sliced chicken breast, tri-color bell peppers, and red onion — all seasoned with taco spices and roasted on one sheet pan.
Ready in under 35 minutes, they make 3 hearty servings that store beautifully in the fridge for up to four days. Think: easy, colorful, and genuinely delicious.
Why You’ll Love This Recipe
- These Chicken Fajita Meal Prep Boxes come together faster than your favorite takeout order — and taste even better.
- One sheet pan, minimal cleanup, and lunches sorted for the whole week. Busy moms, this one is for you.
- The tri-color peppers and taco seasoning make every box look and taste like something from a trendy lunch spot.
- According to Budget Bytes in their guide to easy sheet pan chicken fajitas, baking fajitas creates beautiful caramelization on peppers and onions — and this recipe proves exactly why that matters.
Quick Facts
Here’s the quick scoop on this Chicken Fajita Meal Prep.
- CourseMain Dish / Lunch Meal Prep
- Prep Time10 minutes
- Cook Time25 minutes
- Total Time35 minutes
- Servings3 servings
- DifficultyEasy
Nutritional Peek
Here’s an approximate nutritional breakdown per serving (chicken and veggie mix with 3 tortillas, no toppings).
| Nutrient | Amount Per Serving |
|---|---|
| Calories | ~480 kcal |
| Protein | ~38g |
| Carbohydrates | ~45g |
| Total Fat | ~12g |
| Fiber | ~5g |
| Sugar | ~6g |
Numbers will vary based on tortilla brand, chicken size, and toppings. Add sour cream or guac and those numbers shift — deliciously.
Ingredients
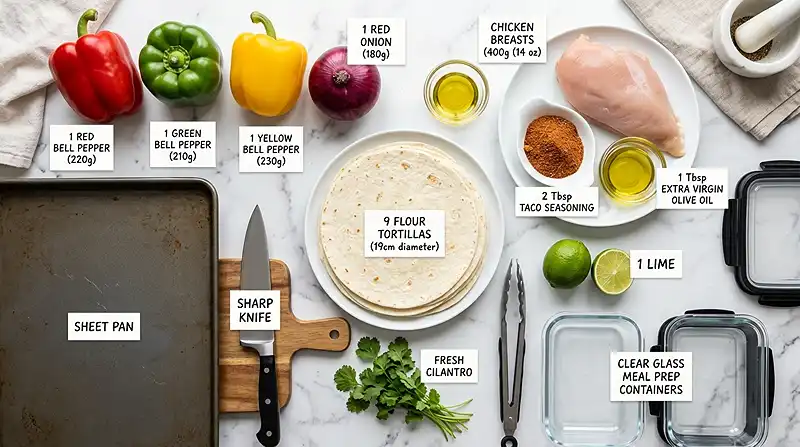
For these fajita bowls meal prep, you’ll work with two simple groups. The star players — sliced chicken breast, olive oil, and taco seasoning — handle the protein and flavor. The supporting cast — red, green, and yellow bell peppers plus red onion — brings color, sweetness, and that irresistible char.
Fresh lime juice ties everything together at the end. Don’t skip it — it brightens the whole dish.
| Amount | Ingredient |
|---|---|
| 1 | Red bell pepper (capsicum) |
| 1 | Green bell pepper (capsicum) |
| 1 | Yellow bell pepper (capsicum) |
| 1 | Red onion |
| 400g (14 oz) | Chicken breasts (approx. 2 large) |
| 1 tablespoon | Extra virgin olive oil |
| 2 tablespoons | Taco seasoning (homemade or store-bought) |
| 1 | Lime (halved) |
| 9 | Flour tortillas (3 per box) |
Tools You’ll Actually Use
- Large rimmed sheet pan (the bigger, the better for even cooking)
- Sharp chef’s knife and cutting board
- Mixing bowl or tongs for tossing
- Meat thermometer (for checking that 70C/165F internal temp)
- 3 meal prep containers with lids
- Oven mitts
Step-by-Step Instructions
These Chicken Fajita Meal Prep Boxes come together on one sheet pan — and the oven does most of the heavy lifting for you.
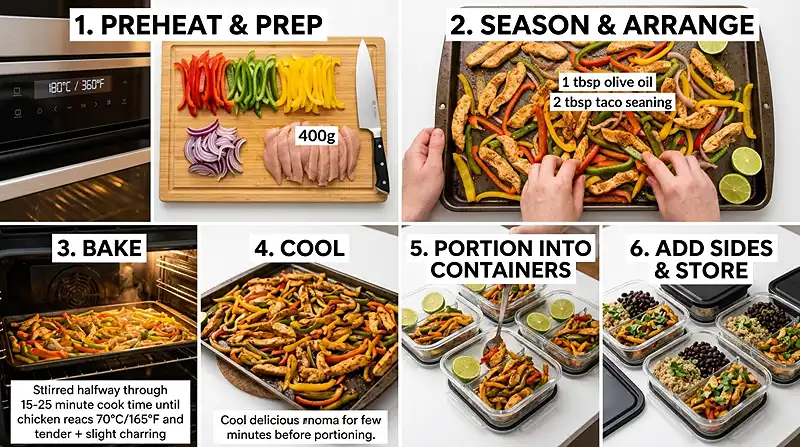
Step 1: Preheat the Oven
Preheat your oven to 180C (360F). Give it a full 10 minutes to come up to temperature before anything goes in.
Step 2: Slice the Veggies and Chicken
Slice 1 red, 1 green, and 1 yellow bell pepper into even strips. Slice 1 red onion into similar-width strips. Slice 400g (14 oz) of chicken breast into even pieces — aim for uniform thickness so everything cooks at the same rate.
Step 3: Season on the Sheet Pan
Spread the sliced chicken, bell peppers, and red onion in a single layer on a large rimmed sheet pan. Drizzle with 1 tablespoon of extra virgin olive oil and sprinkle 2 tablespoons of taco seasoning evenly over the top. Nestle the halved lime onto the pan, cut-side up. Toss everything well until fully coated.
Step 4: Bake Until Golden and Cooked Through
Bake for 15-25 minutes, until the chicken reaches an internal temperature of 70C (165F) and the peppers are tender with slightly charred edges. If your pan is crowded, toss everything halfway through for more even cooking. A more spread-out pan cooks faster — watch it around the 15-minute mark.
Step 5: Cool, Assemble, and Store
Remove the sheet pan from the oven and let everything cool for about 5 minutes. Divide the chicken and veggie mixture evenly across 3 meal prep containers. Add 3 tortillas to each box (either rolled up on the side or stored separately in a bag). Add any desired garnishes — sour cream, yogurt, salsa, guac — either now or fresh when serving.
Pro Tips and Gentle Guidance
Healthy meal prep chicken recipes get so much better with a few simple tweaks. Here are the ones that actually make a difference for this dish.
Don’t crowd the pan. This is the single biggest tip for fajita success. If the chicken and veggies are piled on top of each other, they’ll steam instead of roast. Use two sheet pans if needed — your peppers will thank you with those gorgeous caramelized edges.
Slice everything evenly. Uniform cuts mean everything finishes cooking at the same time. If your chicken pieces vary in thickness, the thinner bits will dry out before the thicker ones are done.
Use a meat thermometer. It takes the guesswork out completely. You’re looking for 70C (165F) in the thickest part of the chicken breast. This is especially helpful because cook time varies depending on pan fullness.
Let it cool before boxing up. Packing hot food directly into sealed containers creates steam, which makes everything soggy. A 5-minute rest on the counter makes a big difference for texture.
Quick Fixes for Chicken Fajita Meal Prep Boxes
My chicken came out dry.
This usually means it was overcooked or the slices were too thin. Next time, aim for thicker, more uniform pieces and pull them out as soon as they hit 70C (165F). A touch more olive oil in the marinade also helps keep things juicy.
The veggies are mushy, not charred.
The pan was probably too crowded. Spread everything into a single layer — even if that means using two pans. More space equals more roasting, less steaming, and those beautiful golden edges.
Everything tastes a bit bland.
Don’t hold back on the taco seasoning. Two tablespoons sounds like a lot but it coats a full pound of chicken and three peppers. Also, squeezing that roasted lime over everything right before eating? Game-changer. It wakes the whole dish up.
My tortillas went hard in the fridge.
Store tortillas separately from the filling — either in a zip-lock bag inside the container or in a separate bag entirely. A quick 10-second microwave blast before eating softens them right back up.
Variations and Adaptations
This chicken meal prep recipe is wonderfully flexible. Here are a few fun directions to take it.
Gluten-free: Swap regular flour tortillas for certified gluten-free corn tortillas or serve the filling over rice or cauliflower rice instead.
Extra protein boost: Add a can of drained black beans to the sheet pan in the last 10 minutes of cooking. They roast up beautifully and add fiber and plant-based protein.
Dairy-free version: Skip the sour cream garnish and top with a generous scoop of fresh guacamole or a dairy-free yogurt instead.
Low-carb option: Ditch the tortillas and serve everything over shredded lettuce or zucchini noodles for a lighter box.
Spice lovers: Add a pinch of cayenne or chipotle powder to your taco seasoning before tossing. A little heat goes a long way.
If you love easy weeknight flavor combinations, you might also enjoy this creamy pesto chicken tortellini skillet for a pasta-night twist on easy chicken dinners.
Serving, Storage, and Reheating
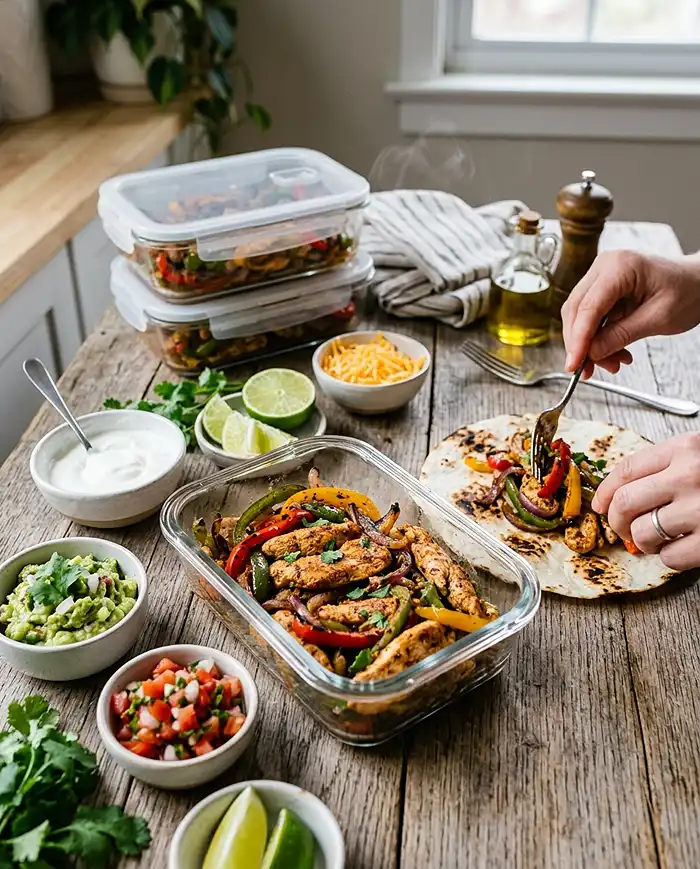
These fajita bowls meal prep containers are ready to go straight from the fridge to your bag in the morning. Serve the chicken and veggie mix warm inside tortillas with your favorite toppings — sour cream, salsa, guacamole, or a squeeze of fresh lime.
Store the meal prep boxes in airtight containers in the refrigerator for up to 4 days. Keep tortillas in a separate bag to prevent them from getting soggy. The chicken and veggie filling actually tastes even better on day two once all those spices have had time to mingle.
To reheat, microwave the chicken and veggie filling for 1-2 minutes until warmed through. Warm tortillas separately for about 10 seconds — or wrap them in a damp paper towel for the softest result. Add cold toppings after reheating so they stay fresh.
This recipe is just the start of something delicious. Browse the entire Classic Chicken Dinners collection and discover all the ways you can bring more flavor to your table. Your family will thank you.
No-Waste Kitchen Magic
Got leftover chicken and pepper filling that didn’t make it into boxes? It’s actually incredibly versatile.
- Fajita fried rice: Toss leftover filling with cooked rice, a scrambled egg, and a splash of soy sauce for a speedy next-day lunch.
- Fajita quesadillas: Stuff the leftover mix between two tortillas with cheese and pan-fry until golden and crispy.
- Fajita soup: Simmer leftover filling with chicken broth, a can of diced tomatoes, and black beans for a quick Tex-Mex style soup.
- Breakfast scramble: Chop the leftover chicken and veggies finely and stir them into scrambled eggs the next morning. So good.
If you end up with extra lime halves, squeeze them into water for a refreshing drink, or use the juice to brighten up a simple salad dressing.
FAQs
Can I freeze Chicken Fajita Meal Prep Boxes?
Yes, the chicken and veggie filling freezes really well for up to 2 months. Portion it into freezer-safe containers without the tortillas, then thaw overnight in the fridge and reheat when needed. Add fresh tortillas on serving day for the best texture.
What is the best way to store Chicken Fajita Meal Prep?
Store the filling and tortillas separately in airtight containers in the fridge for up to 4 days. Keeping them separate prevents the tortillas from absorbing moisture and going limp. Pack toppings like sour cream or salsa in small containers on the side.
How do I know when the chicken fajita filling is done?
The most reliable way is a meat thermometer — you’re looking for an internal temperature of 70C (165F) in the thickest piece of chicken. Visually, the chicken should be white all the way through with no pink, and the peppers should be tender with slightly charred edges.
Why should I use tri-color bell peppers in Chicken Fajita Meal Prep?
Tri-color peppers (red, yellow, green) add visual appeal, but they also each bring slightly different flavors. Red peppers are the sweetest, yellow are mild, and green have a slightly earthier bite. Together they create a more complex and balanced filling than using just one color.
Will this chicken fajita recipe work with chicken thighs?
Absolutely. Boneless, skinless chicken thighs work beautifully and actually stay juicier than breast meat. They may need an extra 5 minutes in the oven — just check for that 70C (165F) internal temperature before pulling them out.
Final Thoughts
So there you have it — Chicken Fajita Meal Prep Boxes that are colorful, satisfying, and honestly kind of fun to make on a Sunday afternoon.
They’ve completely changed the way I approach weekday lunches. No more boring desk food or expensive takeout runs — just warm tortillas, juicy spiced chicken, and those gorgeous roasted peppers waiting in the fridge.
I’d love to see your spin on this Chicken Fajita Meal Prep! Drop a photo in the comments or tag EdenPlate so I can cheer you on. What toppings did you go for? Guac? Salsa? Both? These Chicken Fajita Meal Prep Boxes are so versatile — I bet you’ve already got some amazing variations in mind.
And if you’re in the mood for something sweet after all that meal planning, these soft lemon sugar cookie bars are the perfect Sunday bake to go alongside your prep session.
Happy prepping, friend. You’ve got this week handled.
About the Author
I’m Linda Sandra — a home cook who believes weekday meals should feel like a treat, not a task. Around here, cooking is about cozy vibes, smart shortcuts, and food that makes you feel genuinely good.
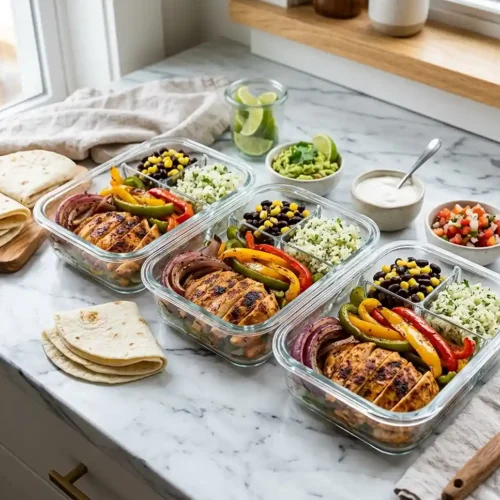
Chicken Fajita Meal Prep Boxes (Sheet Pan Easy!)
Equipment
- Large rimmed sheet pan
- Sharp chef’s knife
- Cutting board
- Mixing bowl or tongs
- Meat thermometer
- Meal prep containers with lids
- Oven mitts
Ingredients
Fajita Filling
- 1 Red bell pepper (capsicum)
- 1 Green bell pepper (capsicum)
- 1 Yellow bell pepper (capsicum)
- 1 Red onion
- 400 g Chicken breasts approximately 2 large
- 1 tablespoon Extra virgin olive oil
- 2 tablespoons Taco seasoning homemade or store-bought
- 1 Lime halved
For Serving
- 9 Flour tortillas 3 per box
Instructions
- Preheat your oven to 180C (360F). Allow it to fully preheat for about 10 minutes.
- Slice the red, green, and yellow bell peppers into even strips. Slice the red onion into similar-width strips. Slice the chicken breasts into even pieces for consistent cooking.
- Spread the sliced chicken, bell peppers, and red onion onto a large rimmed sheet pan in a single layer. Drizzle with olive oil, sprinkle taco seasoning evenly over the top, and add the halved lime cut-side up. Toss everything until evenly coated.
- Bake for 15–25 minutes, until the chicken reaches an internal temperature of 70C (165F) and the vegetables are tender with lightly charred edges. Toss halfway through if needed for even cooking.
- Let the fajita mixture cool for about 5 minutes. Divide evenly among 3 meal prep containers. Add 3 tortillas to each box, either on the side or stored separately. Add optional toppings like sour cream, salsa, yogurt, or guacamole if desired.